
Grow Abundant Eggplants: Dreaming of a summer filled with delicious, homegrown eggplant dishes? I know I am! Forget those bland, store-bought eggplants – imagine sinking your teeth into a perfectly grilled, smoky eggplant grown right in your own backyard. This isn’t just a pipe dream; it’s an achievable reality with a few simple tricks and DIY hacks!
Eggplants, with their rich history tracing back to ancient Asia, have been cultivated for centuries, gracing tables from India to Italy. They’re more than just a vegetable; they’re a symbol of culinary tradition and garden bounty. But let’s be honest, getting eggplants to thrive can sometimes feel like a challenge. They can be a bit finicky, demanding the right conditions to truly flourish.
That’s where this DIY guide comes in! I’m going to share my tried-and-true secrets to help you grow abundant eggplants, even if you’re a beginner gardener. We’ll cover everything from soil preparation and sunlight requirements to pest control and harvesting tips. No more struggling with stunted growth or disappointing yields. Get ready to transform your garden into an eggplant paradise and impress your friends and family with your homegrown culinary creations. Let’s get our hands dirty!
Eggplants in Abundance: Your DIY Guide for a Rich Harvest
Hello garden friends! I love eggplants, and nothing is more satisfying than growing them yourself and then using them in delicious dishes. But I also know that eggplants can sometimes be a bit fussy. That’s why I’ve put together this comprehensive DIY guide to help you achieve a bountiful harvest. We’ll look at everything from sowing to harvesting, and I’ll share my best tips and tricks so you can soon be enjoying plump, shiny eggplants.
The Preparation: The Foundation for Your Success
Before we start the actual cultivation, we need to make sure we create the right conditions. It’s like cooking – the best ingredients and the right preparation are the keys to success!
There are countless varieties of eggplants, and choosing the right one is crucial for your success. Consider your climate, the available space, and of course, your personal taste.
- Climate: In cooler regions, you should choose early-maturing varieties like ‘Black Beauty’ or ‘Early Long Purple’. In warmer regions, you have more options, such as ‘Ichiban’, ‘Rosa Bianca’, or ‘Listada de Gandia’.
- Space: If you have limited space, compact varieties like ‘Patio Baby’ are ideal. For larger gardens, varieties like ‘Black Krim’ or ‘Long Purple’ are suitable.
- Taste: Tastes differ! ‘Black Beauty’ is a classic with a mild flavor, ‘Rosa Bianca’ is sweeter, and ‘Listada de Gandia’ has a slightly bitter aroma.
You have a choice: either you start your eggplants from seed yourself, or you buy young plants from a garden center. Both have their pros and cons.
- Sowing: Sowing is cheaper and you have a wider choice of varieties. However, it is also more time-consuming and requires a bit more experience.
- Seedlings: Young plants are easier to handle and save you time. However, they are more expensive and the selection is limited.
I personally usually start my eggplants from seed because I like to have control over the entire process. But if you’re short on time or a beginner, young plants are a good option.
Eggplants are heat-loving and should only be planted outdoors after the last frost.
- Sowing: Start sowing indoors about 8-10 weeks before the last frost date.
- Planting: Plant the eggplants outdoors when the soil temperature is at least 15°C (59°F). This is usually from mid-May to early June.
Sowing: The Start to an Eggplant Paradise
If you’ve decided to sow, let’s get started! Here is a step-by-step guide on how to successfully start your eggplants:
- The right substrate: Use a high-quality seed starting mix. It is low in nutrients and loose, which promotes root formation.
- The sowing containers: You can use seed trays, pots, or even egg cartons. It’s important that they have holes in the bottom for water to drain.
- Sowing: Fill the containers with soil and press it down lightly. Place the seeds about 0.5 cm (0.2 inches) deep in the soil and cover them with a thin layer of soil.
- Watering: Water the soil gently, preferably with a spray bottle, so the seeds are not washed away.
- The location: Place the containers in a warm and bright place. A temperature of 20-25°C (68-77°F) is ideal for germination.
- Germination: Germination usually takes 1-2 weeks. Keep the soil moist but not wet during this time.
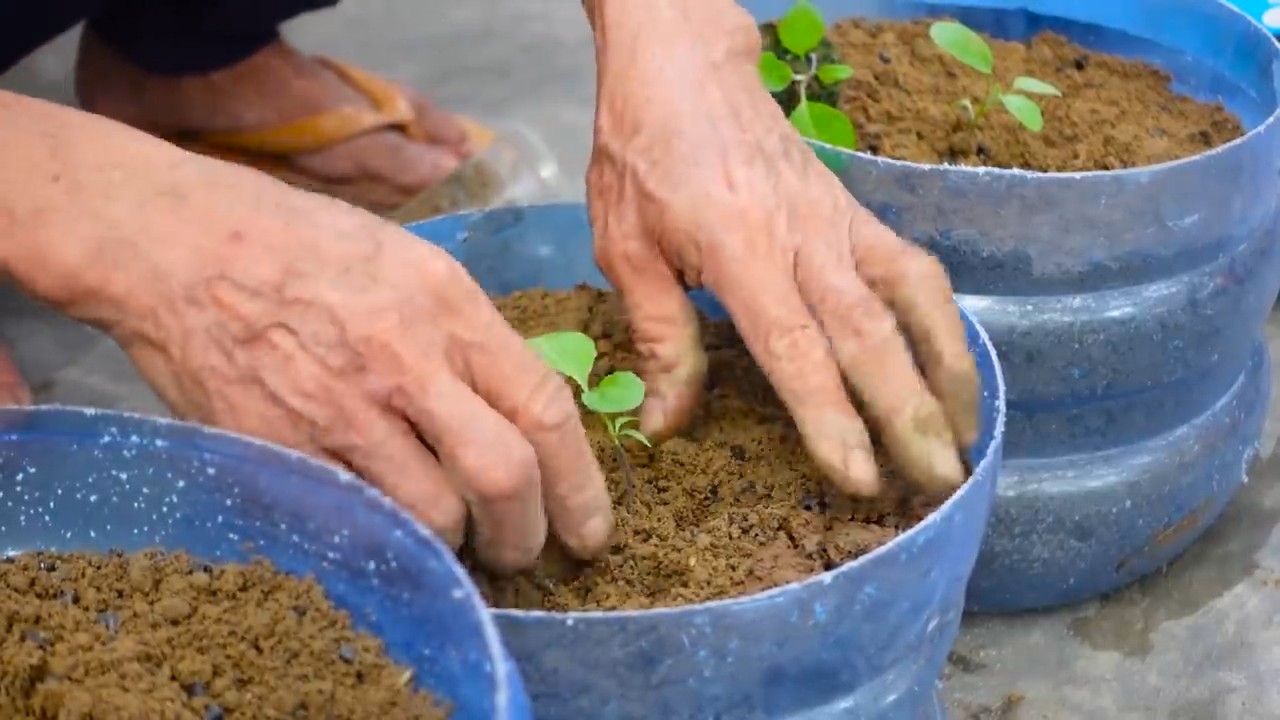
- Pricking out: As soon as the seedlings have formed their first true leaves, you can prick them out. This means transplanting them into larger pots so they have more space to grow.
Planting: Off to the Outdoors!
After your eggplants are strong enough, they can be planted outdoors.
- Preparing the soil: Eggplants love a sunny location with well-draining, nutrient-rich soil. Prepare the soil by working in compost or well-rotted manure.
- Planting: Dig holes that are slightly larger than the root balls of the eggplants. Carefully place the plants in the holes and fill them with soil. Press the soil down lightly and water the plants thoroughly.
- Spacing: Pay attention to the correct spacing between the plants. Depending on the variety, you should maintain a distance of 45-60 cm (18-24 inches).
- Support: Eggplants can get quite large and may need support to keep from falling over. Use bamboo stakes or tomato stakes to support the plants.
The Care: Keeping Your Eggplants Happy
Eggplants need regular care to grow well and produce lots of fruit.
- Watering: Water the eggplants regularly, especially in dry weather. Make sure the soil is always slightly moist, but not wet.
- Fertilizing: Fertilize the eggplants every 2-3 weeks with an organic fertilizer. I like to use compost tea or nettle tea.
- Pruning (suckering): Regularly remove the side shoots that grow in the leaf axils. This promotes fruit production and provides better air circulation for the plants.
- Mulching: Mulch the soil around the eggplants with straw or grass clippings. This keeps the soil moist, suppresses weeds, and protects the fruit from dirt.
- Pest protection: Eggplants can be infested by various pests, such as aphids, potato beetles, or spider mites. Check the plants regularly and combat pests with biological means if necessary.
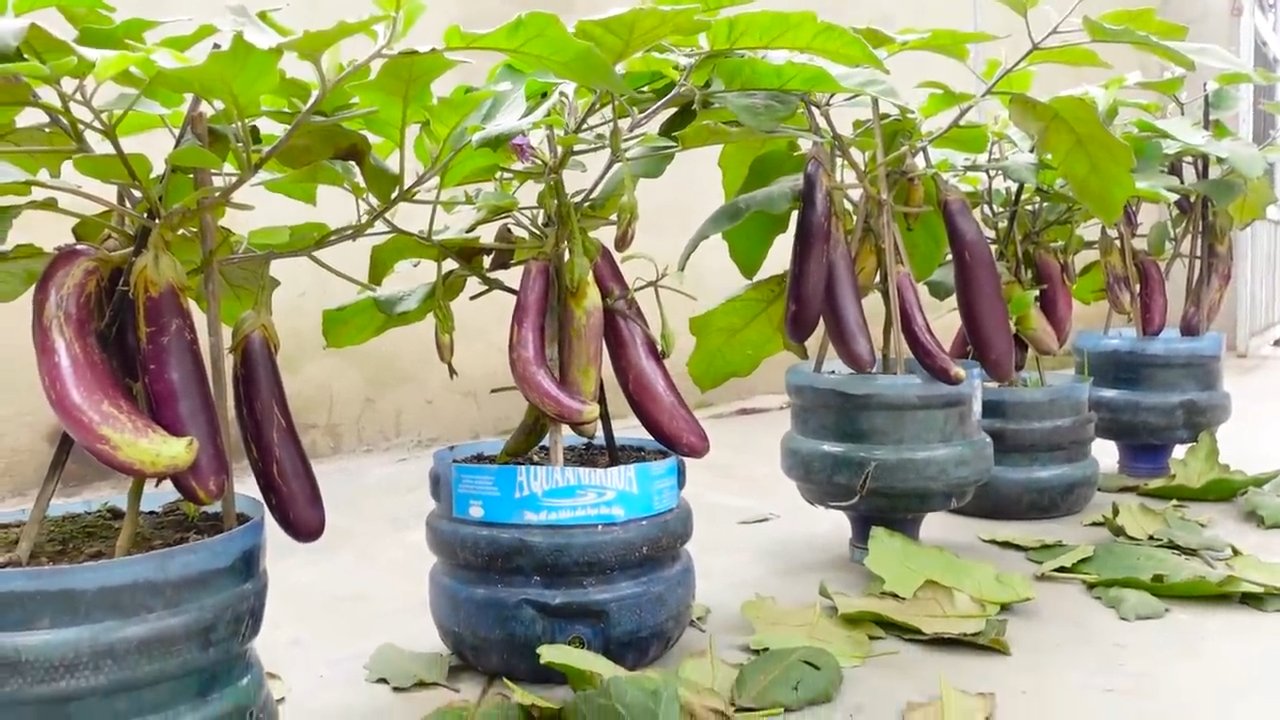
The Harvest: The Reward for Your Efforts
Finally, the time has come: the eggplants are ripe and can be harvested!
- The timing: Eggplants are ripe when they have a shiny, plump skin and yield slightly to pressure.
- The harvest: Cut the eggplants off with a sharp knife or garden shears. Leave a small stem on the fruit.
- Storage: Eggplants do not keep for long. Store them in the refrigerator and use them within a few days.
Additional Tips for a Rich Harvest
Here are a few more tips that can help you maximize your eggplant harvest:
- Pollination: Eggplants are self-pollinating, but additional pollination by insects or by manually shaking the plants can improve fruit set.
- Fruit set: If the eggplants are not setting fruit properly, it could be due to high temperatures or too little moisture. Ensure adequate watering and shade the plants if necessary.
- Diseases: Eggplants can be affected by various diseases, such as Verticillium wilt or gray mold. Watch for signs of disease and combat them with appropriate means if necessary.
I hope this guide helps you achieve a bountiful eggplant harvest! With a little patience and care, you will soon be enjoying delicious, homegrown eggplants.
Conclusion
So, there you have it! Mastering the art of growing abundant eggplants doesn’t require a green thumb blessed by the gardening gods. It simply requires a little know-how, a dash of dedication, and this surprisingly effective DIY trick. We’ve walked you through the process, highlighting the benefits of this method, and hopefully, dispelled any lingering doubts you might have had.
Why is this a must-try? Because it addresses some of the most common challenges faced by eggplant growers. It promotes stronger root development, leading to healthier, more resilient plants. It encourages earlier and more prolific fruiting, meaning you’ll be harvesting delicious, homegrown eggplants sooner and in greater quantities. And perhaps most importantly, it’s a cost-effective and environmentally friendly alternative to relying solely on commercial fertilizers.
But the beauty of gardening lies in its adaptability. Feel free to experiment with variations on this DIY trick. For instance, if you’re using coffee grounds, consider mixing them with a small amount of wood ash to provide an extra boost of potassium, which is crucial for fruit development. If you’re using banana peels, you can also try fermenting them in water for a few days to create a nutrient-rich “banana peel tea” that can be diluted and used as a foliar spray. Just remember to research the specific needs of your eggplant variety and adjust your approach accordingly.
Don’t be afraid to get your hands dirty and embrace the learning process. Gardening is a journey, not a destination. There will be successes and setbacks along the way, but each experience will bring you closer to becoming a more skilled and knowledgeable gardener.
We are confident that this DIY trick will significantly improve your eggplant-growing endeavors. Imagine the satisfaction of harvesting baskets overflowing with plump, glossy eggplants that you nurtured from seed to table. Picture the delicious meals you’ll create with your homegrown bounty – from classic eggplant parmesan to exotic curries and flavorful stir-fries.
Now, it’s your turn! We wholeheartedly encourage you to try this DIY trick and witness the difference it can make in your eggplant patch. Document your progress, take photos, and most importantly, share your experiences with us and the wider gardening community. Let us know what worked well for you, what challenges you encountered, and any variations you tried. Your insights will help other gardeners learn and grow, and together, we can unlock the secrets to growing the most abundant eggplants imaginable. So, go forth, get planting, and let the eggplant adventure begin! We can’t wait to hear your success stories!
Frequently Asked Questions (FAQ)
What exactly does this DIY trick do for my eggplants?
This DIY trick primarily focuses on improving soil health and providing essential nutrients to your eggplant plants. By incorporating organic materials like coffee grounds, banana peels, or eggshells into the soil, you’re enriching it with nitrogen, phosphorus, potassium, and other micronutrients that are vital for healthy growth, strong root development, and abundant fruit production. These materials also improve soil structure, drainage, and water retention, creating a more favorable environment for your eggplants to thrive. Ultimately, this leads to healthier, more resilient plants that are better equipped to withstand pests, diseases, and environmental stressors.
How often should I apply this DIY trick to my eggplants?
The frequency of application depends on the specific materials you’re using and the overall health of your soil. For coffee grounds, a light application every 2-3 weeks is generally sufficient. Banana peels can be buried around the base of the plants every month or so. Eggshells can be added to the soil at planting time and then again every few months. It’s important to observe your plants closely and adjust the frequency accordingly. If you notice any signs of nutrient deficiencies (e.g., yellowing leaves, stunted growth), you may need to increase the frequency of application. Conversely, if you notice any signs of nutrient toxicity (e.g., leaf burn), you may need to reduce the frequency. Remember, moderation is key.
Can I use this DIY trick on other plants besides eggplants?
Yes, many of the materials used in this DIY trick can benefit other plants as well. Coffee grounds are a great source of nitrogen and can be used on acid-loving plants like blueberries, azaleas, and rhododendrons. Banana peels are rich in potassium and can be used on flowering plants like roses and tomatoes. Eggshells provide calcium and can be used on plants that are prone to blossom-end rot, such as tomatoes and peppers. However, it’s important to research the specific needs of each plant before applying these materials. Some plants may be more sensitive to certain nutrients than others.
What if I don’t have access to coffee grounds, banana peels, or eggshells? Are there any alternatives?
Absolutely! There are many other organic materials that can be used to enrich the soil and provide nutrients to your eggplants. Compost is a fantastic all-around soil amendment that provides a wide range of nutrients. Manure (well-rotted) is another excellent source of nitrogen and other essential elements. Seaweed is rich in micronutrients and can be used as a soil amendment or foliar spray. You can also use cover crops like clover or buckwheat to improve soil health and add organic matter to the soil. The key is to choose materials that are readily available to you and that meet the specific needs of your eggplant plants.
My eggplants are already planted. Is it too late to use this DIY trick?
No, it’s never too late to improve the health of your soil and provide nutrients to your eggplants. You can still incorporate coffee grounds, banana peels, or eggshells into the soil around the base of the plants. Just be careful not to damage the roots. You can also use these materials to make a nutrient-rich tea that can be diluted and used as a foliar spray. This is a great way to deliver nutrients directly to the leaves of the plants.
Will this DIY trick completely eliminate the need for commercial fertilizers?
While this DIY trick can significantly reduce your reliance on commercial fertilizers, it may not completely eliminate the need for them, especially if your soil is severely depleted or if your eggplants are heavy feeders. It’s important to monitor your plants closely and supplement with commercial fertilizers as needed. However, by using this DIY trick, you can create a healthier and more sustainable growing environment for your eggplants, reducing the amount of commercial fertilizers you need and minimizing your environmental impact.
How do I know if this DIY trick is working?
There are several signs that this DIY trick is working. You may notice that your eggplant plants are growing more vigorously, with stronger stems and healthier leaves. You may also notice that they are producing more flowers and fruits. The fruits themselves may be larger, more flavorful, and more resistant to pests and diseases. Ultimately, the best way to know if this DIY trick is working is to compare the performance of your eggplants to previous years or to other plants that are not receiving the same treatment.
Are there any risks associated with using this DIY trick?
While this DIY trick is generally safe and beneficial, there are a few potential risks to be aware of. Over-application of coffee grounds can make the soil too acidic, which can harm some plants. Banana peels can attract pests like fruit flies if they are not buried properly. Eggshells can be sharp and may pose a hazard to pets or children if they are not crushed into small pieces. It’s important to use these materials responsibly and to follow the guidelines outlined in this article. If you have any concerns, consult with a local gardening expert.


Leave a Comment