
Grow Asparagus Year Round? Yes, you read that right! Imagine stepping into your garden in the dead of winter and harvesting fresh, tender asparagus spears. It sounds like a dream, doesn’t it? Well, with a few clever DIY tricks and hacks, that dream can become a delicious reality. For centuries, asparagus has been prized for its delicate flavor and nutritional benefits. The ancient Romans even considered it a delicacy, and its cultivation has evolved over time to meet the demands of discerning palates.
But let’s face it, asparagus season is notoriously short. That’s where these DIY methods come in! I’m going to show you how to extend your harvest and even grow asparagus year round, regardless of your climate. Whether you’re a seasoned gardener or just starting out, these simple techniques will empower you to enjoy this delectable vegetable whenever you crave it. Forget relying on expensive, imported asparagus – let’s bring the taste of spring to your table all year long!
This article will give you the knowledge and confidence to take control of your asparagus production. So, grab your gardening gloves, and let’s get started on this exciting journey to year-round asparagus goodness!
Growing Asparagus Indoors: A Year-Round Harvest!
Hey there, fellow gardening enthusiasts! Ever dreamt of enjoying fresh, homegrown asparagus even when the snow is falling outside? Well, dream no more! I’m going to walk you through the process of growing asparagus indoors, so you can have a delicious and nutritious harvest all year round. It might seem a little daunting at first, but trust me, with a little patience and the right setup, you’ll be enjoying tender asparagus spears in no time.
Choosing Your Asparagus Variety
Before we dive into the nitty-gritty, let’s talk about choosing the right asparagus variety. While most asparagus varieties can technically be grown indoors, some are better suited than others.
* ‘Jersey Knight’: This is a popular choice for its high yield and disease resistance. It’s a male variety, which means it doesn’t produce seeds, so all its energy goes into spear production.
* ‘Jersey Giant’: Similar to ‘Jersey Knight,’ this variety is known for its large, tender spears.
* ‘Purple Passion’: If you’re looking for something a little different, ‘Purple Passion’ offers beautiful purple spears that turn green when cooked. It’s also known for being sweeter than green varieties.
* ‘Mary Washington’: This is an heirloom variety that’s been around for ages. It’s reliable and produces good-quality spears.
I personally recommend starting with ‘Jersey Knight’ or ‘Jersey Giant’ as they are generally considered easier to grow and more productive.
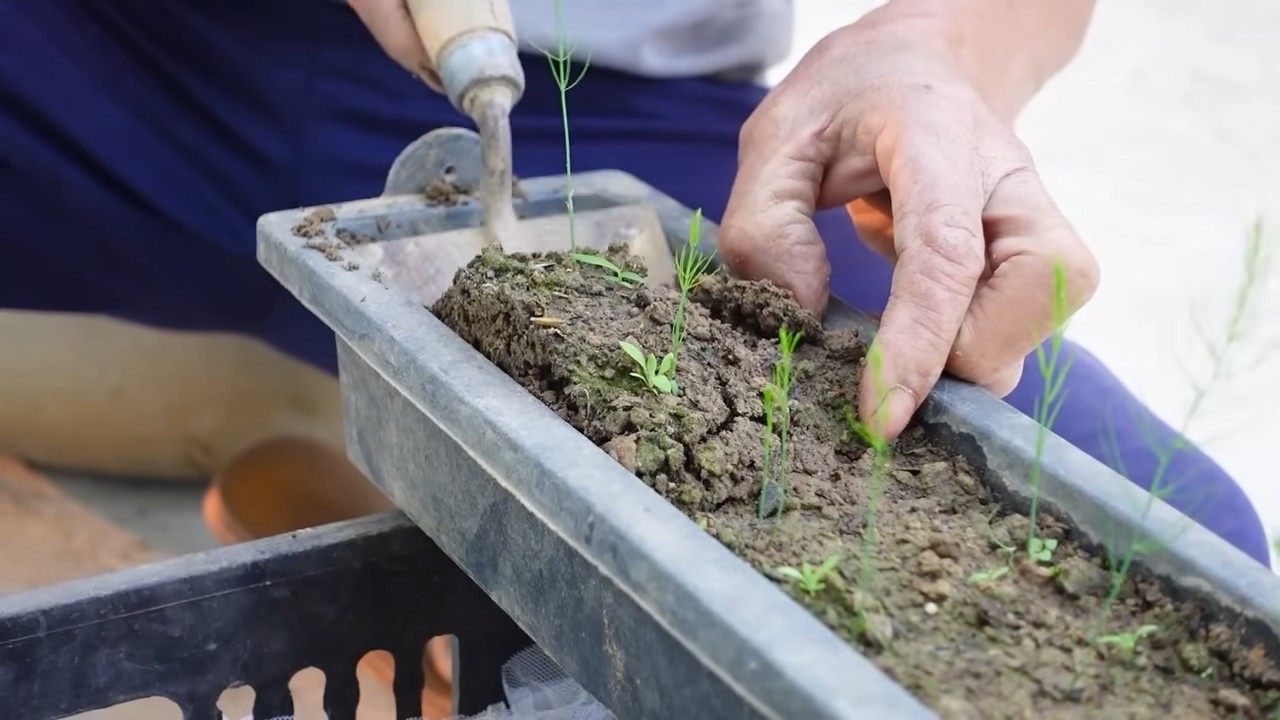
Getting Started: From Seed or Crown?
You have two main options for starting your asparagus: from seed or from crowns.
* Seeds: Starting from seed is the more economical option, but it takes longer. You’ll need to start the seeds indoors about 12-14 weeks before you plan to transplant them into larger containers.
* Crowns: Crowns are one-year-old asparagus plants that have already developed a root system. They’re more expensive than seeds, but they’ll give you a head start and you’ll likely harvest sooner.
For this guide, I’ll focus on starting from crowns, as it’s the faster and more common method.
Materials You’ll Need
Okay, let’s gather our supplies! Here’s what you’ll need to grow asparagus indoors:
* Asparagus Crowns: Purchase healthy, one-year-old crowns from a reputable nursery. Look for crowns that are plump and have plenty of healthy roots.
* Large Containers: Asparagus needs plenty of room for its roots to grow. Choose containers that are at least 12 inches deep and 12 inches wide. I recommend using fabric pots, as they allow for better drainage and aeration.
* Well-Draining Potting Mix: Asparagus doesn’t like soggy soil, so use a well-draining potting mix. A mix of compost, peat moss, and perlite works well.
* Grow Lights: Asparagus needs at least 14-16 hours of light per day to thrive indoors. Invest in a good set of grow lights. LED grow lights are energy-efficient and provide the full spectrum of light that plants need.
* Fertilizer: Asparagus is a heavy feeder, so you’ll need to fertilize regularly. Use a balanced fertilizer (e.g., 10-10-10) or a fertilizer specifically formulated for vegetables.
* Watering Can or Hose: For watering your asparagus plants.
* Pruning Shears: For harvesting and trimming.
* Optional: A humidity tray to increase humidity around the plants.
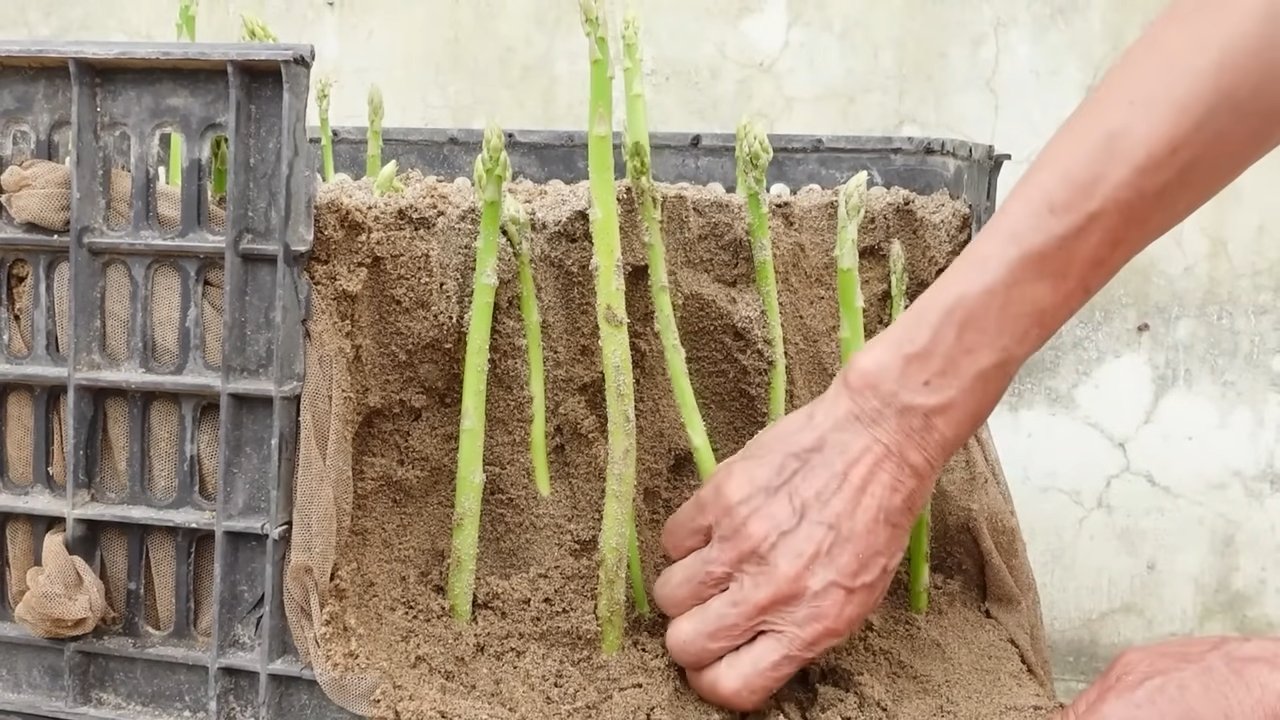
Planting Your Asparagus Crowns
Now for the fun part – planting!
1. Prepare the Containers: Fill your containers with the well-draining potting mix, leaving about 2-3 inches of space at the top.
2. Create a Mound: In the center of each container, create a small mound of soil. This will help spread the roots out.
3. Position the Crown: Place the asparagus crown on top of the mound, spreading the roots out around it.
4. Cover the Crown: Gently cover the crown with soil, leaving the tips of the buds exposed.
5. Water Thoroughly: Water the containers thoroughly until water drains out of the bottom.
6. Place Under Grow Lights: Position the containers under your grow lights, ensuring the lights are about 6-12 inches above the plants.
Caring for Your Indoor Asparagus
Asparagus needs consistent care to thrive indoors. Here’s what you need to do:
1. Watering: Water your asparagus plants regularly, keeping the soil consistently moist but not soggy. Check the soil moisture by sticking your finger into the soil. If the top inch feels dry, it’s time to water.
2. Fertilizing: Fertilize your asparagus plants every 2-3 weeks with a balanced fertilizer. Follow the instructions on the fertilizer package.
3. Lighting: Ensure your asparagus plants receive at least 14-16 hours of light per day. Adjust the height of your grow lights as the plants grow.
4. Temperature: Asparagus prefers temperatures between 65-75°F (18-24°C).
5. Humidity: Asparagus prefers moderate humidity. If your indoor environment is dry, you can increase humidity by using a humidity tray or humidifier.
6. Weeding: Keep the containers free of weeds.
7. Pest Control: Keep an eye out for pests such as aphids and spider mites. If you spot any pests, treat them with insecticidal soap or neem oil.
Harvesting Your Asparagus
Patience is key when it comes to harvesting asparagus. You shouldn’t harvest any spears during the first year, as the plants need time to establish their root systems. In the second year, you can harvest a few spears, but only for a short period (about 2-3 weeks). In the third year and beyond, you can harvest spears for a longer period (about 6-8 weeks).
1. Harvesting Time: Harvest asparagus spears when they are about 6-8 inches tall and the tips are still tightly closed.
2. Harvesting Method: Use a sharp knife or pruning shears to cut the spears at ground level.
3. Harvesting Frequency: Harvest spears every day or every other day during the harvesting season.
Dormancy Period
Asparagus needs a dormancy period each year to rest and recharge. This is especially important when growing asparagus indoors.
1. Preparing for Dormancy: In the fall, after you’ve finished harvesting, stop fertilizing your asparagus plants.
2. Cutting Back Foliage: Once the foliage starts to turn yellow and brown, cut it back to ground level.
3. Cool Storage: Move the containers to a cool, dark place (such as a garage or basement) where the temperature stays between 32-50°F (0-10°C).
4. Reduced Watering: Water the plants sparingly during the dormancy period, just enough to keep the soil from completely drying out.
5. Dormancy Duration: Allow the plants to remain dormant for about 8-12 weeks.
6. Bringing Them Back: After the dormancy period, bring the containers back indoors, place them under your grow lights, and resume watering and fertilizing.
Troubleshooting
Even with the best care, you might encounter some problems when growing asparagus indoors. Here are some common issues and how to address them:
* Yellowing Foliage: This could be caused by overwatering, underwatering, nutrient deficiency, or pest infestation. Check the soil moisture, fertilize regularly, and inspect the plants for pests.
* Thin Spears: This could be caused by insufficient light, nutrient deficiency, or overcrowding. Ensure the plants are receiving enough light, fertilize regularly, and thin out the plants if necessary.
* Lack of Spear Production: This could be caused by insufficient light, improper dormancy, or immature plants. Ensure the plants are receiving enough light, provide a proper dormancy period, and be patient.
Enjoying Your Homegrown Asparagus
Congratulations! You’ve successfully grown asparagus indoors. Now it’s time to enjoy the fruits (or rather, vegetables) of your labor. Freshly harvested asparagus is delicious steamed, roasted, grilled, or added to salads and omelets.
Here are a few of my favorite ways to enjoy homegrown asparagus:
* Roasted Asparagus with Parmesan Cheese: Toss asparagus spears with olive oil, salt, pepper, and grated Parmesan cheese. Roast at 400°F (200°C) for 10-15 minutes, or until tender and slightly browned.
* Asparagus and Lemon Risotto: Add chopped asparagus to your favorite risotto recipe for
Conclusion
So, there you have it! Growing asparagus year-round might seem like a distant dream reserved for seasoned gardeners with sprawling greenhouses, but with this simple DIY trick, it’s entirely within your reach. We’ve unlocked the secret to extending the asparagus season far beyond its typical spring window, allowing you to enjoy the fresh, earthy flavor of this delectable vegetable whenever the craving strikes.
Why is this a must-try? Because it empowers you to take control of your food source, reduce your reliance on store-bought produce (often shipped from afar), and experience the unparalleled satisfaction of harvesting your own homegrown asparagus, even in the dead of winter. Imagine the look on your friends’ faces when you serve them a dish featuring freshly picked asparagus in December! It’s a conversation starter, a testament to your gardening prowess, and a delicious way to brighten up those cold, dreary days.
But the benefits extend beyond mere bragging rights. Freshly harvested asparagus boasts a superior flavor profile compared to its store-bought counterpart. The sugars haven’t had time to convert to starch, resulting in a sweeter, more tender spear. Plus, you know exactly what went into growing your asparagus – no harmful pesticides or herbicides, just pure, unadulterated goodness.
Now, let’s talk variations. While the method we’ve outlined provides a solid foundation, feel free to experiment and adapt it to your specific needs and preferences. For instance, if you live in a particularly cold climate, you might consider adding an extra layer of insulation to your container or using a grow light to supplement natural sunlight. You could also try different varieties of asparagus to see which ones perform best under indoor conditions. ‘Jersey Knight’ and ‘Purple Passion’ are two popular choices known for their vigor and flavor.
Another exciting variation involves companion planting. Consider adding herbs like basil or parsley to your asparagus container. These herbs not only enhance the flavor of your asparagus but also help to deter pests and attract beneficial insects. It’s a win-win situation!
Don’t be afraid to get creative and personalize your asparagus-growing setup. The key is to provide your plants with the right conditions – adequate light, consistent moisture, and well-draining soil – and they will reward you with a bountiful harvest.
We understand that embarking on a new gardening venture can be daunting, but we assure you that this DIY trick is surprisingly simple and straightforward. With a little bit of effort and attention, you’ll be enjoying fresh, homegrown asparagus in no time.
So, what are you waiting for? Gather your supplies, follow our instructions, and prepare to be amazed by the results. We’re confident that you’ll find this DIY trick to be a game-changer in your gardening journey.
And most importantly, we want to hear about your experience! Share your successes, your challenges, and your tips with us in the comments section below. Let’s create a community of asparagus enthusiasts who are passionate about growing their own food and sharing their knowledge with others. Together, we can unlock the full potential of this amazing vegetable and enjoy its deliciousness year-round. Happy growing! Remember, mastering how to grow asparagus year round is easier than you think!
Frequently Asked Questions (FAQ)
1. What type of asparagus is best for growing indoors?
While most asparagus varieties can be grown indoors with the right conditions, some tend to perform better than others. ‘Jersey Knight’ is a popular choice due to its high yield and disease resistance. ‘Purple Passion’ is another excellent option, known for its beautiful purple spears and sweet flavor. ‘Millennium’ is also a good choice, offering high yields and good disease resistance. Consider your local climate and growing conditions when selecting a variety. Researching the specific needs of each variety will help you make the best choice for your indoor garden. Remember to choose varieties that are known to be relatively compact, as space can be a limiting factor indoors.
2. How much light does indoor asparagus need?
Asparagus requires a significant amount of light to thrive, especially when grown indoors. Aim for at least 6-8 hours of direct sunlight per day. If you don’t have a sunny window that provides sufficient light, you’ll need to supplement with grow lights. Full-spectrum LED grow lights are an excellent option, as they provide the necessary wavelengths of light for optimal plant growth. Position the grow lights close to the plants (but not so close that they burn the leaves) and adjust the height as the plants grow. Monitor your plants closely for signs of insufficient light, such as leggy growth or pale leaves.
3. What kind of soil is best for growing asparagus in containers?
Asparagus prefers well-draining soil that is rich in organic matter. A good potting mix for asparagus should consist of a combination of compost, peat moss (or coconut coir), and perlite or vermiculite. This mixture will provide the necessary nutrients, moisture retention, and drainage that asparagus needs to thrive. Avoid using heavy clay soil, as it can become waterlogged and lead to root rot. Before planting, amend the soil with a slow-release fertilizer to provide a steady supply of nutrients.
4. How often should I water my indoor asparagus?
Water your asparagus regularly, keeping the soil consistently moist but not waterlogged. Check the soil moisture level by sticking your finger into the soil. If the top inch feels dry, it’s time to water. Water deeply, allowing the excess water to drain out of the bottom of the container. Avoid overwatering, as this can lead to root rot. During the dormant period (fall and winter), reduce watering frequency.
5. How do I fertilize my indoor asparagus?
Asparagus is a heavy feeder and requires regular fertilization to produce a good harvest. Use a balanced fertilizer (e.g., 10-10-10) every 2-3 weeks during the growing season. You can also supplement with organic fertilizers, such as compost tea or fish emulsion. Avoid over-fertilizing, as this can burn the roots. During the dormant period, reduce or eliminate fertilization.
6. How long does it take to harvest asparagus from seed?
Growing asparagus from seed requires patience, as it can take 2-3 years before you can harvest spears. It’s generally recommended to start with asparagus crowns (one-year-old plants) to shorten the time to harvest. If you choose to grow from seed, start the seeds indoors in early spring and transplant them outdoors after the last frost.
7. How do I overwinter my indoor asparagus?
Asparagus requires a dormant period to rest and rejuvenate. In the fall, allow the foliage to turn yellow and brown. Cut back the foliage to the ground and move the container to a cool, dark location (e.g., a garage or basement) for 2-3 months. During this time, reduce watering frequency. In early spring, move the container back to a sunny location and resume regular watering and fertilization.
8. What are some common pests and diseases that affect asparagus?
Asparagus beetles are a common pest that can damage the foliage and spears. Handpick the beetles or use an insecticidal soap to control them. Asparagus rust is a fungal disease that can cause orange pustules on the foliage. Ensure good air circulation and avoid overhead watering to prevent rust. Root rot can occur in poorly drained soil. Use well-draining soil and avoid overwatering to prevent root rot.
9. Can I grow asparagus in a small container?
While asparagus can be grown in containers, it requires a relatively large container to accommodate its extensive root system. A container that is at least 12 inches in diameter and 12 inches deep is recommended. Choose a container that has drainage holes to prevent waterlogging.
10. How do I know when to harvest asparagus?
Harvest asparagus spears when they are 6-8 inches tall and about as thick as your finger. Cut the spears at ground level with a sharp knife. Avoid harvesting all of the spears in the first year, as this can weaken the plants. Allow some of the spears to grow into ferns to nourish the roots.
Leave a Comment