
Grow Bean Sprouts at Home – it’s easier than you think, and I’m here to show you how! Forget those pricey, pre-packaged sprouts from the grocery store. Imagine having a constant supply of fresh, crunchy bean sprouts right at your fingertips, ready to add a nutritious boost to your salads, stir-fries, and sandwiches.
Sprouting beans isn’t just a modern health trend; it’s a practice with roots stretching back centuries. In many Asian cultures, bean sprouts have been a staple food, valued not only for their taste but also for their concentrated nutrients and ease of digestion. Think of it as a tiny, edible time capsule packed with goodness!
But why should you learn to grow bean sprouts at home? Well, for starters, it’s incredibly cost-effective. A handful of dried beans can yield a surprising amount of sprouts. Plus, you have complete control over the growing process, ensuring they’re free from pesticides and other unwanted chemicals. In today’s world, where healthy eating is a priority, knowing exactly where your food comes from is a huge advantage. And honestly, there’s something incredibly satisfying about nurturing life from a tiny seed to a delicious, edible sprout. So, let’s dive in and unlock the secrets to growing your own bean sprout bounty!
Growing Bean Sprouts Yourself: A Simple Guide for Home
Hello dear DIY friends! I love fresh sprouts, especially in salads or as a topping on soups. They are super healthy and give every dish a crunchy kick of freshness. And the best part: you can easily grow them at home! I’ll show you how it’s done – it’s really child’s play and fun!
What you need:
- Beans: Mung beans are best, but lentils, chickpeas, or adzuki beans also work great. Make sure they are untreated and capable of germinating. You can often find them in organic food stores or health food shops.
- A sprouting jar or another container: A sprouting jar with a sieve lid is ideal, but a normal canning jar with a piece of cheesecloth or a fine-meshed sieve, which you attach with a rubber band, will also do.
- Water: Preferably filtered water or boiled, cooled water.
- A dark place: Sprouts germinate best in the dark. A kitchen cabinet or a drawer is perfect.
- Patience: It takes a few days until your sprouts are ready to harvest.
Step-by-step guide:
- Prepare beans: Put about 2-3 tablespoons of beans in your sprouting jar or container. I usually use mung beans because they grow so quickly.
- Soak: Fill the jar with plenty of water so that the beans are well covered. Let them soak for 8-12 hours. Soaking wakes up the beans and starts the germination process. I usually do this in the evening, so they can soak overnight.
- Drain water and rinse: Pour off the soaking water and rinse the beans thoroughly with fresh water. This is important to prevent mold.
- Position the jar: Place the jar at an angle so that excess water can drain off and the beans are not sitting in water. I usually place it in a bowl or a draining rack.
- Store in the dark: Place the jar in a dark place.
- Rinse, rinse, rinse: Rinse the beans 2-3 times a day with fresh water. This is the be-all and end-all for healthy sprouts! Make sure the water drains well.
- Wait and watch: After 2-3 days you should see the first small sprouts. Depending on the temperature and bean variety, it will take 3-5 days until they are ready to harvest.
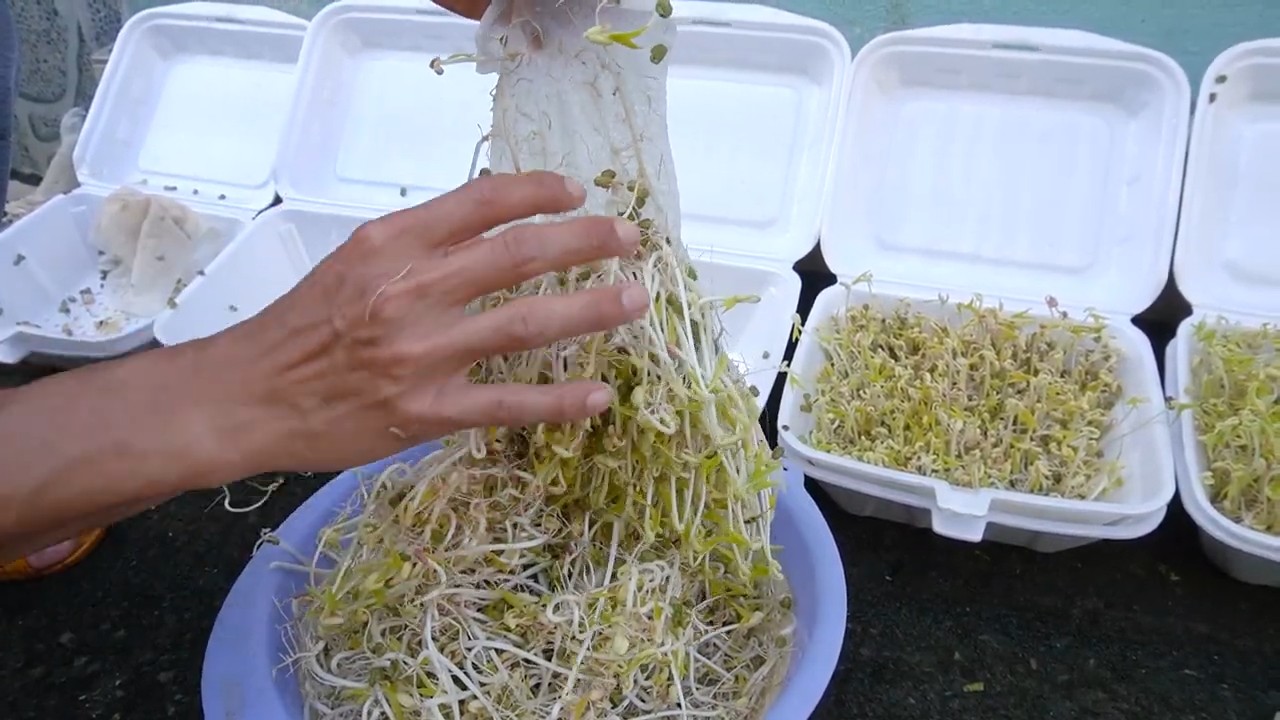
- Harvest: When the sprouts have reached the desired length (I like them best when they are about 2-3 cm long), you can harvest them. Rinse them thoroughly one more time.
- Store: Keep the sprouts in the refrigerator. They will last for about 3-5 days there. Preferably in an airtight container.
Tips and tricks for perfect sprouts:
- Hygiene is important: Make sure your sprouting jar and all utensils are clean. This reduces the risk of mold. I always rinse my sprouting jar with hot water.
- Not too many beans: Do not use too many beans at once, otherwise they will not have enough space to grow and mold can form.
- Rinse evenly: Make sure you rinse the beans evenly so that all beans get enough moisture.
- Light at the end: When the sprouts are almost ready, you can put them in the light for a few hours. This makes them greener and they develop more chlorophyll. But be careful: not for too long, otherwise they will become bitter.
- Avoid mold: If you discover mold, you should dispose of the affected sprouts immediately. It is better to be on the safe side.
- Try different beans: Try out different types of beans to find out which ones you like best. Lentils and chickpeas have a slightly different taste than mung beans.
- Note the germination time: The germination time varies depending on the type of bean. Find out in advance how long the respective variety takes to germinate.
- Water quality: It is best to use filtered water or boiled, cooled water for rinsing. Tap water can sometimes contain too many minerals that can impair growth.
- Regular rinsing: Regular rinsing is crucial to keep the sprouts moist and prevent mold. I rinse my sprouts at least twice a day, sometimes three times, especially on warm days.
- Air circulation: Ensure good air circulation in the sprouting jar. This helps to reduce moisture and prevent mold.
- Temperature: The ideal temperature for germination is between 18 and 22 degrees Celsius. Avoid extreme temperatures.
- Store sprouts correctly: To extend the shelf life of the sprouts in the refrigerator, you can store them in an airtight container with a piece of paper towel. The paper towel absorbs excess moisture.
- Wash sprouts before consumption: Rinse the sprouts thoroughly again before consumption to remove any possible contaminants.
- Do not consume sprouts raw: Some sprouts, such as bean sprouts, should be briefly blanched or steamed before consumption to break down any potentially harmful substances. Find out beforehand whether the respective variety can be consumed raw.
- Sprouts as a superfood: Sprouts are rich in vitamins, minerals, and enzymes. They are a great addition to a healthy diet.
Common problems and solutions:
- Mold formation: If you discover mold, it is usually due to poor hygiene or insufficient rinsing. Dispose of the affected sprouts and clean your sprouting jar thoroughly. Next time, pay more attention to hygiene and rinse the sprouts more often.
- No germination: If the beans do not germinate, there can be several reasons. Perhaps the beans are not capable of germinating, the water was not clean enough, or the temperature was not optimal. Try it with other beans, clean water, and a suitable temperature.
- Bitter taste: A bitter taste can occur if the sprouts have been exposed to light for too long. Place them in the shade earlier next time.
- Foul smell: A foul smell indicates mold. Dispose of the sprouts immediately.
Special tips for mung beans
Mung beans are my absolute favorite beans for sprouting because they germinate so reliably and quickly. Here are a few more special tips for mung beans:
- Soaking time: Mung beans generally need a soaking time of 8-12 hours.
- Rinsing: Rinse mung beans particularly thoroughly, as they tend to form slime.
- Harvest time: Mung bean sprouts are tastiest when they are about 2-3 cm long.
- Use: Mung bean sprouts are versatile. They go well in salads, soups, stir-fries, or as a topping on sandwiches.
Sprouts in the kitchen: Delicious recipe ideas
Sprouts are not only healthy but also incredibly versatile in the kitchen. Here are a few ideas on how you can use your home-grown sprouts:
Salads: Add a handful of sprouts to your favorite salad. They give it a crunchy kick of freshness.

Conclusion
So, there you have it! Growing your own bean sprouts at home is not only incredibly easy and cost-effective, but it also provides you with a constant supply of fresh, nutritious ingredients right at your fingertips. Forget those limp, pre-packaged sprouts from the grocery store. With just a few simple supplies and a little patience, you can cultivate vibrant, crunchy bean sprouts bursting with flavor and goodness.
This DIY trick is a must-try for several compelling reasons. First and foremost, you have complete control over the growing process. You know exactly what’s going into your sprouts – no hidden chemicals or preservatives. This translates to a healthier and more flavorful product. Secondly, it’s a fantastic way to reduce food waste. Instead of buying sprouts that might go bad before you can use them all, you can grow only what you need, when you need it. Thirdly, it’s a surprisingly rewarding experience. Watching those tiny seeds transform into edible sprouts is a miniature miracle of nature, and it’s incredibly satisfying to harvest your own homegrown food.
But the benefits don’t stop there. Growing bean sprouts at home is also a great way to introduce children to the wonders of gardening and healthy eating. It’s a simple and engaging project that can teach them about the life cycle of plants and the importance of fresh produce. Plus, it’s a fun activity that the whole family can enjoy together.
Looking for variations? Experiment with different types of beans! Mung beans are the most common choice, but you can also try adzuki beans, lentils, or even chickpeas. Each type of bean will yield sprouts with a slightly different flavor and texture. You can also adjust the sprouting time to achieve your desired level of sprout length and crunchiness. Some people prefer shorter, more delicate sprouts, while others prefer longer, more robust ones.
Consider adding a touch of spice to your sprouts by including a small piece of ginger or a chili pepper in the sprouting jar. This will infuse the sprouts with a subtle, aromatic flavor. You can also experiment with different sprouting mediums. While a jar is the most common method, you can also use a sprouting bag or a multi-tiered sprouting system for larger yields.
We wholeheartedly encourage you to give this DIY trick a try. It’s a simple, affordable, and rewarding way to enhance your culinary creations and embrace a healthier lifestyle. Once you’ve experienced the joy of growing your own bean sprouts, you’ll never go back to store-bought ones again.
Don’t be afraid to experiment and find what works best for you. And most importantly, share your experience with us! We’d love to hear about your successes, your challenges, and any creative variations you come up with. Post your photos and stories on social media using [Your Hashtag Here] and let’s inspire others to discover the magic of growing bean sprouts at home. Happy sprouting!
Frequently Asked Questions (FAQ)
What kind of beans can I use to grow bean sprouts?
The most common and readily available bean for sprouting is the mung bean. However, you can also successfully sprout adzuki beans, lentils, chickpeas, and even some types of peas. Keep in mind that different beans will have different sprouting times and flavor profiles. Experiment to find your favorites! Avoid using kidney beans or other beans that are toxic when raw; these require cooking before consumption. Always use beans specifically intended for sprouting or culinary use, not those treated for agricultural purposes.
How long does it take to grow bean sprouts?
Generally, bean sprouts will be ready to harvest in 3 to 5 days. The exact time will depend on the type of bean, the temperature, and the humidity. Mung beans typically sprout the fastest. You’ll know they’re ready when the sprouts are about 1-2 inches long and have a small root tail.
What if my bean sprouts start to smell bad?
A foul odor is a sign of bacterial contamination. This usually happens if the sprouts are not rinsed frequently enough or if the sprouting environment is too warm and humid. Discard the sprouts immediately if they smell bad. To prevent this, ensure you rinse the sprouts thoroughly at least twice a day with cool, clean water. Good ventilation is also important.
How do I store bean sprouts?
Once your bean sprouts are ready, rinse them thoroughly and drain them well. Store them in an airtight container lined with a paper towel in the refrigerator. The paper towel will help absorb excess moisture and keep the sprouts fresh for up to a week. Check them daily and discard any that show signs of spoilage.
Can I eat the bean shells?
Yes, the bean shells are perfectly edible and contain fiber and nutrients. However, some people prefer to remove them for a smoother texture. You can easily remove the shells by gently agitating the sprouts in a bowl of water. The shells will float to the surface and can be skimmed off.
What are the nutritional benefits of bean sprouts?
Bean sprouts are a nutritional powerhouse! They are low in calories and fat but high in vitamins, minerals, and fiber. They are a good source of vitamin C, vitamin K, folate, and manganese. They also contain antioxidants and enzymes that can promote overall health.
My bean sprouts are growing mold. What should I do?
Mold growth is a sign of contamination and means the sprouts are not safe to eat. Discard them immediately and thoroughly clean your sprouting container with hot, soapy water and a bleach solution (1 tablespoon of bleach per gallon of water). Rinse well before using it again. To prevent mold growth, ensure good ventilation, rinse the sprouts frequently, and avoid overcrowding the sprouting container.
Can I grow bean sprouts without a sprouting jar?
Yes, you can use other methods. A sprouting bag made of hemp or cotton is a good alternative. You can also use a colander lined with cheesecloth or a multi-tiered sprouting system. The key is to provide adequate drainage and ventilation.
Why are my bean sprouts not sprouting?
There could be several reasons why your bean sprouts are not sprouting. First, make sure you are using fresh, viable beans specifically intended for sprouting. Old or damaged beans may not germinate. Second, ensure the beans are properly soaked before sprouting. Third, the temperature may be too cold or too hot. Bean sprouts thrive in a temperature range of 70-80°F (21-27°C). Finally, make sure the beans are kept moist but not waterlogged.
Are there any risks associated with eating raw bean sprouts?
While bean sprouts are generally safe to eat, there is a small risk of foodborne illness, particularly from bacteria like Salmonella or E. coli. This risk is higher with commercially produced sprouts due to the potential for contamination during processing. By growing your own bean sprouts at home, you can significantly reduce this risk by controlling the growing environment and ensuring proper hygiene. Always rinse the sprouts thoroughly before eating and discard any that show signs of spoilage. If you are pregnant, elderly, or have a weakened immune system, it is recommended to cook bean sprouts before eating them.
Leave a Comment