
Grow Bell Peppers in Containers and unlock a world of fresh, vibrant flavors right outside your door! Imagine plucking juicy, colorful bell peppers straight from your patio, ready to add a burst of sunshine to your next meal. Forget those bland, store-bought peppers – with a little know-how, you can cultivate your own thriving bell pepper garden, even if you’re short on space.
For centuries, container gardening has allowed people to cultivate food and beauty in limited spaces. From the hanging gardens of Babylon to the humble window boxes of today, the desire to nurture life in confined areas is deeply ingrained in human history. Now, you can tap into that tradition and experience the joy of growing your own food.
Why should you learn to grow bell peppers in containers? Well, for starters, it’s incredibly rewarding! Plus, it gives you complete control over the growing environment, minimizing pests and diseases. More importantly, it’s a fantastic way to enjoy fresh, healthy produce without the need for a large garden. In this DIY guide, I’ll share my favorite tips and tricks for successfully growing bell peppers in containers, from choosing the right pot and soil to providing the perfect amount of sunlight and water. Get ready to transform your balcony, patio, or even a sunny windowsill into a thriving bell pepper paradise!
Growing Bell Peppers in Containers: A Comprehensive Guide
Hey there, fellow gardening enthusiasts! I’m so excited to share my tried-and-true method for growing vibrant, delicious bell peppers right in containers. Whether you have a sprawling backyard or just a sunny balcony, this guide will walk you through every step, ensuring a bountiful harvest. Let’s get started!
Choosing the Right Container and Soil
First things first, we need to set the stage for success. The container and soil are crucial for healthy pepper plants.
* Container Size: Bell peppers need room to spread their roots. I recommend a container that’s at least 12 inches in diameter and 12 inches deep. A 5-gallon bucket works perfectly! Bigger is generally better, as it provides more space for root growth and helps retain moisture.
* Drainage: This is non-negotiable! Make sure your container has drainage holes. Peppers hate sitting in soggy soil, which can lead to root rot. If your container doesn’t have holes, you can easily drill some.
* Material: Plastic, terracotta, or even fabric pots will work. I personally prefer plastic because they retain moisture better, especially during hot summer months. Terracotta pots are beautiful, but they dry out faster.
* Potting Mix: Forget garden soil! It’s too heavy and doesn’t drain well in containers. Instead, opt for a high-quality potting mix specifically designed for containers. Look for a mix that contains peat moss, perlite, and vermiculite. These ingredients provide good drainage, aeration, and water retention. I often amend my potting mix with compost for added nutrients.
Selecting Your Bell Pepper Variety
The fun part! There are so many bell pepper varieties to choose from, each with its own unique flavor and color.
* Consider your climate: Some varieties are better suited for warmer climates, while others can tolerate cooler temperatures. Check the seed packet or plant label for information on the variety’s heat tolerance and days to maturity.
* Popular Choices: Some of my favorites include ‘California Wonder’ (a classic green bell pepper), ‘Yolo Wonder’ (another reliable green variety), ‘Golden Bell’ (a sweet yellow pepper), and ‘Purple Beauty’ (a stunning purple pepper).
* Compact Varieties: If you’re short on space, look for compact or dwarf varieties specifically bred for container gardening. These varieties typically produce smaller plants with smaller peppers, but they’re perfect for balconies and patios. ‘Patio Bell’ is a great option.
* Disease Resistance: Look for varieties that are resistant to common pepper diseases like Tobacco Mosaic Virus (TMV) and Phytophthora root rot. This will save you a lot of headaches down the road.
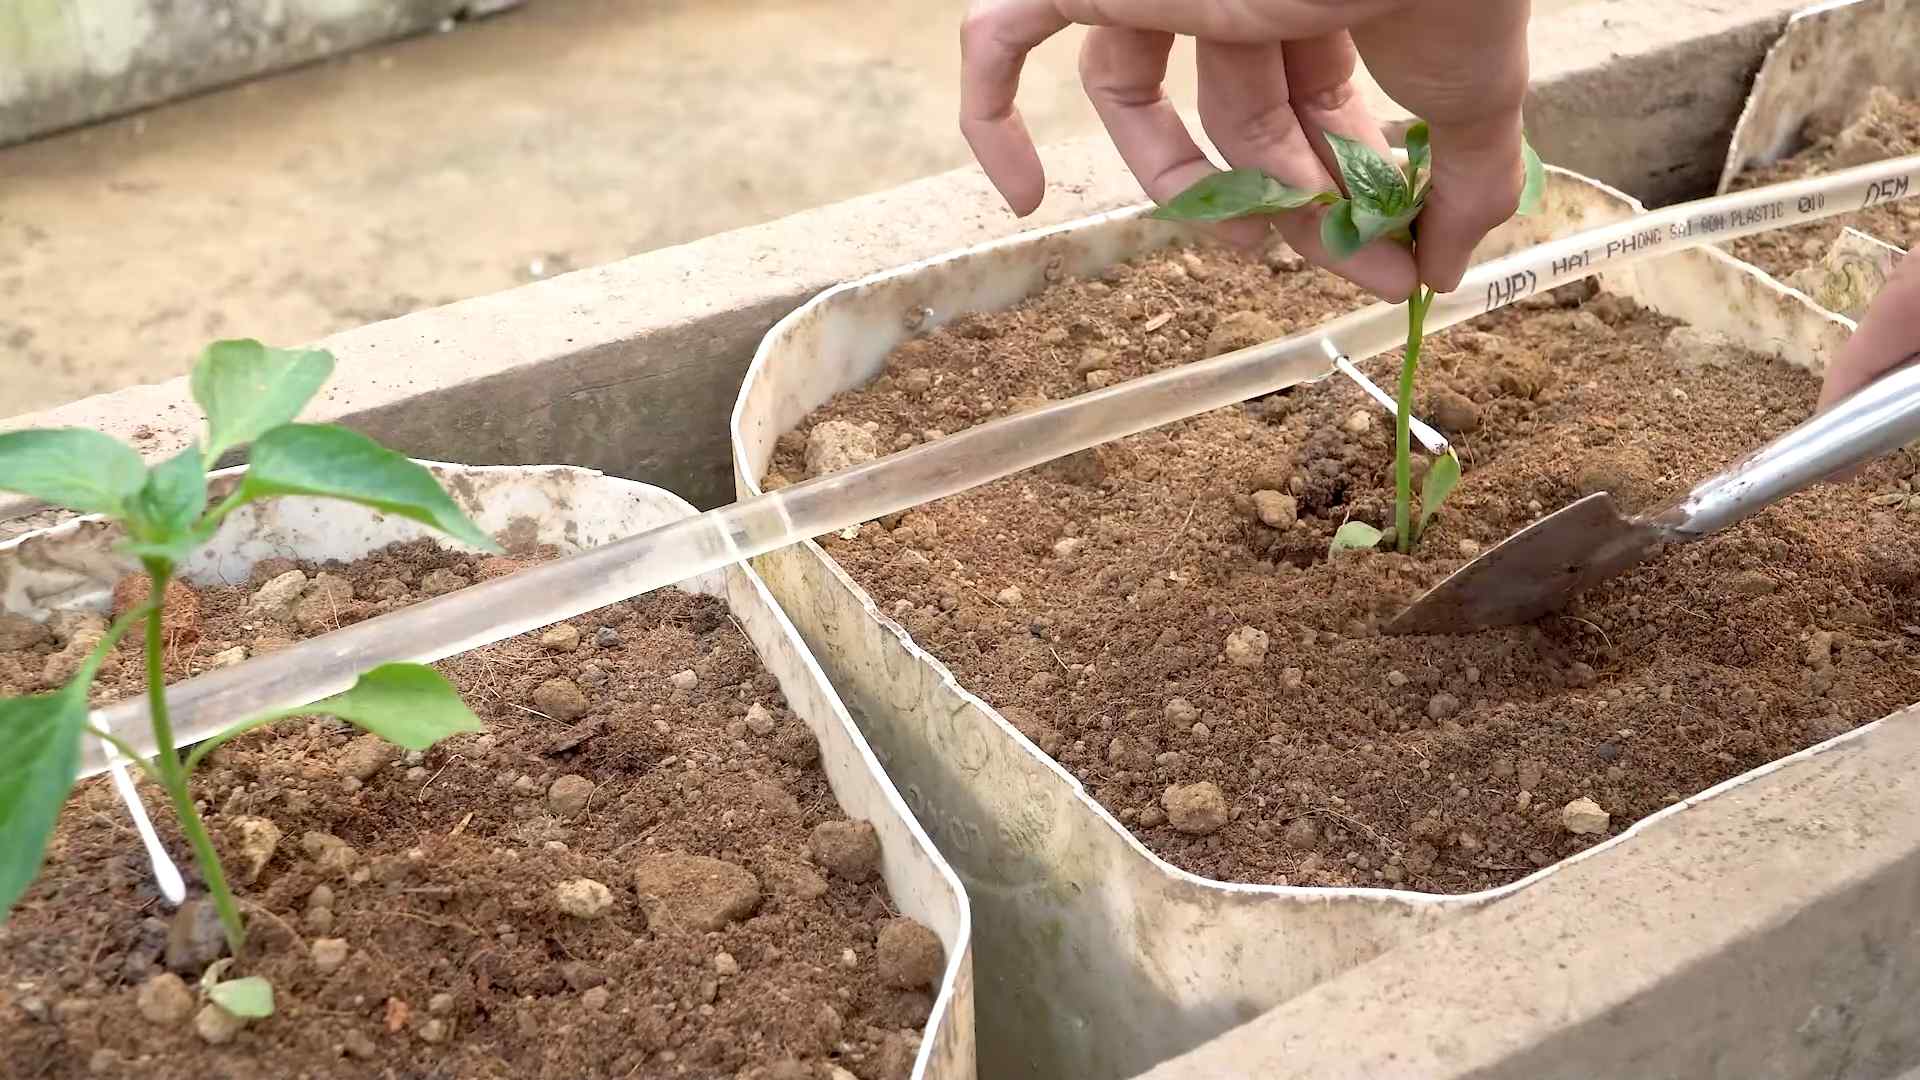
Planting Your Bell Pepper Seedlings
Now for the hands-on part!
1. Prepare the Container: Fill your chosen container with the potting mix, leaving about an inch or two of space at the top. Gently pat down the soil to remove any air pockets.
2. Water the Soil: Thoroughly water the potting mix until water drains out of the drainage holes. This will help settle the soil and provide moisture for the seedling.
3. Dig a Hole: Dig a hole in the center of the container that’s slightly larger than the root ball of your bell pepper seedling.
4. Remove the Seedling: Gently remove the seedling from its nursery pot. If the roots are tightly bound, gently loosen them with your fingers.
5. Plant the Seedling: Place the seedling in the hole, making sure the top of the root ball is level with the surrounding soil.
6. Fill and Pat: Fill in the hole with potting mix and gently pat down the soil around the seedling.
7. Water Again: Water the seedling thoroughly to help it settle in.
8. Provide Support (Optional): If you’re growing a taller variety, you may want to insert a stake or tomato cage into the container to provide support as the plant grows. This will prevent the plant from toppling over when it’s loaded with peppers.
Caring for Your Bell Pepper Plants
Consistent care is key to a successful harvest.
* Sunlight: Bell peppers need at least 6-8 hours of direct sunlight per day. Place your container in the sunniest spot you can find. If you live in a very hot climate, you may need to provide some afternoon shade to prevent the peppers from scorching.
* Watering: Water your bell pepper plants regularly, especially during hot, dry weather. The soil should be consistently moist but not soggy. Check the soil moisture by sticking your finger into the soil. If the top inch feels dry, it’s time to water. Water deeply, allowing the water to drain out of the drainage holes. Avoid overhead watering, as this can promote fungal diseases.
* Fertilizing: Bell peppers are heavy feeders, so they need regular fertilization. Start fertilizing about two weeks after planting. Use a balanced fertilizer (e.g., 10-10-10) or a fertilizer specifically formulated for vegetables. Follow the instructions on the fertilizer label. I like to use a liquid fertilizer diluted to half strength and apply it every two weeks. You can also use a slow-release fertilizer at planting time.
* Pruning: Pruning isn’t essential, but it can help improve air circulation and encourage fruit production. Remove any suckers (small shoots that grow from the base of the plant) to direct the plant’s energy towards fruit development. You can also remove any yellowing or diseased leaves.
* Pest Control: Keep an eye out for common pepper pests like aphids, whiteflies, and spider mites. Inspect your plants regularly and take action if you see any signs of infestation. You can often control these pests with insecticidal soap or neem oil.
* Pollination: Bell peppers are self-pollinating, but they can benefit from a little help. Gently shake the plants or use a small paintbrush to transfer pollen from one flower to another. This is especially important if you’re growing your peppers indoors or in a sheltered location where there aren’t many pollinators.
Harvesting Your Bell Peppers
The moment we’ve been waiting for!
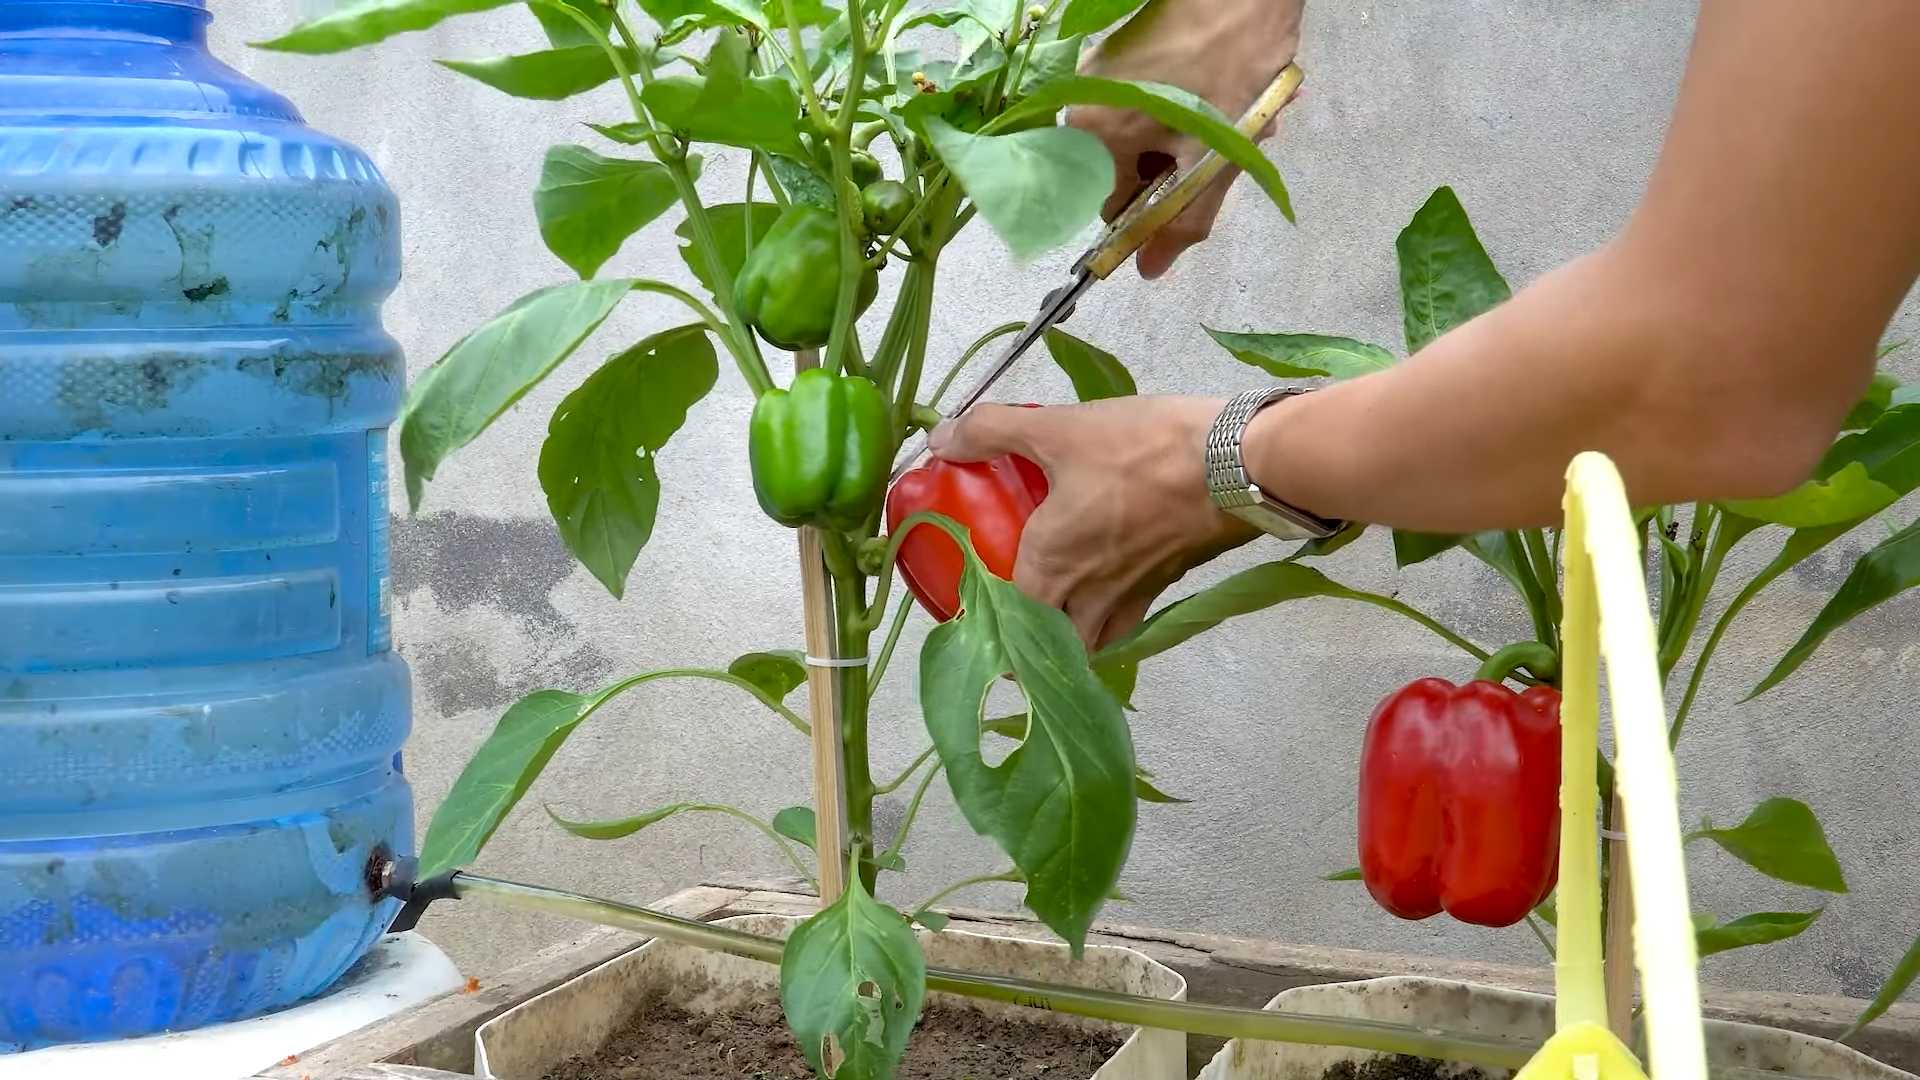
* Timing: Bell peppers are typically ready to harvest 60-90 days after planting, depending on the variety. The peppers will change color from green to their mature color (red, yellow, orange, or purple).
* Ripeness: You can harvest bell peppers at any stage of ripeness, but they’ll be sweetest and most flavorful when they’re fully colored.
* Harvesting Technique: Use a sharp knife or pruning shears to cut the peppers from the plant. Cut the stem about an inch above the pepper. Avoid pulling the peppers off the plant, as this can damage the plant.
* Storage: Store harvested bell peppers in the refrigerator for up to a week.
Troubleshooting Common Problems
Even with the best care, you might encounter some challenges. Here are a few common problems and how to address them:
* Blossom End Rot: This is a common problem in bell peppers, characterized by a dark, sunken spot on the bottom of the pepper. It’s caused by a calcium deficiency, usually due to inconsistent watering. To prevent blossom end rot, water your plants regularly and consistently, and consider adding calcium to the soil.
* Sunscald: This occurs when peppers are exposed to too much direct sunlight, causing them to develop white or tan patches. To prevent sunscald, provide some afternoon shade during the hottest part of the day.
* Aphids: These tiny pests can suck the sap from your pepper plants, causing them to weaken and become distorted. Control aphids with insecticidal soap or neem oil.
* Lack of Fruit Set: If your bell pepper plants are producing flowers but not setting fruit, it could be due to a number of factors, including high temperatures, poor pollination, or nutrient deficiencies. Make sure your plants are getting enough sunlight, water, and fertilizer, and try hand-pollinating the flowers.
Extending the Growing Season
Want to enjoy fresh bell peppers for even longer? Here are a few tips for extending the growing season:
* Start Seeds Indoors: Start your bell pepper seeds indoors 6-8 weeks before the last expected frost. This will give you a head start on the growing season.
* Use Row Covers: Row covers can protect your plants from frost and cold temperatures, allowing you to plant earlier in the spring and extend the harvest later into the fall.
* Move Containers Indoors: If you live in a cold climate, you can move your containers indoors when the weather turns cold. Place them in a sunny window or under grow lights.
Growing bell peppers in containers is a rewarding experience. With a little bit of care and attention, you can enjoy a bountiful harvest of fresh, delicious peppers right from your own home. Happy gardening!
Conclusion
So, there you have it! Growing bell peppers in containers is not only achievable, but it’s also incredibly rewarding. We’ve walked you through the entire process, from selecting the right container and soil to nurturing your plants and harvesting those vibrant, flavorful peppers. But why should you take the plunge and try this DIY trick?
First and foremost, container gardening offers unparalleled flexibility. Whether you have a sprawling backyard or a tiny apartment balcony, you can enjoy the satisfaction of growing your own food. No more relying solely on grocery store produce – you’ll have fresh, organic bell peppers right at your fingertips. Imagine the burst of flavor in your salads, stir-fries, and stuffed pepper recipes, all thanks to your own green thumb!
Beyond the convenience, growing bell peppers in containers allows for greater control over the growing environment. You can easily move your plants to chase the sun, protect them from harsh weather, and monitor their health more closely. This level of control translates to healthier, more productive plants and a more abundant harvest.
But the benefits don’t stop there. This DIY trick is also a fantastic way to connect with nature, relieve stress, and learn new skills. There’s something deeply satisfying about nurturing a plant from seed to harvest, and the sense of accomplishment you’ll feel when you pick your first ripe bell pepper is truly unmatched.
Now, let’s talk about variations. Feel free to experiment with different bell pepper varieties. From the classic green bell pepper to the sweeter red, yellow, and orange varieties, there’s a pepper to suit every taste. You can also try growing miniature bell peppers, which are perfect for snacking or adding to lunchboxes.
Consider companion planting to further enhance your container garden. Basil, marigolds, and nasturtiums are all excellent companions for bell peppers, as they help to deter pests and attract beneficial insects. You can also add a layer of mulch to your containers to help retain moisture and suppress weeds.
Don’t be afraid to get creative with your container selection. While plastic pots are a practical choice, you can also use terracotta pots, wooden crates, or even repurposed containers like old buckets or barrels. Just make sure your chosen container has adequate drainage holes.
Growing bell peppers in containers is a journey of discovery, and we encourage you to embrace the learning process. Don’t be discouraged if you encounter challenges along the way – every gardener faces setbacks. The key is to learn from your mistakes and keep experimenting until you find what works best for you.
So, what are you waiting for? Grab a container, some soil, and a bell pepper seedling, and get started today! We’re confident that you’ll be amazed by the results. And once you’ve harvested your first crop of homegrown bell peppers, be sure to share your experience with us. We’d love to hear your tips, tricks, and success stories. Share your photos and stories on social media using #ContainerBellPeppers and inspire others to join the container gardening movement. Let’s grow together!
Frequently Asked Questions (FAQ)
What is the best size container for growing bell peppers?
The ideal container size for growing bell peppers is at least 5 gallons, but 7-10 gallons is even better. This provides ample space for the roots to grow and allows the plant to thrive. Smaller containers may restrict root growth, leading to stunted plants and reduced yields. If you’re planning to grow multiple bell pepper plants in a single container, choose a larger container accordingly. Remember, the bigger the container, the more room for root development and the more water and nutrients the plant can access.
What type of soil should I use for growing bell peppers in containers?
Bell peppers thrive in well-draining, nutrient-rich soil. A good potting mix specifically formulated for vegetables is an excellent choice. Avoid using garden soil, as it can be too heavy and compact, hindering drainage and root growth. You can also create your own potting mix by combining equal parts of peat moss, perlite, and compost. The peat moss helps retain moisture, the perlite improves drainage, and the compost provides essential nutrients. Adding a slow-release fertilizer to your potting mix will also give your bell peppers a boost.
How often should I water my bell pepper plants in containers?
Watering frequency depends on several factors, including the weather, the size of the container, and the type of soil. As a general rule, water your bell pepper plants when the top inch of soil feels dry to the touch. During hot, dry weather, you may need to water them daily. Be sure to water deeply, allowing the water to drain out of the bottom of the container. Avoid overwatering, as this can lead to root rot. A good way to check if your plants need water is to lift the container – if it feels light, it’s time to water.
How much sunlight do bell pepper plants need?
Bell peppers need at least 6-8 hours of direct sunlight per day to thrive. Choose a sunny location for your container garden, such as a south-facing balcony or patio. If you don’t have enough sunlight, you can supplement with grow lights. Rotate your containers regularly to ensure that all sides of the plant receive adequate sunlight. Insufficient sunlight can result in leggy plants with poor fruit production.
What are some common pests and diseases that affect bell pepper plants?
Bell pepper plants are susceptible to a variety of pests and diseases, including aphids, spider mites, whiteflies, blossom-end rot, and fungal diseases. Regularly inspect your plants for signs of infestation or disease. If you spot any problems, take action immediately. Aphids, spider mites, and whiteflies can be controlled with insecticidal soap or neem oil. Blossom-end rot is caused by calcium deficiency and can be prevented by adding calcium to the soil. Fungal diseases can be treated with fungicides.
How do I prevent blossom-end rot in my bell peppers?
Blossom-end rot is a common problem in bell peppers, characterized by a dark, sunken spot on the bottom of the fruit. It’s caused by a calcium deficiency, which can be due to insufficient calcium in the soil or inconsistent watering. To prevent blossom-end rot, add calcium to the soil before planting, using bone meal or crushed eggshells. Water your plants consistently, avoiding both overwatering and underwatering. Mulching around the plants can also help retain moisture and prevent calcium deficiency.
When should I harvest my bell peppers?
Bell peppers are typically ready to harvest 60-90 days after transplanting, depending on the variety. The peppers should be firm, glossy, and fully colored. You can harvest green bell peppers when they reach their mature size, or you can wait for them to turn red, yellow, or orange for a sweeter flavor. Use a sharp knife or pruning shears to cut the peppers from the plant, leaving a short stem attached.
Can I grow bell peppers indoors?
Yes, you can grow bell peppers indoors, but it requires providing them with adequate light and warmth. Use grow lights to supplement natural sunlight, ensuring that your plants receive at least 12-14 hours of light per day. Maintain a consistent temperature of 70-80°F during the day and 60-70°F at night. Pollinate the flowers by hand using a small brush or cotton swab. Indoor bell pepper plants may not produce as many peppers as outdoor plants, but you can still enjoy a decent harvest.
How do I fertilize my bell pepper plants in containers?
Bell pepper plants are heavy feeders and require regular fertilization. Use a balanced fertilizer with a ratio of 10-10-10 or 14-14-14. Fertilize your plants every 2-3 weeks during the growing season. You can also use a liquid fertilizer diluted according to the package instructions. Avoid over-fertilizing, as this can lead to excessive foliage growth and reduced fruit production.
Can I save seeds from my bell peppers to grow next year?
Yes, you can save seeds from your bell peppers to grow next year, but keep in mind that hybrid varieties may not produce true-to-type offspring. To save seeds, allow the peppers to fully ripen on the plant until they are soft and wrinkled. Cut open the peppers and remove the seeds. Rinse the seeds thoroughly and spread them out on a paper towel to dry completely. Store the dried seeds in an airtight container in a cool, dark place.

Leave a Comment