
Grow Bitter Gourd at Home? Absolutely! And I’m here to tell you it’s easier than you might think. Forget those bland, store-bought gourds – imagine harvesting your own vibrant, slightly bitter, and incredibly healthy bounty right from your backyard. For centuries, bitter gourd, also known as karela, has been a staple in Asian and African cuisines and traditional medicine, revered for its medicinal properties and unique flavor.
But let’s be honest, sometimes the idea of growing your own food feels overwhelming. Where do you even start? That’s where these DIY tricks and hacks come in! I’m going to share simple, step-by-step instructions that will empower you to successfully grow bitter gourd at home, even if you’re a complete beginner.
Why do you need this? Because fresh, homegrown bitter gourd tastes infinitely better, is packed with more nutrients, and gives you the satisfaction of knowing exactly where your food comes from. Plus, it’s a fantastic way to connect with nature, reduce your carbon footprint, and impress your friends and family with your green thumb. So, grab your gardening gloves, and let’s get started on this exciting journey of growing your own bitter gourd!
Growing Bitter Gourd at Home: A Comprehensive DIY Guide
Hey there, fellow gardening enthusiasts! I’m so excited to share my experience and knowledge on growing bitter gourd (also known as bitter melon or karela) right in your own backyard. It might seem intimidating at first, but trust me, with a little patience and these simple steps, you’ll be harvesting your own bitter gourds in no time!
Why Grow Bitter Gourd?
Before we dive in, let’s talk about why you should even bother growing this unique vegetable. Besides its distinctive bitter taste (which, admittedly, isn’t for everyone!), bitter gourd is packed with nutrients and has numerous health benefits. Plus, there’s nothing quite like the satisfaction of eating something you’ve grown yourself!
What You’ll Need:
Here’s a list of everything you’ll need to get started:
* Bitter gourd seeds (choose a variety suited to your climate)
* Seed starting trays or small pots
* Seed starting mix or potting soil
* A sunny location with at least 6-8 hours of sunlight per day
* Well-draining soil (amend with compost if necessary)
* Trellis or support structure (bitter gourd is a vine)
* Gardening gloves
* Watering can or hose
* Fertilizer (organic is best!)
* Optional: Row covers or netting to protect from pests
Phase 1: Starting Your Seeds
Starting your seeds indoors gives them a head start, especially if you live in a region with a shorter growing season. I’ve found this method to be super effective!
1. Soaking the Seeds: Bitter gourd seeds have a tough outer shell, so soaking them beforehand helps with germination. I usually soak my seeds in warm water for 24 hours. This softens the shell and allows moisture to penetrate, encouraging sprouting.
2. Preparing the Seed Starting Trays: Fill your seed starting trays or small pots with seed starting mix. Make sure the mix is moist but not soggy. I like to use a spray bottle to dampen the soil evenly.
3. Planting the Seeds: Make a small hole (about ½ inch deep) in the center of each pot or cell. Place one seed in each hole and gently cover it with soil. Lightly pat down the soil to ensure good contact with the seed.
4. Watering and Warmth: Water the trays gently, being careful not to dislodge the seeds. Place the trays in a warm location, ideally between 75-85°F (24-29°C). A heat mat can be helpful if you live in a cooler climate.
5. Patience is Key: Keep the soil consistently moist but not waterlogged. Germination usually takes about 7-14 days. Once the seedlings emerge, move them to a sunny location or under grow lights.
Phase 2: Preparing Your Garden Bed
While your seeds are germinating, it’s time to get your garden bed ready. This is a crucial step for healthy and productive plants.
1. Choosing the Right Location: Bitter gourd needs plenty of sunlight, so choose a spot in your garden that receives at least 6-8 hours of direct sunlight each day.
2. Soil Preparation: Bitter gourd prefers well-draining soil that is rich in organic matter. If your soil is heavy clay or sandy, amend it with compost or well-rotted manure. This will improve drainage and provide essential nutrients.
3. Testing the Soil (Optional): A soil test can help you determine the pH level and nutrient content of your soil. Bitter gourd prefers a slightly acidic to neutral pH (around 6.0-7.0). You can purchase a soil testing kit at most garden centers.
4. Building a Trellis: Bitter gourd is a vine and needs a support structure to climb on. You can use a trellis, fence, or even a sturdy bamboo structure. Make sure the trellis is tall enough to accommodate the vine’s growth (at least 6-8 feet). I’ve had success with both wooden and metal trellises.
5. Adding Fertilizer: Before planting, incorporate a slow-release organic fertilizer into the soil. This will provide your plants with a steady supply of nutrients throughout the growing season.
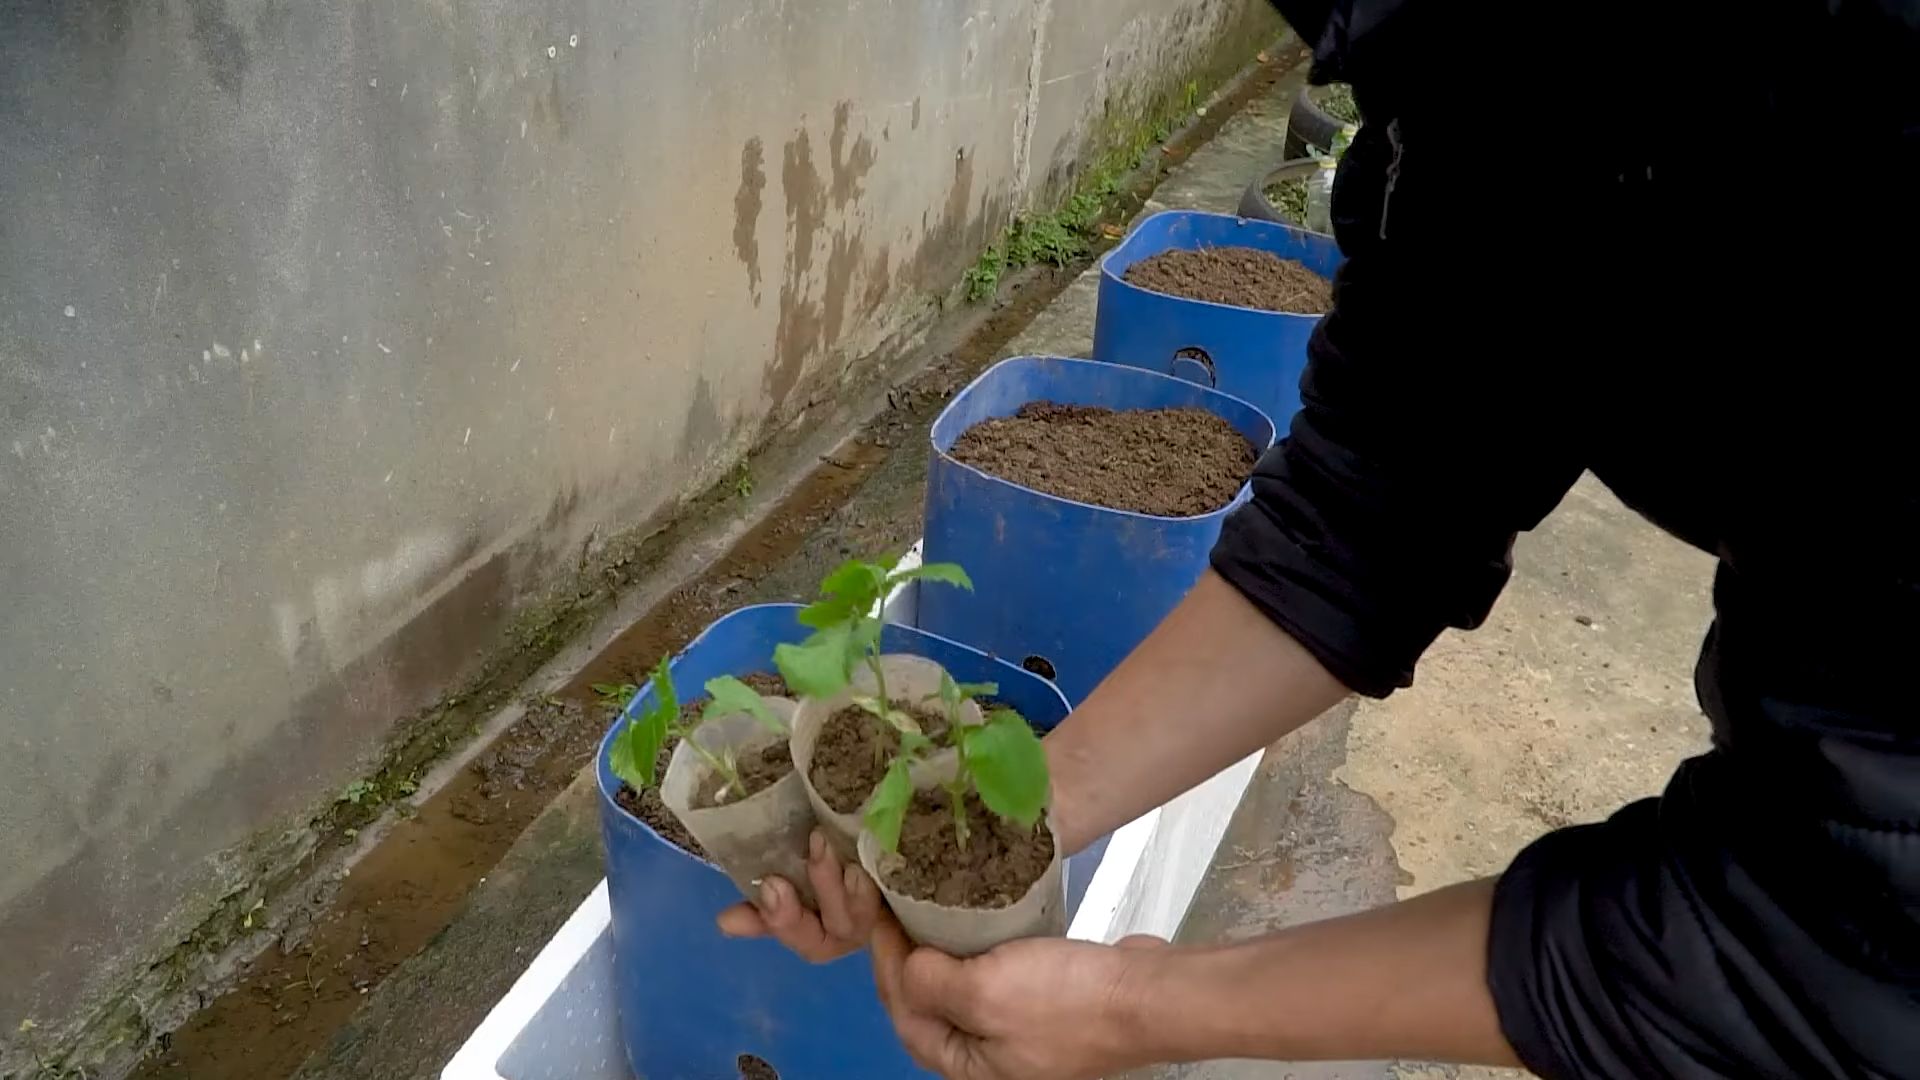
Phase 3: Transplanting Your Seedlings
Once your seedlings have developed a few sets of true leaves (usually after 3-4 weeks), they’re ready to be transplanted into the garden.
1. Hardening Off: Before transplanting, you need to “harden off” your seedlings. This means gradually exposing them to outdoor conditions to help them adjust to the change in temperature and sunlight. Start by placing the trays outdoors in a sheltered location for a few hours each day, gradually increasing the amount of time they spend outside over the course of a week.
2. Choosing the Right Time: Transplant your seedlings on a cloudy day or in the late afternoon to minimize stress. Avoid transplanting during the hottest part of the day.
3. Digging the Holes: Dig holes that are slightly larger than the root balls of your seedlings. Space the holes about 2-3 feet apart.
4. Carefully Removing the Seedlings: Gently remove the seedlings from their trays or pots, being careful not to damage the roots. If the roots are tightly bound, gently loosen them before planting.
5. Planting the Seedlings: Place the seedlings in the holes and cover the roots with soil. Gently pat down the soil around the base of the plants.
6. Watering Thoroughly: Water the newly transplanted seedlings thoroughly to help them settle in.
Phase 4: Caring for Your Bitter Gourd Plants
Now that your plants are in the ground, it’s time to provide them with the care they need to thrive.
1. Watering: Bitter gourd needs consistent moisture, especially during hot weather. Water deeply and regularly, but avoid overwatering, which can lead to root rot. I usually water my plants every other day, or more frequently during dry spells.
2. Fertilizing: Feed your plants with a balanced organic fertilizer every 2-3 weeks. You can also use compost tea or fish emulsion to provide them with extra nutrients.
3. Pruning: Pruning can help improve air circulation and encourage fruit production. Remove any yellowing or dead leaves. You can also pinch off the tips of the vines to encourage branching.
4. Training the Vines: As the vines grow, train them to climb up the trellis. You can use twine or plant clips to secure the vines to the support structure.
5. Pest and Disease Control: Keep an eye out for pests such as aphids, spider mites, and squash bugs. You can control these pests with insecticidal soap or neem oil. Bitter gourd can also be susceptible to fungal diseases such as powdery mildew. To prevent these diseases, ensure good air circulation and avoid overhead watering. If you notice any signs of disease, treat the plants with a fungicide. I prefer using organic options whenever possible.
6. Weeding: Regularly weed around your plants to prevent competition for nutrients and water. Mulching can also help suppress weeds and retain moisture in the soil.
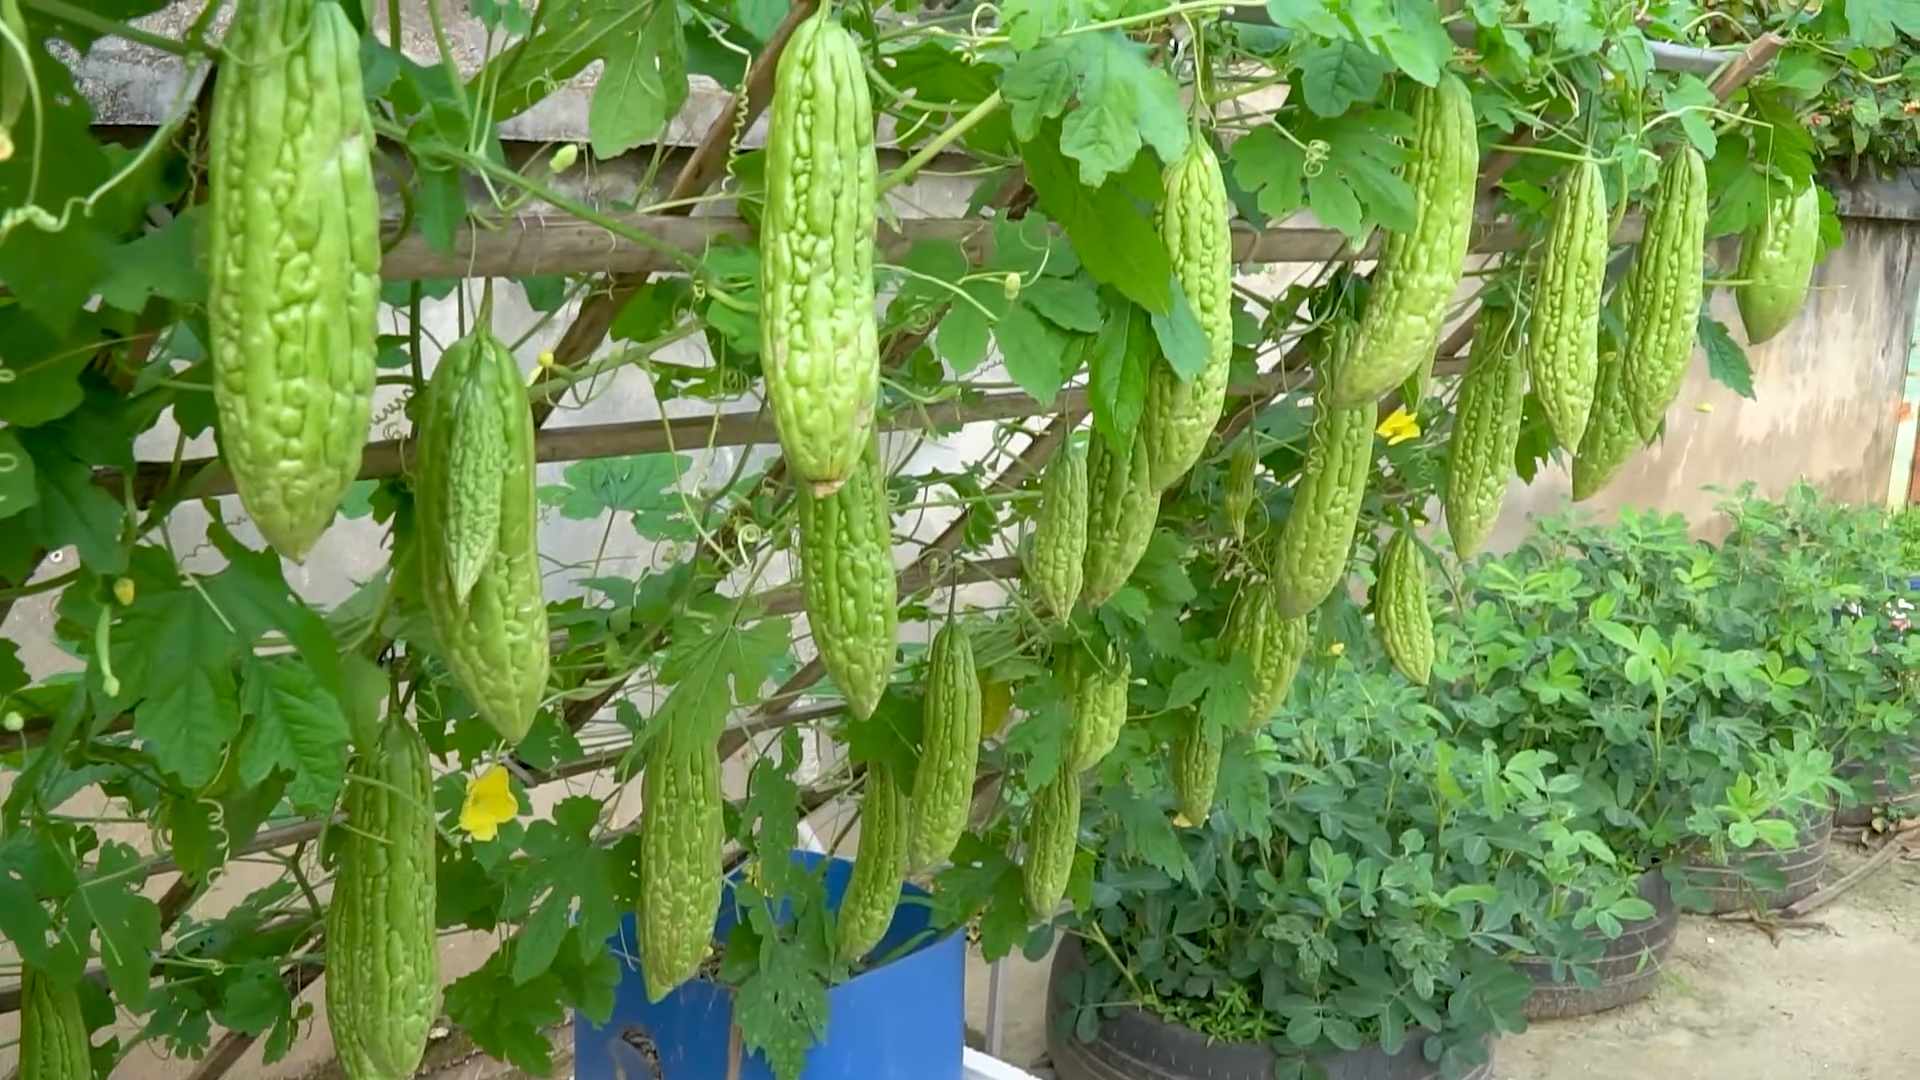
Phase 5: Harvesting Your Bitter Gourd
The moment you’ve been waiting for! Harvesting your own homegrown bitter gourd is incredibly rewarding.
1. Knowing When to Harvest: Bitter gourd is typically ready to harvest about 2-3 months after planting. The fruits should be firm and green, with a slightly waxy coating. They should also be relatively small (about 6-8 inches long). If you wait too long, the fruits will turn yellow and become more bitter.
2. Harvesting Carefully: Use a sharp knife or pruning shears to cut the fruits from the vine. Be careful not to damage the vine.
3. Storing Your Harvest: Bitter gourd can be stored in the refrigerator for up to a week. Wrap the fruits in a paper towel to absorb excess moisture.
Troubleshooting Common Problems
Even with the best care, you might encounter some challenges along the way. Here are a few common problems and how to address them:
* Poor Germination: If your seeds aren’t germinating, make sure the soil is warm enough and consistently moist. You can also try scarifying the seeds (gently scratching the outer shell) to help them absorb water.
* Yellowing Leaves: Yellowing leaves can be a sign of nutrient deficiency or overwatering. Check the soil moisture and fertilize your plants if necessary.
* Lack of Fruit Production: Lack of fruit production can be caused by a variety of factors, including insufficient sunlight, poor pollination, or nutrient deficiency. Make sure your plants are getting enough sunlight and fertilizer. You can also try hand-pollinating the flowers to improve fruit set.
* Pest Infestations: Regularly inspect your plants for pests and take action immediately if you notice any signs of infestation. Insecticidal soap and neem oil are effective organic options.
* Disease Problems: Ensure good air circulation and avoid overhead watering to prevent
Conclusion
So, there you have it! Growing bitter gourd at home is not only achievable, but it’s also incredibly rewarding. From the satisfaction of nurturing a plant from seed to the joy of harvesting your own fresh, healthy produce, this DIY project offers a multitude of benefits. We’ve walked you through the essential steps, from seed preparation and soil selection to trellising and pest control, equipping you with the knowledge you need to succeed.
But why is this DIY trick a must-try? Beyond the obvious advantages of having access to fresh, organic bitter gourd, growing your own allows you to control the entire process. You know exactly what goes into your food, avoiding harmful pesticides and ensuring the highest quality. Plus, the taste of homegrown bitter gourd is simply unmatched – a vibrant, slightly bitter flavor that elevates any dish.
This is more than just gardening; it’s an investment in your health and well-being.
Consider these variations to personalize your bitter gourd growing experience:
* **Container Gardening:** If you have limited space, don’t despair! Bitter gourd thrives in large containers, making it perfect for balconies or patios. Choose a pot that’s at least 12 inches in diameter and ensure it has good drainage.
* **Vertical Gardening:** Maximize your space by training your bitter gourd vines up a wall or fence. This not only saves space but also creates a beautiful green backdrop.
* **Different Varieties:** Experiment with different varieties of bitter gourd to find your favorite. Some are smaller and more tender, while others are larger and more bitter.
* **Companion Planting:** Enhance your garden’s ecosystem by planting companion plants alongside your bitter gourd. Marigolds, basil, and nasturtiums can help deter pests and attract beneficial insects.
We understand that gardening can sometimes feel daunting, but with a little patience and attention, you’ll be amazed at what you can achieve. Remember to observe your plants regularly, adjust your watering schedule as needed, and don’t be afraid to experiment.
The key to successful bitter gourd cultivation lies in consistent care and attention to detail. Provide your plants with plenty of sunlight, water, and nutrients, and they will reward you with a bountiful harvest.
Now, it’s your turn! We encourage you to embark on this exciting DIY adventure and experience the joy of growing your own bitter gourd at home. Don’t be afraid to get your hands dirty and learn along the way.
We’re confident that you’ll find the process both enjoyable and rewarding. And most importantly, we want to hear about your experience! Share your photos, tips, and challenges in the comments below. Let’s create a community of bitter gourd enthusiasts and learn from each other. Happy gardening!
Frequently Asked Questions (FAQ)
What is the best time of year to plant bitter gourd?
The ideal time to plant bitter gourd is during the late spring or early summer, after the last frost has passed. Bitter gourd thrives in warm weather and requires a long growing season of at least 90-120 days. In regions with mild winters, you may be able to start seeds indoors earlier and transplant them outdoors once the weather warms up. Consider your local climate and growing conditions when determining the best planting time for your area.
How much sunlight does bitter gourd need?
Bitter gourd requires at least 6-8 hours of direct sunlight per day to thrive. Choose a planting location that receives ample sunlight throughout the day. If you’re growing bitter gourd in containers, make sure to place them in a sunny spot. Insufficient sunlight can lead to weak growth, reduced flowering, and smaller fruit.
What type of soil is best for growing bitter gourd?
Bitter gourd prefers well-drained, fertile soil that is rich in organic matter. The ideal soil pH is between 6.0 and 7.0. Before planting, amend the soil with compost, well-rotted manure, or other organic materials to improve drainage and fertility. Avoid heavy clay soils, as they can retain too much moisture and lead to root rot. If you have clay soil, consider growing bitter gourd in raised beds or containers.
How often should I water bitter gourd plants?
Water bitter gourd plants regularly, especially during hot, dry weather. Keep the soil consistently moist but not waterlogged. Water deeply at the base of the plants, avoiding wetting the foliage, which can increase the risk of fungal diseases. Check the soil moisture regularly and adjust your watering schedule accordingly. During periods of heavy rainfall, you may need to reduce watering.
How do I fertilize bitter gourd plants?
Bitter gourd plants are heavy feeders and benefit from regular fertilization. Start by incorporating a slow-release fertilizer into the soil at planting time. Throughout the growing season, feed your plants with a balanced liquid fertilizer every 2-3 weeks. Choose a fertilizer that is high in phosphorus and potassium, which promote flowering and fruit development. Avoid over-fertilizing, as this can lead to excessive vegetative growth and reduced fruit production.
How do I control pests and diseases in bitter gourd plants?
Bitter gourd plants can be susceptible to various pests and diseases, including aphids, spider mites, squash bugs, and powdery mildew. To prevent pest and disease problems, practice good garden hygiene, such as removing weeds and debris from around the plants. Inspect your plants regularly for signs of pests or diseases and take action promptly. Use organic pest control methods, such as insecticidal soap, neem oil, or diatomaceous earth, to control pests. For fungal diseases, use a copper-based fungicide or a baking soda solution.
How do I trellis bitter gourd vines?
Bitter gourd vines are vigorous climbers and require a trellis or other support structure to grow properly. Install a sturdy trellis, fence, or arbor near your plants to provide support for the vines. As the vines grow, train them to climb the trellis by gently guiding them and tying them to the support structure. Prune the vines regularly to encourage branching and fruit production.
When is bitter gourd ready to harvest?
Bitter gourd is typically ready to harvest about 2-3 months after planting. The fruits should be firm, green, and slightly immature. The size and shape of the fruits will vary depending on the variety. Harvest the fruits when they are still tender and before they turn yellow or orange, as they will become more bitter as they mature. Use a sharp knife or pruning shears to cut the fruits from the vine, leaving a short stem attached.
How do I store bitter gourd?
Store freshly harvested bitter gourd in the refrigerator for up to a week. Wrap the fruits in a plastic bag or container to prevent them from drying out. Bitter gourd can also be frozen for longer storage. To freeze bitter gourd, blanch the slices in boiling water for 2-3 minutes, then transfer them to an ice bath to cool. Drain the slices and pack them into freezer bags or containers.
Can I grow bitter gourd from seeds saved from store-bought fruits?
While you can attempt to grow bitter gourd from seeds saved from store-bought fruits, the results may not be consistent. Store-bought fruits may be hybrids, which means that their seeds may not produce plants that are true to type. Additionally, the seeds may not be viable or may carry diseases. For best results, purchase seeds from a reputable seed supplier.


Leave a Comment