
Grow Bitter Gourds Abundantly and unlock the secrets to a thriving, bountiful harvest right in your own backyard! Have you ever dreamt of plucking fresh, vibrant bitter gourds straight from the vine, knowing exactly where they came from and how they were grown? Well, dream no more! This DIY guide is your passport to achieving just that, even if you’re a complete beginner.
Bitter gourd, also known as karela, isn’t just a vegetable; it’s a culinary and medicinal staple with a rich history, particularly in Asian cultures. For centuries, it’s been revered for its unique flavor profile and impressive health benefits. But let’s be honest, growing it can sometimes feel like a challenge. That’s where these simple yet effective DIY tricks come in.
Why do you need these hacks? Because store-bought bitter gourds can be expensive and often lack the freshness and flavor of homegrown produce. Plus, knowing how to grow bitter gourds abundantly allows you to control the growing process, ensuring you’re consuming healthy, pesticide-free vegetables. I’m going to share my tried-and-true methods for maximizing your yield, tackling common problems, and enjoying a continuous supply of this nutritious and delicious vegetable. Get ready to transform your garden into a bitter gourd paradise!
Growing an Abundance of Bitter Gourds Yourself: Your DIY Guide
I love bitter gourds! They are not only super healthy but also incredibly versatile in the kitchen. But instead of always buying them at the supermarket, I decided to grow them myself. And I can tell you, it’s not as hard as you might think! With a little patience and the right tips, you too can achieve a bountiful harvest. Here is my detailed DIY guide to help you grow an abundance of bitter gourds:
What you need:
- Bitter gourd seeds (preferably from a trusted source)
- Seed starter pots or trays
- Seed starting mix
- Garden soil (well-draining and nutrient-rich)
- Compost or organic fertilizer
- Stakes or a trellis
- Watering can or garden hose
- Pruning shears
- Mulch (optional)
Preparation: The Key to Success
Before we start, good preparation is the be-all and end-all. Bitter gourds are a bit picky about their environment, so we should give them the best possible start.
- Choose your seeds: Make sure to get high-quality seeds from a reputable source. This increases the chances of successful germination and healthy plants.
- Location selection: Bitter gourds love the sun! Choose a location in your garden that receives at least 6-8 hours of direct sunlight per day. The soil should also be well-draining to prevent waterlogging.
- Prepare the soil: Bitter gourds prefer nutrient-rich soil. Loosen the soil thoroughly and mix in compost or organic fertilizer. This ensures good drainage and provides the plants with essential nutrients.
Step-by-Step Guide: From Seed to Plant
Now let’s get down to the nitty-gritty! Here is a detailed guide on how to successfully grow your bitter gourds:
- Prepare the seeds (optional, but recommended): To speed up germination, you can prepare the seeds before planting. Place the seeds in lukewarm water for 24 hours. This helps to soften the hard seed coat.
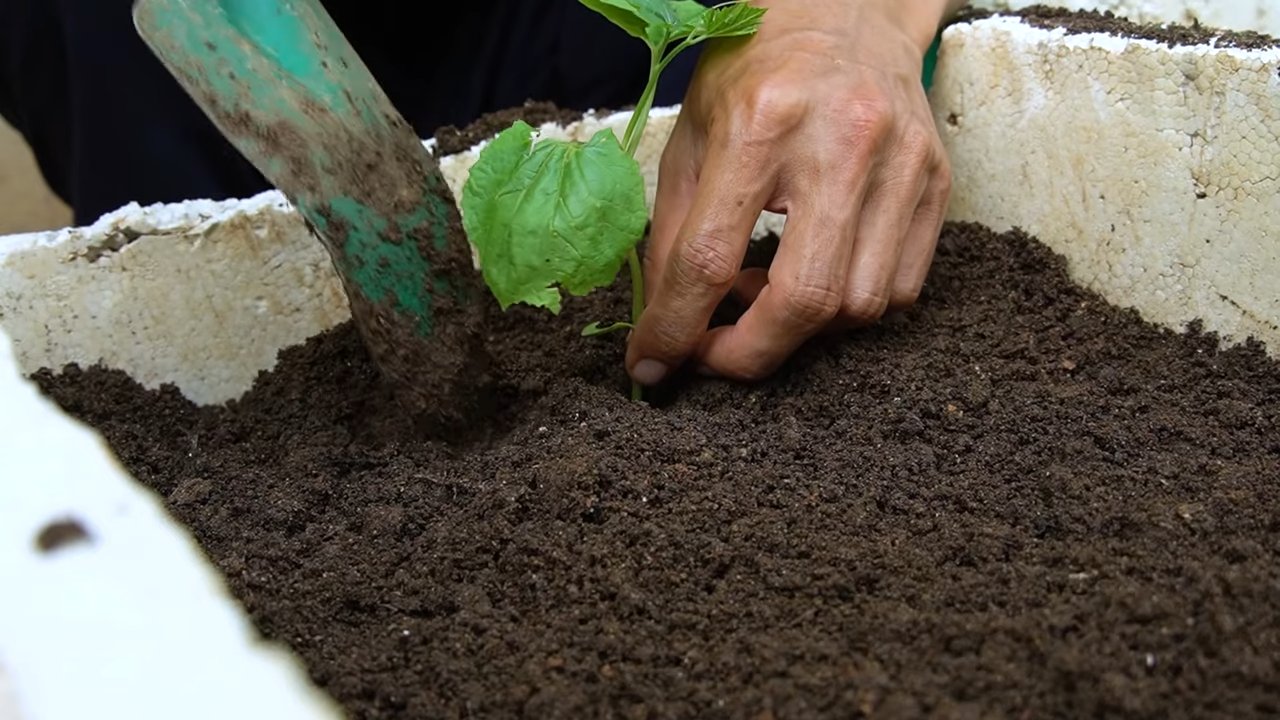
- Sowing in starter pots: Fill the starter pots with seed starting mix. Lightly press the soil and sow the seeds about 1-2 cm (0.4-0.8 inches) deep. Cover the seeds with soil and water them gently.
- Create the right environment: Place the starter pots in a warm and bright location. A temperature of 25-30°C (77-86°F) is ideal for germination. You can also cover the pots with plastic wrap to increase humidity. However, be sure to ventilate regularly to prevent mold.
- Patience is required: Germination usually takes 7-14 days. Keep the soil moist, but not wet. Once the seedlings have developed a few leaves, you can transplant them into larger pots.
- Transplanting outdoors: Once temperatures rise and there is no more risk of frost (usually mid-May), you can transplant the bitter gourds outdoors. Choose a sunny location with well-draining soil.
- Mind the spacing: Plant the bitter gourds about 60-90 cm (24-35 inches) apart. This gives them enough space to grow and vine.
- Install a trellis: Bitter gourds are climbing plants and need a support to hold onto. Install stakes, a trellis, or a frame near the plants.
- Water regularly: Bitter gourds need regular watering, especially during the hot summer months. It’s best to water the plants early in the morning or late in the evening to avoid evaporation.
- Don’t forget to fertilize: Fertilize the bitter gourds every 2-3 weeks with an organic fertilizer or compost. This provides them with essential nutrients and promotes growth.
- Mulching (optional): A layer of mulch around the plants helps to retain moisture in the soil and suppress weeds. You can use straw, wood chips, or grass clippings as mulch.
Care: So Your Bitter Gourds Thrive
The work isn’t over yet! To achieve a bountiful harvest, regular care is essential.
- Regular watering: Make sure the soil is always slightly moist. However, avoid waterlogging, as this can lead to root rot.
- Fertilizing: Fertilize the plants regularly with an organic fertilizer or compost. This provides them with essential nutrients and promotes growth.
- Trellising: Regularly guide the shoots of the bitter gourds along the trellis. This ensures good air circulation and prevents the plants from lying on the ground.
- Pests and diseases: Watch for signs of pests or diseases. Aphids, spider mites, and mildew can affect bitter gourds. If necessary, you can use organic pesticides.
- Pruning (optional): Some gardeners remove side shoots (pruning) to concentrate the plant’s energy on fruit production. Whether you want to prune is a matter of personal preference.
The Harvest: The Reward for Your Effort
The time has finally come! The bitter gourds are ripe and can be harvested.
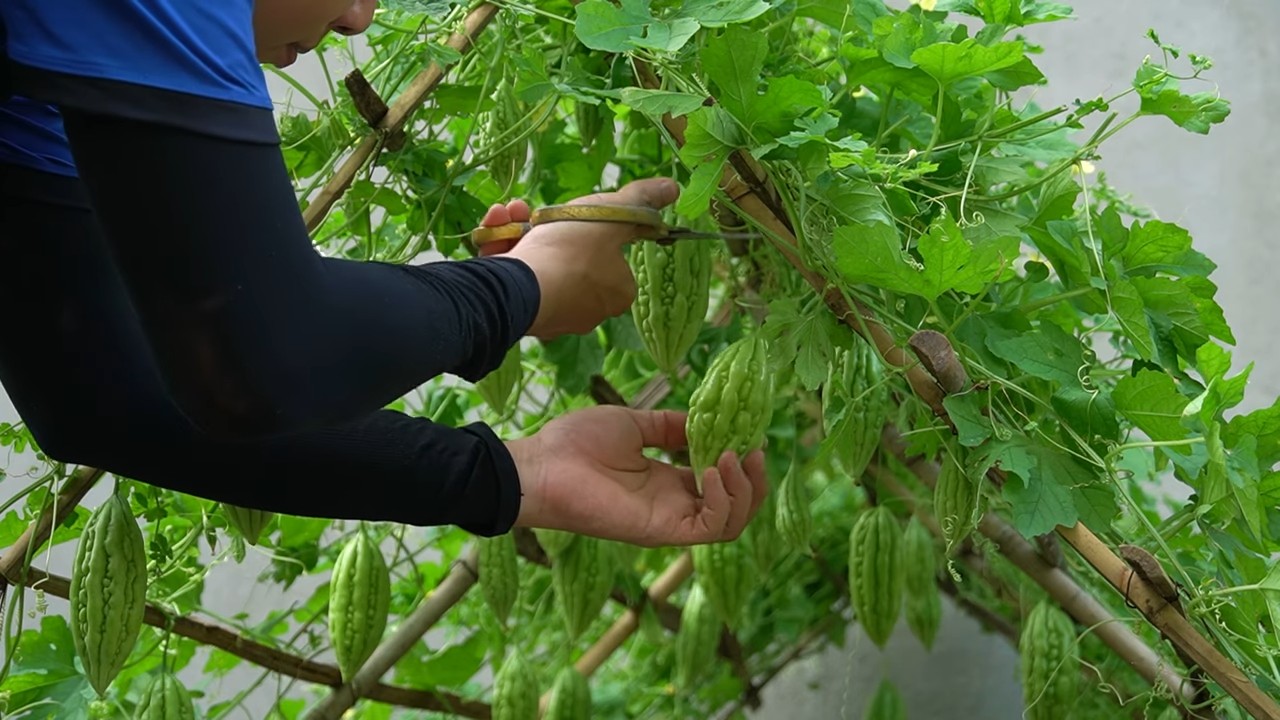
- Recognizing ripeness: Bitter gourds are ripe when they have a bright green color and are easily detached from the stem.
- Harvesting: Cut the bitter gourds with pruning shears. Be careful not to damage the stem.
- Harvest regularly: Harvest the bitter gourds regularly to stimulate fruit production. The more you harvest, the more fruits will grow back.
Common Problems and Solutions:
- Yellow leaves: Yellow leaves can be a sign of nutrient deficiency, overwatering, or pest infestation. Check the soil moisture, fertilize the plants, and look for pests.
- No fruit: If your bitter gourds are not producing fruit, it could be due to a lack of pollination. Bitter gourds are monoecious, meaning they have male and female flowers on the same plant. You can assist with pollination by dabbing the male flowers with a brush and transferring the pollen to the female flowers.
- Pests: Aphids, spider mites, and mildew can affect bitter gourds. If necessary, you can use organic pesticides.
Additional Tips for a Bountiful Harvest:
- Sunny location: Bitter gourds love the sun! Make sure they receive at least 6-8 hours of direct sunlight per day.
- Good drainage: Bitter gourds do not tolerate waterlogging. Make sure the soil is well-draining.
- Regular watering: Bitter gourds need regular water, especially during the hot summer months.
- Fertilizing: Fertilize the plants regularly with an organic fertilizer or compost.
- Trellis: Bitter gourds are climbing plants and need a support to hold onto.
- Pests and diseases: Watch for signs of pests or diseases and treat them if necessary.
With these tips and tricks, you too can grow an abundance of bitter gourds. Good luck and a bountiful harvest! And don’t forget to tell me about your experiences! I’m excited to see how it goes for you.
Conclusion
So, there you have it! Mastering the art of abundant bitter gourd cultivation is within your reach, and it all starts with understanding and implementing these simple yet effective DIY tricks. We’ve explored how to optimize soil conditions, create the perfect support system, and, most importantly, implement a strategic watering and feeding schedule tailored to the specific needs of your bitter gourd plants.
Why is this a must-try? Because store-bought bitter gourds simply can’t compare to the vibrant flavor and nutritional value of those you’ve nurtured yourself. Imagine the satisfaction of harvesting a basket overflowing with these healthful vegetables, knowing you played an integral role in their growth. Beyond the taste, you’ll be reducing your reliance on commercially grown produce, minimizing your environmental impact, and gaining a deeper connection to the food you eat.
But the benefits don’t stop there. Growing your own bitter gourds allows for experimentation and customization. Feel free to explore different varieties, from the long, slender types to the shorter, more bulbous ones. Consider companion planting with beneficial herbs and flowers to attract pollinators and deter pests naturally. You can even try different training methods to maximize space and sunlight exposure.
Don’t be afraid to experiment! For instance, if you live in a particularly hot climate, consider providing afternoon shade to prevent sunscald. If your soil is naturally alkaline, amend it with sulfur to lower the pH. The beauty of gardening lies in its adaptability, so tailor these techniques to your specific environment and growing conditions.
We’ve focused on a holistic approach to growing bitter gourds, emphasizing sustainable practices and natural solutions. This not only benefits your plants but also contributes to a healthier ecosystem. By avoiding harsh chemicals and embracing organic methods, you’re creating a thriving garden that supports biodiversity and promotes long-term soil health.
Remember, consistent care and attention are key to success. Regularly monitor your plants for signs of pests or diseases, and address any issues promptly. Stay vigilant with your watering and feeding schedule, adjusting as needed based on weather conditions and plant growth. And most importantly, don’t give up! Even experienced gardeners encounter challenges, but with perseverance and a willingness to learn, you’ll be rewarded with a bountiful harvest.
We are confident that by implementing these DIY tricks, you’ll be well on your way to enjoying a prolific yield of delicious and nutritious bitter gourds. So, grab your gardening gloves, prepare your soil, and get ready to embark on this rewarding journey.
Now, we want to hear from you! Have you tried any of these techniques before? What challenges have you faced when growing bitter gourds? What successes have you celebrated? Share your experiences, tips, and photos in the comments below. Let’s create a community of passionate gardeners who are dedicated to mastering the art of growing bitter gourds abundantly. Your insights could inspire and help others achieve their gardening goals. Let’s cultivate a thriving community of bitter gourd enthusiasts! We encourage you to share your unique approaches to **grow bitter gourds** and contribute to our collective knowledge.
Frequently Asked Questions (FAQ)
1. What is the best time of year to plant bitter gourd seeds?
The ideal time to plant bitter gourd seeds is during the late spring or early summer, after the last frost has passed and the soil has warmed up to at least 65°F (18°C). Bitter gourds thrive in warm weather and require a long growing season of at least 90-120 days. If you live in a region with a shorter growing season, you can start the seeds indoors 4-6 weeks before the last expected frost and transplant them outdoors once the weather is suitable.
2. What type of soil is best for growing bitter gourds?
Bitter gourds prefer well-drained, fertile soil that is rich in organic matter. The ideal soil pH is between 6.0 and 6.8. Before planting, amend the soil with compost, well-rotted manure, or other organic amendments to improve drainage, fertility, and water retention. Avoid heavy clay soils, as they can become waterlogged and hinder root growth. If you have clay soil, consider adding sand or perlite to improve drainage.
3. How often should I water my bitter gourd plants?
Bitter gourd plants require consistent moisture, especially during hot and dry weather. Water deeply and regularly, aiming to keep the soil consistently moist but not waterlogged. The frequency of watering will depend on the weather conditions, soil type, and plant size. As a general rule, water deeply 2-3 times per week, or more often during periods of intense heat. Use a soaker hose or drip irrigation system to deliver water directly to the roots and minimize water loss through evaporation. Avoid overhead watering, as it can increase the risk of fungal diseases.
4. What type of fertilizer should I use for bitter gourds?
Bitter gourds are heavy feeders and benefit from regular fertilization. Start with a balanced fertilizer (e.g., 10-10-10) at planting time, and then switch to a fertilizer that is higher in phosphorus and potassium during the flowering and fruiting stages (e.g., 5-10-10). You can also supplement with organic fertilizers such as compost tea, fish emulsion, or seaweed extract. Apply fertilizer according to the manufacturer’s instructions, and avoid over-fertilizing, as this can lead to excessive vegetative growth and reduced fruit production.
5. How do I control pests and diseases on my bitter gourd plants?
Bitter gourds can be susceptible to various pests and diseases, including aphids, squash bugs, cucumber beetles, powdery mildew, and downy mildew. To prevent pest and disease problems, practice good garden hygiene, such as removing weeds and debris, providing adequate air circulation, and avoiding overhead watering. Monitor your plants regularly for signs of pests or diseases, and take action promptly if you notice any problems. Use organic pest control methods such as insecticidal soap, neem oil, or diatomaceous earth to control pests. For fungal diseases, use a copper-based fungicide or a biofungicide.
6. How do I know when my bitter gourds are ready to harvest?
Bitter gourds are typically ready to harvest when they are about two-thirds of their mature size and still green. The exact size and color will vary depending on the variety. The skin should be firm and smooth, and the flesh should be crisp and slightly bitter. Overripe bitter gourds will turn yellow or orange and become more bitter. Harvest bitter gourds by cutting them from the vine with a sharp knife or pruning shears. Handle them carefully to avoid bruising.
7. Can I grow bitter gourds in containers?
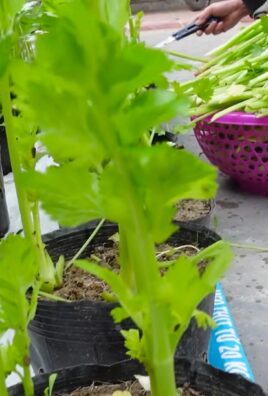
Yes, bitter gourds can be grown in containers, but you will need to choose a large container that is at least 18 inches in diameter and depth. Use a well-draining potting mix and provide a sturdy trellis or support system for the vines to climb. Water and fertilize regularly, as container-grown plants tend to dry out and deplete nutrients more quickly than those grown in the ground. Choose a sunny location that receives at least 6-8 hours of direct sunlight per day.
8. How can I reduce the bitterness of bitter gourds?
Bitter gourds are known for their distinctive bitter taste, but there are several ways to reduce the bitterness. One method is to soak the sliced bitter gourd in salted water for at least 30 minutes before cooking. This helps to draw out some of the bitter compounds. Another method is to blanch the bitter gourd in boiling water for a few minutes before cooking. You can also remove the seeds and pith, as these are the most bitter parts of the fruit. Cooking bitter gourds with acidic ingredients such as vinegar or lemon juice can also help to reduce the bitterness.
9. What are some popular ways to cook bitter gourds?
Bitter gourds can be cooked in a variety of ways, including stir-frying, steaming, baking, and stuffing. They are often used in Asian cuisines, such as Indian, Chinese, and Filipino dishes. Some popular recipes include bitter gourd curry, bitter gourd stir-fry with eggs, stuffed bitter gourd, and bitter gourd soup. Bitter gourds can also be juiced or added to smoothies for their health benefits.
10. Where can I find bitter gourd seeds?
Bitter gourd seeds can be found at most garden centers, nurseries, and online seed retailers. Look for reputable seed companies that offer high-quality seeds and a wide selection of varieties. You can also save seeds from your own bitter gourd plants, but be aware that the resulting plants may not be true to type if the parent plants were cross-pollinated.
Leave a Comment