
Grow Cauliflower Backyard – sounds intimidating, right? But trust me, it’s more achievable (and rewarding!) than you might think. Forget those pricey, sometimes lackluster, heads of cauliflower from the grocery store. Imagine strolling into your own backyard and harvesting a crisp, fresh, and perfectly formed cauliflower, ready to be transformed into a delicious meal.
For centuries, cauliflower has been a staple in gardens and kitchens worldwide. Originating in the Mediterranean, this cruciferous vegetable has been cultivated and enjoyed for its unique flavor and nutritional benefits. From Roman emperors to modern-day foodies, cauliflower has consistently held a place of honor on the table.
But why should you bother with the effort to grow cauliflower backyard? Well, beyond the satisfaction of growing your own food, you’ll have access to varieties you simply won’t find in stores. Plus, you’ll know exactly what went into growing your cauliflower – no mystery pesticides or questionable farming practices. In this article, I’m going to share some simple, yet effective, DIY tricks and hacks that will help you cultivate a thriving cauliflower patch, even if you’re a complete beginner. We’ll cover everything from soil preparation to pest control, ensuring you have all the knowledge you need to enjoy a bountiful harvest. Let’s get our hands dirty!
Growing Cauliflower in Your Backyard: A Comprehensive DIY Guide
Alright, fellow gardening enthusiasts! Today, we’re diving into the wonderful world of cauliflower cultivation. Growing your own cauliflower might seem intimidating, but trust me, with a little patience and this guide, you’ll be harvesting beautiful, creamy heads in no time. I’m going to walk you through every step, from choosing the right variety to dealing with pesky pests. Let’s get our hands dirty!
Choosing the Right Cauliflower Variety
Before we even think about planting, we need to pick the perfect cauliflower variety for our garden. Different varieties have different maturity times and are suited for different climates. Here’s a breakdown to help you decide:
* Consider your climate: Are you in a warm or cool climate? Some varieties are more heat-tolerant than others.
* Think about maturity time: Do you want to harvest early, mid-season, or late? This will depend on your growing season length.
* Explore different colors: While white cauliflower is the most common, you can also find purple, orange, and green varieties! They add a fun pop of color to your garden and your plate.
Here are a few popular and reliable cauliflower varieties:
* Snowball Y Improved: A classic, early-maturing white variety.
* Cheddar: An orange variety that’s packed with Vitamin A.
* Graffiti: A stunning purple variety that adds visual interest.
* Romanesco: A unique, fractal-shaped green variety with a nutty flavor.
Preparing the Soil
Cauliflower is a heavy feeder, meaning it needs nutrient-rich soil to thrive. Proper soil preparation is crucial for a successful harvest.
* Soil Testing: Before anything else, test your soil’s pH. Cauliflower prefers a pH between 6.0 and 7.0. You can purchase a soil testing kit at most garden centers or send a sample to your local agricultural extension office.
* Amending the Soil: Based on your soil test results, amend the soil accordingly.
* If your soil is too acidic (pH below 6.0), add lime to raise the pH.
* If your soil is too alkaline (pH above 7.0), add sulfur to lower the pH.
* Adding Organic Matter: Incorporate plenty of organic matter, such as compost, well-rotted manure, or leaf mold. This will improve soil drainage, aeration, and fertility. Aim for at least 4 inches of organic matter worked into the top 12 inches of soil.
* Fertilizing: Cauliflower needs a good supply of nitrogen, phosphorus, and potassium. Apply a balanced fertilizer (e.g., 10-10-10) according to the package directions. You can also use organic fertilizers like bone meal (for phosphorus) and kelp meal (for potassium).
Starting Cauliflower Seeds Indoors (Recommended)
Starting cauliflower seeds indoors gives you a head start on the growing season, especially if you live in a cooler climate.
1. Timing: Start your seeds 4-6 weeks before the last expected frost in your area.
2. Materials: You’ll need seed starting trays or small pots, seed starting mix, cauliflower seeds, and a spray bottle.
3. Sowing the Seeds: Fill the trays or pots with seed starting mix. Moisten the mix thoroughly. Sow the seeds about 1/4 inch deep. Gently cover the seeds with more mix.
4. Watering: Water the seeds gently with a spray bottle to avoid disturbing them. Keep the soil consistently moist but not waterlogged.
5. Providing Light: Place the trays or pots under grow lights or in a sunny window. If using a window, rotate the trays regularly to ensure even light exposure.
6. Temperature: Maintain a temperature of around 65-70°F (18-21°C) for optimal germination.
7. Hardening Off: Before transplanting the seedlings outdoors, you need to “harden them off.” This process gradually acclimates the seedlings to outdoor conditions. Start by placing the seedlings outdoors in a sheltered location for a few hours each day, gradually increasing the amount of time they spend outside over the course of a week.
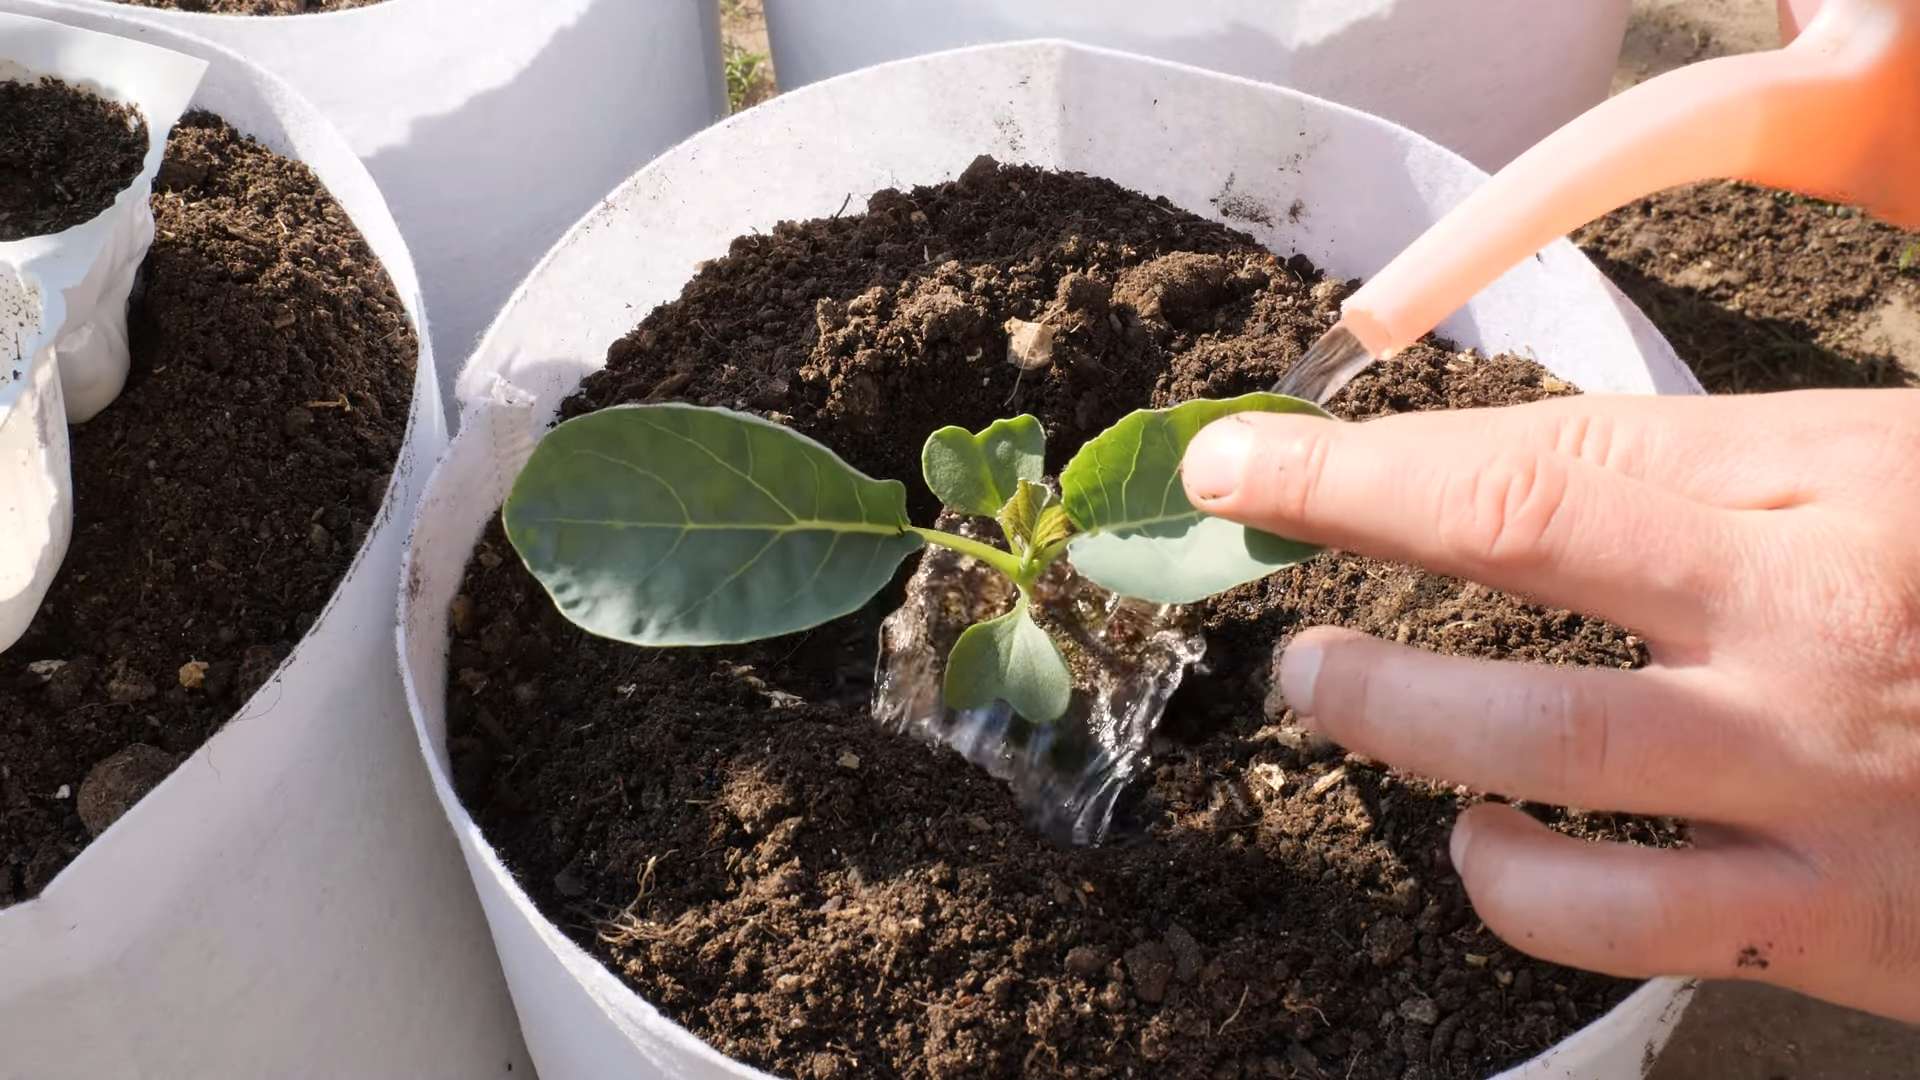
Transplanting Cauliflower Seedlings Outdoors
Once the danger of frost has passed and your seedlings have been hardened off, it’s time to transplant them into your garden.
1. Choosing a Location: Select a sunny location that receives at least 6 hours of sunlight per day.
2. Spacing: Space the seedlings 18-24 inches apart in rows that are 24-36 inches apart. This will give them enough room to grow and mature.
3. Planting: Dig a hole that is slightly larger than the root ball of the seedling. Gently remove the seedling from its tray or pot and place it in the hole. Backfill with soil and gently firm it around the base of the plant.
4. Watering: Water the seedlings thoroughly after transplanting.
5. Mulching: Apply a layer of mulch around the plants to help retain moisture, suppress weeds, and regulate soil temperature. Organic mulches like straw, wood chips, or shredded leaves are excellent choices.
Caring for Your Cauliflower Plants
Now that your cauliflower plants are in the ground, it’s important to provide them with the care they need to thrive.
* Watering: Cauliflower needs consistent moisture, especially during head formation. Water deeply and regularly, aiming for about 1-2 inches of water per week. Avoid overhead watering, as this can promote fungal diseases. Drip irrigation is an excellent option.
* Fertilizing: Side-dress your cauliflower plants with a nitrogen-rich fertilizer every 2-3 weeks. This will help promote healthy growth and head development. You can use a commercial fertilizer or an organic option like fish emulsion or compost tea.
* Weeding: Keep the area around your cauliflower plants free of weeds. Weeds compete with cauliflower for nutrients and water. Hand-pull weeds regularly or use a hoe to cultivate the soil.
* Blanching (for White Varieties): Blanching is the process of covering the developing cauliflower head to prevent it from turning yellow or brown. This is only necessary for white varieties.
1. When the head is about 2-3 inches in diameter, gather the outer leaves around the head and secure them with twine, rubber bands, or clothespins.
2. Check the head regularly and re-tie the leaves as needed.
3. Blanching typically takes about 4-7 days.
Dealing with Pests and Diseases
Cauliflower is susceptible to a few common pests and diseases. Here’s how to deal with them:
* Cabbage Worms: These green caterpillars can quickly devour cauliflower leaves.
* Prevention: Cover your plants with row covers to prevent cabbage moths from laying eggs.
* Control: Hand-pick the worms off the plants. You can also use Bacillus thuringiensis (Bt), a biological insecticide that is effective against cabbage worms.
* Aphids: These small, sap-sucking insects can weaken cauliflower plants.
* Control: Spray the plants with a strong stream of water to dislodge the aphids. You can also use insecticidal soap or neem oil.
* Clubroot: This fungal disease causes swollen, distorted roots and stunted growth.
* Prevention: Plant cauliflower in well-drained soil. Rotate your crops regularly.
* Control: There is no cure for clubroot. Remove and destroy infected plants. Amend the soil with lime to raise the pH.
* Black Rot: This bacterial disease causes yellow, V-shaped lesions on the leaves.
* Prevention: Plant disease-resistant varieties. Avoid overhead watering.
* Control: Remove and destroy infected leaves. Spray the plants with a copper-based fungicide.
Harvesting Your Cauliflower
Harvest time is the most rewarding part of growing cauliflower!
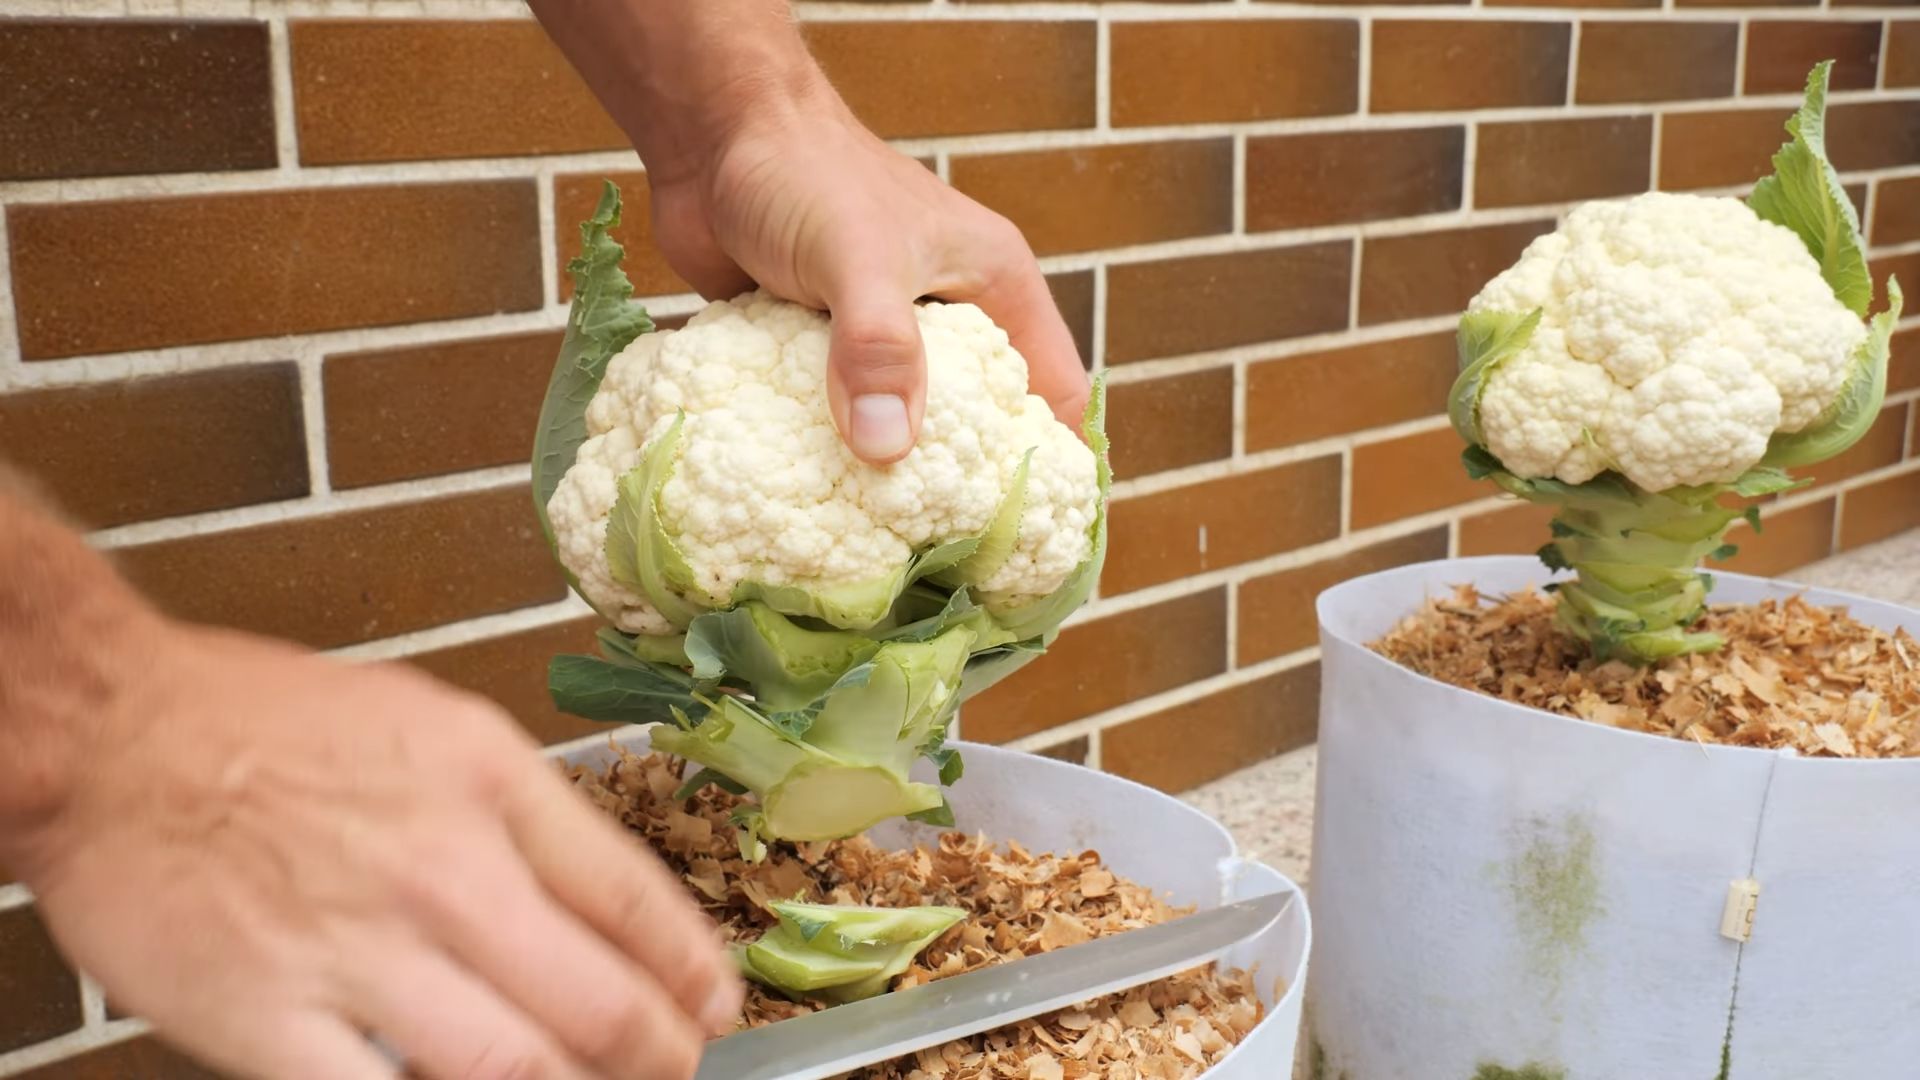
1. Timing: Harvest your cauliflower when the head is firm, compact, and about 6-8 inches in diameter. The exact timing will depend on the variety you are growing.
2. Cutting: Use a sharp knife to cut the head from the plant, leaving a few inches of stem attached.
3. Storage: Store cauliflower in the refrigerator for up to a week.
Troubleshooting Common Problems
Even with the best care, you might encounter some problems while growing cauliflower. Here are a few common issues and how to address them:
* Small Heads: This can be caused by insufficient nutrients, water, or sunlight. Make sure your plants are getting enough of all three.
* Loose Heads: This can be caused by hot weather or inconsistent watering. Try to provide shade during the hottest part of the day and water regularly.
* Yellowing Heads: This
Conclusion
So, there you have it! Growing cauliflower in your backyard isn’t just a gardening project; it’s a rewarding journey that culminates in the freshest, most flavorful cauliflower you’ve ever tasted. Forget the bland, pre-packaged heads from the grocery store. With a little patience, dedication, and the techniques we’ve discussed, you can cultivate vibrant, healthy cauliflower right outside your door.
Why is this DIY trick a must-try? Because it empowers you to control the entire process, from seed to table. You know exactly what goes into your food – no mystery pesticides or long-distance transportation. Plus, the satisfaction of harvesting your own homegrown vegetables is simply unparalleled. Imagine the pride you’ll feel serving a creamy cauliflower soup or a perfectly roasted head of cauliflower, knowing you nurtured it from a tiny seed.
But the adventure doesn’t stop there! Feel free to experiment with different varieties of cauliflower. Purple cauliflower adds a splash of color to your dishes, while Romanesco cauliflower offers a unique, fractal-like appearance and a slightly nutty flavor. You can also try different growing methods, such as container gardening if you have limited space, or companion planting to deter pests naturally. Consider adding herbs like rosemary or thyme nearby to naturally deter cabbage moths.
Don’t be intimidated if you’re a beginner gardener. Growing cauliflower, like any skill, requires practice and learning. There will be challenges along the way, but the rewards are well worth the effort. Embrace the process, learn from your mistakes, and celebrate your successes.
We encourage you to take the plunge and try growing cauliflower in your backyard. It’s a fantastic way to connect with nature, eat healthier, and impress your friends and family with your gardening prowess. Once you’ve harvested your first head of homegrown cauliflower, we’d love to hear about your experience! Share your tips, tricks, and photos in the comments below. Let’s build a community of cauliflower enthusiasts and inspire others to discover the joys of homegrown produce. Remember, the best cauliflower is the cauliflower you grow yourself!
Frequently Asked Questions (FAQ)
Q: How much space do I need to grow cauliflower?
A: Cauliflower plants typically need about 18-24 inches of space between them to allow for proper growth and air circulation. If you’re planting in rows, leave about 30-36 inches between rows. This spacing ensures that each plant has enough room to develop a healthy head and prevents overcrowding, which can lead to disease. If you’re growing in containers, choose a pot that is at least 12 inches in diameter and depth for each plant. Remember to consider the mature size of the specific cauliflower variety you’re growing, as some varieties may require more space than others.
Q: What kind of soil is best for growing cauliflower?
A: Cauliflower thrives in well-drained, fertile soil that is rich in organic matter. The ideal soil pH is between 6.0 and 7.0. Before planting, amend your soil with compost, aged manure, or other organic materials to improve its structure and fertility. This will provide the cauliflower plants with the nutrients they need to grow strong and healthy. If your soil is heavy clay, consider adding sand or perlite to improve drainage. A soil test can help you determine the pH and nutrient levels of your soil, allowing you to make necessary adjustments before planting.
Q: How often should I water my cauliflower plants?
A: Cauliflower plants need consistent moisture, especially during head formation. Water deeply and regularly, aiming to keep the soil consistently moist but not waterlogged. A good rule of thumb is to water when the top inch of soil feels dry to the touch. During hot, dry weather, you may need to water more frequently. Mulching around the plants can help retain moisture in the soil and reduce the need for frequent watering. Avoid overhead watering, as this can increase the risk of fungal diseases. Instead, water at the base of the plants.
Q: How do I protect my cauliflower from pests?
A: Cauliflower is susceptible to several pests, including cabbage worms, aphids, and flea beetles. To protect your plants, consider using row covers to create a physical barrier against pests. Regularly inspect your plants for signs of infestation and take action promptly. Handpicking pests, such as cabbage worms, can be effective for small infestations. You can also use organic insecticides, such as Bacillus thuringiensis (Bt) for cabbage worms or insecticidal soap for aphids. Companion planting with herbs like rosemary, thyme, or marigolds can also help deter pests. Crop rotation can also help prevent pest and disease buildup in the soil.
Q: When is the best time to harvest cauliflower?
A: Cauliflower is typically ready to harvest when the head is firm, compact, and about 6-8 inches in diameter. The exact timing will depend on the variety and growing conditions. Check the seed packet or plant tag for specific maturity dates. To harvest, use a sharp knife to cut the head from the plant, leaving a few leaves attached to protect the head. Harvest in the morning when the plant is cool. If you notice the head starting to separate or become loose, harvest it immediately, as this indicates that it is overripe.
Q: What causes cauliflower heads to turn yellow or brown?
A: Several factors can cause cauliflower heads to turn yellow or brown, including sun exposure, nutrient deficiencies, and disease. To prevent sunscald, which can cause yellowing, blanch the head by tying the outer leaves together over the developing head when it reaches about 3 inches in diameter. This will protect it from direct sunlight. Ensure that your plants are receiving adequate nutrients, especially nitrogen and boron. Soil testing can help identify any nutrient deficiencies. Diseases such as black rot can also cause discoloration. Practice good sanitation and crop rotation to prevent disease.
Q: Can I grow cauliflower in containers?
A: Yes, you can successfully grow cauliflower in containers, especially if you have limited space. Choose a container that is at least 12 inches in diameter and depth for each plant. Use a high-quality potting mix that is well-draining and rich in organic matter. Water regularly and fertilize every few weeks with a balanced fertilizer. Container-grown cauliflower may require more frequent watering and fertilization than plants grown in the ground. Place the container in a location that receives at least 6 hours of sunlight per day.
Q: How do I blanch cauliflower?
A: Blanching cauliflower involves protecting the developing head from direct sunlight to prevent it from turning yellow or brown. When the head reaches about 3 inches in diameter, gently pull the outer leaves together over the head and secure them with twine, rubber bands, or clothespins. Be careful not to damage the head. Check the head regularly and harvest when it is firm and compact. Blanching is especially important for white cauliflower varieties, as they are more susceptible to sunscald.
Q: What are some common problems when growing cauliflower and how can I fix them?
A: Some common problems include buttoning (small heads), bolting (premature flowering), and pest infestations. Buttoning can be caused by nutrient deficiencies, stress, or transplant shock. Ensure that your plants are receiving adequate nutrients and water, and handle transplants carefully. Bolting can be caused by temperature fluctuations or stress. Choose heat-tolerant varieties and provide consistent growing conditions. Address pest infestations promptly using appropriate control methods. Regularly inspect your plants for signs of problems and take action quickly to prevent them from escalating.

Leave a Comment