
Grow Chili Peppers Anywhere – sounds like a superpower, right? Well, maybe not quite, but it’s definitely a skill you can master, and I’m here to show you how! Forget needing acres of land or a sprawling garden; with a few clever tricks and a dash of DIY spirit, you can cultivate these fiery fruits practically anywhere you call home.
Chili peppers have a rich history, dating back thousands of years in the Americas. They weren’t just a food source; they were used in medicine, rituals, and even as currency! Today, they add zest to cuisines worldwide, and growing your own allows you to enjoy that fresh, vibrant flavor whenever you want.
But why bother with the effort? Well, store-bought chili peppers can be expensive, and sometimes, they just don’t pack the punch you’re looking for. Plus, there’s something incredibly satisfying about nurturing a plant from seed to harvest. Imagine the bragging rights when you serve up a dish made with chili peppers you grew yourself! This DIY guide will give you the knowledge to grow chili peppers anywhere, regardless of your space or experience level. We’ll cover everything from choosing the right varieties for container gardening to maximizing your yield with simple, effective techniques. So, grab your gardening gloves, and let’s get started!
Grow Chili Peppers Anywhere: A DIY Guide to Container Gardening
Hey there, fellow chili enthusiasts! Ever dreamt of having a fiery stash of fresh chili peppers right at your fingertips, no matter where you live? Whether you have a sprawling garden or just a sunny balcony, growing chili peppers in containers is totally doable and incredibly rewarding. I’m going to walk you through everything you need to know to get started, from choosing the right peppers to harvesting your spicy bounty. Let’s get growing!
Choosing Your Chili Peppers
First things first, let’s talk peppers! The world of chili peppers is vast and exciting, ranging from mild and sweet to face-meltingly hot. Think about what you like to cook with and how much heat you can handle. Here are a few popular choices for container gardening:
* **Jalapeños:** A classic choice, easy to grow, and perfect for adding a moderate kick to your dishes.
* **Serranos:** A bit hotter than jalapeños, these are great for salsas and sauces.
* **Cayenne Peppers:** These slender peppers pack a punch and are ideal for drying and making chili powder.
* **Habaneros:** If you’re a heat seeker, habaneros are for you! Be warned, they’re seriously spicy.
* **Bell Peppers:** Okay, okay, not technically chili peppers, but they’re still peppers! And they’re delicious and easy to grow in containers.
* **Thai Chili Peppers:** Small but mighty, these peppers add a fiery touch to Asian cuisine.
Consider the size of the mature plant when choosing your peppers. Some varieties can get quite large, so you’ll need a bigger container. Seed packets or plant labels usually provide this information.
Gathering Your Supplies
Okay, now that we’ve picked our peppers, let’s gather the necessary supplies. Here’s what you’ll need:
* **Chili Pepper Seeds or Seedlings:** You can start from seed or buy established seedlings from a garden center. Seedlings will give you a head start.
* **Containers:** Choose containers that are at least 12 inches in diameter and depth. Larger containers are generally better, as they provide more room for the roots to grow. Make sure the containers have drainage holes!
* **Potting Mix:** Use a high-quality potting mix specifically formulated for containers. Avoid using garden soil, as it can compact and drain poorly.
* **Fertilizer:** A balanced fertilizer (e.g., 10-10-10) or a fertilizer specifically formulated for tomatoes and peppers will provide the nutrients your plants need.
* **Watering Can or Hose:** For watering your plants.
* **Trowel or Small Shovel:** For planting.
* **Gloves (Optional):** Especially if you’re handling hot peppers!
* **Plant Markers:** To label your pepper varieties.
* **Stakes or Cages (Optional):** For supporting taller pepper plants.
Planting Your Chili Peppers
Alright, let’s get our hands dirty! This section will cover planting from both seeds and seedlings.
Starting from Seeds
1. **Start Seeds Indoors (6-8 Weeks Before Last Frost):** Chili peppers need a long growing season, so it’s best to start them indoors. Fill small pots or seed trays with seed-starting mix.
2. **Sow Seeds:** Plant the seeds about 1/4 inch deep.
3. **Water Gently:** Water the soil gently to moisten it.
4. **Provide Warmth:** Chili pepper seeds need warmth to germinate. A heat mat can help, or you can place the pots in a warm location.
5. **Keep Soil Moist:** Keep the soil consistently moist, but not soggy.
6. **Provide Light:** Once the seedlings emerge, provide them with plenty of light. A grow light is ideal, but a sunny windowsill can also work.
7. **Harden Off Seedlings:** Before transplanting the seedlings outdoors, you’ll need to harden them off. This means gradually exposing them to outdoor conditions over a period of about a week. Start by placing them outside for an hour or two each day, gradually increasing the amount of time they spend outdoors.
Planting Seedlings
1. **Choose a Sunny Location:** Chili peppers need at least 6-8 hours of sunlight per day.
2. **Fill the Container:** Fill the container with potting mix, leaving a few inches of space at the top.
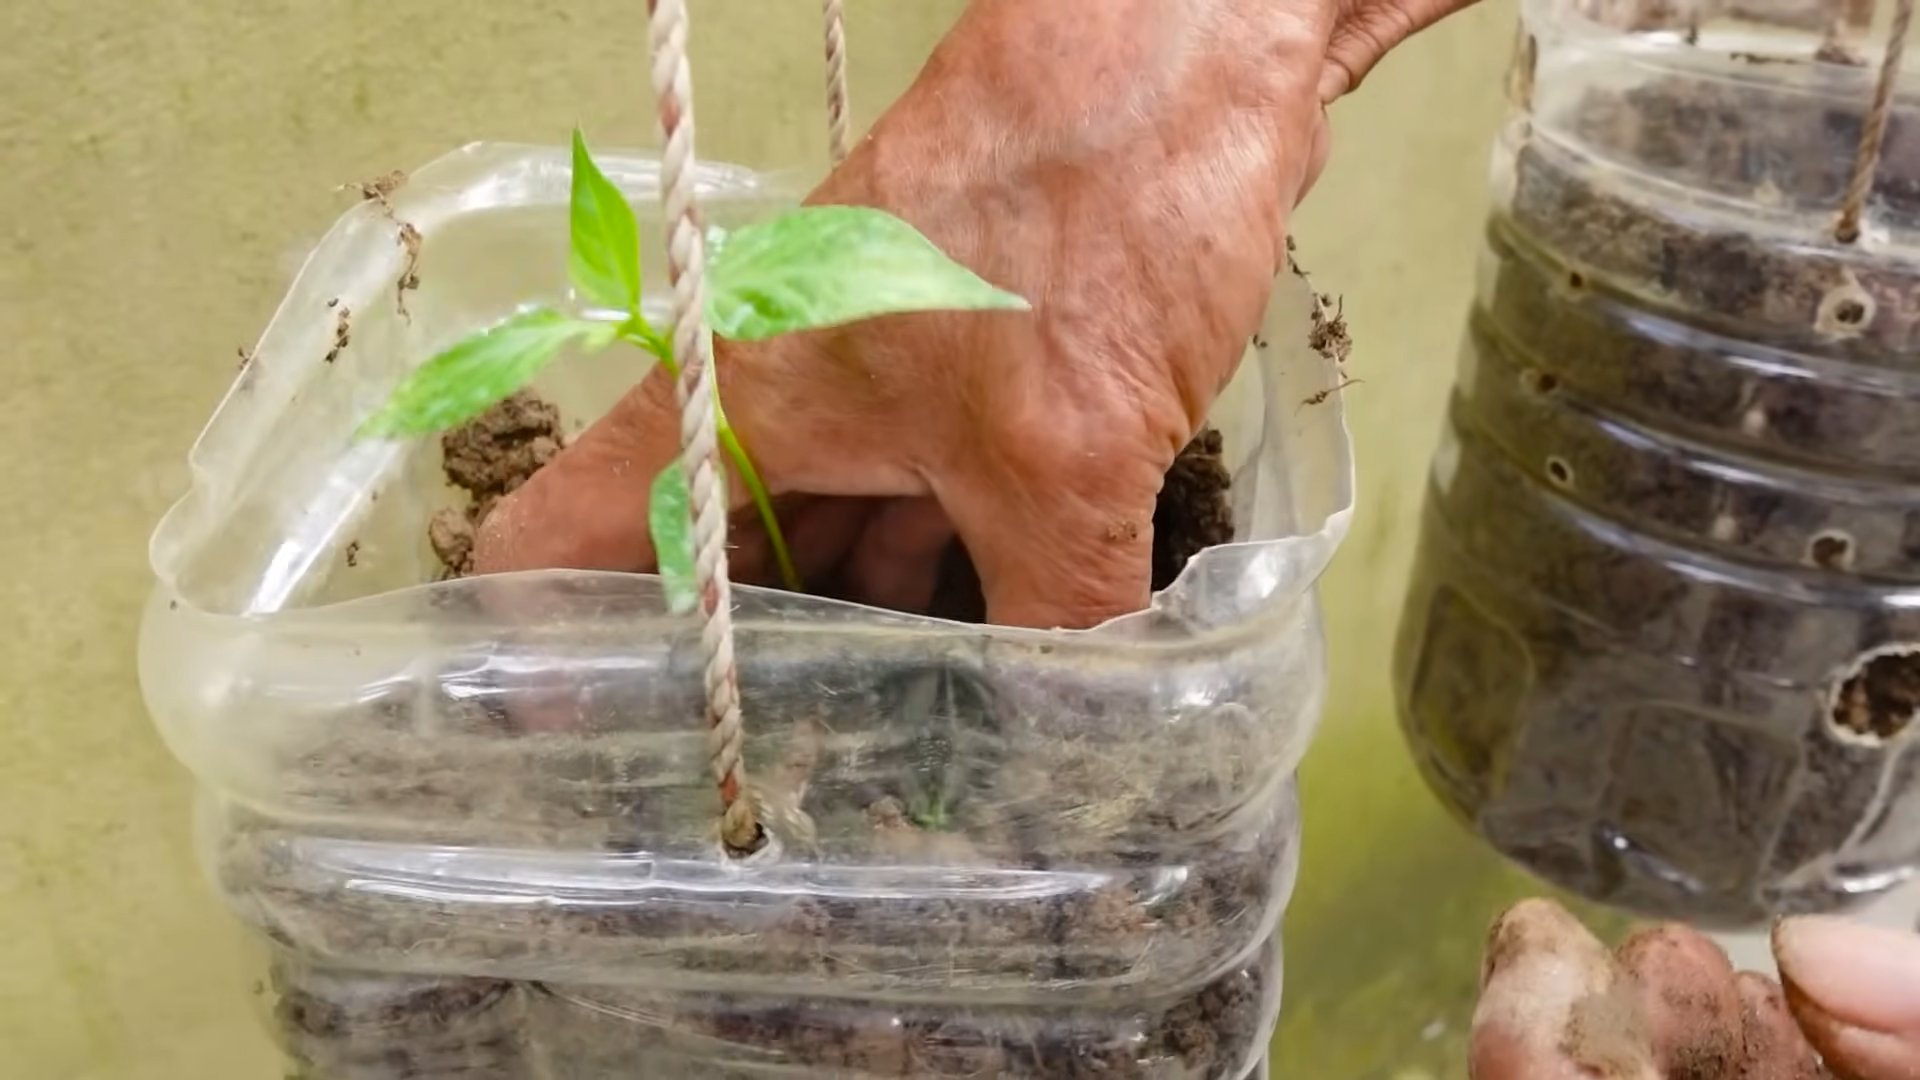
3. **Dig a Hole:** Dig a hole in the center of the container that is large enough to accommodate the root ball of the seedling.
4. **Remove Seedling from Pot:** Gently remove the seedling from its pot, being careful not to damage the roots.
5. **Plant the Seedling:** Place the seedling in the hole and gently backfill with potting mix.
6. **Water Thoroughly:** Water the plant thoroughly after planting.
7. **Add Support (Optional):** If you’re growing a taller variety of chili pepper, you may want to add a stake or cage to provide support.
Caring for Your Chili Peppers
Now that your chili peppers are planted, it’s time to provide them with the care they need to thrive.
Watering
* **Water Regularly:** Chili peppers need consistent moisture, especially during hot weather. Water deeply when the top inch of soil feels dry to the touch.
* **Avoid Overwatering:** Overwatering can lead to root rot, so be careful not to water too much.
* **Water in the Morning:** Water in the morning so the foliage has time to dry before nightfall. This helps prevent fungal diseases.
Fertilizing
* **Fertilize Regularly:** Chili peppers are heavy feeders and need regular fertilization.
* **Use a Balanced Fertilizer:** Use a balanced fertilizer (e.g., 10-10-10) or a fertilizer specifically formulated for tomatoes and peppers.
* **Follow Package Instructions:** Follow the package instructions for application rates.
* **Fertilize Every 2-3 Weeks:** Fertilize every 2-3 weeks during the growing season.
Pruning
* **Pinch Off Early Flowers (Optional):** Pinching off the first few flowers can encourage the plant to focus on vegetative growth, resulting in a stronger, more productive plant.
* **Remove Suckers:** Remove any suckers (small shoots that grow from the base of the plant) to improve air circulation and prevent disease.
* **Prune for Shape (Optional):** You can prune your chili pepper plants to maintain a desired shape.
Pest and Disease Control
* **Inspect Plants Regularly:** Inspect your plants regularly for pests and diseases.
* **Common Pests:** Common pests of chili peppers include aphids, spider mites, and whiteflies.
* **Treat Pests:** Treat pests with insecticidal soap or neem oil.
* **Common Diseases:** Common diseases of chili peppers include fungal diseases like powdery mildew and blossom end rot.
* **Prevent Diseases:** Prevent diseases by providing good air circulation, avoiding overwatering, and using a fungicide if necessary.
Harvesting Your Chili Peppers
The moment we’ve all been waiting for! Harvesting your spicy rewards.
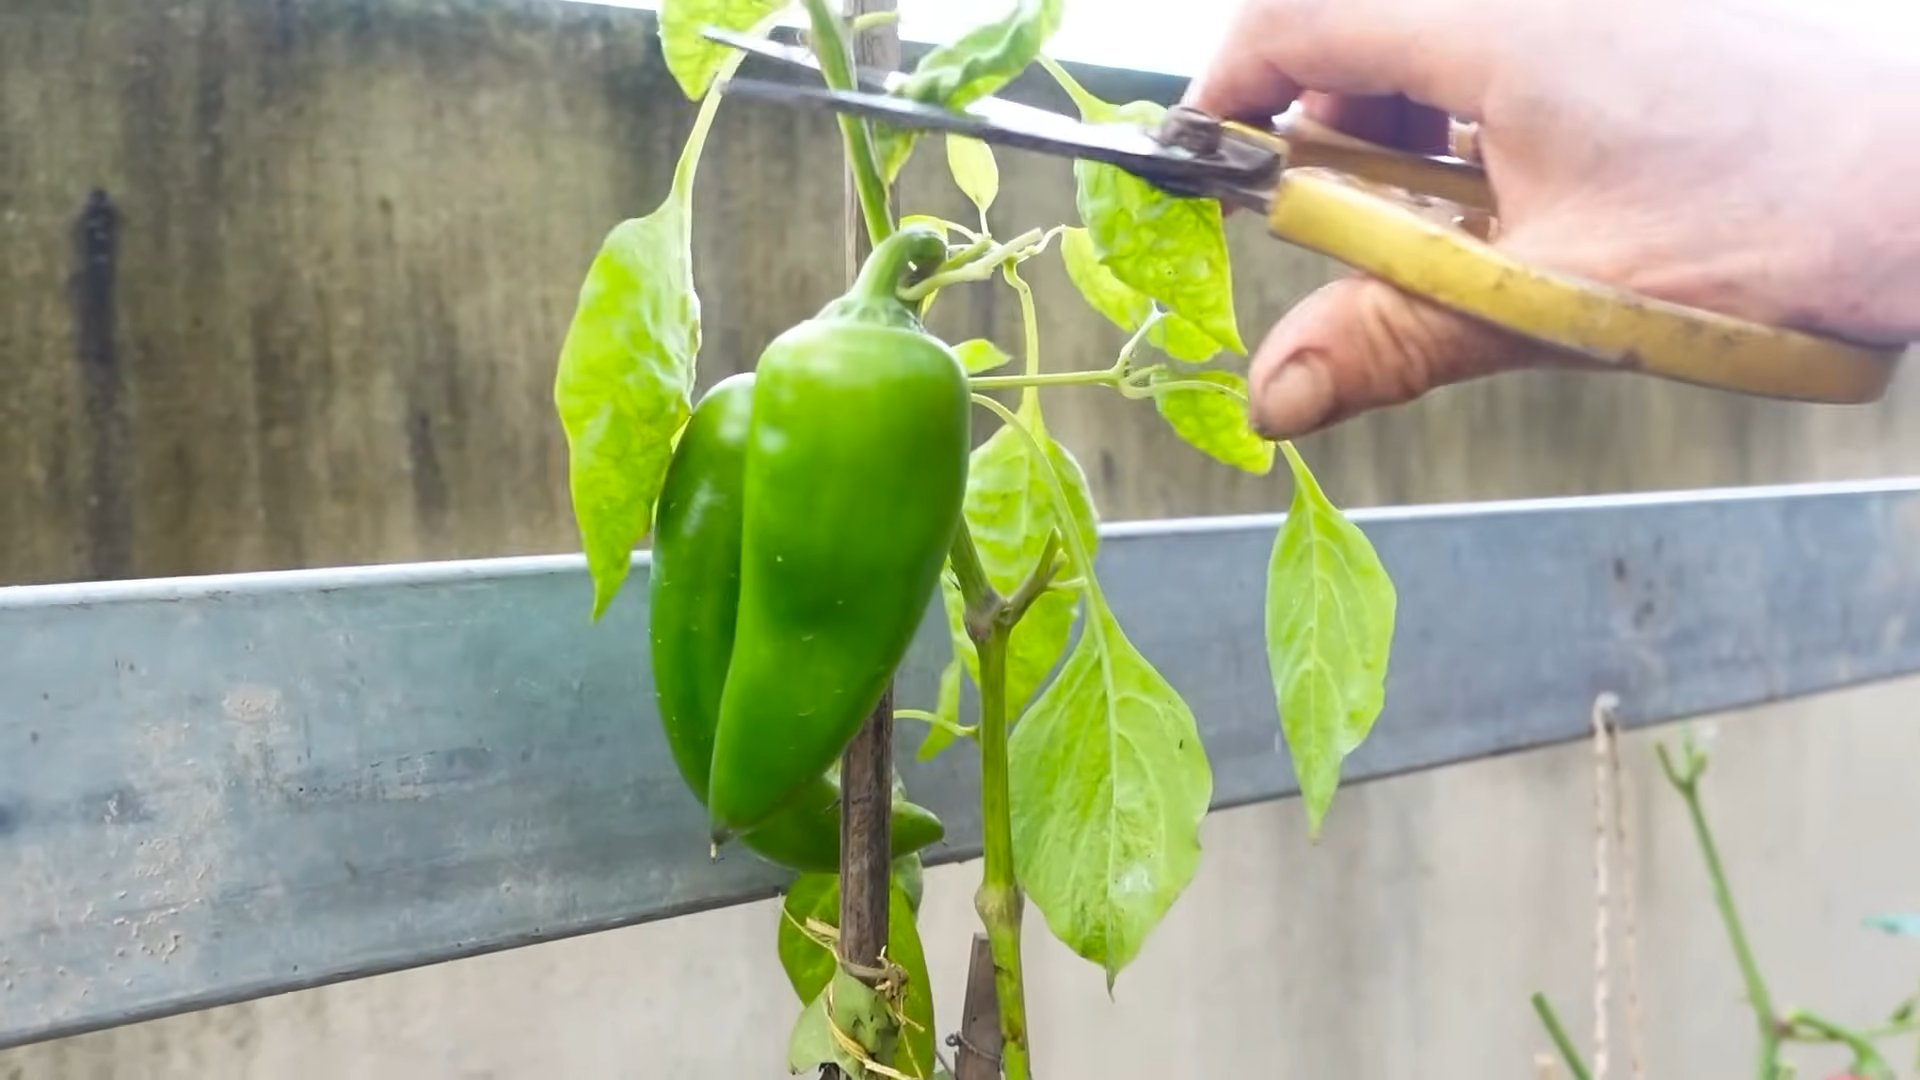
* **Harvest When Ripe:** Chili peppers are typically ready to harvest when they reach their mature color. This can vary depending on the variety.
* **Use Scissors or Pruners:** Use scissors or pruners to cut the peppers from the plant.
* **Handle with Care:** Be careful when handling hot peppers, as the oils can irritate your skin. Wear gloves if necessary.
* **Harvest Regularly:** Harvest peppers regularly to encourage the plant to produce more.
Troubleshooting
Even with the best care, you might encounter some problems along the way. Here are a few common issues and how to address them:
* **Blossom End Rot:** This is caused by a calcium deficiency. Ensure consistent watering and consider adding calcium to the soil.
* **Yellowing Leaves:** This can be caused by overwatering, underwatering, or nutrient deficiencies. Adjust your watering schedule and fertilize as needed.
* **Lack of Fruit:** This can be caused by insufficient sunlight, poor pollination, or extreme temperatures. Ensure your plants are getting enough sunlight, hand-pollinate if necessary, and protect them from extreme temperatures.
* **Pest Infestations:** As mentioned earlier, treat pests with insecticidal soap or neem oil.
Enjoying Your Harvest
Congratulations! You’ve successfully grown your own chili peppers. Now it’s time to enjoy the fruits (or peppers!) of your labor. Here are a few ideas:
* **Use Fresh:** Add fresh chili peppers to your favorite dishes.
* **Dry:** Dry your chili peppers for later use. You can dry them in a dehydrator, in the oven, or by hanging them in a well-ventilated area.
* **Freeze:** Freeze your chili peppers for long-term storage.
* **Make Hot Sauce:** Create your own signature hot sauce.
* **Share with Friends:** Share your spicy bounty with friends and family.
Growing chili peppers in containers
Conclusion
So, there you have it! Growing chili peppers, even if you lack a sprawling garden, is entirely achievable with this simple, effective DIY trick. We’ve unlocked the secret to bringing the fiery flavors of homegrown chilies to your kitchen, regardless of your living situation. This isn’t just about saving money; it’s about the satisfaction of nurturing life, the joy of harvesting your own produce, and the unparalleled taste of fresh, vibrant chili peppers.
This method, focusing on container gardening and strategic placement, offers a multitude of benefits. It’s space-saving, making it ideal for apartments, balconies, or even sunny windowsills. It provides greater control over the growing environment, allowing you to tailor the soil, watering, and sunlight exposure to your chili peppers’ specific needs. And, perhaps most importantly, it’s incredibly rewarding to watch your tiny seedlings transform into plants laden with colorful, flavorful peppers.
But don’t stop there! Experiment with different varieties of chili peppers. From the mild poblano to the scorching habanero, the possibilities are endless. Try different container sizes and materials to see what works best for your space and climate. Consider companion planting – basil, for example, is known to deter pests and enhance the flavor of chili peppers. You can also explore different soil mixes, adding compost or other organic matter to boost nutrient levels.
This DIY chili pepper growing method is more than just a gardening hack; it’s an invitation to connect with nature, to cultivate your own food, and to add a touch of spice to your life.
We’ve provided you with the knowledge and the tools; now it’s your turn to put them into action. Don’t be intimidated if you’re a beginner. Gardening is a learning process, and even experienced gardeners encounter challenges. The key is to be patient, observant, and willing to adapt.
We strongly encourage you to try this DIY trick for growing chili peppers. You’ll be amazed at how easy and rewarding it can be. And once you’ve harvested your first batch of homegrown chilies, we want to hear all about it! Share your experiences, your successes, and even your failures in the comments section below. Let’s create a community of chili pepper enthusiasts, sharing tips, tricks, and inspiration.
Growing chili peppers doesn’t have to be complicated or expensive. With a little creativity and effort, you can enjoy the taste of fresh, homegrown chilies all season long. So, grab your seeds, your containers, and your gardening gloves, and get ready to embark on a flavorful adventure! We can’t wait to see what you grow!
Frequently Asked Questions (FAQ)
What kind of chili peppers are easiest to grow for beginners?
For beginners, milder varieties like Anaheim, Poblano, or even Jalapeno are excellent choices. They tend to be more forgiving and less demanding than hotter varieties like Habaneros or Scotch Bonnets. These beginner-friendly peppers also have a shorter growing season, meaning you’ll see results sooner, which can be very encouraging. Remember to check the seed packet for specific growing instructions, as even within these milder varieties, there can be slight differences in care requirements.
What size container should I use for growing chili peppers?
The ideal container size depends on the variety of chili pepper you’re growing. Generally, a container that is at least 5 gallons in size is recommended for most varieties. Larger varieties, like bell peppers (which are technically a type of chili pepper), may benefit from even larger containers, around 10 gallons. The key is to provide enough space for the roots to grow and spread. If the roots become too constricted, the plant may become stunted and produce fewer peppers. Ensure the container has adequate drainage holes to prevent waterlogging, which can lead to root rot.
How much sunlight do chili peppers need?
Chili peppers thrive in full sun, meaning they need at least 6-8 hours of direct sunlight per day. If you’re growing them indoors, place them near a south-facing window or use grow lights to supplement natural sunlight. Insufficient sunlight can result in leggy plants with fewer flowers and peppers. If you live in a particularly hot climate, providing some afternoon shade can prevent the peppers from getting sunburned.
What kind of soil is best for growing chili peppers?
Chili peppers prefer well-draining, fertile soil with a slightly acidic pH (around 6.0 to 6.8). A good potting mix specifically formulated for vegetables is a great option. You can also amend your own soil by adding compost, perlite, and vermiculite to improve drainage and aeration. Avoid using garden soil in containers, as it tends to compact and doesn’t drain well.
How often should I water my chili pepper plants?
Water your chili pepper plants regularly, especially during hot, dry weather. The soil should be kept consistently moist, but not waterlogged. Check the soil moisture by sticking your finger about an inch deep into the soil. If it feels dry, it’s time to water. Avoid overhead watering, as this can lead to fungal diseases. Instead, water at the base of the plant.
Do I need to fertilize my chili pepper plants?
Yes, chili pepper plants benefit from regular fertilization. Use a balanced fertilizer (e.g., 10-10-10) or a fertilizer specifically formulated for vegetables. Follow the instructions on the fertilizer package for application rates and frequency. During the flowering and fruiting stages, you can switch to a fertilizer with a higher phosphorus content (the middle number) to promote pepper production.
How do I prevent pests and diseases on my chili pepper plants?
Regularly inspect your plants for signs of pests and diseases. Common pests include aphids, spider mites, and whiteflies. You can control these pests with insecticidal soap, neem oil, or by handpicking them off the plants. To prevent fungal diseases, ensure good air circulation around the plants and avoid overhead watering. If you notice any signs of disease, remove the affected leaves or plants immediately.
When is the best time to harvest chili peppers?
The best time to harvest chili peppers depends on the variety and your personal preference. Generally, peppers are ready to harvest when they have reached their mature size and color. Some peppers, like jalapenos, are often harvested when they are still green, while others, like habaneros, are harvested when they turn orange or red. Use pruning shears or scissors to cut the peppers from the plant, leaving a small stem attached.
Can I grow chili peppers indoors year-round?
Yes, you can grow chili peppers indoors year-round, provided you provide them with adequate light, warmth, and humidity. Use grow lights to supplement natural sunlight, and maintain a consistent temperature between 70-80°F (21-27°C). You may also need to increase the humidity around the plants by using a humidifier or placing them on a tray of pebbles filled with water.
What if my chili pepper plant is not producing peppers?
There are several reasons why your chili pepper plant might not be producing peppers. Common causes include insufficient sunlight, overwatering or underwatering, lack of pollination, and nutrient deficiencies. Ensure your plant is getting at least 6-8 hours of direct sunlight per day, water it regularly but not excessively, and fertilize it with a balanced fertilizer. You can also try hand-pollinating the flowers by gently shaking the plant or using a small paintbrush to transfer pollen from one flower to another.
Leave a Comment