
Growing Bok Choy at Home can seem daunting, especially if you’re new to gardening. But trust me, with a few simple tricks and a little know-how, you can be harvesting your own delicious, crisp bok choy in no time! Imagine stepping out into your backyard and picking fresh, vibrant greens for a stir-fry or a healthy salad – that’s the magic of home gardening!
Bok choy, also known as pak choi, has been a staple in Asian cuisine for centuries. Originating in China, this nutritious leafy green has made its way into gardens and kitchens worldwide. Its mild, slightly sweet flavor and crisp texture make it incredibly versatile. But beyond its culinary appeal, growing your own bok choy offers a sense of accomplishment and connection to nature.
Why should you learn these DIY tricks for growing bok choy at home? Well, for starters, you’ll have access to fresher, healthier produce than you can often find in stores. Plus, you’ll know exactly what’s going into your food – no pesticides or mystery ingredients! I’m going to share some simple, effective techniques that will help you overcome common challenges and maximize your yield. Whether you have a sprawling garden or just a small balcony, growing bok choy at home is within your reach. Let’s get started and unlock the secrets to a bountiful bok choy harvest!
Growing Bok Choy at Home: A Beginner’s Guide
Hey there, fellow gardening enthusiasts! I’m so excited to share my experience with growing bok choy right in my own backyard. It’s surprisingly easy, and the fresh, crisp taste of homegrown bok choy is simply unbeatable. This guide will walk you through every step, from choosing the right seeds to harvesting your delicious leafy greens. Let’s get started!
Choosing Your Bok Choy Variety
First things first, let’s talk about bok choy varieties. There are a few different types you can choose from, each with its own unique characteristics.
* Standard Bok Choy: This is the most common type, with large, dark green leaves and thick, white stalks. It’s a reliable choice and grows well in most conditions.
* Baby Bok Choy: As the name suggests, this variety is smaller and more tender than standard bok choy. It’s perfect for quick stir-fries or salads.
* Shanghai Bok Choy: This type has light green leaves and pale green stalks. It has a milder flavor than standard bok choy and is often used in Asian cuisine.
* Purple Bok Choy: A visually stunning variety with deep purple leaves. It adds a pop of color to your garden and has a slightly sweeter flavor.
I personally love growing both baby bok choy and standard bok choy. The baby bok choy is great for a quick weeknight meal, while the standard bok choy is perfect for larger dishes.
Preparing Your Garden Bed
Bok choy thrives in well-drained, fertile soil. Here’s how I prepare my garden bed:
* Sunlight: Bok choy needs at least 4-6 hours of sunlight per day. Choose a spot in your garden that gets plenty of sunshine.
* Soil: The ideal soil for bok choy is loamy and rich in organic matter. If your soil is heavy clay or sandy, amend it with compost or well-rotted manure.
* pH Level: Bok choy prefers a slightly acidic to neutral soil pH of 6.0 to 7.5. You can test your soil pH with a soil testing kit.
* Drainage: Good drainage is essential to prevent root rot. Make sure your garden bed doesn’t stay waterlogged after rain.
Planting Bok Choy Seeds
Now for the fun part – planting the seeds!
1. Timing: Bok choy is a cool-season crop, so it’s best to plant it in early spring or late summer. I usually plant my seeds about 4-6 weeks before the last expected frost in spring or 6-8 weeks before the first expected frost in fall.
2. Direct Sowing: Bok choy can be directly sown into the garden bed. Sow seeds about ½ inch deep and 1 inch apart in rows that are 12-18 inches apart.
3. Starting Indoors: If you want to get a head start, you can start seeds indoors about 4-6 weeks before the last expected frost. Sow seeds in seed trays or small pots filled with seed-starting mix. Keep the soil moist and provide plenty of light.
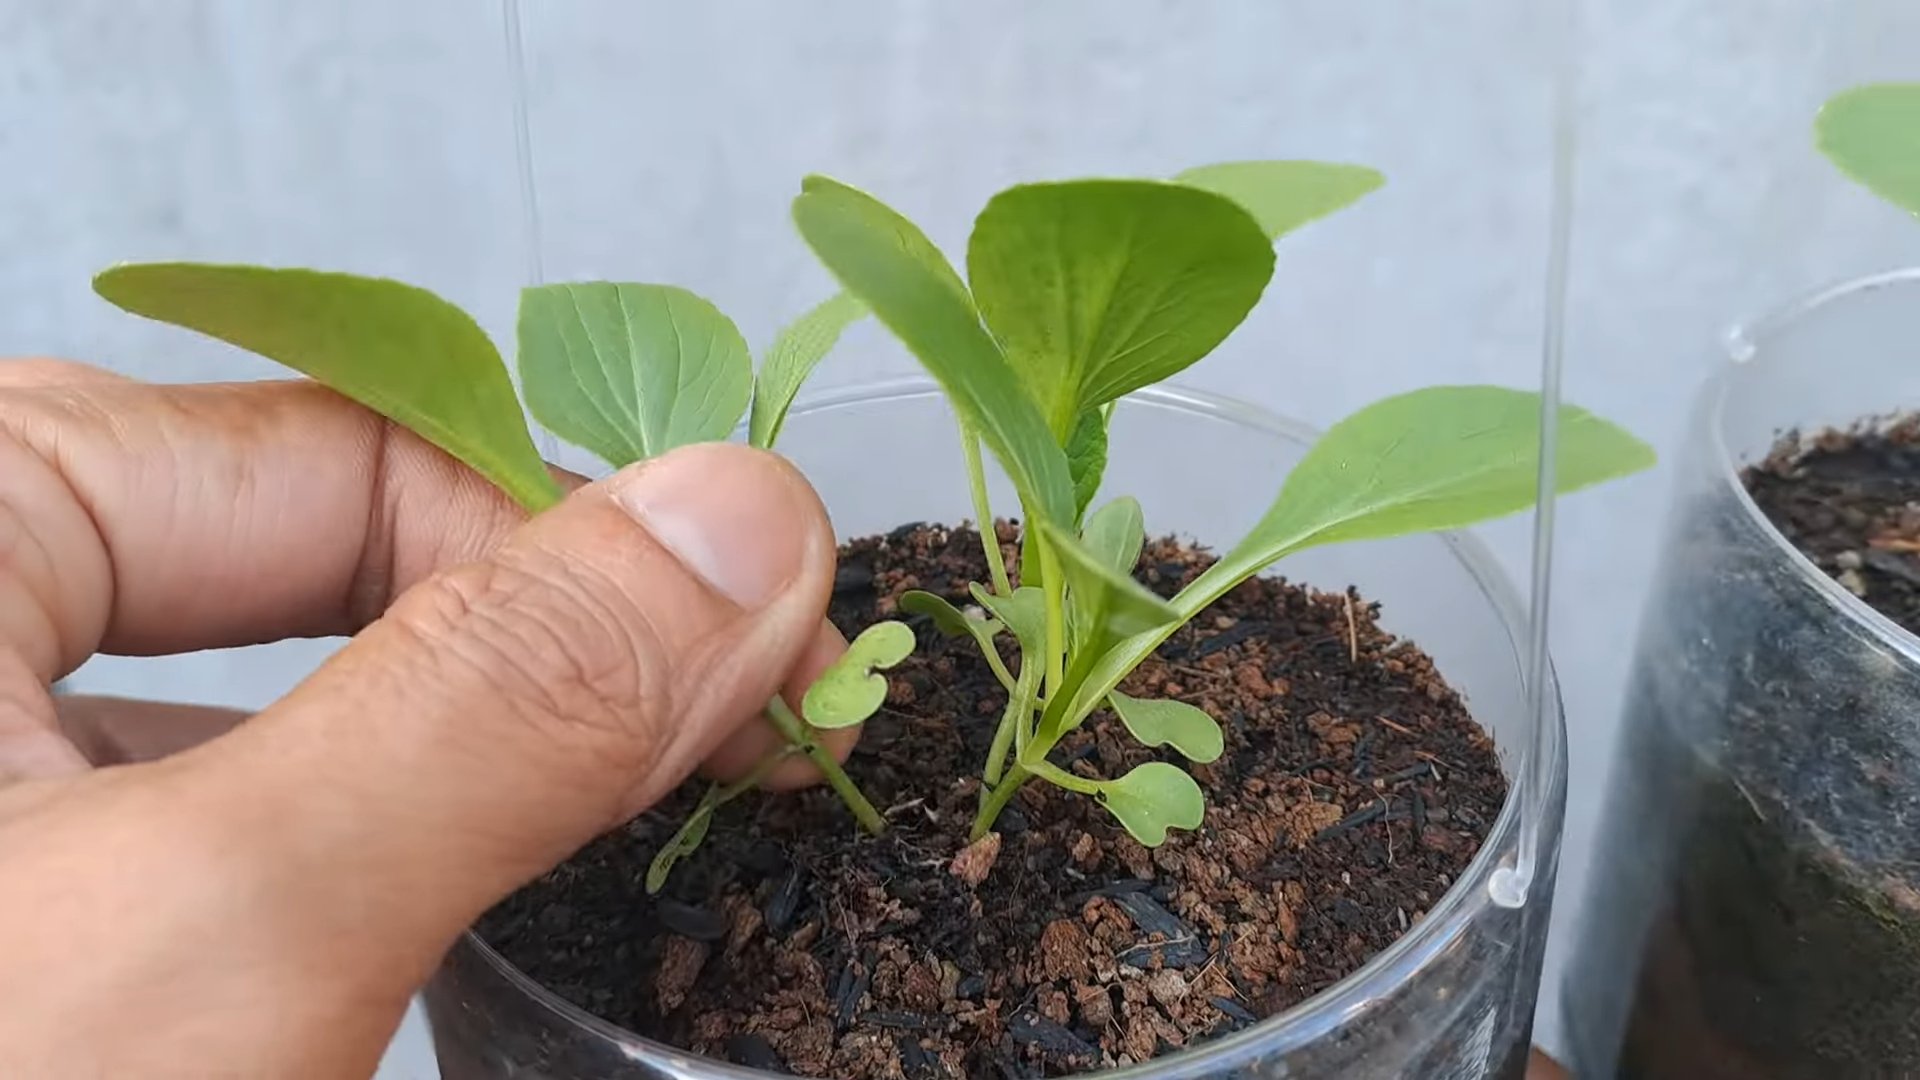
4. Thinning: Once the seedlings emerge, thin them to about 6-8 inches apart for baby bok choy and 8-12 inches apart for standard bok choy. This will give the plants enough room to grow. I know it feels harsh to pull out the extra seedlings, but it’s necessary for healthy growth!
5. Watering: Water the seeds or seedlings gently after planting. Keep the soil consistently moist but not waterlogged.
Caring for Your Bok Choy Plants
Once your bok choy plants are established, it’s important to provide them with proper care to ensure a bountiful harvest.
* Watering: Bok choy needs consistent moisture, especially during hot weather. Water deeply whenever the top inch of soil feels dry. I like to water in the morning to allow the leaves to dry before nightfall, which helps prevent fungal diseases.
* Fertilizing: Bok choy is a heavy feeder, so it benefits from regular fertilization. I use a balanced organic fertilizer, such as fish emulsion or compost tea, every 2-3 weeks.
* Weeding: Keep the garden bed free of weeds, which can compete with bok choy for nutrients and water. I like to hand-pull weeds regularly or use a hoe to cultivate the soil.
* Pest Control: Bok choy can be susceptible to pests such as aphids, cabbage worms, and flea beetles. I use organic pest control methods, such as insecticidal soap or neem oil, to keep these pests at bay. You can also cover your plants with row covers to prevent pests from reaching them.
* Bolting: Bok choy is prone to bolting (going to seed) in hot weather. To prevent bolting, plant bok choy in a shady location or provide shade during the hottest part of the day. You can also choose bolt-resistant varieties.
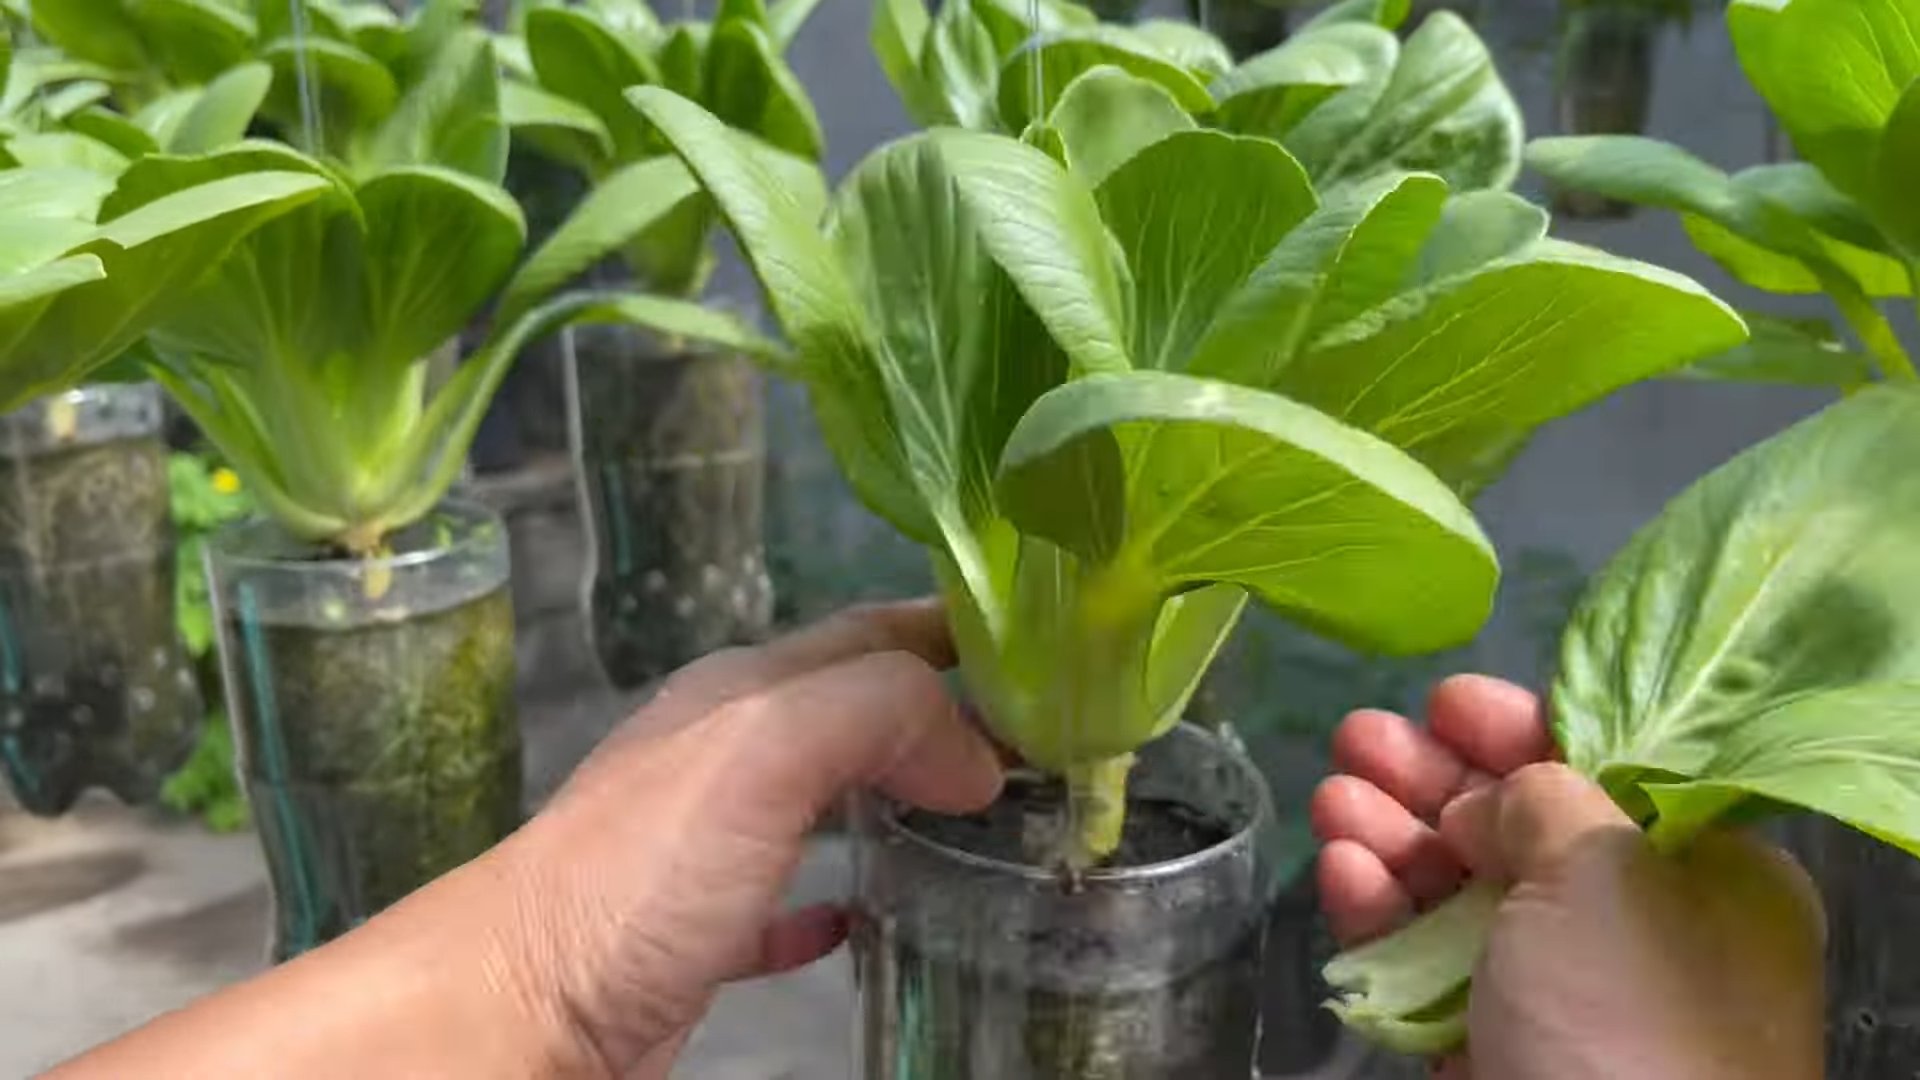
Harvesting Your Bok Choy
The moment we’ve all been waiting for – harvesting!
1. Timing: Bok choy can be harvested at any stage of growth, depending on your preference. Baby bok choy can be harvested when the leaves are about 4-6 inches long, while standard bok choy can be harvested when the heads are about 8-12 inches tall.
2. Harvesting Method: To harvest bok choy, use a sharp knife to cut the entire head at the base of the plant. You can also harvest individual leaves as needed, starting with the outer leaves.
3. Storage: Bok choy can be stored in the refrigerator for up to a week. Wrap the heads in a damp paper towel and place them in a plastic bag.
Troubleshooting Common Problems
Even with the best care, you might encounter some problems while growing bok choy. Here are a few common issues and how to address them:
* Aphids: These tiny pests can suck the sap from bok choy leaves, causing them to become yellow and distorted. Spray aphids with insecticidal soap or neem oil.
* Cabbage Worms: These green caterpillars can devour bok choy leaves. Handpick cabbage worms or use Bacillus thuringiensis (Bt), a natural insecticide.
* Flea Beetles: These small, jumping beetles can create tiny holes in bok choy leaves. Cover plants with row covers or spray with neem oil.
* Root Rot: This fungal disease can cause bok choy roots to rot, leading to wilting and death. Prevent root rot by planting bok choy in well-drained soil and avoiding overwatering.
* Bolting: As mentioned earlier, bolting can be a problem in hot weather. Plant bolt-resistant varieties or provide shade during the hottest part of the day.
Enjoying Your Homegrown Bok Choy
Now that you’ve harvested your delicious bok choy, it’s time to enjoy it! Here are a few of my favorite ways to use homegrown bok choy:
* Stir-fries: Bok choy is a classic ingredient in stir-fries. Simply chop it up and add it to your favorite stir-fry recipe.
* Salads: Baby bok choy is delicious in salads. Its tender leaves add a mild, slightly sweet flavor.
* Soups: Bok choy can be added to soups for extra flavor and nutrients.
* Steaming: Steamed bok choy is a simple and healthy side dish.
* Sautéing: Sauté bok choy with garlic and ginger for a flavorful and easy side dish.
I hope this guide has inspired you to grow your own bok choy at home. It’s a rewarding experience that will provide you with fresh, healthy greens for your table. Happy gardening!
Conclusion
So, there you have it! Growing your own bok choy at home is not only surprisingly simple, but it’s also incredibly rewarding. Imagine stepping out into your garden or even just onto your balcony and harvesting fresh, crisp bok choy whenever you need it. Forget those wilted, overpriced heads at the grocery store. With a little effort and the right conditions, you can enjoy a continuous supply of this nutritious and versatile vegetable.
This DIY trick is a must-try for several reasons. First, you have complete control over the growing process, ensuring that your bok choy is free from harmful pesticides and chemicals. Second, it’s a fantastic way to reduce your carbon footprint by minimizing transportation and packaging waste. Third, and perhaps most importantly, it’s simply a fun and engaging activity that connects you with nature and provides a sense of accomplishment.
Don’t be afraid to experiment with different varieties of bok choy. While the standard green bok choy is a great starting point, you might also consider trying baby bok choy for its tender leaves and mild flavor, or even red bok choy for its vibrant color and slightly peppery taste. You can also adjust the growing conditions to suit your specific climate and preferences. For example, if you live in a particularly hot area, you might want to provide some shade during the hottest part of the day to prevent bolting.
Consider companion planting to further enhance your bok choy growing experience. Marigolds can help deter pests, while herbs like dill and chamomile can attract beneficial insects. You can even interplant your bok choy with other cool-season vegetables like lettuce and spinach to maximize your garden space.
We encourage you to give this DIY trick a try. It’s a simple, cost-effective, and environmentally friendly way to enjoy fresh, delicious bok choy. And once you’ve harvested your first crop, don’t hesitate to get creative in the kitchen. Bok choy is incredibly versatile and can be used in a wide range of dishes, from stir-fries and soups to salads and slaws.
Most importantly, we want to hear about your experience! Share your tips, tricks, and photos with us in the comments below. Let us know what worked for you, what challenges you faced, and what delicious dishes you created with your homegrown bok choy. Together, we can create a community of bok choy enthusiasts and inspire others to embrace the joys of gardening. Growing your own bok choy is a journey, and we’re excited to be a part of yours. So, grab your seeds, get your hands dirty, and start growing!
Frequently Asked Questions (FAQ)
What is the best time of year to plant bok choy?
Bok choy is a cool-season crop, meaning it thrives in cooler temperatures and shorter days. The best time to plant bok choy is in early spring or late summer/early fall. Avoid planting during the hottest months of summer, as high temperatures can cause the plants to bolt (go to seed prematurely), resulting in bitter-tasting leaves. In spring, plant after the last frost. For a fall harvest, plant about 4-6 weeks before the first expected frost. If you live in a region with mild winters, you may even be able to grow bok choy throughout the winter months.
How much sunlight does bok choy need?
Bok choy prefers partial shade, especially during the hottest part of the day. While it can tolerate full sun, too much direct sunlight can scorch the leaves and cause them to become tough. Aim for at least 4-6 hours of sunlight per day, but provide some shade during the afternoon if you live in a hot climate. If you’re growing bok choy indoors, place it near a sunny window or use grow lights to supplement natural light.
What kind of soil is best for growing bok choy?
Bok choy prefers well-drained, fertile soil that is rich in organic matter. The ideal soil pH is between 6.0 and 7.5. Before planting, amend the soil with compost, aged manure, or other organic matter to improve drainage and fertility. You can also add a slow-release fertilizer to provide essential nutrients throughout the growing season. Avoid heavy clay soils, as they can retain too much moisture and lead to root rot. If you have clay soil, amend it with plenty of organic matter to improve drainage.
How often should I water bok choy?
Bok choy needs consistent moisture to thrive. Water deeply and regularly, especially during dry periods. Aim to keep the soil consistently moist but not waterlogged. Overwatering can lead to root rot, while underwatering can cause the leaves to wilt and become tough. Check the soil moisture regularly by sticking your finger into the soil. If the top inch feels dry, it’s time to water. Mulching around the plants can help retain moisture and suppress weeds.
What are some common pests and diseases that affect bok choy?
Bok choy is susceptible to several common pests and diseases, including aphids, cabbage worms, flea beetles, and downy mildew. To prevent pest and disease problems, practice good garden hygiene. Remove any weeds or debris that can harbor pests or diseases. Inspect your plants regularly for signs of infestation or infection. If you spot any pests, you can try hand-picking them off the plants or using insecticidal soap or neem oil. For diseases, ensure good air circulation and avoid overhead watering. If necessary, you can use a fungicide to control the spread of disease.
How do I harvest bok choy?
You can harvest bok choy at any stage of growth, depending on your preference. For baby bok choy, harvest when the leaves are about 4-6 inches long. For mature bok choy, harvest when the head is firm and the leaves are fully developed. You can harvest the entire head at once by cutting it off at the base, or you can harvest individual leaves as needed. To harvest individual leaves, start with the outer leaves and work your way inward. This will allow the plant to continue producing new leaves.
How do I store bok choy after harvesting?
After harvesting, rinse the bok choy thoroughly and pat it dry. Store it in a plastic bag in the refrigerator. Bok choy will typically last for about 3-5 days in the refrigerator. To extend its shelf life, you can wrap the bok choy in a damp paper towel before placing it in the plastic bag. Avoid storing bok choy near ethylene-producing fruits and vegetables, such as apples and bananas, as this can cause it to spoil more quickly.
Can I grow bok choy in containers?
Yes, bok choy can be grown successfully in containers. Choose a container that is at least 12 inches deep and wide to allow enough room for the roots to grow. Use a well-draining potting mix and water regularly. Place the container in a location that receives at least 4-6 hours of sunlight per day. Container-grown bok choy may need to be fertilized more frequently than bok choy grown in the ground, as the nutrients in the potting mix can be depleted more quickly.
How do I prevent bok choy from bolting?
Bolting is a common problem with bok choy, especially during hot weather. To prevent bolting, choose bolt-resistant varieties, plant at the right time of year, and provide shade during the hottest part of the day. Water regularly to keep the soil consistently moist. You can also mulch around the plants to help keep the soil cool. If your bok choy does start to bolt, you can still harvest the leaves, but they may be more bitter than usual.

Leave a Comment