
Grow Kohlrabi on Balcony: Imagine stepping onto your balcony and harvesting fresh, crisp kohlrabi, ready to be enjoyed in a salad or as a crunchy snack. Sounds idyllic, right? Well, it’s more achievable than you might think! For centuries, people have cultivated small gardens in limited spaces, from window boxes in bustling cities to rooftop oases. This tradition speaks to our innate connection with nature and the satisfaction of nurturing our own food.
But let’s be honest, not everyone has a sprawling backyard. That’s where this DIY guide comes in! I’m going to share my favorite tricks and tips for successfully grow kohlrabi on balcony, even if you’re a complete beginner. We’ll cover everything from choosing the right container and soil to providing optimal sunlight and watering.
Why is this important? Because growing your own food, even in a small space, offers incredible benefits. You’ll have access to fresh, organic produce, save money on groceries, and experience the therapeutic joy of gardening. Plus, imagine the bragging rights when you serve a dish featuring kohlrabi you grew yourself! So, let’s get started and transform your balcony into a thriving kohlrabi haven!
Growing Kohlrabi on Your Balcony: A Beginner’s Guide
Hey there, fellow balcony gardeners! I’m so excited to share my experience growing kohlrabi in containers. It’s surprisingly easy, and the fresh, slightly sweet, and crunchy taste is totally worth the effort. Plus, the unique look of kohlrabi adds a cool, almost alien-like vibe to your balcony garden. Let’s get started!
Choosing the Right Kohlrabi Variety
First things first, let’s talk about kohlrabi varieties. Not all kohlrabi are created equal, especially when it comes to container gardening. You’ll want to choose varieties that are known for their compact size and relatively quick maturity.
Here are a few of my favorites:
* ‘Early White Vienna’: This is a classic choice, known for its mild flavor and early maturity (around 55 days). It produces pale green bulbs.
* ‘Early Purple Vienna’: Similar to the white variety, but with a beautiful purple hue. It also matures quickly.
* ‘Grand Duke’: This hybrid variety is known for its disease resistance and uniform bulb size. It’s a reliable choice for beginners.
* ‘Kossak’: If you’re looking for larger bulbs, ‘Kossak’ is a good option, but be sure to provide it with a larger container. It takes a bit longer to mature (around 70 days).
Gathering Your Supplies
Okay, now that we’ve picked our kohlrabi variety, let’s gather everything we need. Here’s a checklist:
* Kohlrabi seeds: Obviously! Make sure they’re fresh for the best germination rate.
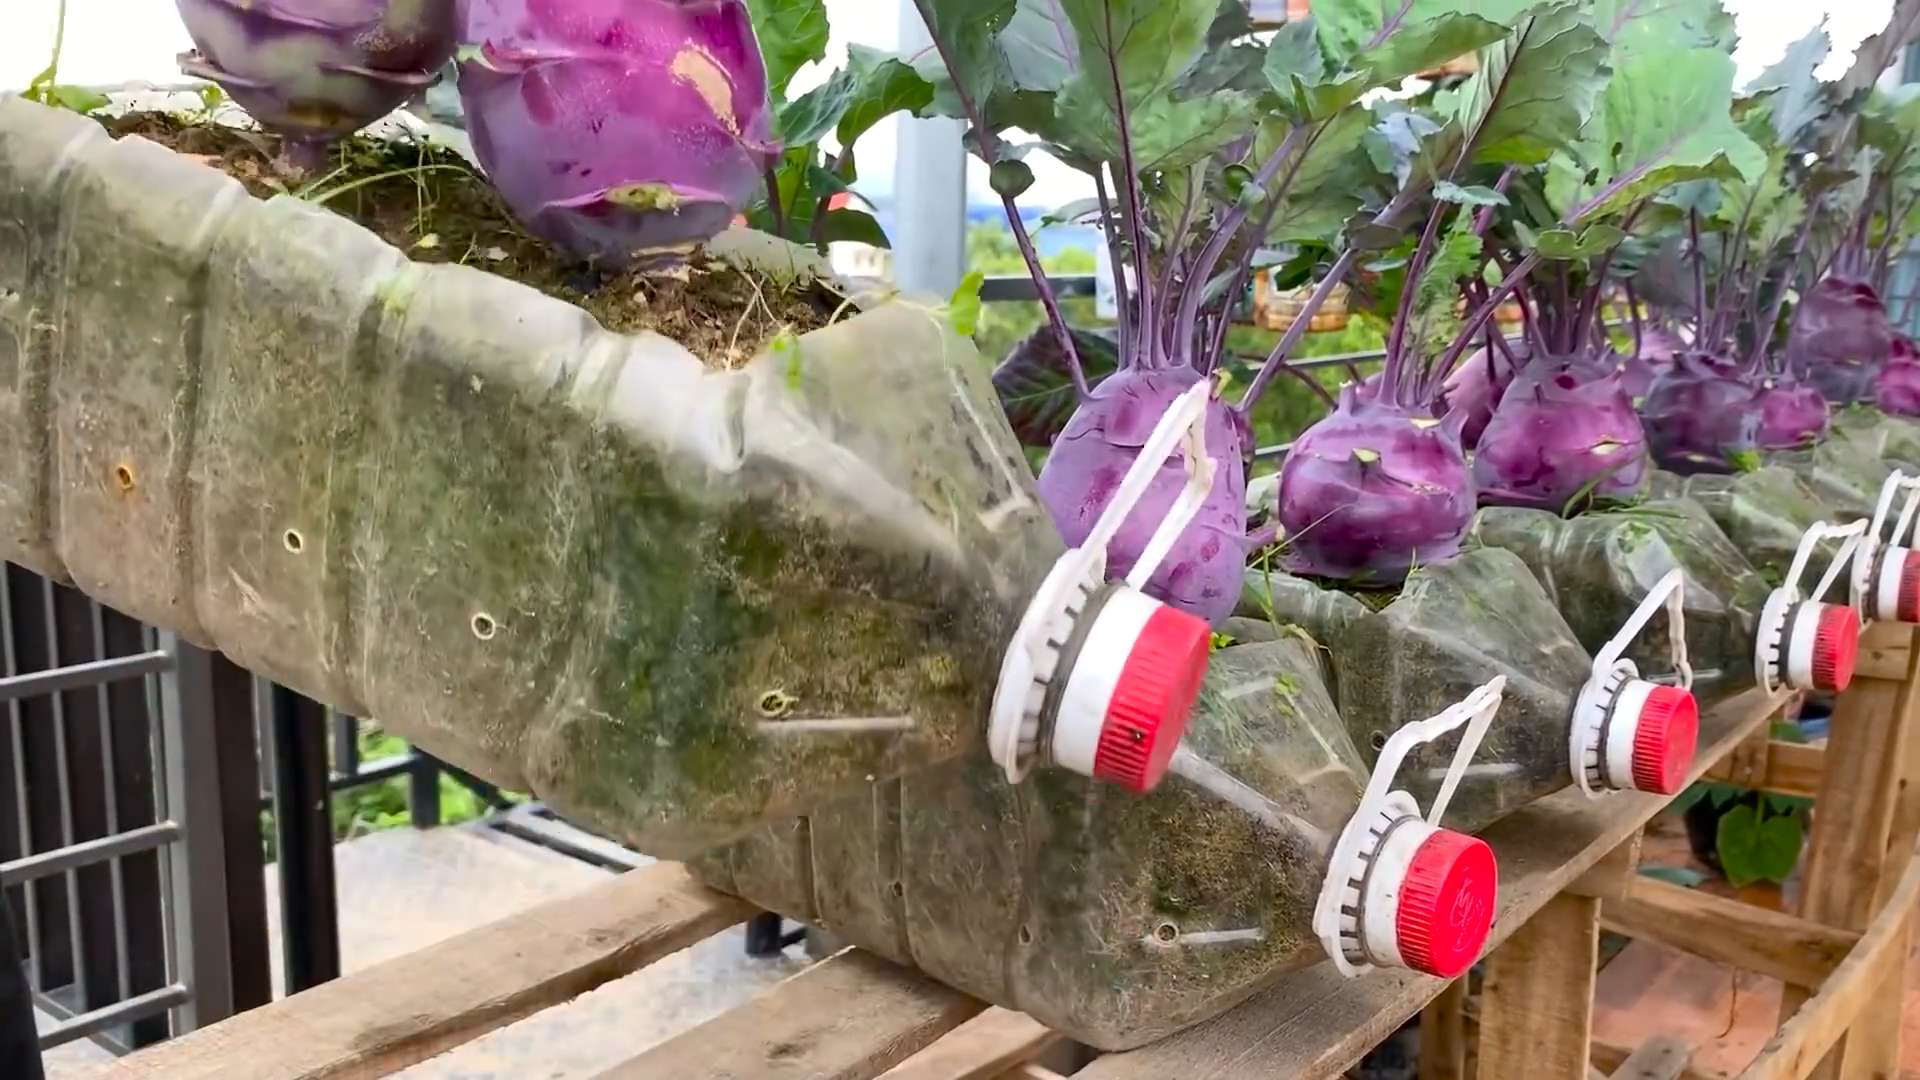
* Containers: Choose containers that are at least 6-8 inches deep and wide. I prefer using pots that are 10-12 inches in diameter to give the kohlrabi plenty of room to grow. Make sure they have drainage holes!
* Potting mix: Use a high-quality, well-draining potting mix. Avoid using garden soil, as it can compact in containers and hinder drainage.
* Watering can or hose: For watering your kohlrabi.
* Fertilizer: A balanced, water-soluble fertilizer (like 10-10-10) or an organic fertilizer like compost tea.
* Trowel or small shovel: For planting and transplanting.
* Optional:
* Seed starting tray and dome (if you’re starting seeds indoors).
* Plant labels: To keep track of your varieties.
* Gardening gloves: To keep your hands clean.
Planting Your Kohlrabi
There are two ways to plant kohlrabi: direct sowing and starting seeds indoors. I usually prefer starting seeds indoors, especially if I want an earlier harvest.
Starting Seeds Indoors (Optional)
1. Fill your seed starting tray with potting mix: Moisten the potting mix before filling the tray.
2. Sow the seeds: Plant 2-3 seeds per cell, about ¼ inch deep.
3. Water gently: Use a spray bottle to avoid disturbing the seeds.
4. Cover with a dome: This helps to retain moisture and create a humid environment for germination.
5. Place in a warm location: Kohlrabi seeds germinate best at temperatures between 65-75°F (18-24°C).
6. Keep the soil moist: Check the soil daily and water as needed.
7. Remove the dome once seedlings emerge: This usually takes about 5-7 days.
8. Provide adequate light: Place the seedlings under a grow light or in a sunny window. If using a window, rotate the tray regularly to prevent the seedlings from becoming leggy.
9. Thin the seedlings: Once the seedlings have their first true leaves (the second set of leaves), thin them to one seedling per cell. Snip off the weaker seedlings at the soil line.
10. Harden off the seedlings: Before transplanting the seedlings outdoors, you’ll need to harden them off. This means gradually exposing them to outdoor conditions over a period of 7-10 days. Start by placing them in a sheltered location for a few hours each day, gradually increasing the amount of time they spend outdoors.
Direct Sowing
1. Fill your containers with potting mix: Leave about an inch of space at the top of the container.
2. Sow the seeds: Plant 2-3 seeds per container, about ¼ inch deep. Space the seeds about 2-3 inches apart.
3. Water gently: Make sure the soil is evenly moist.
4. Thin the seedlings: Once the seedlings emerge and have their first true leaves, thin them to one seedling per container. Choose the strongest seedling and snip off the others at the soil line.
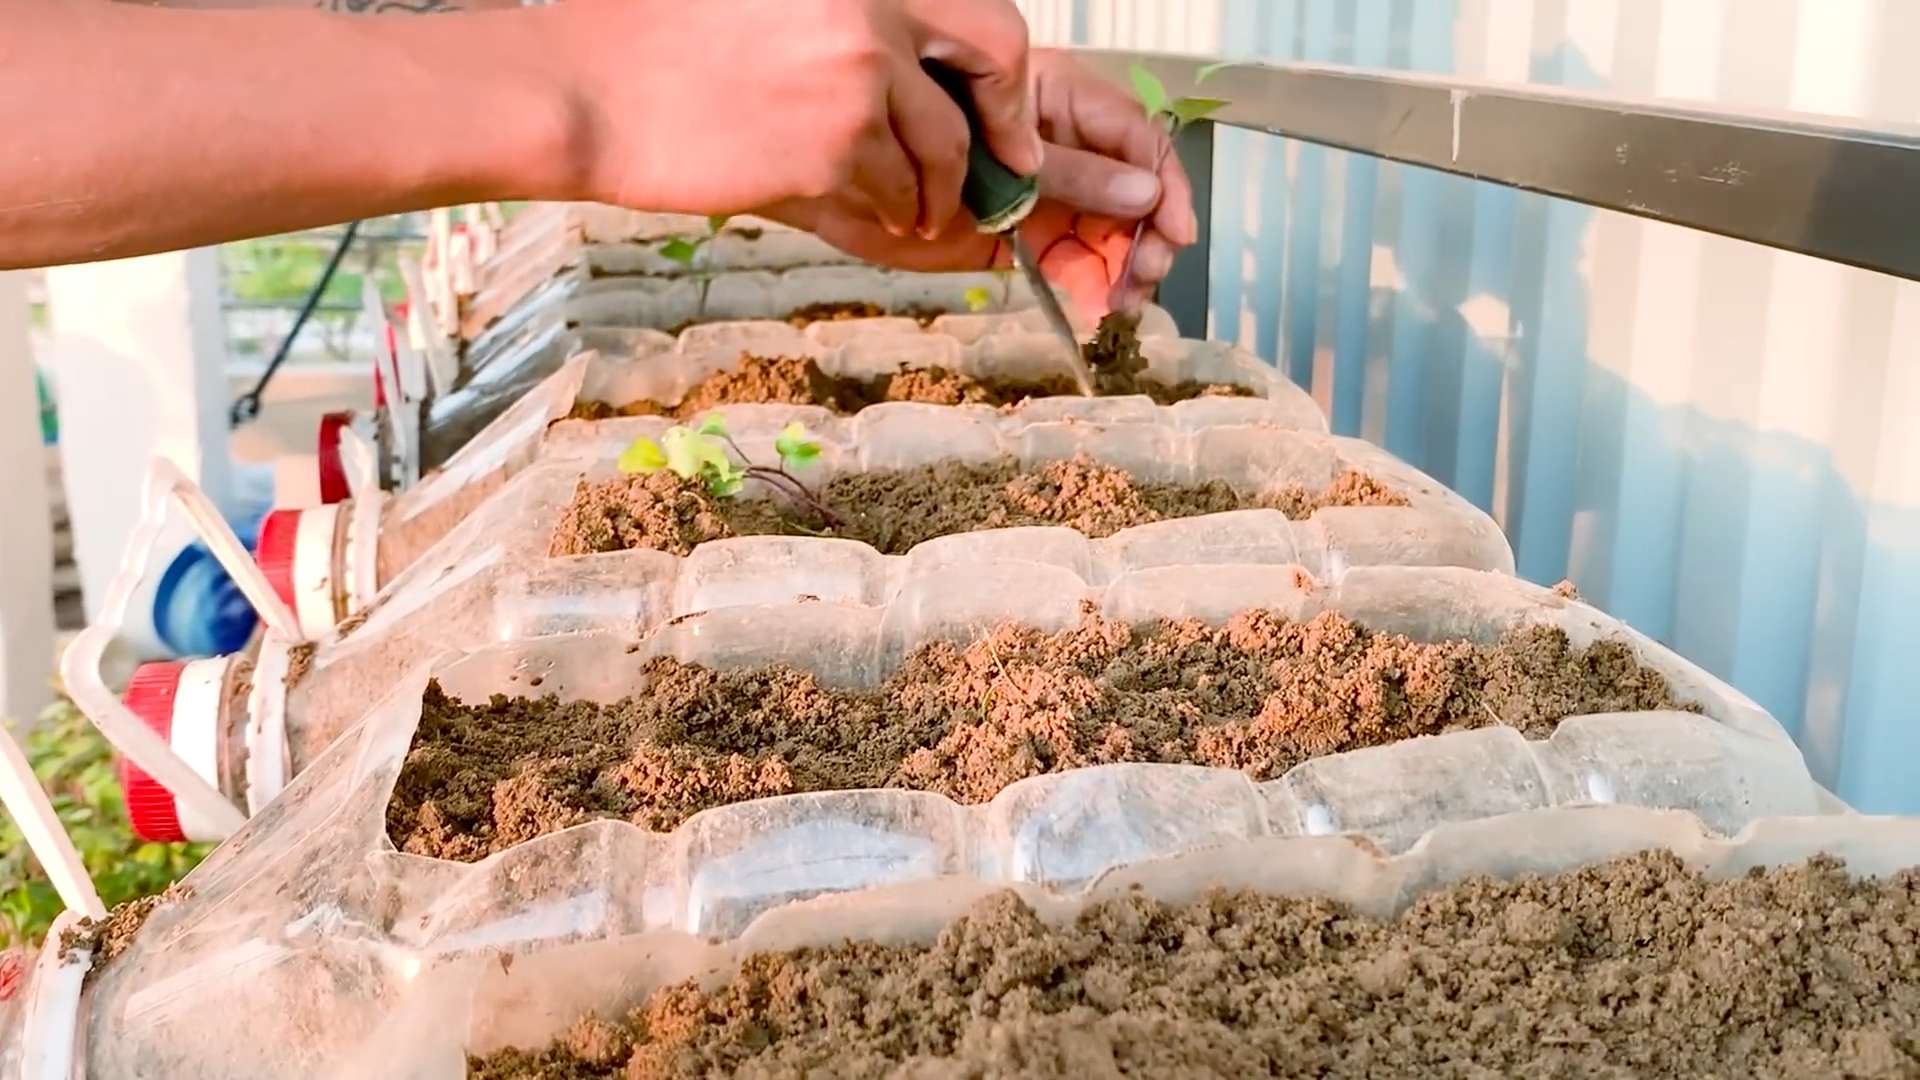
Transplanting Seedlings
1. Prepare your containers: Fill your containers with potting mix, leaving about an inch of space at the top.
2. Dig a hole: Make a hole in the center of the container that is large enough to accommodate the root ball of the seedling.
3. Gently remove the seedling from the seed starting tray: Be careful not to damage the roots.
4. Place the seedling in the hole: Make sure the top of the root ball is level with the soil surface.
5. Fill in the hole with potting mix: Gently firm the soil around the seedling.
6. Water thoroughly: Make sure the soil is evenly moist.
Caring for Your Kohlrabi Plants
Now that your kohlrabi is planted, it’s time to take care of it! Here’s what you need to do:
* Watering: Kohlrabi needs consistent moisture to thrive. Water deeply whenever the top inch of soil feels dry to the touch. Avoid overwatering, as this can lead to root rot.
* Fertilizing: Feed your kohlrabi plants every 2-3 weeks with a balanced, water-soluble fertilizer or an organic fertilizer like compost tea. Follow the instructions on the fertilizer package.
* Sunlight: Kohlrabi needs at least 6 hours of sunlight per day. Place your containers in a sunny location on your balcony.
* Weeding: Keep your containers free of weeds. Weeds can compete with your kohlrabi for nutrients and water.
* Pest control: Kohlrabi can be susceptible to pests like aphids, cabbage worms, and flea beetles. Inspect your plants regularly for signs of pests. If you find any, you can try spraying them with insecticidal soap or neem oil. You can also handpick the pests off the plants.
* Crop rotation: If you’re growing kohlrabi in the same containers year after year, it’s a good idea to practice crop rotation. This means planting different types of vegetables in the containers each year to help prevent soilborne diseases.
Harvesting Your Kohlrabi
The best part! Kohlrabi is usually ready to harvest about 55-70 days after planting, depending on the variety. You’ll want to harvest the bulbs when they are about 2-3 inches in diameter.
Here’s how to harvest kohlrabi:
1. Loosen the soil around the bulb: Use a trowel or small shovel to gently loosen the soil around the base of the plant.
2. Pull the bulb out of the soil: Grasp the bulb firmly and pull it straight up.
3. Cut off the leaves: Leave about an inch of stem attached to the bulb.
4. Store the kohlrabi: Kohlrabi can be stored in the refrigerator for several weeks.
Enjoying Your Harvest
Kohlrabi is incredibly versatile. You can eat it raw, cooked, or pickled. Here are a few of my favorite ways to enjoy kohlrabi:
* Raw: Slice it thinly and add it to salads or slaws. It has a crisp, slightly sweet flavor that’s delicious.
* Roasted: Toss it with olive oil, salt, and pepper and roast it in the oven until tender.
* Mashed: Boil or steam it until tender and then mash it with butter, milk, and seasonings.
* Stir-fried: Add it to stir-fries for a crunchy texture.
* Pickled: Pickle it for a tangy and refreshing snack.
Troubleshooting
Even with the best care, you might encounter some problems while growing kohlrabi. Here are a few common issues and how to address them:
* Bulbs are small and woody: This can be caused by overcrowding, lack of water, or poor soil. Make sure you thin your seedlings properly, water regularly, and fertilize
Conclusion
So, there you have it! Growing kohlrabi on your balcony isn’t just a whimsical gardening dream; it’s a surprisingly achievable reality that brings fresh, homegrown goodness right to your doorstep. We’ve walked you through the essential steps, from selecting the right container and soil to nurturing your kohlrabi plants for optimal growth. But why should you actually *do* this?
The answer is multifaceted. First and foremost, the taste of freshly harvested kohlrabi is simply unparalleled. Store-bought varieties often lack the crisp sweetness that homegrown kohlrabi boasts. Imagine adding that unique, slightly peppery crunch to your salads, stir-fries, or even enjoying it raw as a healthy snack. Beyond the taste, growing your own kohlrabi offers a sense of accomplishment and connection to nature, even in the heart of the city. It’s a therapeutic activity that can reduce stress and boost your overall well-being. Plus, you’ll have the satisfaction of knowing exactly where your food comes from and that it’s free from harmful pesticides.
But the benefits don’t stop there. Balcony gardening, especially with compact vegetables like kohlrabi, is a fantastic way to maximize limited space. It transforms your balcony into a vibrant, productive oasis. And let’s not forget the educational aspect. Growing kohlrabi is a wonderful learning experience for both adults and children, teaching valuable lessons about plant life cycles, responsibility, and the importance of sustainable food practices.
This DIY kohlrabi growing trick is a must-try because it empowers you to take control of your food source, enjoy fresher, tastier produce, and create a beautiful, functional balcony garden.
Now, let’s talk about variations and suggestions. Feel free to experiment with different kohlrabi varieties. ‘Early White Vienna’ and ‘Purple Vienna’ are popular choices, but there are also newer cultivars with unique colors and flavors. Consider companion planting to enhance growth and deter pests. Marigolds, nasturtiums, and dill are excellent companions for kohlrabi. You can also try succession planting, sowing seeds every few weeks to ensure a continuous harvest throughout the growing season. If you find that pests are a problem, consider using organic pest control methods like neem oil or insecticidal soap.
Don’t be afraid to get creative with your kohlrabi recipes! Try grating it into coleslaw, roasting it with other root vegetables, or even pickling it for a tangy treat. The possibilities are endless.
We’re confident that you’ll find growing kohlrabi on your balcony to be a rewarding and enjoyable experience. So, grab your seeds, soil, and containers, and get started today! We encourage you to share your experiences with us. Post photos of your kohlrabi plants on social media using #BalconyKohlrabi and tell us about your successes, challenges, and favorite kohlrabi recipes. We can’t wait to see what you create! Let’s build a community of balcony gardeners and inspire others to grow their own food, one kohlrabi at a time. Remember, even a small balcony can yield a bountiful harvest with a little bit of effort and the right knowledge. Happy gardening!
Frequently Asked Questions (FAQs)
What is the best time of year to plant kohlrabi on my balcony?
The ideal time to plant kohlrabi depends on your climate. Generally, kohlrabi is a cool-season crop, so it thrives in spring and fall. For a spring crop, start seeds indoors 4-6 weeks before the last expected frost. You can transplant them outdoors once the soil has warmed up and the risk of frost has passed. For a fall crop, sow seeds directly into your containers in late summer or early fall. Check your local weather forecast and planting guides for specific recommendations based on your region. If you live in an area with mild winters, you may even be able to grow kohlrabi year-round.
What size container do I need for growing kohlrabi?
Kohlrabi plants need adequate space for their roots to develop properly. A container that is at least 12 inches deep and 12 inches in diameter is generally sufficient for one kohlrabi plant. If you plan to grow multiple plants in the same container, choose a larger container accordingly. Ensure that the container has drainage holes to prevent waterlogging, which can lead to root rot. You can use plastic pots, terracotta pots, or even repurposed containers like buckets or tubs. Just make sure they are clean and have adequate drainage.
What type of soil is best for kohlrabi?
Kohlrabi prefers well-draining, fertile soil that is rich in organic matter. A good potting mix specifically formulated for vegetables is an excellent choice. You can also amend your own soil by mixing equal parts of garden soil, compost, and perlite or vermiculite. The compost will provide essential nutrients, while the perlite or vermiculite will improve drainage and aeration. Avoid using heavy clay soil, as it can become waterlogged and hinder root growth. Before planting, test the soil pH and adjust it if necessary. Kohlrabi prefers a slightly acidic to neutral pH of 6.0 to 7.0.
How often should I water my kohlrabi plants?
Kohlrabi plants need consistent moisture to thrive. Water them regularly, especially during hot and dry weather. Check the soil moisture by sticking your finger into the soil. If the top inch feels dry, it’s time to water. Water deeply, ensuring that the entire root zone is moistened. Avoid overwatering, as this can lead to root rot. Mulching around the plants can help retain moisture and suppress weeds. In general, you should water your kohlrabi plants every 2-3 days, but adjust the frequency based on the weather conditions and the moisture level of the soil.
How much sunlight do kohlrabi plants need?
Kohlrabi plants need at least 6 hours of direct sunlight per day to grow properly. Choose a location on your balcony that receives ample sunlight. If your balcony is partially shaded, try to position your kohlrabi plants where they will receive the most sunlight possible. You can also supplement with artificial light if necessary, especially if you are starting seeds indoors. Use grow lights specifically designed for plants and position them close to the seedlings. Rotate the plants regularly to ensure that they receive even light exposure.
What are some common pests and diseases that affect kohlrabi?
Kohlrabi plants can be susceptible to various pests and diseases, including aphids, cabbage worms, flea beetles, and clubroot. Regularly inspect your plants for signs of infestation or disease. If you notice any problems, take action immediately. For aphids, you can spray the plants with a strong stream of water or use insecticidal soap. Cabbage worms can be handpicked or treated with Bacillus thuringiensis (Bt), a natural insecticide. Flea beetles can be controlled with row covers or by spraying with neem oil. Clubroot is a soilborne disease that can be prevented by practicing crop rotation and ensuring good drainage.
How do I know when my kohlrabi is ready to harvest?
Kohlrabi is typically ready to harvest when the bulb is about 2-3 inches in diameter. The exact size will depend on the variety. Check the seed packet or plant label for specific harvesting instructions. The bulb should be firm and smooth. If it becomes too large, it can become tough and woody. To harvest, simply cut the bulb from the stem just above the soil line. You can also harvest the leaves, which are edible and can be used in salads or stir-fries.
Can I grow kohlrabi in the winter?
In many regions, growing kohlrabi in the winter is possible, especially in areas with mild climates. If you live in a colder climate, you can still grow kohlrabi indoors under grow lights. Choose a variety that is well-suited for indoor growing and provide adequate light, water, and nutrients. You may also need to protect the plants from frost if you are growing them outdoors in containers. Consider using a cold frame or greenhouse to extend the growing season.
What are some creative ways to use kohlrabi in cooking?
Kohlrabi is a versatile vegetable that can be used in a variety of dishes. You can eat it raw, cooked, or pickled. Raw kohlrabi has a crisp, slightly peppery flavor that is delicious in salads or as a snack. Cooked kohlrabi can be roasted, steamed, stir-fried, or added to soups and stews. It pairs well with other root vegetables, such as carrots, potatoes, and turnips. You can also use kohlrabi leaves in salads or stir-fries. Pickled kohlrabi is a tangy and refreshing condiment that can be used to add flavor to sandwiches, tacos, or other dishes.
Is growing kohlrabi organically on a balcony feasible?
Absolutely! Growing kohlrabi organically on your balcony is not only feasible but also highly recommended. By using organic potting mix, compost, and natural pest control methods, you can ensure that your kohlrabi plants are healthy and free from harmful chemicals. Avoid using synthetic fertilizers and pesticides, which can contaminate the soil and harm beneficial insects. Instead, opt for organic alternatives like compost tea, neem oil, and insecticidal soap. You can


Leave a Comment