
Grow More Yardlong Beans: Imagine harvesting armfuls of vibrant, delicious yardlong beans from your very own backyard! It’s not just a dream; it’s an achievable reality with a few clever tricks and DIY techniques. For centuries, these fascinating legumes, also known as asparagus beans or Chinese long beans, have been a staple in Asian cuisine, symbolizing prosperity and longevity. Their impressive length and unique flavor have made them a beloved ingredient in stir-fries, salads, and countless other dishes.
But let’s be honest, sometimes getting a bountiful harvest can feel like a challenge. That’s where this guide comes in! I’m going to share some of my favorite DIY hacks and proven strategies to help you grow more yardlong beans than you ever thought possible. Whether you’re a seasoned gardener or just starting out, these tips will empower you to maximize your yield and enjoy a continuous supply of these delectable beans.
Why do you need these tricks? Because who wouldn’t want a garden overflowing with fresh, homegrown produce? Plus, knowing you cultivated something so unique and delicious is incredibly rewarding. So, grab your gardening gloves, and let’s dive into the secrets of abundant yardlong bean harvests!
How to Grow Yardlong Beans Yourself: A Comprehensive DIY Guide
I love growing my own vegetables, and yardlong beans are one of my absolute favorite varieties! They are not only super delicious but also a real eye-catcher in the garden. In this article, I will show you step-by-step how you can grow these fascinating beans yourself. Don’t worry, it’s easier than you think!
What you need for growing yardlong beans:
- Seeds: Get high-quality yardlong bean seeds. You can find them in garden centers or online. Make sure they are suitable for your climate.
- Garden tools: Spade, rake, pruning shears, possibly a trowel.
- Soil: Well-draining, fertile soil is ideal.
- Fertilizer: Compost or organic fertilizer.
- Support/Trellis: Yardlong beans need support as they grow very long. You can use a trellis, a fence, or a teepee.
- Watering can or hose: For irrigation.
- Mulch: To retain moisture in the soil and suppress weeds.
Preparation is Everything: The Right Location and Soil
Before we start planting, it’s important to prepare the right location and soil. Yardlong beans love the sun!
- Choose a sunny location: Yardlong beans need at least 6-8 hours of sunlight per day.
- Prepare the soil: Loosen the soil with a spade and remove stones and weeds.
- Improve the soil: Mix compost or organic fertilizer into the soil to enrich it with nutrients. This helps the beans grow strong.
- Ensure good drainage: Yardlong beans do not like waterlogged soil. Make sure the soil is well-draining. If your soil is very clayey, you can add sand or perlite to improve drainage.
Sowing Yardlong Beans: How to Do It Right
The best time to sow yardlong beans is when there is no more risk of frost and the soil has warmed up. This is usually in late spring or early summer.
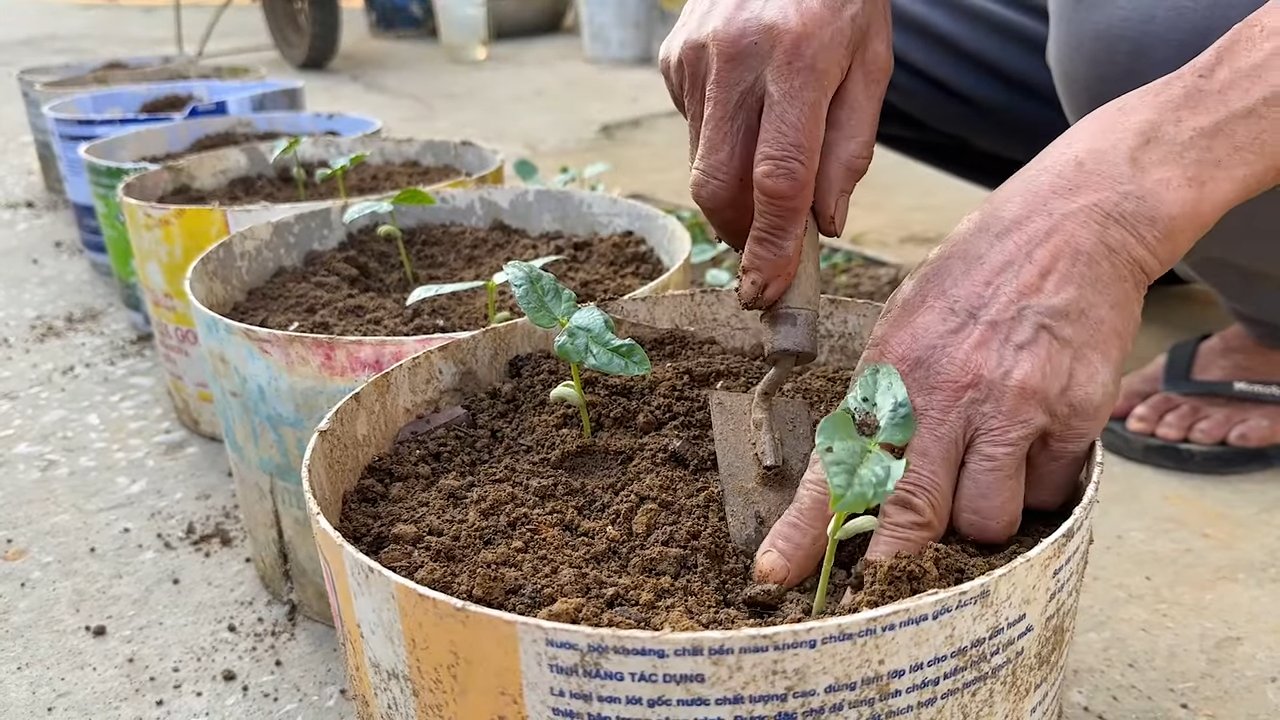
- Direct sowing or starting indoors: You can either sow the seeds directly into the bed or start them in pots. I prefer direct sowing as the plants are then more robust.
- Sowing in the bed: Make small holes about 10-15 cm (4-6 inches) apart. The holes should be about 2-3 cm (1 inch) deep.
- Place the seeds: Put 2-3 seeds in each hole. This increases the likelihood that at least one plant will germinate.
- Cover with soil: Cover the seeds with soil and press down lightly.
- Water: Water the soil gently so that it is moist but not wet.
- Starting indoors (optional): If you want to start the seeds indoors, sow them in small pots with seed-starting mix. Keep the soil moist and place the pots in a warm, bright place. Once the plants are large enough (about 10-15 cm / 4-6 inches), you can transplant them into the garden bed.
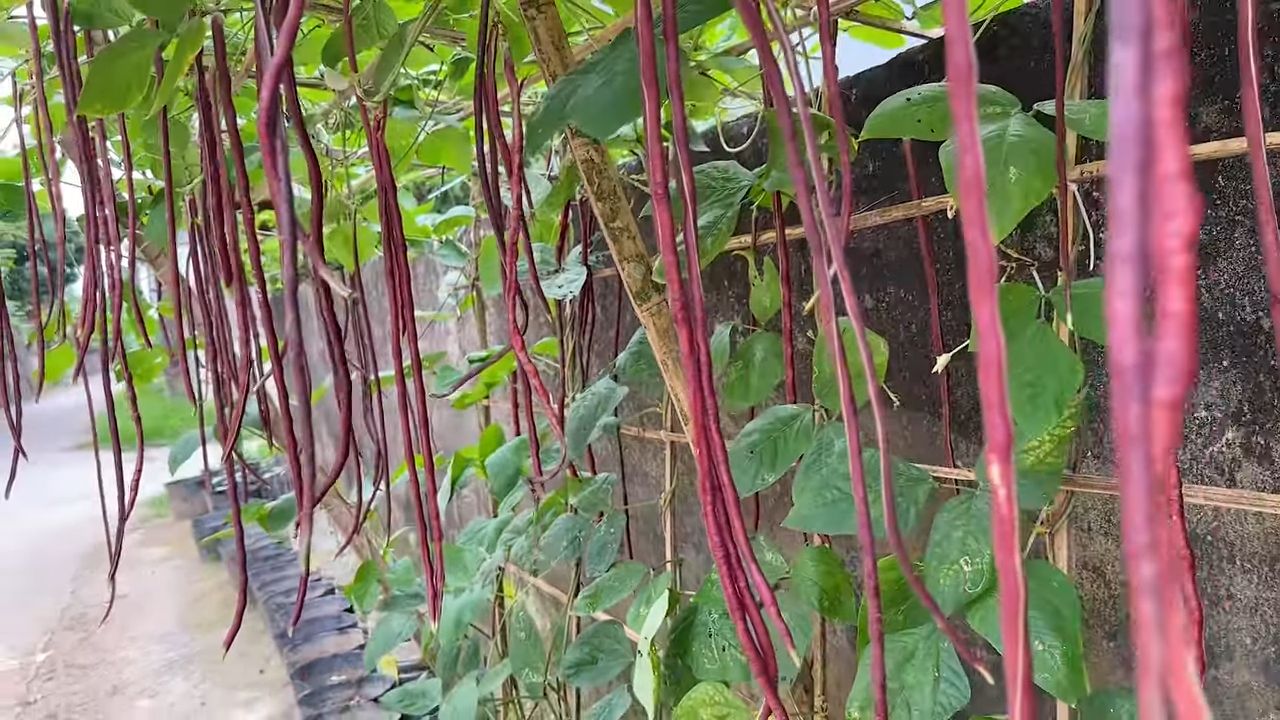
The Support/Trellis: Essential for Yardlong Beans
Yardlong beans are climbing plants and absolutely need a support structure. Without support, they cannot grow properly, and the harvest will be smaller.
- Choose the right support: There are various options for a support structure. You can use a trellis, a fence, a teepee, or even a self-built frame.
- Install the support: Make sure the support is stable and provides the plants with enough hold. The support should be at least 2 meters (about 6.5 feet) high, as yardlong beans can grow very long.
- Guide the plants: Once the plants are large enough, gently guide them along the support. You can secure them with plant ties or string.
Caring for Yardlong Beans: Watering, Fertilizing, Mulching
Proper care is crucial for a bountiful harvest.
- Watering: Water the plants regularly, especially during dry periods. Make sure the soil is always moist but not wet. It’s best to water in the morning so the leaves can dry during the day. This helps prevent fungal diseases.
- Fertilizing: Fertilize the plants every few weeks with compost or organic fertilizer. This provides them with the necessary nutrients.
- Mulching: Cover the soil around the plants with mulch. This retains moisture in the soil, suppresses weeds, and protects the roots from extreme temperatures.
- Remove weeds: Regularly remove weeds that grow around the plants. Weeds compete with the beans for nutrients and water.
- Pests and diseases: Watch out for pests like aphids or bean beetles. If necessary, you can use organic pesticides. Also, look for signs of diseases like mildew. Good air circulation and avoiding waterlogged soil can help prevent diseases.
Harvest Time: When are the Yardlong Beans Ripe?
The harvest time for yardlong beans usually begins about 60-70 days after sowing.
- Harvesting time: The beans are ripe when they are about 30-60 cm (12-24 inches) long and still feel tender. Depending on the variety, they can also grow longer.
- Harvesting: Cut the beans with pruning shears. Be careful not to damage the plant.
- Regular harvesting: Harvest the beans regularly to encourage the production of new beans. The more you harvest, the more beans will grow back.
- Storage: Yardlong beans do not last very long. You can store them in the refrigerator for a few days or freeze them.
Yardlong Beans in the Kitchen: Versatile and Delicious
Yardlong beans are incredibly versatile in the kitchen. You can boil, fry, grill, or use them in salads.
- Boiled: Boiled yardlong beans are a delicious side dish for meat or fish.
- Fried: Fried yardlong beans with garlic and chili are a delicious dish.
- Grilled: Grilled yardlong beans are a great addition to any barbecue.
- Salads: Raw yardlong beans, thinly sliced, are a crunchy ingredient for salads.
- Asian Cuisine: Yardlong beans are an important component of many Asian dishes, such as stir-fries or curries.
Additional Tips for Successful Cultivation:
- Practice crop rotation: Do not grow yardlong beans in the same location every year. Rotate the planting area to prevent diseases and pests.
- Beans as green manure: Yardlong beans are legumes and can enrich the soil with nitrogen. This makes them a good green manure crop.
- Saving seeds: If you wish, you can save seeds from your own yardlong beans. Let some beans mature and dry on the plant. You can then sow the seeds again the following year.
- Experiment: Try out different varieties of yardlong beans to find out which ones you like best and which grow best in your climate.
I hope this guide helps you.
Conclusion
So, there you have it! Growing your own yardlong beans isn’t just about adding a unique and delicious vegetable to your garden; it’s about embracing a rewarding and surprisingly simple DIY project that yields impressive results. Forget those flimsy, overpriced beans at the grocery store. With a little planning and effort, you can cultivate a thriving patch of these fascinating legumes right in your backyard.
Why is this DIY trick a must-try? Because it offers a trifecta of benefits: superior flavor, cost savings, and the sheer satisfaction of harvesting something you nurtured from seed. Freshly picked yardlong beans have a crispness and sweetness that store-bought varieties simply can’t match. Plus, think of the money you’ll save by bypassing the produce aisle! And let’s not forget the joy of watching those beans climb and flourish, a testament to your green thumb.
But the beauty of growing yardlong beans lies in its adaptability. Feel free to experiment with different varieties. Consider the ‘Red Noodle’ bean for its vibrant color and slightly nutty flavor, or the ‘Chinese Red Noodle’ for an even more intense hue. You can also adjust your growing methods to suit your space. If you’re short on ground space, try growing them in large containers on a balcony or patio. Just ensure they have a sturdy trellis or support system to climb.
Another variation to consider is companion planting. Yardlong beans thrive alongside certain plants, such as corn, sunflowers, and marigolds. These companions can help deter pests, attract pollinators, and even improve soil health. Research which plants work best in your region and create a symbiotic garden ecosystem.
Don’t be intimidated by the length of these beans! They’re incredibly versatile in the kitchen. Use them in stir-fries, salads, soups, or even grilled as a side dish. Their slightly chewy texture and mild flavor make them a perfect complement to a wide range of cuisines.
Ultimately, the best way to discover the magic of growing yardlong beans is to simply dive in and try it yourself. Start small, learn as you go, and don’t be afraid to experiment. The rewards are well worth the effort.
We encourage you to embark on this gardening adventure and experience the joy of harvesting your own homegrown yardlong beans. Once you’ve tasted the difference, you’ll never go back to store-bought! And most importantly, we want to hear about your experiences. Share your tips, successes, and even your challenges in the comments below. Let’s create a community of yardlong bean enthusiasts and learn from each other. Happy gardening!
Frequently Asked Questions (FAQ)
What are yardlong beans, and why should I grow them?
Yardlong beans, also known as asparagus beans or Chinese long beans, are a type of legume characterized by their exceptionally long pods, often reaching lengths of 18-36 inches. They offer a unique flavor and texture compared to regular green beans, with a slightly chewy consistency and a mild, sweet taste. Growing them yourself ensures you get the freshest, most flavorful beans possible, often at a fraction of the cost of store-bought varieties. Plus, the climbing nature of the plants adds visual interest to your garden.
How do I start growing yardlong beans?
You can start yardlong beans from seed either directly in the ground or indoors as transplants. If starting indoors, sow seeds 2-3 weeks before the last expected frost. Use a well-draining potting mix and keep the soil consistently moist. Once the seedlings have developed a few sets of true leaves and the weather has warmed up, you can transplant them outdoors. For direct sowing, wait until the soil temperature reaches at least 65°F (18°C). Choose a sunny location with well-drained soil and provide a sturdy trellis or support system for the beans to climb.
What kind of soil and sunlight do yardlong beans need?
Yardlong beans thrive in well-drained soil that is rich in organic matter. Amend your soil with compost or aged manure before planting to improve its fertility and drainage. They prefer a slightly acidic to neutral soil pH (around 6.0-7.0). They also require at least 6-8 hours of direct sunlight per day to produce a bountiful harvest. Insufficient sunlight can lead to leggy growth and reduced bean production.
How often should I water and fertilize my yardlong beans?
Water your yardlong beans regularly, especially during hot, dry weather. Aim to keep the soil consistently moist but not waterlogged. Water deeply at the base of the plants to avoid wetting the foliage, which can increase the risk of fungal diseases. Fertilize your yardlong beans with a balanced fertilizer (e.g., 10-10-10) at planting time and then again every 4-6 weeks during the growing season. Avoid over-fertilizing with nitrogen, as this can promote excessive foliage growth at the expense of bean production.
What kind of support system do yardlong beans need?
Yardlong beans are climbing plants and require a sturdy trellis or support system to grow properly. Options include trellises made of wood, metal, or bamboo, as well as fences, arbors, or even sunflowers. The support system should be at least 6-8 feet tall to accommodate the vigorous growth of the beans. Ensure the support is strong enough to withstand the weight of the mature plants and the beans.
What are some common pests and diseases that affect yardlong beans, and how can I prevent them?
Common pests that can affect yardlong beans include aphids, bean beetles, and spider mites. To prevent infestations, inspect your plants regularly and remove any pests you find by hand or with a strong spray of water. You can also use insecticidal soap or neem oil to control pests. Common diseases include fungal diseases such as powdery mildew and bean rust. To prevent these diseases, ensure good air circulation around your plants, avoid overhead watering, and apply a fungicide if necessary. Crop rotation can also help prevent soilborne diseases.
When and how do I harvest yardlong beans?
Yardlong beans are typically ready to harvest about 60-80 days after planting. Harvest the beans when they are young and tender, before the seeds inside become too large and tough. The pods should be firm and snap easily when bent. Use scissors or pruning shears to cut the beans from the vine, leaving a short stem attached. Harvest regularly to encourage continued production.
How do I store yardlong beans?
Freshly harvested yardlong beans can be stored in the refrigerator for up to a week. Place them in a plastic bag or container and keep them in the crisper drawer. You can also freeze yardlong beans for longer storage. Blanch them in boiling water for 2-3 minutes, then plunge them into ice water to stop the cooking process. Drain well and freeze in freezer bags or containers.
Can I save seeds from my yardlong beans to plant next year?
Yes, you can save seeds from your yardlong beans to plant next year. Allow some of the pods to mature fully on the vine until they are dry and brown. Remove the seeds from the pods and allow them to dry completely before storing them in an airtight container in a cool, dark, and dry place. Be aware that if you grew a hybrid variety, the seeds may not produce plants that are true to type.
Are there any companion plants that are beneficial for yardlong beans?
Yes, several companion plants can benefit yardlong beans. Corn and sunflowers can provide support for the beans to climb, while also providing shade and attracting beneficial insects. Marigolds can help deter pests such as nematodes and bean beetles. Other good companion plants include rosemary, thyme, and savory. Avoid planting yardlong beans near onions or garlic, as these can inhibit their growth.


Leave a Comment