
Grow mushrooms at home? Absolutely! Imagine harvesting fresh, flavorful mushrooms right from your own kitchen – no more trips to the grocery store or wondering about their freshness. For centuries, cultivating fungi has been a practice steeped in mystery and tradition, particularly in Eastern cultures where mushrooms are revered for their culinary and medicinal properties. From ancient Chinese emperors seeking the “elixir of life” to modern-day foodies experimenting with gourmet varieties, the allure of growing your own mushrooms has always been strong.
But let’s be honest, the idea of cultivating mushrooms can seem intimidating. Many people believe it requires specialized equipment and a degree in mycology. That’s where this DIY guide comes in! I’m here to demystify the process and show you that you can easily grow mushrooms at home with simple, affordable techniques. Whether you’re a seasoned gardener or a complete beginner, I’ll walk you through everything you need to know, from choosing the right mushroom variety to creating the perfect growing environment. Get ready to unlock the secrets of home mushroom cultivation and enjoy a delicious, sustainable harvest!
Mushroom Cultivation at Home: Your Own Mushroom Garden
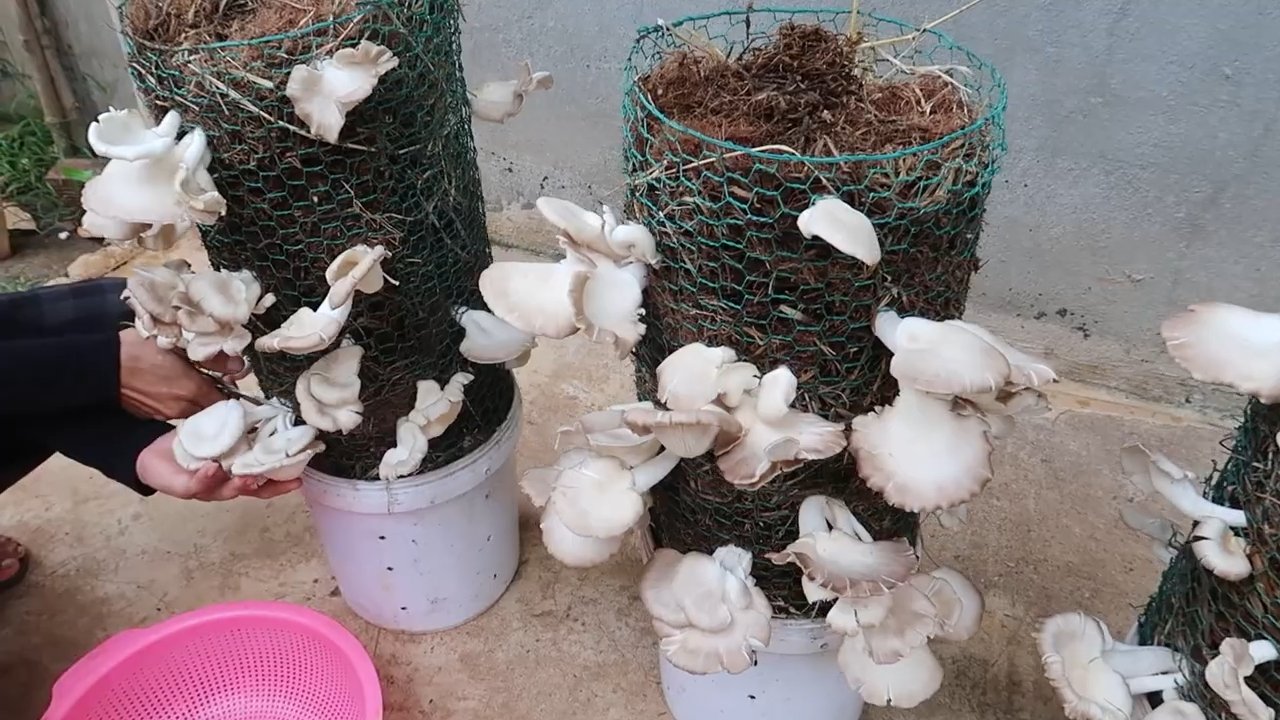
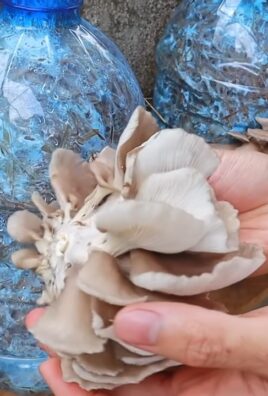
Hello dear mushroom friends! Have you ever wondered what it would be like to grow your own delicious mushrooms? It’s easier than you think and incredibly satisfying. In this article, I’ll show you how to grow your own mushrooms at home with simple tools and a little patience. We will focus on growing oyster mushrooms, as they are relatively easy to cultivate and provide a high yield. Let’s get started!
What you need for your mushroom cultivation project:
- Mushroom spawn: Oyster mushroom spawn (available online or in specialized garden centers). Make sure the spawn looks fresh and vital.
- Substrate: Straw (wheat straw is ideal), coffee grounds, or wood chips (hardwood).
- Container: Buckets, plastic bags, or special mushroom grow bags.
- Spray bottle: For moistening the substrate.
- Disinfectant: Alcohol or bleach solution to clean the work surface and containers.
- Gloves: To avoid contamination.
- Optional: Lime (for straw treatment), thermometer, hygrometer.
Preparation is Everything: The Substrate
Before we start the actual growing, we need to prepare the substrate. The substrate is the food source for our mushrooms, so good preparation is crucial for success.
Preparing Straw Substrate:
- Pasteurization: Straw contains many microorganisms that could compete with our mushrooms. To eliminate them, we need to pasteurize the straw. This means we heat it to kill the harmful microorganisms without destroying the beneficial nutrients.
- Fill a large pot or tub with water.
- Heat the water to about 70-80°C. A thermometer is very helpful here.
- Submerge the straw completely in the hot water and let it soak for 60-90 minutes.
- After pasteurization, let the straw cool down and drain the excess water. The straw should be moist, but not dripping wet.
- Lime treatment (optional, but recommended): By adding lime, we increase the pH of the straw, which promotes the growth of oyster mushrooms and inhibits the growth of mold.
- Mix about 1-2% lime (based on the dry weight of the straw) with the cooled straw. Be sure to wear gloves!
- Mix everything thoroughly so that the lime is evenly distributed.
Preparing Coffee Grounds Substrate:
Coffee grounds are a fantastic substrate for oyster mushrooms because they are already pasteurized (through the brewing process) and rich in nutrients.
- Collect: Collect fresh coffee grounds. Preferably directly from the filter or coffee machine.
- Cool down: Let the coffee grounds cool before processing them further.
- Mix (optional): You can mix the coffee grounds with other substrates like straw or wood chips to increase the nutrient diversity. A ratio of 50% coffee grounds and 50% straw or wood chips is ideal.
Preparing Wood Chip Substrate:
Wood chips are particularly well-suited for growing oyster mushrooms that grow on wood.
- Selection: Use hardwood chips (beech, oak, maple). Avoid softwood chips, as they contain resins that can inhibit mushroom growth.
- Pasteurization: Like with straw, the wood chips must also be pasteurized.
- Fill a large pot or tub with water.
- Heat the water to about 70-80°C.
- Submerge the wood chips completely in the hot water and let them soak for 60-90 minutes.
- After pasteurization, let the wood chips cool down and drain the excess water.
The Inoculation: Introducing Mushroom Spawn to the Substrate
Now comes the exciting part: we introduce the mushroom spawn into our prepared substrate. This process is called inoculation.
- Cleaning: Clean your work surface thoroughly with disinfectant. Wear gloves to avoid contamination.
- Layered Filling: Fill your container (bucket, plastic bag, mushroom grow bag) layer by layer with substrate and mushroom spawn. Start with a layer of substrate, then a layer of mushroom spawn, then substrate again, and so on. The ratio should be about 10-20% mushroom spawn to 80-90% substrate.
- Compaction: Press each layer down lightly to ensure good contact between the substrate and the spawn.
- Finishing: The top layer should be substrate.
- Ventilation: If you are using a bucket or plastic bag, drill small holes (about 5-10 mm in diameter) in the container to ensure good ventilation. The holes should be about 5-10 cm apart. For mushroom grow bags, the holes are usually already present.
The Incubation: Waiting and Watching
After inoculation, the incubation phase begins. In this phase, the mycelium (the fungal network) grows through the substrate.
- Location: Place the container in a dark, warm place (about 20-25°C). Avoid direct sunlight.
- Humidity: The humidity should be high (about 80-90%). You can increase the humidity by covering the container with a plastic sheet or placing it in a humid room (e.g., a bathroom).
- Observation: Observe the container regularly. After a few days or weeks (depending on the mushroom species and substrate), you should see a white, fluffy mycelium spreading over the substrate.
- Contamination: Watch for signs of contamination, such as green, black, or orange spots. If you discover contamination, remove the affected area immediately to prevent it from spreading further.
The Fruiting: Finally, Mushrooms!
Once the mycelium has completely colonized the substrate (it should be completely white), it is time for fruiting.
- Change of Location: Move the container to a brighter place, but avoid direct sunlight.
- Temperature: The temperature should be slightly lower than in the incubation phase (about 15-20°C).
- Humidity: The humidity should remain high (about 80-90%). Spray the container regularly with water to maintain humidity.
- Ventilation: Ensure good ventilation to promote the formation of mushroom caps.
- Mushroom Formation: After a few days or weeks, small mushroom heads should form. These grow quickly and will soon be ready to harvest.
The Harvest: Pure Enjoyment!
The harvest is the highlight of our mushroom cultivation project.
Harvest Time: Harvest the mushrooms when the caps have fully developed but have not yet begun to drop spores (recognizable by a white, powdery coating under the caps).

Conclusion
So, there you have it! Cultivating your own mushrooms at home is not only surprisingly simple, but it’s also an incredibly rewarding experience. Forget those expensive, pre-packaged mushrooms from the grocery store – imagine the satisfaction of harvesting your own fresh, flavorful fungi, knowing exactly where they came from and how they were grown. This DIY project transforms you from a consumer into a creator, connecting you with the natural world in a tangible and delicious way.
Why is this a must-try? Beyond the cost savings and the sheer joy of gardening, growing mushrooms at home offers unparalleled freshness and flavor. Commercially grown mushrooms often travel long distances, losing some of their peak taste and nutritional value along the way. When you grow your own, you can harvest them at their prime, ensuring the most intense and satisfying culinary experience. Plus, it’s a fantastic conversation starter! Imagine serving a dish featuring mushrooms you personally cultivated – your guests will be amazed.
But the benefits don’t stop there. This project is also incredibly educational, offering a fascinating glimpse into the world of mycology. You’ll learn about the life cycle of fungi, the importance of substrate and humidity, and the delicate balance required for successful cultivation. It’s a hands-on science lesson that’s both engaging and delicious.
Ready to take your mushroom growing to the next level? Consider experimenting with different substrates. While coffee grounds are a great starting point, you can also try using straw, sawdust, or even cardboard. Each substrate will impart a slightly different flavor and texture to your mushrooms. You can also explore different varieties of mushrooms. Oyster mushrooms are a popular choice for beginners, but once you’ve mastered the basics, you can branch out to shiitake, lion’s mane, or even more exotic species. Remember to research the specific needs of each variety to ensure optimal growth.
Another variation to consider is the growing environment. While a dark, humid closet is a good starting point, you can also create a more sophisticated growing chamber using a plastic tub or even a repurposed refrigerator. Adding a humidifier and a small fan can help to maintain the ideal temperature and humidity levels, leading to even more impressive yields.
Don’t be afraid to experiment and adapt the process to suit your own needs and preferences. The beauty of DIY is that it’s all about learning and adapting. And most importantly, don’t be discouraged if your first attempt isn’t perfect. Mushroom growing can be a bit of a learning curve, but with patience and persistence, you’ll be harvesting your own delicious mushrooms in no time.
So, what are you waiting for? Grab some coffee grounds, a spray bottle, and a little bit of patience, and embark on your own mushroom growing adventure. We’re confident that you’ll be amazed by the results. We encourage you to try this **grow mushrooms at home** method and share your experiences with us! Post pictures of your mushroom harvests on social media using #HomeGrownMushrooms and tell us about your successes (and your challenges!). We can’t wait to see what you create!
Frequently Asked Questions
What kind of mushrooms can I grow at home?
The easiest mushrooms to grow at home, especially for beginners, are oyster mushrooms. They are relatively forgiving and can thrive on a variety of substrates, including coffee grounds, straw, and even cardboard. Other popular choices include shiitake mushrooms, which require a bit more patience and a different substrate (typically hardwood sawdust), and lion’s mane mushrooms, known for their unique texture and flavor. The key is to research the specific needs of each variety before you begin. Some mushrooms, like morels, are notoriously difficult to cultivate and are best left to experienced foragers.
How long does it take to grow mushrooms at home?
The time it takes to grow mushrooms at home depends on the variety of mushroom and the growing conditions. Oyster mushrooms are generally the fastest, often fruiting within a few weeks of inoculation. Shiitake mushrooms can take several months to fruit, while other varieties may take even longer. Factors such as temperature, humidity, and substrate quality can also affect the growth rate. Be patient and consistent with your care, and you’ll eventually be rewarded with a bountiful harvest.
What are the best growing conditions for mushrooms?
Mushrooms generally prefer a dark, humid environment with good air circulation. The ideal temperature varies depending on the variety, but most mushrooms thrive in temperatures between 60 and 75 degrees Fahrenheit. Humidity is crucial for mushroom growth, so you’ll need to mist your growing medium regularly to keep it moist. Good air circulation helps to prevent mold and other contaminants from taking hold. A dark closet or basement is often a good starting point, but you can also create a more controlled environment using a plastic tub or a repurposed refrigerator.
Can I use any type of coffee grounds to grow mushrooms?
Yes, you can use most types of coffee grounds to grow mushrooms, but it’s best to use grounds that are relatively fresh and free of contaminants. Avoid using grounds that have been sitting out for too long, as they may have already started to decompose. Used coffee grounds are ideal because the brewing process sterilizes them to some extent. Both caffeinated and decaffeinated coffee grounds can be used, as the caffeine content is not a significant factor in mushroom growth.
How do I know when my mushrooms are ready to harvest?
Mushrooms are typically ready to harvest when the caps have fully opened and the gills are visible. The exact timing will vary depending on the variety, but a good rule of thumb is to harvest them just before the caps start to flatten out. Gently twist or cut the mushrooms off at the base of the stem, being careful not to damage the surrounding mycelium.
What if my mushrooms don’t grow?
There are several reasons why your mushrooms might not be growing. The most common causes include insufficient humidity, improper temperature, contamination, or poor substrate quality. Make sure you’re providing the right growing conditions for your chosen variety of mushroom, and be vigilant about preventing contamination. If you’re using coffee grounds, make sure they’re relatively fresh and free of mold. If you’re still having trouble, try experimenting with different substrates or growing environments.
Are there any risks associated with growing mushrooms at home?
The main risk associated with growing mushrooms at home is the potential for contamination. Mold and other fungi can compete with your mushrooms for resources, preventing them from growing. To minimize this risk, it’s important to sterilize your substrate and growing containers before you begin. You should also maintain good hygiene practices, such as washing your hands thoroughly before handling your mushrooms. It’s also crucial to properly identify the mushrooms you are growing. Only consume mushrooms that you are 100% certain are safe to eat. If you are unsure, it’s best to err on the side of caution and discard them.
Can I grow mushrooms outdoors?
Yes, you can grow mushrooms outdoors, but it requires a bit more planning and preparation. You’ll need to choose a location that is shaded and protected from the elements. You’ll also need to ensure that the soil is well-drained and rich in organic matter. Some mushrooms, such as wine cap stropharia, are particularly well-suited for outdoor cultivation.
How do I store my harvested mushrooms?
Freshly harvested mushrooms are best stored in the refrigerator in a paper bag. This will help to absorb excess moisture and prevent them from becoming slimy. They should be used within a few days of harvesting. You can also dry or freeze your mushrooms for longer-term storage. To dry them, simply slice them thinly and place them in a dehydrator or oven on low heat. To freeze them, blanch them briefly in boiling water and then transfer them to an ice bath. Once they’re cooled, you can pack them into freezer bags and store them in the freezer for up to a year.
Leave a Comment