
Grow mushrooms at home? Absolutely! Imagine harvesting fresh, flavorful mushrooms right from your own kitchen. No more trips to the grocery store or wondering about their freshness. This isn’t just a culinary dream; it’s a surprisingly achievable reality with our easy DIY guide!
For centuries, mushroom cultivation has been a treasured practice, particularly in Eastern cultures. From ancient Chinese medicinal practices to the sophisticated truffle farms of Europe, the art of growing fungi has deep roots. Now, you can tap into this rich history and bring the magic of mushroom farming into your own home.
Why should you learn to grow mushrooms at home? Well, beyond the sheer satisfaction of nurturing your own food, it’s incredibly practical. Store-bought mushrooms can be expensive and often lack the robust flavor of freshly harvested ones. Plus, you’ll know exactly what went into growing them – no pesticides or mystery ingredients! In this article, I’ll show you simple, step-by-step methods to cultivate delicious mushrooms, even if you have limited space or experience. Get ready to embark on a fun and rewarding journey into the fascinating world of home mycology!
Grow Your Own Gourmet Mushrooms at Home: A Beginner’s Guide
Hey there, fellow fungi fanatics! Ever dreamt of harvesting your own delicious mushrooms right in your kitchen? Well, dream no more! Growing mushrooms at home is surprisingly easier than you might think, and I’m here to guide you through the process. This guide focuses on growing oyster mushrooms, as they’re relatively forgiving and produce a bountiful harvest. Let’s get started!
What You’ll Need
Before we dive in, let’s gather our supplies. Don’t worry, you probably have some of these already!
* Oyster Mushroom Spawn: This is the “seed” of your mushrooms. You can find it online or at a local gardening supply store. Make sure to get a reputable source!
* Substrate: This is what your mushrooms will grow on. Straw is a fantastic option, as it’s readily available and affordable. You can also use coffee grounds, but we’ll stick with straw for this guide.
* Large Heat-Resistant Bag: A polypropylene (PP) bag is ideal. These can withstand high temperatures during pasteurization.
* Large Pot or Container: Big enough to submerge your straw.
* Bleach: For sanitizing.
* Spray Bottle: For misting.
* Gloves: To keep everything clean.
* Thermometer: To monitor the temperature of the straw during pasteurization.
* Drill or Knife: For creating ventilation holes in the bag.
* Rubbing Alcohol: For sanitizing your hands and tools.
* A Clean, Dark, and Humid Space: A basement, closet, or even under the sink can work!
Preparing the Substrate: Pasteurization is Key!
This is arguably the most crucial step. Pasteurization kills off competing organisms that could prevent your mushrooms from growing. Think of it as clearing the playing field for your oyster mushrooms.
1. Chop the Straw: Cut the straw into smaller pieces, about 2-3 inches long. This makes it easier for the mycelium (the mushroom’s root system) to colonize. I like to use garden shears for this.
2. Soak the Straw: Fill your large pot or container with water and add a splash of bleach (about 1 tablespoon per gallon of water). This helps to further sanitize the straw. Submerge the chopped straw in the water and let it soak for at least 24 hours. This ensures the straw is thoroughly hydrated.
3. Pasteurize the Straw: Drain the water from the straw. Now, we need to heat the straw to pasteurize it. There are a couple of ways to do this:
* Hot Water Pasteurization: This is the method I prefer. Fill your pot with fresh water and bring it to a temperature of 160-180°F (71-82°C). Place the soaked straw in the water and maintain that temperature for 60-90 minutes. Use your thermometer to keep a close eye on the temperature. Don’t let it get too hot, or you’ll kill beneficial organisms along with the bad ones!
* Steam Pasteurization: If you have a steamer, you can steam the straw for 60-90 minutes. Make sure the straw is evenly exposed to the steam.
4. Cool the Straw: After pasteurization, carefully remove the straw from the hot water (or steamer) and let it cool down to room temperature. This is important! You don’t want to cook your mushroom spawn. I usually spread the straw out on a clean surface to help it cool faster.
Inoculating the Substrate: Planting the Seeds
Now for the fun part – introducing the mushroom spawn to the straw!
1. Sanitize Everything: Before you start, thoroughly sanitize your hands with rubbing alcohol. Also, wipe down your work surface and the inside of the PP bag with rubbing alcohol. We want to minimize the risk of contamination.
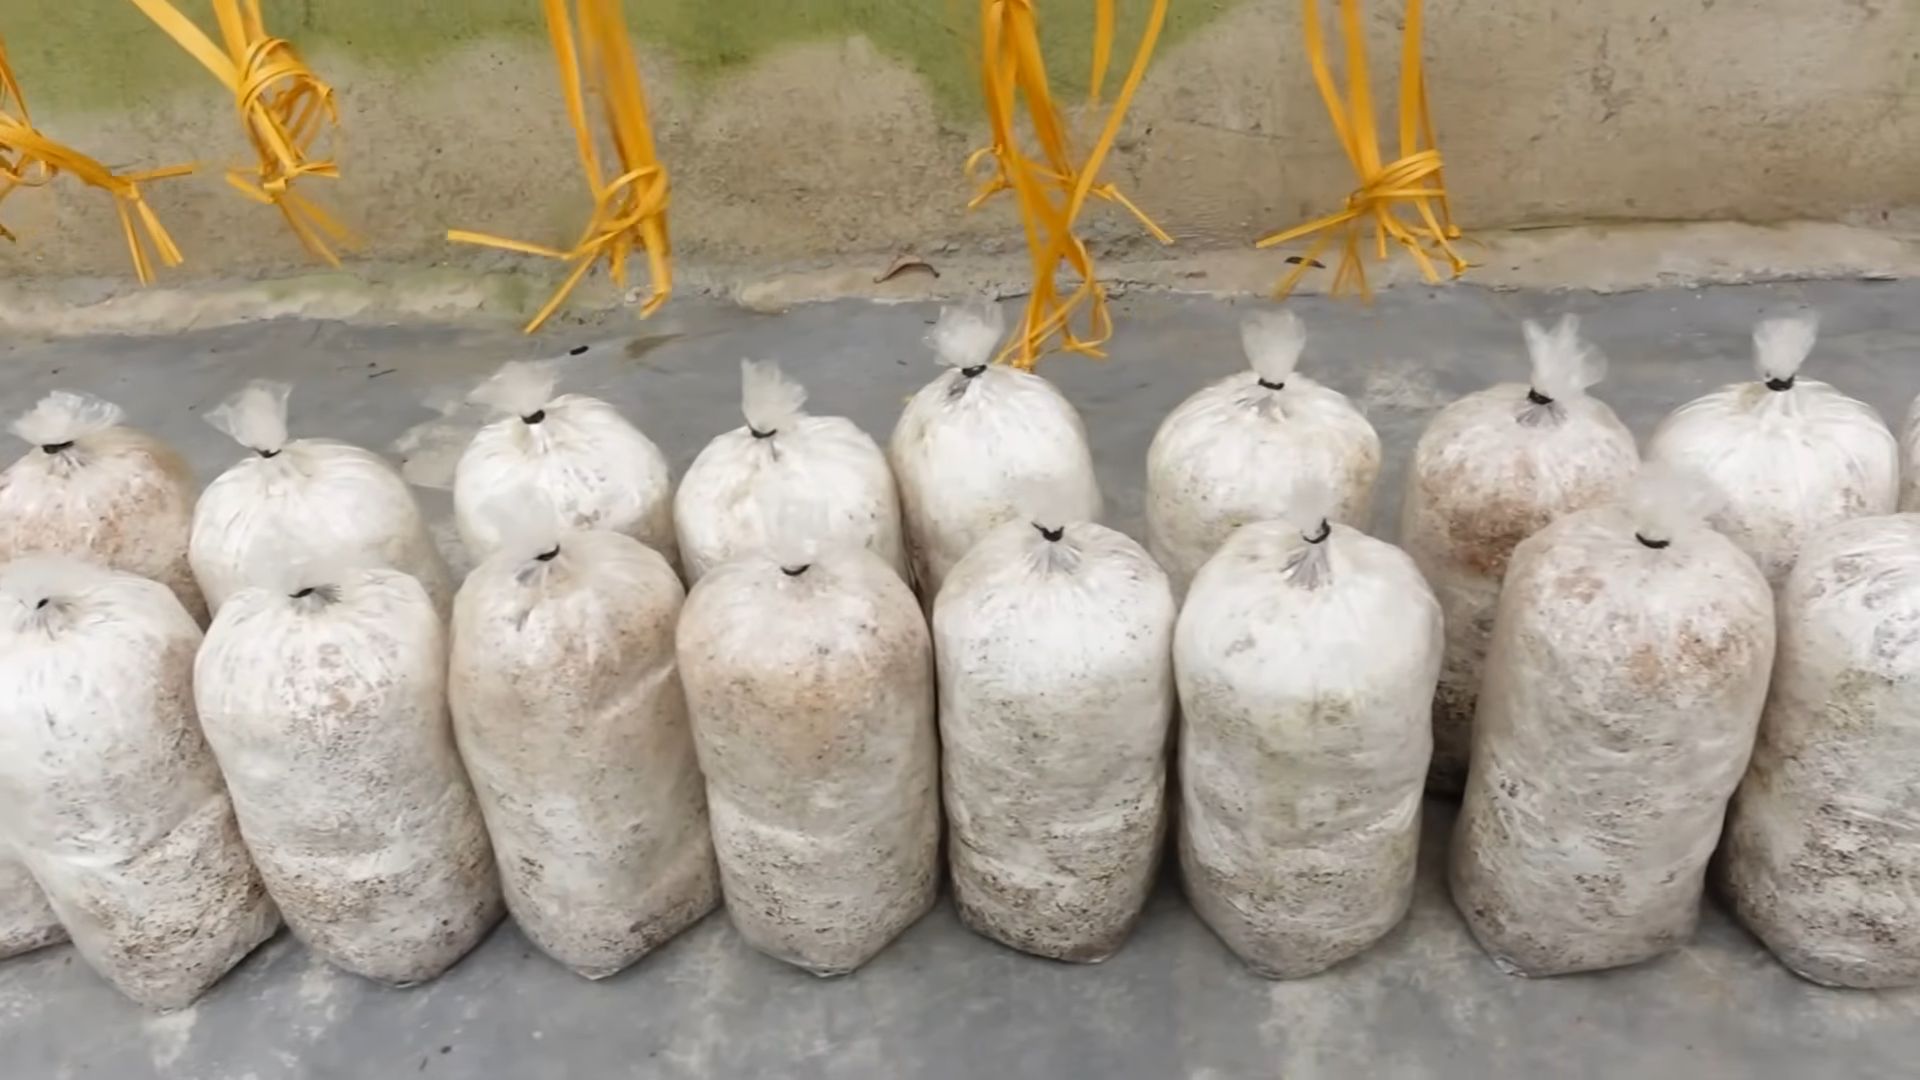
2. Layer the Straw and Spawn: Place a layer of pasteurized straw in the bottom of the PP bag. Then, sprinkle a layer of oyster mushroom spawn over the straw. Repeat this process, layering straw and spawn, until the bag is almost full. The final layer should be straw. A good rule of thumb is to use about 5-10% spawn by weight of the straw.
3. Seal the Bag: Fold the top of the bag over several times and secure it with tape or a rubber band. You want to create a tight seal to prevent contamination.
4. Create Ventilation Holes: Using a drill or a knife, carefully create several small ventilation holes (about ¼ inch in diameter) in the bag. These holes will allow the mushrooms to breathe. Space them evenly around the bag. I usually make about 10-15 holes.
Incubation: The Waiting Game
This is where patience comes in. The mycelium needs time to colonize the straw.
1. Find a Suitable Location: Place the bag in a clean, dark, and humid location. A temperature of 65-75°F (18-24°C) is ideal. A basement, closet, or even under the sink can work well.
2. Monitor the Bag: Check the bag regularly for signs of colonization. You should start to see white, fuzzy growth (the mycelium) spreading throughout the straw. This usually takes about 2-3 weeks.
3. Maintain Humidity: If the air in your chosen location is dry, you may need to mist the bag lightly with water every few days to maintain humidity. Be careful not to overwater, as this can lead to mold growth.
Fruiting: Time to Harvest!
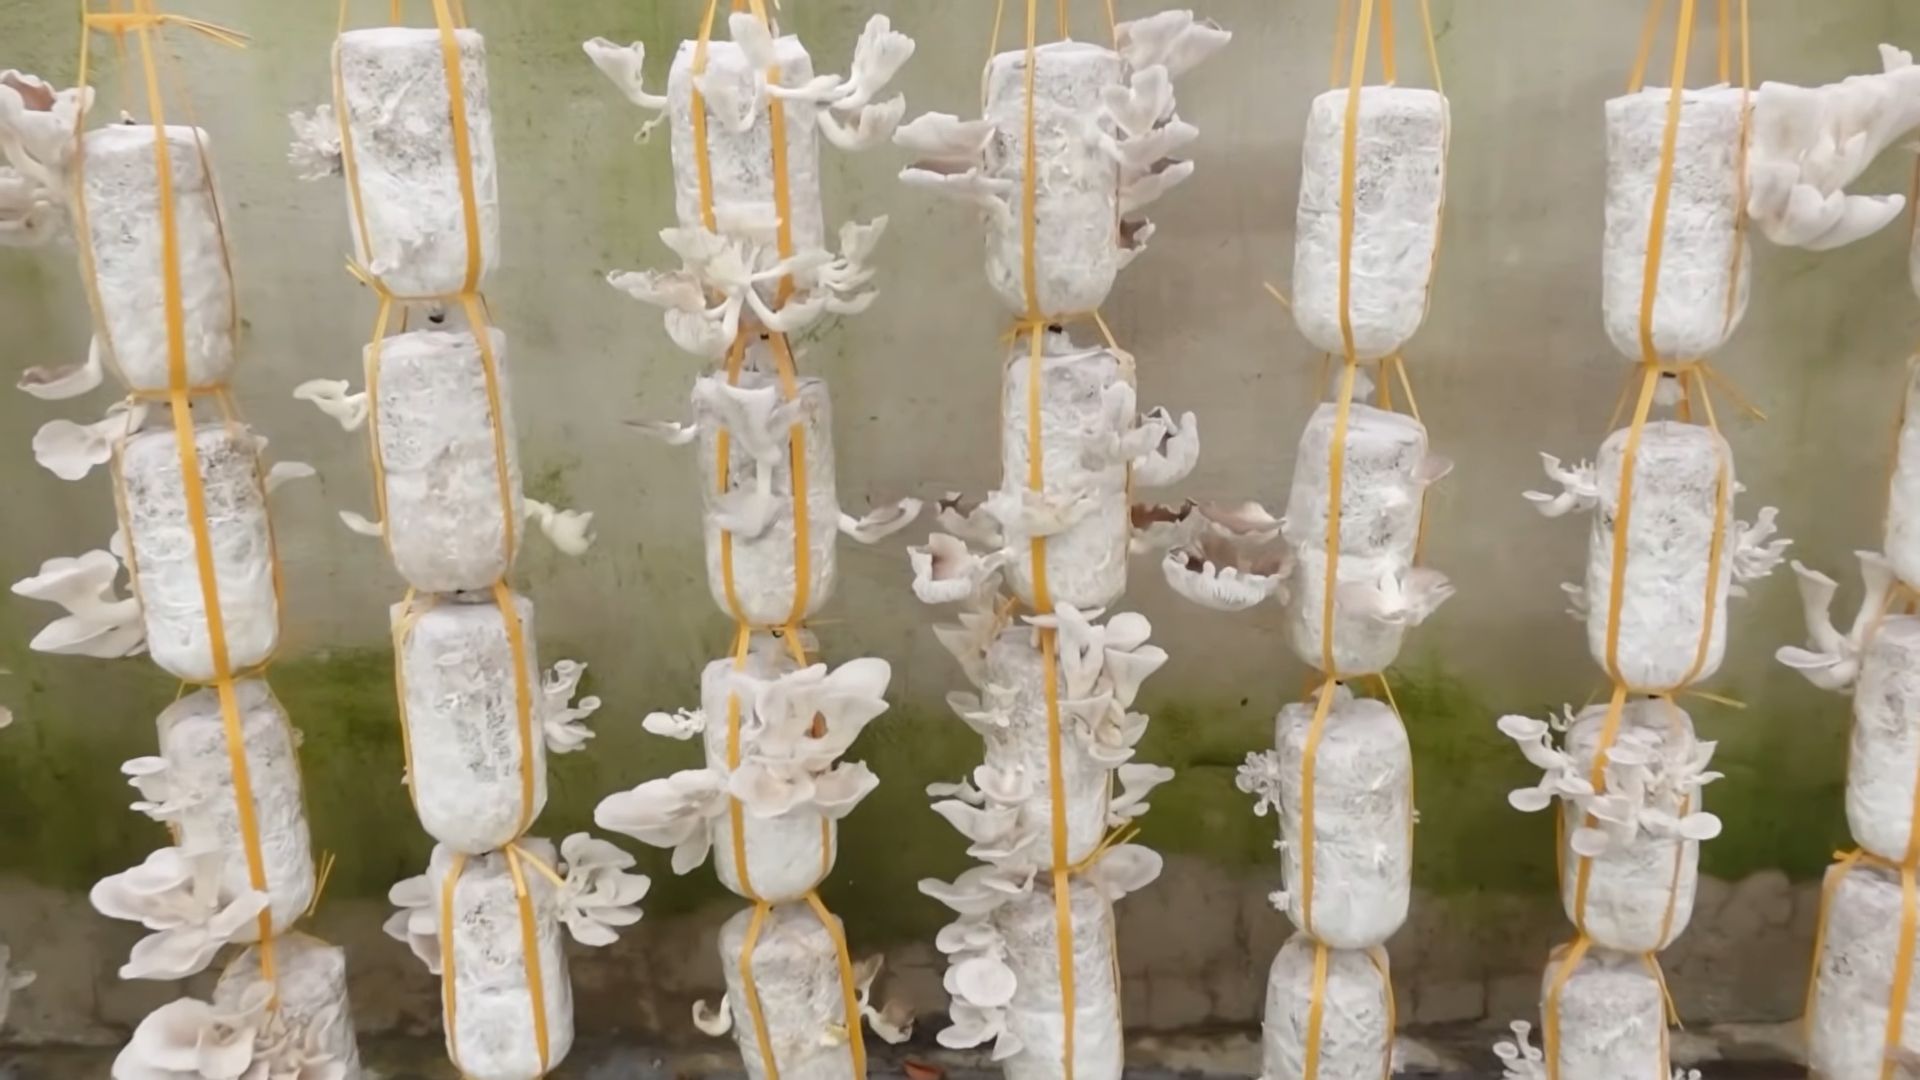
Once the straw is fully colonized (it will look completely white), it’s time to initiate fruiting.
1. Increase Light and Ventilation: Move the bag to a location with more light (but not direct sunlight) and increased ventilation. This signals to the mycelium that it’s time to produce mushrooms.
2. Cut an Opening: Cut a slit or an “X” shape in the bag where you want the mushrooms to grow. This will provide an opening for the mushrooms to emerge.
3. Maintain Humidity: Mist the opening with water several times a day to maintain high humidity. This is crucial for mushroom development.
4. Harvest the Mushrooms: In a week or two, you should start to see small mushroom “pins” forming. These will quickly grow into mature oyster mushrooms. Harvest the mushrooms when the caps are fully developed but before they start to drop spores. To harvest, simply twist or cut the mushrooms off the substrate.
Troubleshooting: What to Do When Things Go Wrong
Sometimes, things don’t go exactly as planned. Here are a few common problems and how to address them:
* Contamination (Mold): If you see green, black, or other colored mold growing in the bag, it’s contaminated. Unfortunately, there’s not much you can do at this point. Dispose of the bag properly to prevent the mold from spreading. Prevention is key – make sure to pasteurize your substrate thoroughly and sanitize everything!
* Slow Colonization: If the mycelium is growing slowly, it could be due to low temperature, low humidity, or poor spawn quality. Make sure the temperature is within the ideal range (65-75°F), increase humidity by misting, and ensure you’re using fresh, high-quality spawn.
* No Fruiting: If the straw is fully colonized but no mushrooms are forming, it could be due to lack of light, lack of ventilation, or low humidity. Move the bag to a location with more light and ventilation, and increase humidity by misting.
* Small Mushrooms: If the mushrooms are small and stunted, it could be due to lack of humidity or nutrients. Make sure to maintain high humidity by misting, and consider adding a small amount of nutrient-rich supplement to the substrate (like coffee grounds) in future grows.
Tips for Success
* Start Small: Don’t try to grow too much at once. Start with a small bag and gradually increase the size as you gain experience.
* Be Patient: Mushroom growing takes time. Don’t get discouraged if you don’t see results immediately.
* Keep it Clean: Sanitation is crucial for preventing contamination.
* Experiment: Try different substrates and growing conditions to see what works best for you.
* Have Fun! Growing mushrooms is a rewarding and fascinating hobby. Enjoy the process!
Growing mushrooms at home is a journey, and there’s always something new to learn. Don’t be afraid to experiment and adapt your techniques as you go. With a little patience and effort, you’ll be enjoying fresh, homegrown oyster mushrooms in no time! Happy growing!
Conclusion
So, there you have it! Growing mushrooms at home is not only achievable but also incredibly rewarding. Forget those expensive, pre-packaged mushrooms from the grocery store. With a little patience and these simple steps, you can cultivate your own fresh, flavorful fungi right in your kitchen, basement, or even a shady spot in your garden.
This DIY trick is a must-try for several compelling reasons. First and foremost, the taste of homegrown mushrooms is simply unparalleled. They are fresher, more vibrant, and possess a depth of flavor that store-bought varieties often lack. Imagine adding these intensely flavorful mushrooms to your favorite pasta dishes, omelets, or stir-fries. The possibilities are endless!
Secondly, growing mushrooms at home is a sustainable and eco-friendly practice. You’re reducing your reliance on commercially grown mushrooms, which often involve long transportation distances and intensive farming methods. By cultivating your own, you’re contributing to a more localized and environmentally conscious food system.
Thirdly, it’s a fantastic learning experience. You’ll gain a deeper understanding of the fascinating world of fungi and the intricate processes involved in their growth. It’s a rewarding hobby that connects you to nature and provides a sense of accomplishment.
Ready to experiment? Consider these variations to personalize your mushroom-growing journey:
* Different Mushroom Varieties: While we focused on oyster mushrooms in this guide, don’t be afraid to explore other varieties like shiitake, lion’s mane, or even wine cap mushrooms. Each variety has its unique flavor profile and growing requirements, so do your research and choose one that suits your preferences and environment.
* Substrate Experimentation: The substrate is the foundation of your mushroom farm. While straw and coffee grounds are popular choices, you can also experiment with other materials like sawdust, cardboard, or even agricultural waste products. Just ensure the substrate is properly pasteurized or sterilized to prevent contamination.
* Vertical Growing: If space is limited, consider vertical growing techniques. You can use stacked containers, hanging bags, or even repurposed shelves to maximize your mushroom yield in a small area.
* Outdoor Mushroom Beds: For certain mushroom varieties like wine caps, you can create outdoor mushroom beds in a shady area of your garden. This is a great way to utilize garden waste and create a self-sustaining mushroom patch.
Don’t be intimidated by the process. While it may seem complex at first, growing mushrooms at home is surprisingly straightforward once you understand the basics. The key is to maintain a clean environment, provide adequate moisture, and be patient.
We encourage you to embark on this exciting adventure and discover the joys of homegrown mushrooms. Share your experiences with us! We’d love to hear about your successes, challenges, and any unique techniques you develop along the way. Post pictures of your mushroom harvests on social media using #HomegrownMushrooms and tag us! Let’s build a community of mushroom enthusiasts and inspire others to embrace this rewarding DIY project. So go ahead, give it a try, and unlock the delicious potential of growing mushrooms at home!
Frequently Asked Questions (FAQ)
What are the easiest types of mushrooms to grow at home for beginners?
Oyster mushrooms are generally considered the easiest for beginners due to their rapid growth, tolerance of various substrates, and relatively simple cultivation requirements. Shiitake mushrooms are also a good option, although they require a bit more patience as they take longer to fruit. Avoid more demanding varieties like morels or truffles until you have more experience.
What is the best substrate for growing mushrooms at home?
The best substrate depends on the mushroom variety you’re growing. Oyster mushrooms thrive on straw, coffee grounds, and even cardboard. Shiitake mushrooms prefer hardwood sawdust or logs. Always ensure your substrate is properly pasteurized or sterilized to eliminate competing organisms.
How long does it take to grow mushrooms at home?
The time it takes to grow mushrooms varies depending on the variety and growing conditions. Oyster mushrooms can fruit in as little as 2-3 weeks after inoculation, while shiitake mushrooms may take several months to fruit on logs. Be patient and monitor your mushrooms regularly for signs of growth.
What are the ideal temperature and humidity conditions for growing mushrooms?
Most mushrooms prefer temperatures between 60-75°F (15-24°C) and high humidity levels (80-90%). You can maintain humidity by misting your mushrooms regularly or using a humidity tent. Avoid direct sunlight, as it can dry out your mushrooms.
How do I prevent contamination when growing mushrooms at home?
Contamination is a common challenge in mushroom cultivation. To minimize the risk, maintain a clean environment, sterilize your substrate properly, and use sterile techniques when inoculating your substrate with mushroom spawn. Avoid touching the substrate or mushrooms with unwashed hands.
What are the signs of contamination in my mushroom grow?
Signs of contamination include mold growth (green, black, or other colors), foul odors, and unusual textures on the substrate or mushrooms. If you suspect contamination, remove the affected area immediately to prevent it from spreading. In severe cases, you may need to discard the entire grow.
How often should I water my mushrooms?
Water your mushrooms regularly to maintain high humidity levels. Mist them with a spray bottle several times a day, especially during dry periods. Avoid overwatering, as this can lead to rot. The substrate should be moist but not soggy.
How do I know when my mushrooms are ready to harvest?
Mushrooms are typically ready to harvest when the caps have fully expanded and the edges are starting to curl upwards. Harvest them by gently twisting or cutting them off at the base of the stem.
Can I reuse the substrate after harvesting mushrooms?
Yes, you can often get multiple flushes (harvests) from the same substrate. After harvesting, rehydrate the substrate by soaking it in water for a few hours. Then, return it to its growing environment and wait for the next flush. The yield may decrease with each subsequent flush.
Is it safe to eat homegrown mushrooms?
Yes, it is generally safe to eat homegrown mushrooms as long as you have correctly identified the species and followed proper cultivation techniques. Only consume mushrooms that you are 100% certain are edible. If you are unsure, consult with a mycologist or experienced mushroom grower.
Where can I buy mushroom spawn?
Mushroom spawn can be purchased from online retailers specializing in mushroom cultivation supplies. Look for reputable suppliers that offer high-quality spawn of the desired mushroom variety.
Can I grow mushrooms outdoors?
Yes, certain mushroom varieties like wine caps and shiitake can be grown outdoors in mushroom beds or on logs. Choose a shady location with good drainage and protect your mushrooms from pests and extreme weather conditions.
What are some common problems when growing mushrooms at home and how can I fix them?
Common problems include contamination, low humidity, and pest infestations. Prevent contamination by maintaining a clean environment and sterilizing your substrate. Increase humidity by misting your mushrooms regularly or using a humidity tent. Control pests by using natural pest control methods or introducing beneficial insects.
How can I improve the flavor of my homegrown mushrooms?
The flavor of your homegrown mushrooms can be influenced by the substrate you use and the growing conditions. Experiment with different substrates to find the one that produces the best flavor. Ensure your mushrooms receive adequate moisture and ventilation. Harvesting them at the right time can also enhance their flavor.
What are the nutritional benefits of eating mushrooms?
Mushrooms are a good source of vitamins, minerals, and antioxidants. They are low in calories and fat and high in fiber. Some mushrooms also contain compounds that may have immune-boosting and anti-cancer properties. Growing mushrooms at home allows you to enjoy these nutritional benefits with fresh, flavorful fungi.
Leave a Comment