
Grow Napa Cabbage at Home and unlock the secrets to fresh, flavorful, and homegrown goodness right in your backyard! Have you ever dreamed of strolling through your garden and harvesting crisp, juicy Napa cabbage for your favorite Asian-inspired dishes? Well, dream no more! This DIY guide is your passport to cultivating this versatile vegetable with ease, even if you’re a beginner gardener.
Napa cabbage, also known as Chinese cabbage, boasts a rich history deeply intertwined with Asian culinary traditions. For centuries, it has been a staple ingredient in kimchi, stir-fries, and countless other delectable recipes. Beyond its culinary appeal, growing your own Napa cabbage offers a unique connection to this heritage, allowing you to appreciate the journey from seed to table.
Why should you embark on this DIY adventure? Because store-bought vegetables simply can’t compare to the vibrant taste and nutritional value of homegrown produce. Plus, knowing exactly where your food comes from and how it’s grown provides peace of mind. With rising food costs and concerns about pesticides, learning to grow Napa Cabbage at Home is not just a hobby; it’s a smart, sustainable, and satisfying way to nourish yourself and your family. I’m excited to share my favorite tips and tricks to help you succeed!
Growing Napa Cabbage at Home: Your DIY Guide
Hello garden friends! I’m thrilled to show you today how you can grow this delicious and versatile Napa cabbage (also known as Chinese cabbage) right in your own garden. It’s easier than you think, and the result is simply fantastic – fresh, crisp cabbage whenever you need it! Let’s get started!
What you need:
- Napa cabbage seeds: Choose a variety that is suitable for your climate.
- Seed starting pots or trays: for starting seeds indoors.
- Seed starting mix: Light and nutrient-rich.
- Garden soil: Well-draining and enriched with compost.
- Compost or organic fertilizer: For a good supply of nutrients.
- Watering can or garden hose: For watering.
- Mulch material (straw, wood chips): To retain moisture and suppress weeds.
- Garden tools: Spade, rake, trowel.
- Protective netting (optional): Against pests like cabbage whites.
The best time to plant:
Napa cabbage is a cool-weather crop. This means the best time to plant is either in the spring (for a summer harvest) or in late summer (for a fall harvest). Avoid growing Napa cabbage during the hottest summer months, as the heat can cause it to bolt (form flowers) and become bitter.
- Spring planting: Start seeds indoors 6-8 weeks before the last expected frost.
- Fall planting: Plant seeds directly in the garden bed or start them indoors 6-8 weeks before the first expected frost.
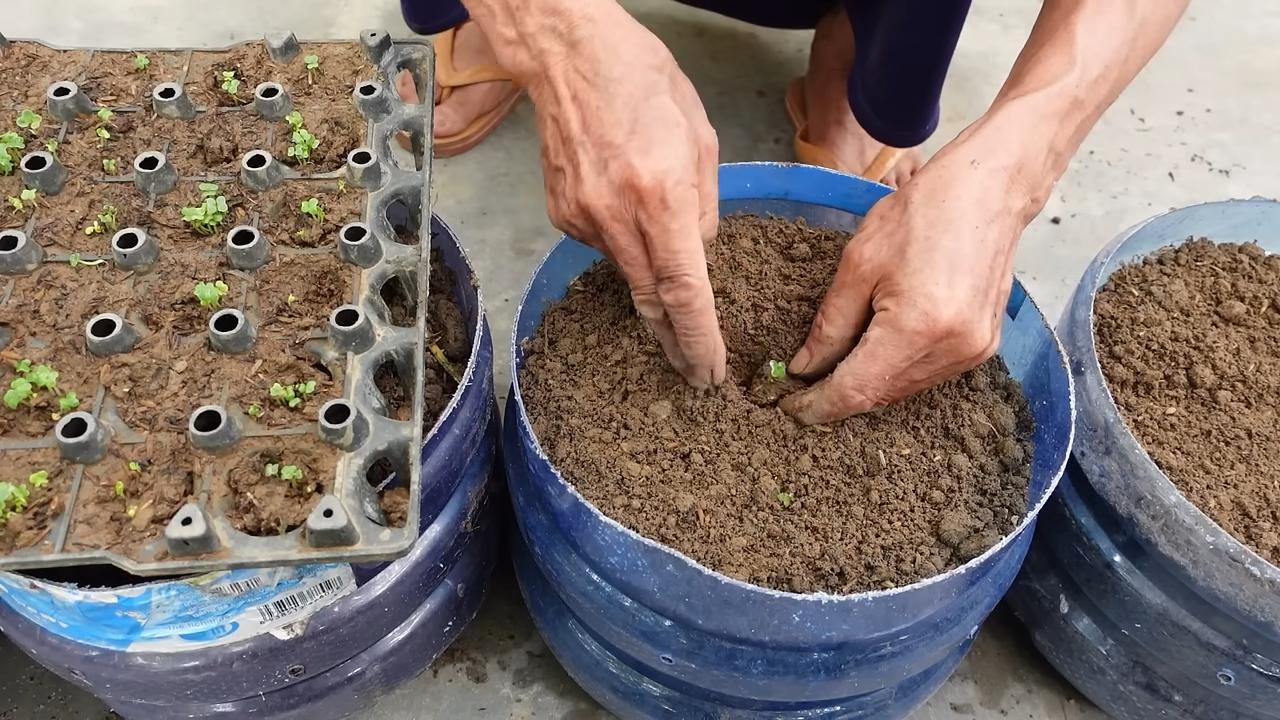
Sowing and Starting Indoors (optional, but recommended):
I personally find that starting seeds indoors has many advantages. You have more control over the conditions and can protect the young plants from pests.
- Preparation of the seed starting pots: Fill the seed starting pots or trays with seed starting mix. Lightly press the soil down.
- Sowing the seeds: Place 2-3 seeds per pot about 1 cm (0.4 inches) deep in the soil.
- Watering: Moisten the soil gently with a spray bottle or watering can. The soil should be damp, but not wet.
- Location: Place the seed starting pots in a bright, warm place. A windowsill or a greenhouse is ideal.
- Germination: The seeds usually germinate within 5-10 days.
- Thinning: Once the seedlings have a few true leaves, thin them out, leaving only the strongest seedling per pot.
Preparing the Garden Bed:
A well-prepared bed is half the battle for a successful harvest. Napa cabbage needs a sunny location and well-draining soil.
- Choosing a location: Choose a location that gets at least 6 hours of sun per day.
- Soil cultivation: Loosen the soil with a spade or digging fork. Remove stones, roots, and weeds.
- Soil improvement: Work in plenty of compost or organic fertilizer into the soil. Napa cabbage is a heavy feeder and requires a lot of nutrients.
- Soil pH: Napa cabbage prefers a slightly acidic to neutral soil pH (6.0-7.0). You can check the pH with a soil test and adjust it if necessary.
Transplanting the Seedlings:
Once the seedlings are strong enough (about 10-15 cm / 4-6 inches high) and the danger of frost has passed (for spring planting), they can be transplanted into the garden bed.
- Hardening off: Before you plant the seedlings in the bed, you should harden them off. To do this, place them outside for a few days during the day and bring them back in at night. This will help them get used to the outdoor conditions.
- Planting distance: Plant the seedlings 30-45 cm (12-18 inches) apart in rows that are 60-75 cm (24-30 inches) apart.
- Planting hole: Dig a hole that is slightly larger than the seedling’s root ball.
- Planting: Place the seedling in the hole and fill it with soil. Lightly press the soil down.
- Watering: Water the seedlings thoroughly after planting.
Direct Sowing (Alternative to Starting Indoors):
If you don’t have the time or desire to start seeds indoors, you can also sow them directly in the garden bed.
- Preparing the bed: Prepare the bed as described above.
- Sowing: Sow the seeds about 1 cm (0.4 inches) deep in rows 60-75 cm (24-30 inches) apart.
- Spacing: Maintain a distance of 5-8 cm (2-3 inches) between the seeds.
- Watering: Moisten the soil gently.
- Thinning: Once the seedlings have a few true leaves, thin them out, leaving only the strongest plants at a distance of 30-45 cm (12-18 inches).
Caring for Napa Cabbage:
Napa cabbage is relatively easy to care for, but there are a few things you should pay attention to.
- Watering: Keep the soil evenly moist, especially during dry periods. Avoid waterlogging, as this can lead to root rot.
- Fertilizing: Fertilize the Napa cabbage every 2-3 weeks with an organic fertilizer or compost tea.
- Weed control: Keep the bed free of weeds by weeding regularly.
- Mulching: Apply a layer of mulch material (straw, wood chips) around the plants. This helps to retain moisture, suppress weeds, and keep the soil cool.
- Pest control: Napa cabbage can be infested by various pests, including cabbage whites, flea beetles, and aphids. Check the plants regularly and take action if necessary. For example, you can cover the plants with protective netting or use natural pesticides.
Protection from Pests:
Cabbage whites are often a problem. Their caterpillars can strip the cabbage leaves bare.
- Protective netting: A protective net is the most effective way to keep cabbage whites away.
- Hand-picking: Regularly pick the caterpillars off by hand.
- Bacillus thuringiensis (Bt): Bt is a biological insecticide that specifically targets caterpillars.
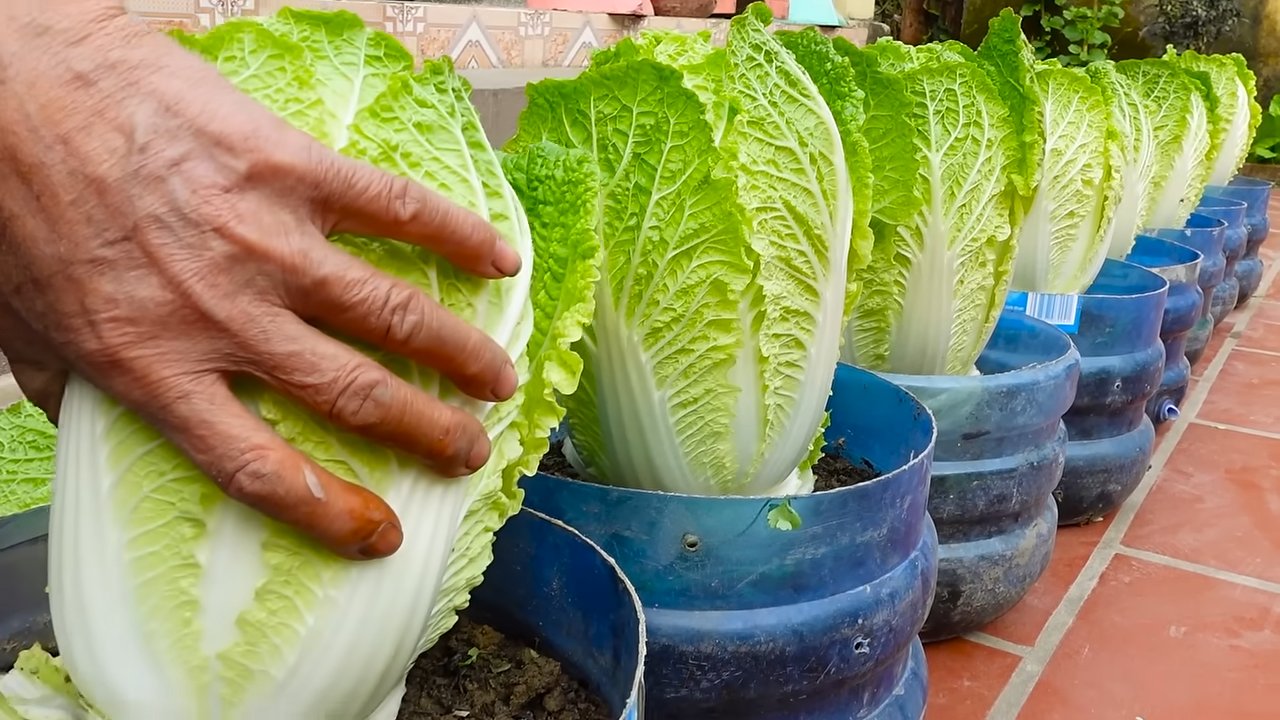
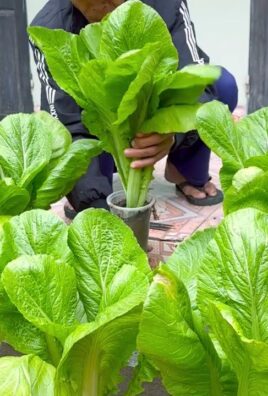
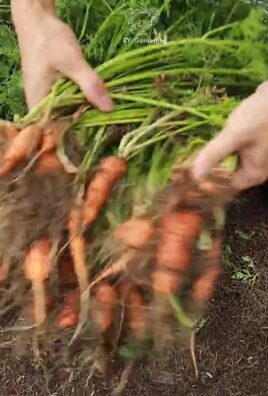
Harvest:
Napa cabbage is usually ready to harvest 70-80 days after sowing.
- Signs of ripeness: The head of cabbage should be firm and closed.
- Harvesting: Cut the head of cabbage with a sharp knife or garden shears just above the ground.
- Storage: Napa cabbage can be stored in the refrigerator for up to 2 weeks.
Common Problems and Solutions:
Root rot: Root rot is caused by waterlogging. Ensure well-draining soil and avoid overwatering.
Bolting (flowering): If Napa cabbage bolts too early, it is usually due to high temperatures or irregular watering. Choose a heat-resistant variety and ensure consistent watering.
Conclusion
So, there you have it! Growing Napa cabbage at home isn’t just a gardening project; it’s an investment in fresh, flavorful meals and a rewarding connection to the food you eat. We’ve walked through the steps, from selecting the right seeds to harvesting your own crisp, delicious heads. But why should you take the plunge and dedicate a little space in your garden to this versatile vegetable?
First and foremost, the taste difference between store-bought and homegrown Napa cabbage is undeniable. The freshness translates directly to a sweeter, more nuanced flavor that elevates everything from slaws and stir-fries to kimchi and dumplings. Imagine the satisfaction of knowing exactly where your food comes from and that it’s free from unwanted pesticides or preservatives. That’s the power of growing your own.
Beyond the superior taste, cultivating your own Napa cabbage offers a unique opportunity to experiment and tailor your harvest to your specific preferences. Want a smaller, more compact head for individual salads? Adjust your spacing and watering accordingly. Craving a spicier kick? Consider companion planting with herbs like mustard or garlic. The possibilities are endless!
And speaking of variations, don’t be afraid to get creative with your Napa cabbage cultivation. Try succession planting to ensure a continuous harvest throughout the growing season. Explore different varieties of Napa cabbage, each with its own subtle nuances in flavor and texture. Perhaps you’ll discover a new favorite!
But the real magic happens when you share your homegrown bounty with friends and family. Imagine the delight on their faces when you present them with a dish featuring your own freshly harvested Napa cabbage. It’s a gift that speaks volumes about your care, dedication, and passion for good food.
Ultimately, growing Napa cabbage at home is more than just a DIY project; it’s a journey of discovery, a celebration of flavor, and a testament to the power of homegrown goodness. It’s about taking control of your food supply and connecting with the natural world in a meaningful way.
We strongly encourage you to give it a try. Even if you’re a beginner gardener, the steps are straightforward, and the rewards are immense. Start small, be patient, and don’t be afraid to experiment. You might be surprised at how easy and enjoyable it is to grow your own delicious Napa cabbage.
And once you’ve harvested your first head, we’d love to hear about your experience! Share your tips, tricks, and favorite recipes in the comments below. Let’s create a community of Napa cabbage enthusiasts and inspire others to embrace the joys of homegrown goodness. What are you waiting for? Get planting!
Frequently Asked Questions (FAQ)
What is the best time to plant Napa cabbage?
The ideal time to plant Napa cabbage depends on your climate. Generally, it’s best to plant in early spring for a summer harvest or late summer for a fall harvest. Napa cabbage prefers cooler temperatures and can bolt (go to seed) in hot weather. In regions with mild winters, you might even be able to grow it throughout the winter months. Check your local frost dates and aim to plant about 4-6 weeks before the last expected frost in spring or 6-8 weeks before the first expected frost in fall. This allows the plants enough time to mature before extreme temperatures arrive.
How much sunlight does Napa cabbage need?
Napa cabbage thrives in full sun, which means at least 6 hours of direct sunlight per day. However, in hotter climates, some afternoon shade can be beneficial to prevent bolting. If you’re growing Napa cabbage indoors under grow lights, ensure the lights are positioned close enough to the plants and provide sufficient intensity. Insufficient sunlight can lead to leggy growth and smaller heads.
What kind of soil is best for growing Napa cabbage?
Napa cabbage prefers well-drained, fertile soil that is rich in organic matter. The ideal soil pH is between 6.0 and 7.5. Before planting, amend your soil with compost or well-rotted manure to improve drainage and fertility. You can also add a slow-release fertilizer to provide essential nutrients throughout the growing season. Avoid heavy clay soils, as they can retain too much moisture and lead to root rot. If you have clay soil, amend it with plenty of organic matter to improve drainage.
How often should I water Napa cabbage?
Napa cabbage needs consistent moisture to thrive. Water deeply and regularly, especially during dry periods. Aim to keep the soil consistently moist but not waterlogged. A good rule of thumb is to water when the top inch of soil feels dry to the touch. Mulching around the plants can help retain moisture and suppress weeds. Avoid overhead watering, as it can increase the risk of fungal diseases. Instead, water at the base of the plants.
What are some common pests and diseases that affect Napa cabbage?
Napa cabbage is susceptible to several pests and diseases, including cabbage worms, aphids, flea beetles, clubroot, and downy mildew. To prevent pest problems, consider using row covers to protect your plants. Regularly inspect your plants for signs of pests and diseases and take action promptly. Organic pest control methods, such as insecticidal soap or neem oil, can be effective against many common pests. To prevent diseases, ensure good air circulation around your plants and avoid overhead watering. Rotate your crops each year to prevent soilborne diseases from building up.
How do I know when my Napa cabbage is ready to harvest?
Napa cabbage is typically ready to harvest when the heads are firm and compact. The exact time to harvest will depend on the variety and growing conditions, but generally, it takes about 70-80 days from planting to harvest. Gently squeeze the head to check for firmness. If it feels solid and dense, it’s likely ready to harvest. You can also check the size of the head against the expected size for the variety you’re growing. To harvest, use a sharp knife to cut the head at the base of the plant.
Can I grow Napa cabbage in containers?
Yes, Napa cabbage can be grown in containers, but you’ll need to choose a large container that is at least 12 inches in diameter and depth. Use a well-draining potting mix and ensure the container has drainage holes. Water regularly and fertilize as needed. Container-grown Napa cabbage may require more frequent watering and fertilization than plants grown in the ground. Choose a sunny location for your container and protect the plants from extreme temperatures.
How do I store Napa cabbage after harvesting?
Napa cabbage can be stored in the refrigerator for several weeks. Wrap the head loosely in plastic wrap or place it in a plastic bag to prevent it from drying out. Store it in the crisper drawer of your refrigerator. You can also ferment Napa cabbage to make kimchi, which can be stored for several months. Another option is to blanch and freeze Napa cabbage for later use in soups and stews.
Can I save seeds from my Napa cabbage?
Saving seeds from Napa cabbage can be challenging because it is a biennial plant, meaning it typically takes two years to produce seeds. You’ll need to overwinter the plants and allow them to flower and produce seeds in the second year. However, Napa cabbage is also cross-pollinated, so the seeds you save may not be true to type. If you’re interested in saving seeds, it’s best to isolate your Napa cabbage plants from other brassicas to prevent cross-pollination.
Leave a Comment