
Grow Peanuts in Foam Box: Ever dreamt of harvesting your own crunchy, delicious peanuts right from your backyard, or even your balcony? I know I have! Forget those sprawling peanut farms you see in movies; you can cultivate these tasty legumes in a surprisingly simple and space-saving way – using a foam box! This DIY project is not only incredibly rewarding, but it also offers a fantastic solution for urban gardeners or anyone with limited space.
Peanuts, originally from South America, have a rich history as a staple food and a symbol of prosperity in many cultures. For centuries, they’ve been cultivated for their nutritional value and unique flavor. Now, you can participate in this agricultural tradition, even without acres of land.
Why should you try growing peanuts in a foam box? Well, for starters, it’s a fantastic way to control the growing environment, ensuring optimal conditions for your peanut plants. Foam boxes provide excellent insulation, protecting the roots from extreme temperatures. Plus, it’s a budget-friendly and eco-conscious way to repurpose materials. Imagine the satisfaction of snacking on peanuts you nurtured from seed to harvest! This guide will walk you through every step, making it easy to grow peanuts in a foam box and enjoy the fruits (or rather, the nuts!) of your labor. Let’s get started!

Growing Peanuts in a Styrofoam Container: Your DIY Guide for a Successful Harvest
Hey garden friends! Have you ever thought about growing your own peanuts? It’s easier than you think and incredibly fun, especially if you have limited space. In this article, I’ll show you how to grow peanuts in a styrofoam container (also known as a foam box). This is a great method for achieving a bountiful harvest even on a balcony, terrace, or in a small garden. Let’s get started!
Why a Styrofoam Container?
Before we start, a few words on why I like styrofoam containers so much:
- Insulation: Styrofoam provides excellent insulation. This is especially important for peanuts, which love a constant soil temperature.
- Lightweight: Even when the container is full of soil, it’s still relatively easy to move.
- Drainage: With a few holes in the bottom, you ensure good drainage, which prevents waterlogging.
- Reuse: Styrofoam containers are often free (just ask at supermarkets or fish markets) and contribute to recycling efforts.
What You Need: The Materials List
Here is a list of all the materials you’ll need for your peanut project:
- Styrofoam container: Preferably a large one (at least 40x60x30 cm / 16x24x12 inches) so the peanut plants have enough space.
- Peanuts: Raw, unsalted peanuts (preferably from an organic store or garden center). Roasted peanuts will not germinate!
- Soil: High-quality potting soil or a mixture of garden soil, compost, and sand.
- Sand: For better drainage and soil aeration.
- Compost: For a good supply of nutrients.
- Drill or screwdriver: For making drainage holes.
- Watering can: For watering the plants.
- Plant labels: For labeling the plants (optional).
- Pruning shears: For removing dead leaves (optional).
- Gloves: To protect your hands (optional).
Step-by-Step Guide: How to Grow Peanuts in a Styrofoam Container
Here comes the detailed guide to ensure nothing goes wrong with your peanut project:
- Drill Drainage Holes:
- Take your drill or screwdriver and make several holes in the bottom of the styrofoam container. The holes should be about 1-2 cm (0.4-0.8 inches) in size and spaced about 10-15 cm (4-6 inches) apart. This is super important so that excess water can drain away and the roots don’t rot.
- Prepare the Container:
- Fill the bottom of the container with a layer of sand (approx. 5-10 cm / 2-4 inches). This further improves drainage.
- Then, mix the soil with compost (ratio of about 2:1). This ensures a good nutrient supply for the peanut plants.
- Fill the container with the soil mixture, but leave about 5-10 cm (2-4 inches) of space at the top.
- Prepare the Peanuts:
- Soak the raw peanuts in lukewarm water for about 24 hours. This helps to speed up germination.
- You can also gently shell the peanuts, but this is not strictly necessary. If you do shell them, be careful not to damage the thin skin around the peanut.
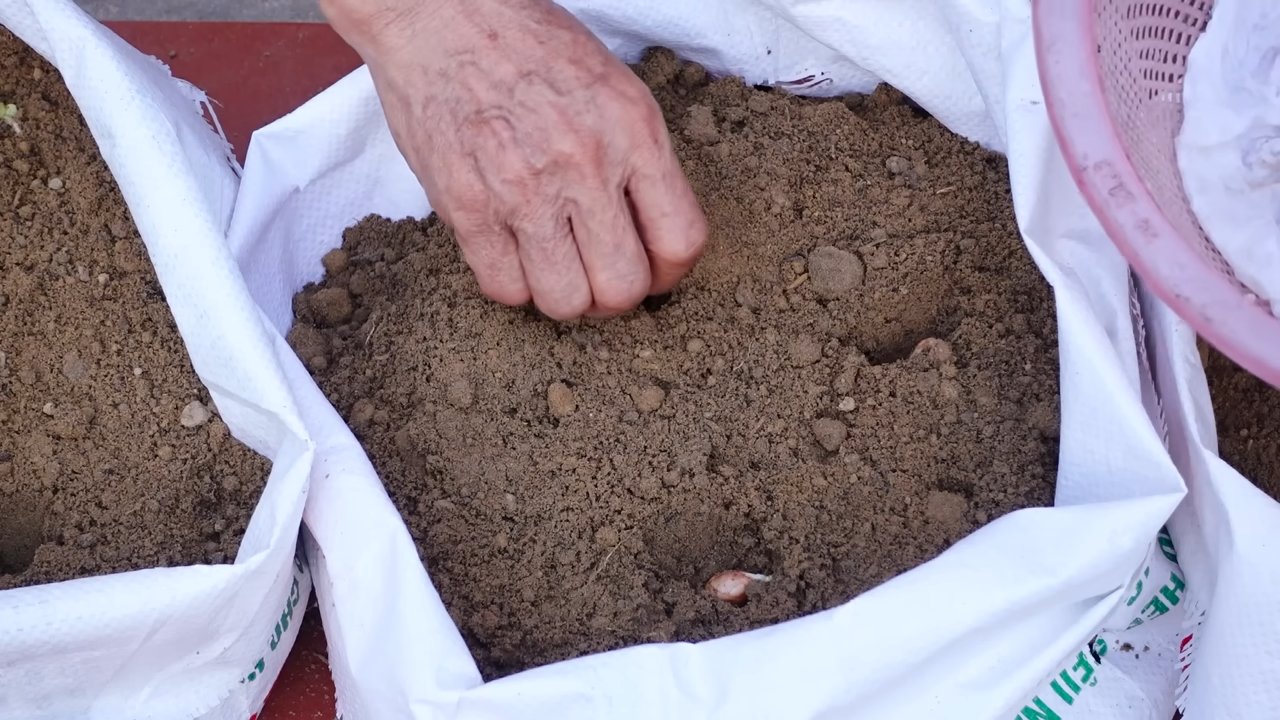
- Plant the Peanuts:
- Use your finger or a small tool to make small holes in the soil (about 2-3 cm / 1 inch deep).
- Place one peanut in each hole.
- Cover the peanuts with soil and press down lightly.
- Make sure the peanuts are not too close together. A distance of about 15-20 cm (6-8 inches) between plants is ideal.
- Watering:
- Gently water the soil until it is well moistened. Avoid waterlogging!
- Choose a Location:
- Place the styrofoam container in a sunny and warm spot. Peanuts love the sun! A location with at least 6-8 hours of direct sunlight per day is ideal.
- Care:
- Watering: Keep the soil moist, but not wet. Water regularly, especially on hot days.
- Fertilizing: Feed the peanut plants about every 2-3 weeks with an organic fertilizer.
- Weeding: Regularly remove any weeds that grow in the container.
- Hilling: When the peanut plants are about 15-20 cm (6-8 inches) tall, mound soil up around the base of the plants. This encourages the formation of peanuts.
- Flowering Time:
- After about 4-6 weeks, the peanut plants will begin to flower. The flowers are small and yellow.
- After fertilization, the flower stalks bend downwards and push into the soil. This is where the peanuts then develop.
- Harvest Time:
- The harvest time is about 4-5 months after sowing. You’ll know the peanuts are ready when the plant’s leaves turn yellow and die back.
- Carefully dig up the peanut plants.
- Shake the soil off the peanuts.
- Let the peanuts dry in a dry, airy place (preferably in the shade). This can take 1-2 weeks.
- After drying, you can store the peanuts or enjoy them right away!
Additional Tips for a Successful Harvest
Here are a few more tips that can help you achieve a bountiful harvest:
- Variety Selection: There are different varieties of peanuts. Find out which variety is best suited for your climate.
- Pests and Diseases: Keep an eye out for pests and diseases. If necessary, you can use organic pesticides.
- Soil Test: If you’re unsure whether your soil has the right nutrients, you can take a soil sample and have it analyzed.
- Mulching: A layer of mulch (e.g., from straw or grass clippings) helps to retain moisture in the soil and suppress weeds.
- Patience: Peanuts take time to grow. Be patient and don’t give up!
Common Problems and Solutions
Problems can also arise when growing peanuts. Here are some common issues and solutions:
Fungal Diseases: Fungal diseases can occur if the humidity is too high. Ensure good ventilation and avoid waterlogging.
No Germination: If the peanuts don’t germinate, there could be several reasons. The peanuts might not have been fresh enough, the temperature was too low, or the soil was too dry. Try again with fresh peanuts and pay attention to the correct temperature and moisture.
Yellow Leaves: Yellow leaves can be a sign of a nutrient deficiency. Fertilize the plants with an organic fertilizer.
Pests: Aphids and other pests can infest peanut plants. Spray the plants with an organic pesticide.
Conclusion
Growing peanuts in a foam box might sound unconventional, but as you’ve seen, it’s a surprisingly effective and rewarding method, especially for those with limited space or challenging soil conditions. This DIY trick offers a controlled environment, protecting your precious peanut plants from pests, diseases, and harsh weather fluctuations. The foam box acts as an insulator, maintaining a more consistent temperature for optimal peanut development. Plus, the portability of the box allows you to chase the sun or shelter your plants during unexpected cold snaps.
But the benefits extend beyond mere convenience. By using a foam box, you’re essentially creating a mini-ecosystem tailored to the specific needs of peanut plants. You have complete control over the soil composition, drainage, and nutrient levels, leading to healthier plants and a more abundant harvest. Imagine the satisfaction of harvesting your own homegrown peanuts, knowing that you nurtured them from seed to shell in your very own foam box garden!
This method isn’t just about practicality; it’s about experimentation and connection with nature. Feel free to adapt the technique to suit your specific needs and preferences. For instance, try different soil mixtures to see which yields the best results in your climate. Consider adding companion plants like marigolds or basil to deter pests naturally. You could even experiment with different varieties of peanuts to discover your favorite flavor profile.
Don’t be afraid to get creative! The beauty of this DIY project lies in its adaptability. You can customize the size of the foam box, the type of soil, and even the watering schedule to perfectly match your local conditions and personal preferences.
We highly encourage you to give this DIY peanut growing trick a try. It’s a fun, educational, and ultimately delicious way to connect with nature and enjoy the fruits (or rather, nuts) of your labor. And once you’ve harvested your first batch of homegrown peanuts, be sure to share your experience with us! We’d love to hear about your successes, challenges, and any variations you’ve tried. Post photos of your foam box garden, share your favorite peanut recipes, and inspire others to embark on their own peanut-growing adventure. Let’s build a community of foam box peanut enthusiasts!
So, grab a foam box, some peanut seeds, and get ready to experience the joy of growing your own delicious and nutritious peanuts. You might be surprised at just how easy and rewarding it can be. Happy growing!
Frequently Asked Questions (FAQ)
1. What type of foam box is best for growing peanuts?
The ideal foam box is one that’s sturdy, clean, and large enough to accommodate the root systems of your peanut plants. A box that’s at least 12 inches deep and 24 inches wide is a good starting point for a few plants. Make sure the box is food-grade or hasn’t been used to store harmful chemicals. You can often find suitable foam boxes at grocery stores, fish markets, or recycling centers. Consider the thickness of the foam; thicker foam provides better insulation. Also, ensure the box has drainage holes to prevent waterlogging. If it doesn’t, you’ll need to drill some yourself.
2. What kind of soil should I use in my foam box peanut garden?
Peanuts thrive in well-draining, sandy loam soil. Avoid heavy clay soils, as they can impede root development and pod formation. A good mix would be equal parts of garden soil, compost, and sand. The compost provides essential nutrients, while the sand improves drainage. You can also add a small amount of perlite or vermiculite to further enhance drainage and aeration. Before planting, test the soil pH. Peanuts prefer a slightly acidic to neutral pH of around 6.0 to 7.0. You can amend the soil with lime if it’s too acidic.
3. How often should I water my peanut plants in a foam box?
Watering frequency depends on the weather, soil type, and the size of your plants. Generally, you should water deeply whenever the top inch of soil feels dry to the touch. Avoid overwatering, as this can lead to root rot. During hot, dry periods, you may need to water daily. In cooler, wetter weather, you can reduce the frequency. Ensure the foam box has adequate drainage to prevent water from pooling at the bottom. A good rule of thumb is to water thoroughly until you see water draining from the bottom of the box.
4. Do I need to fertilize my peanut plants in a foam box?
Yes, peanuts benefit from regular fertilization, especially during the flowering and pod-filling stages. Use a balanced fertilizer with a ratio of 5-10-5 (nitrogen-phosphorus-potassium) or a fertilizer specifically formulated for legumes. Avoid fertilizers that are too high in nitrogen, as this can promote excessive foliage growth at the expense of pod production. Apply the fertilizer according to the manufacturer’s instructions, usually every 2-3 weeks. You can also supplement with organic fertilizers like compost tea or fish emulsion.
5. How do I protect my peanut plants from pests and diseases in a foam box?
The controlled environment of a foam box can help minimize pest and disease problems. However, it’s still important to be vigilant. Regularly inspect your plants for signs of pests like aphids, spider mites, or caterpillars. If you spot any, treat them with insecticidal soap or neem oil. To prevent fungal diseases, ensure good air circulation around your plants and avoid overwatering. You can also apply a fungicide if necessary. Consider using companion plants like marigolds or basil to deter pests naturally.
6. When and how do I harvest my peanuts from the foam box?
Peanuts are typically ready to harvest about 120-150 days after planting. The leaves will start to yellow and the plants will begin to wilt. To check if the peanuts are ready, dig up a plant and examine the pods. The pods should be plump and the kernels should be fully developed and have a reddish-brown skin. To harvest, carefully dig up the entire plant, being careful not to damage the pods. Shake off any excess soil and hang the plants upside down in a warm, dry place for several weeks to cure. Once the peanuts are cured, you can remove them from the plants and store them in a cool, dry place.
7. Can I reuse the soil in my foam box for future peanut crops?
While you can reuse the soil, it’s best to amend it with fresh compost and other organic matter to replenish nutrients. Peanuts are heavy feeders and can deplete the soil over time. You should also consider rotating crops to prevent the buildup of soilborne diseases. If you’ve had any pest or disease problems, it’s best to sterilize the soil before reusing it. You can do this by baking it in the oven or solarizing it in the sun.
8. What are some variations I can try with this foam box peanut growing method?
There are many ways to customize this method to suit your needs and preferences. You can experiment with different varieties of peanuts, such as Virginia, Spanish, or Runner. You can also try growing other legumes in a foam box, such as beans or peas. Consider adding a trellis to support the plants if they become too tall. You can also use a self-watering system to automate the watering process. Get creative and have fun experimenting!
9. Is growing peanuts in a foam box organic?
Growing peanuts in a foam box can be organic if you use organic soil, fertilizers, and pest control methods. Avoid using synthetic fertilizers, pesticides, and herbicides. Choose organic soil amendments like compost, manure, and bone meal. Use natural pest control methods like insecticidal soap, neem oil, and companion planting. By following these guidelines, you can grow healthy and delicious organic peanuts in your foam box garden.
10. What if I live in a colder climate? Can I still grow peanuts in a foam box?
Yes, you can still grow peanuts in a foam box even if you live in a colder climate. The foam box provides insulation, which can help protect the plants from frost and cold temperatures. You can also start the seeds indoors several weeks before the last expected frost and then transplant them into the foam box once the weather warms up. Consider using a greenhouse or cold frame to provide additional protection. You may need to choose a shorter-season variety of peanuts to ensure they have enough time to mature before the first frost.
Leave a Comment