
Grow Sponge Gourd Year Round? Absolutely! Imagine harvesting fresh, delicious sponge gourds from your own backyard, no matter the season. Sounds like a dream, right? Well, it doesn’t have to be! For centuries, gardeners in warmer climates have enjoyed the bounty of sponge gourds, also known as loofah, using clever techniques to extend their growing season. But what about those of us who live in areas with shorter summers or unpredictable weather?
That’s where these DIY tricks and hacks come in. I’m going to share some simple, yet effective methods to help you grow sponge gourd year round, regardless of your local climate. Forget relying solely on the fleeting warmth of summer; with a little planning and these easy-to-follow steps, you can enjoy a continuous supply of this versatile vegetable.
Why is this so important? Well, beyond the joy of fresh, homegrown produce, sponge gourds offer a wealth of benefits. They’re packed with nutrients, incredibly versatile in the kitchen, and, of course, can be transformed into natural, exfoliating sponges! Plus, mastering these techniques will empower you to take control of your food supply and connect with nature in a whole new way. So, let’s dive in and unlock the secrets to year-round sponge gourd success!
Growing Sponge Gourd Year-Round: My DIY Greenhouse Hack
Okay, so you love sponge gourd (also known as loofah!), and you’re bummed that the growing season is so short? I totally get it! I was in the same boat. I wanted fresh, homegrown loofahs all year round, not just during the summer months. That’s when I decided to get creative and build a mini-greenhouse specifically for my sponge gourd. It’s easier than you think, and I’m going to walk you through every step!
Why a Greenhouse for Sponge Gourd?
Before we dive in, let’s quickly talk about why a greenhouse is so beneficial for these tropical beauties. Sponge gourds thrive in warm, humid conditions. They need a long growing season (think 150-180 days!) to fully mature. A greenhouse provides:
* Extended Growing Season: Protects plants from frost and cold temperatures, allowing for earlier planting and later harvesting.
* Consistent Temperature: Creates a stable environment, preventing temperature fluctuations that can stress plants.
* Increased Humidity: Helps maintain the high humidity levels that sponge gourds love.
* Pest and Disease Control: Offers a barrier against some pests and diseases.
Materials You’ll Need
Alright, let’s gather our supplies! This is what I used for my DIY greenhouse. You can adjust the dimensions to fit your space and the number of plants you want to grow.
* PVC Pipes (1/2 inch or 3/4 inch): I used 10-foot lengths. You’ll need enough to create the frame. I used about 10 pipes for my 8ft x 4ft greenhouse.
* PVC Connectors:
* Corner connectors (4)
* T-connectors (at least 6, depending on how many support beams you want)
* Straight connectors (as needed to join PVC pipes)
* Clear Plastic Sheeting (6 mil or thicker): Enough to cover the entire frame with some overlap. Greenhouse plastic is ideal, but heavy-duty construction plastic works too.
* Zip Ties or Clamps: For securing the plastic to the frame. I prefer zip ties because they’re cheap and easy to use.
* Door Hinges (2): For creating a hinged door.
* Door Latch: To keep the door closed.
* Wood (for the base): I used treated 2×4 lumber to build a rectangular base. This is optional, but it provides a stable foundation.
* Screws or Nails: For assembling the wooden base.
* Potting Soil: A well-draining mix specifically for vegetables.
* Sponge Gourd Seeds or Seedlings: Of course!
* Large Pots or Grow Bags: At least 15-20 gallons in size. Sponge gourds have extensive root systems.
* Trellis or Support System: Sponge gourds are climbers! You’ll need something for them to grow on.
* Measuring Tape
* PVC Pipe Cutter or Saw
* Drill (optional, for attaching the door)
* Gloves
* Safety Glasses
Building the Greenhouse Frame
This is where the fun begins! We’re going to construct the skeleton of our sponge gourd paradise.
1. Measure and Cut the PVC Pipes: Decide on the dimensions of your greenhouse. I made mine 8 feet long, 4 feet wide, and 6 feet tall. Cut the PVC pipes accordingly. Remember to account for the connectors when measuring. For example, if you want an 8-foot length, cut the pipe slightly shorter than 8 feet to allow for the connector. I like to cut all the pieces at once to save time.
2. Assemble the Base (Optional): If you’re using a wooden base, assemble it first. Create a rectangle using the 2×4 lumber and secure it with screws or nails. Make sure it’s level! This will provide a solid foundation for your greenhouse.
3. Connect the Frame: Start by connecting the corner pieces to the vertical PVC pipes. Then, connect the horizontal pipes to form the top and bottom frames. Use the T-connectors to add support beams along the length and width of the greenhouse. These will help strengthen the structure and prevent it from sagging. I found that spacing the support beams about 2 feet apart worked well.
4. Create the Door Frame: Decide where you want the door to be located. Cut PVC pipes to create a rectangular frame for the door. Use corner connectors to join the pieces.
5. Attach the Door Frame to the Greenhouse: Use T-connectors to attach the door frame to the main greenhouse frame. Make sure the door frame is securely connected.
Covering the Frame with Plastic
Now, let’s wrap our frame in plastic to create that warm, humid environment.
1. Measure and Cut the Plastic Sheeting: Measure the dimensions of the greenhouse frame, including the roof, sides, and ends. Add extra length and width to allow for overlap and securing the plastic. It’s better to have too much plastic than not enough!
2. Attach the Plastic to the Frame: Starting at the top, carefully drape the plastic sheeting over the frame. Use zip ties or clamps to secure the plastic to the PVC pipes. Pull the plastic taut as you go to avoid wrinkles and sagging. I found it helpful to have a friend assist with this step.
3. Create the Door: Cut a piece of plastic slightly larger than the door frame. Attach the plastic to the door frame using zip ties or clamps.
4. Attach the Door to the Greenhouse: Attach the door frame to the greenhouse frame using the door hinges. Make sure the door swings freely.
5. Install the Door Latch: Install the door latch to keep the door closed. This will help maintain the temperature and humidity inside the greenhouse.
6. Seal Any Gaps: Check for any gaps or openings in the plastic and seal them with tape or extra zip ties. This will help prevent heat loss and keep pests out.
Setting Up the Inside
Time to get our sponge gourd ready for its new home!
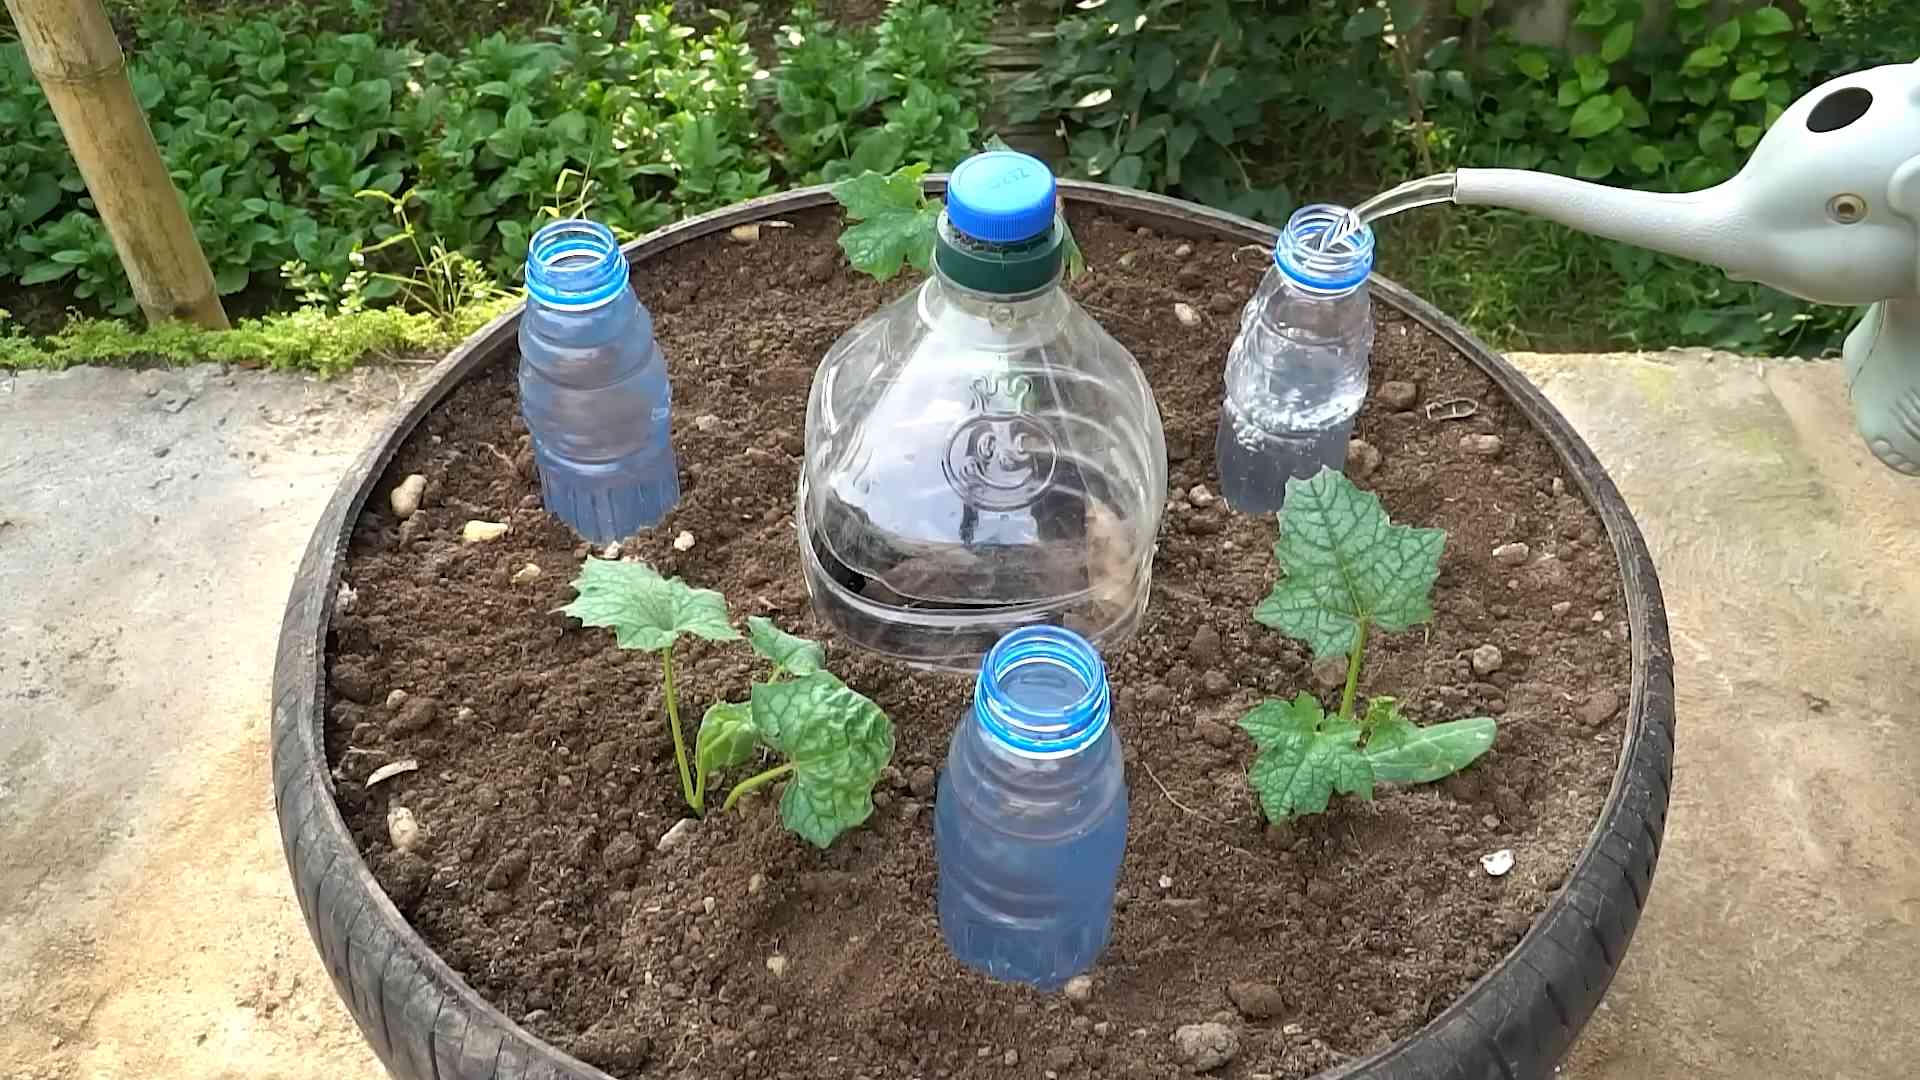
1. Place the Pots or Grow Bags: Arrange the large pots or grow bags inside the greenhouse. Make sure there’s enough space between them for the plants to grow and for you to move around.
2. Fill the Pots with Potting Soil: Fill the pots with a well-draining potting mix specifically designed for vegetables.
3. Plant the Sponge Gourd Seeds or Seedlings: Plant the sponge gourd seeds or seedlings according to the instructions on the seed packet or plant label.
4. Install the Trellis or Support System: Set up the trellis or support system near the plants. Sponge gourds are climbers, so they’ll need something to grow on. I used a simple trellis made of bamboo poles and twine. You can also use a metal trellis or netting.
Maintaining Your Greenhouse
Now that your greenhouse is built and your sponge gourd is planted, here are some tips for maintaining it:
* Ventilation: Open the door or create vents in the plastic to allow for ventilation. This will help prevent the greenhouse from overheating and reduce the risk of fungal diseases. I usually open the door for a few hours each day, especially on sunny days.
* Watering: Water the plants regularly, especially during hot weather. Sponge gourds need plenty of water to thrive. Check the soil moisture regularly and water when the top inch of soil feels dry.
* Fertilizing: Fertilize the plants regularly with a balanced fertilizer. This will provide them with the nutrients they need to grow and produce fruit. I use a liquid fertilizer diluted according to the instructions on the label.
* Pest and Disease Control: Monitor the plants regularly for pests and diseases. If you find any, take action immediately to prevent them from spreading. I use organic pest control methods whenever possible.
* Temperature Control: Monitor the temperature inside the greenhouse. If it gets too hot, open the door or vents to allow for ventilation. If it gets too cold, you may need to add a heater. I use a small electric heater on cold nights.
* Humidity Control: Sponge gourds love humidity. If the air inside the greenhouse is too dry, you can increase the humidity by misting the plants with water or placing a tray of water inside the greenhouse.
* Pollination: Sponge gourds require pollination to produce fruit. If you’re growing them indoors, you may need to hand-pollinate the flowers. Use a small paintbrush to transfer pollen from the male flowers to the female flowers.
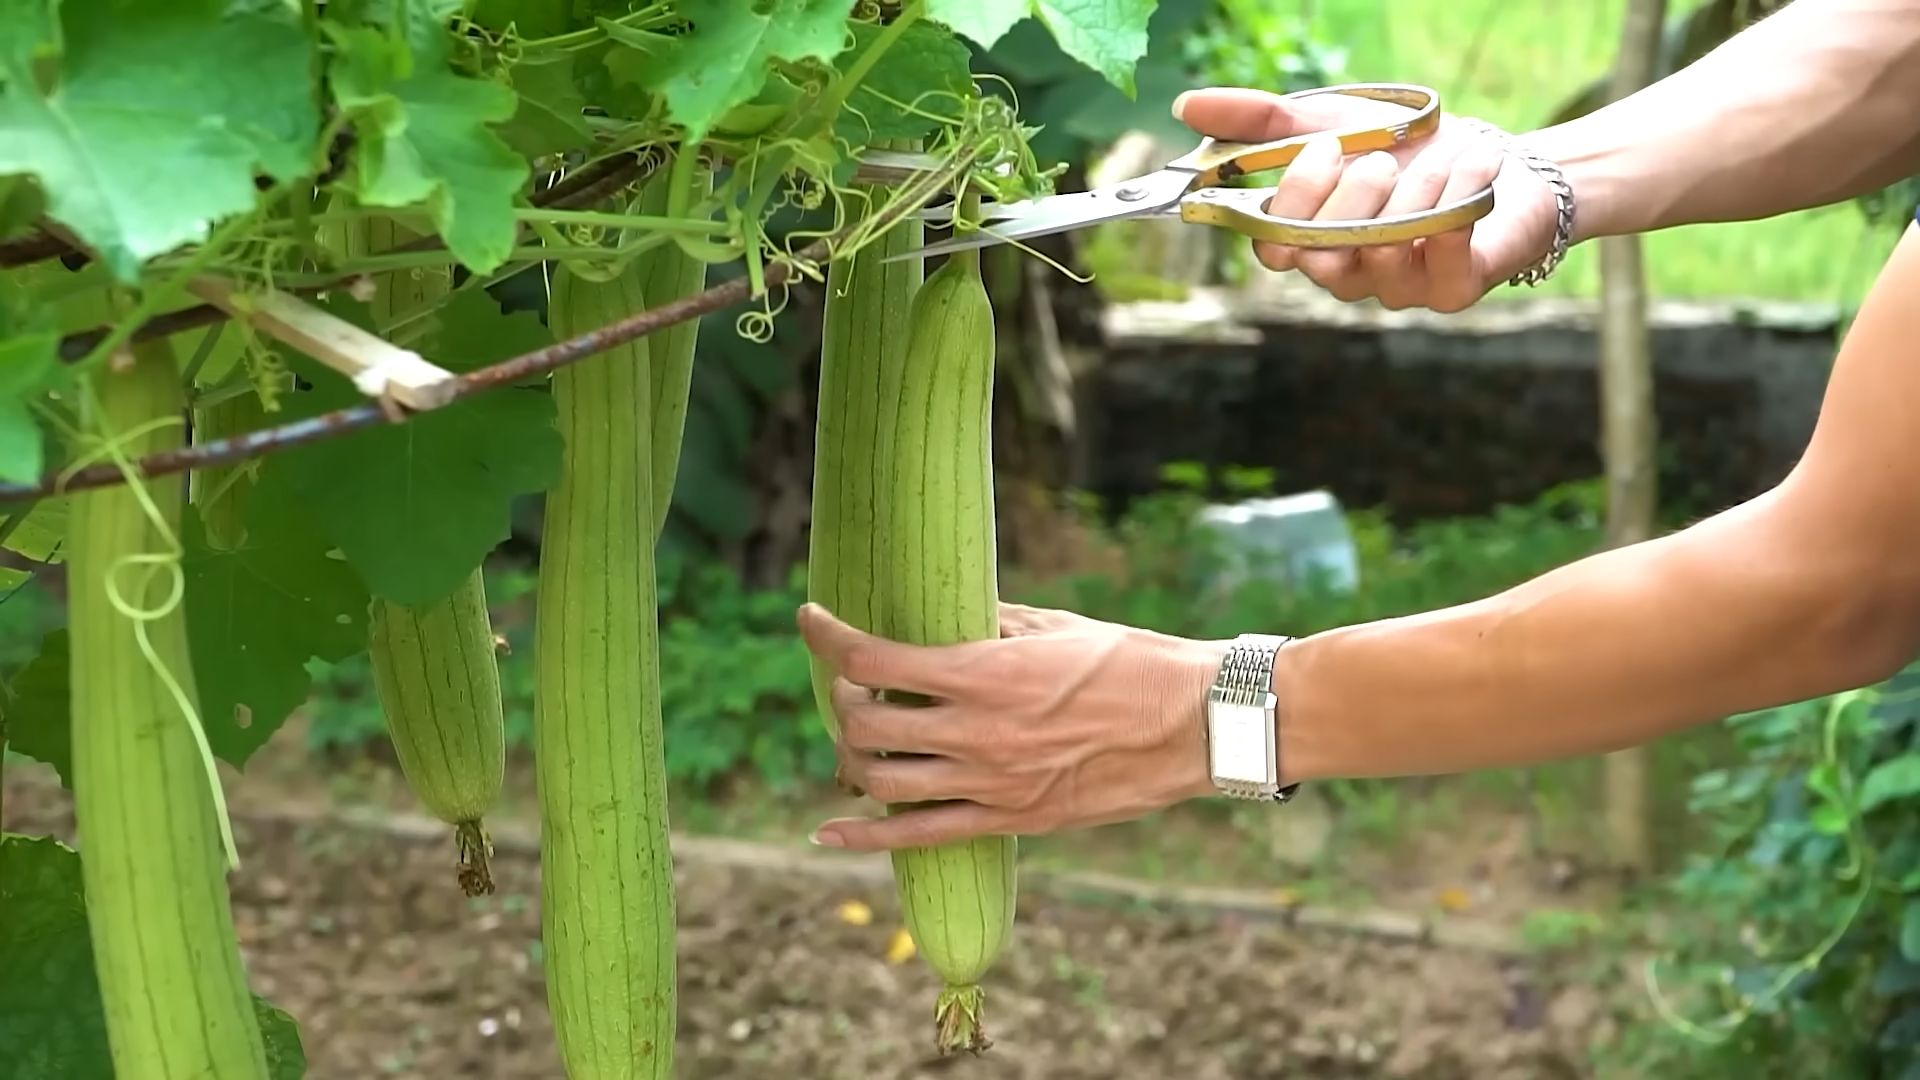
Harvesting Your Sponge Gourds
The moment you’ve been waiting for! Harvesting your homegrown loofahs.
1. Wait for Maturity: Sponge gourds are ready to harvest when they are fully mature and the skin has started to dry and turn brown. This usually takes
Conclusion
So, there you have it! Growing sponge gourd year-round might seem like a tropical dream reserved for those with perpetually sunny climates, but with this simple DIY trick, you can extend your growing season and enjoy fresh, homegrown loofahs no matter where you live. This method, focusing on creating a controlled environment for your seedlings and utilizing strategic indoor/outdoor transitions, truly unlocks the potential for a continuous harvest.
Why is this a must-try? Because it empowers you to take control of your garden’s destiny. No longer are you at the mercy of unpredictable weather patterns or limited growing seasons. You’re creating a microclimate tailored to the specific needs of your sponge gourd, ensuring optimal growth and abundant yields. Imagine the satisfaction of harvesting your own loofahs in the dead of winter, a testament to your ingenuity and gardening prowess!
Beyond the extended growing season, this DIY approach offers several other benefits. It allows you to start your seeds earlier, giving your plants a head start and maximizing their overall size and productivity. It also provides protection from pests and diseases, which can be particularly problematic during certain times of the year. And, perhaps most importantly, it’s incredibly rewarding to nurture your plants from seed to harvest, knowing that you’ve played an active role in their success.
Looking for variations? Consider experimenting with different types of grow lights to find the one that best suits your needs and budget. LED grow lights are energy-efficient and provide a full spectrum of light, while fluorescent grow lights are a more affordable option. You can also adjust the size of your containers to accommodate the growth of your plants. If you have limited space, opt for smaller containers and prune your plants regularly. For those in particularly cold climates, consider adding a heat mat beneath your seedlings to provide extra warmth. Another variation is to experiment with different soil mixes. A well-draining soil is essential for sponge gourd, so consider adding perlite or vermiculite to your potting mix. You can also amend your soil with compost or other organic matter to provide your plants with the nutrients they need.
Don’t be afraid to get creative and adapt this DIY trick to your own specific circumstances. The key is to provide your sponge gourd with the warmth, light, and moisture it needs to thrive.
We are confident that this method will revolutionize your sponge gourd growing experience. It’s a game-changer for anyone who wants to enjoy fresh, homegrown loofahs year-round. So, gather your supplies, follow the steps outlined in this article, and get ready to witness the magic of year-round sponge gourd cultivation.
We encourage you to try this DIY trick and share your experience with us! Let us know how it works for you, what challenges you encountered, and what tips you have to offer. Your feedback will help us refine this method and make it even more accessible to other gardeners. Share your photos and stories on our social media pages using #YearRoundSpongeGourd and let’s build a community of passionate sponge gourd growers! We can’t wait to see your amazing results! Remember, successful **sponge gourd** cultivation is within your reach, regardless of the season.
Frequently Asked Questions (FAQ)
What is the ideal temperature for growing sponge gourd indoors?
Sponge gourd thrives in warm temperatures, ideally between 70°F and 85°F (21°C and 29°C). Maintaining this temperature range indoors is crucial for successful germination and seedling development. You can use a heat mat or a space heater to regulate the temperature in your growing area. Monitor the temperature regularly with a thermometer to ensure it stays within the optimal range. Avoid exposing your seedlings to drafts or sudden temperature fluctuations, as this can stress them and hinder their growth.
How much light do sponge gourd seedlings need indoors?
Sponge gourd seedlings require at least 12-14 hours of light per day. If you’re growing them indoors, you’ll need to supplement natural light with artificial grow lights. LED grow lights are a popular choice due to their energy efficiency and full spectrum of light. Position the grow lights a few inches above the seedlings and adjust the height as they grow. Ensure that all seedlings receive adequate light exposure to prevent them from becoming leggy and weak. Rotate the seedlings regularly to ensure even growth on all sides.
What type of soil is best for growing sponge gourd in containers?
A well-draining potting mix is essential for growing sponge gourd in containers. A mix of equal parts peat moss, perlite, and vermiculite is a good option. You can also add compost or other organic matter to improve the soil’s fertility and drainage. Avoid using garden soil, as it can be too heavy and compact, which can lead to root rot. Ensure that your containers have drainage holes to prevent waterlogging.
How often should I water my sponge gourd plants?
Water your sponge gourd plants regularly, especially during hot and dry weather. The soil should be kept consistently moist, but not waterlogged. Check the soil moisture level by sticking your finger into the soil. If the top inch of soil feels dry, it’s time to water. Water deeply, allowing the water to drain out of the drainage holes. Avoid watering the foliage, as this can promote fungal diseases. Reduce watering frequency during cooler weather or when the plants are not actively growing.
When should I transplant my sponge gourd seedlings outdoors?
Transplant your sponge gourd seedlings outdoors when the weather is warm and settled, and there is no longer any risk of frost. The soil temperature should be at least 60°F (16°C). Harden off your seedlings gradually by exposing them to outdoor conditions for a few hours each day for a week before transplanting. Choose a sunny location with well-draining soil. Space the plants at least 3-4 feet apart to allow for adequate growth.
How do I support my sponge gourd vines?
Sponge gourd vines are vigorous climbers and require strong support. A sturdy trellis, fence, or arbor is ideal. You can also use stakes or ropes to support the vines. Train the vines to climb the support structure by gently guiding them and tying them with soft twine. Prune the vines regularly to encourage branching and fruit production.
How long does it take for sponge gourd to mature?
Sponge gourd typically takes 90-120 days to mature from seed to harvest. The exact time will depend on the variety, growing conditions, and climate. You can harvest the gourds when they are young and tender for culinary use, or allow them to mature fully for use as sponges. Mature gourds will turn brown and dry out.
How do I harvest sponge gourd for use as sponges?
To harvest sponge gourd for use as sponges, allow the gourds to mature fully on the vine until they turn brown and dry out. Cut the gourds from the vine and soak them in water for several days to loosen the skin and pulp. Peel off the skin and remove the seeds. Rinse the sponge thoroughly and allow it to dry completely. You can then use the sponge for bathing, cleaning, or other purposes.
What are some common pests and diseases that affect sponge gourd?
Common pests that affect sponge gourd include aphids, squash bugs, and vine borers. Diseases that can affect sponge gourd include powdery mildew, downy mildew, and fungal leaf spots. Monitor your plants regularly for signs of pests or diseases. Treat infestations or infections promptly with appropriate organic or chemical controls. Ensure good air circulation around the plants to prevent fungal diseases.
Can I grow sponge gourd in a greenhouse?
Yes, you can grow sponge gourd in a greenhouse. A greenhouse provides a controlled environment that can extend the growing season and protect your plants from pests and diseases. Ensure that the greenhouse is well-ventilated and provides adequate light and warmth. You may need to hand-pollinate the flowers if there are no pollinators present in the greenhouse. Growing sponge gourd in a greenhouse can be a great way to enjoy fresh, homegrown loofahs year-round.


Leave a Comment