
Grow Turnips at Home? Absolutely! You might be thinking, “Turnips? Really?” But trust me, these often-overlooked root vegetables are surprisingly easy and rewarding to cultivate in your own backyard, or even in containers on your balcony. Forget those bland, store-bought turnips – imagine the crisp, peppery flavor of freshly harvested turnips gracing your dinner table.
Turnips have a rich history, dating back to ancient Rome and Greece, where they were a staple food. They’ve nourished civilizations for centuries, and now it’s your turn to experience the joy of growing them yourself. But why should you bother with this humble root vegetable? Well, for starters, they’re incredibly versatile in the kitchen – you can roast them, mash them, add them to soups and stews, or even eat them raw in salads. Plus, they’re packed with nutrients, making them a healthy addition to your diet.
In this DIY guide, I’m going to share my favorite tips and tricks for successfully grow turnips at home, even if you’re a complete beginner. We’ll cover everything from choosing the right variety and preparing your soil to planting, watering, and harvesting. So, grab your gardening gloves, and let’s get started on this exciting journey of growing your own delicious and nutritious turnips!
Growing Turnips: A Beginner’s Guide to a Bountiful Harvest
Hey there, fellow gardening enthusiasts! I’m so excited to share my experience with growing turnips. These root vegetables are surprisingly easy to cultivate, even if you’re a complete newbie like I was when I started. They’re packed with nutrients, delicious in so many dishes, and offer both the root and the greens for eating – talk about a win-win! So, grab your gardening gloves, and let’s dive into the wonderful world of turnip cultivation.
What You’ll Need:
Before we get our hands dirty, let’s gather everything we need. Here’s a checklist to make sure you’re prepared:
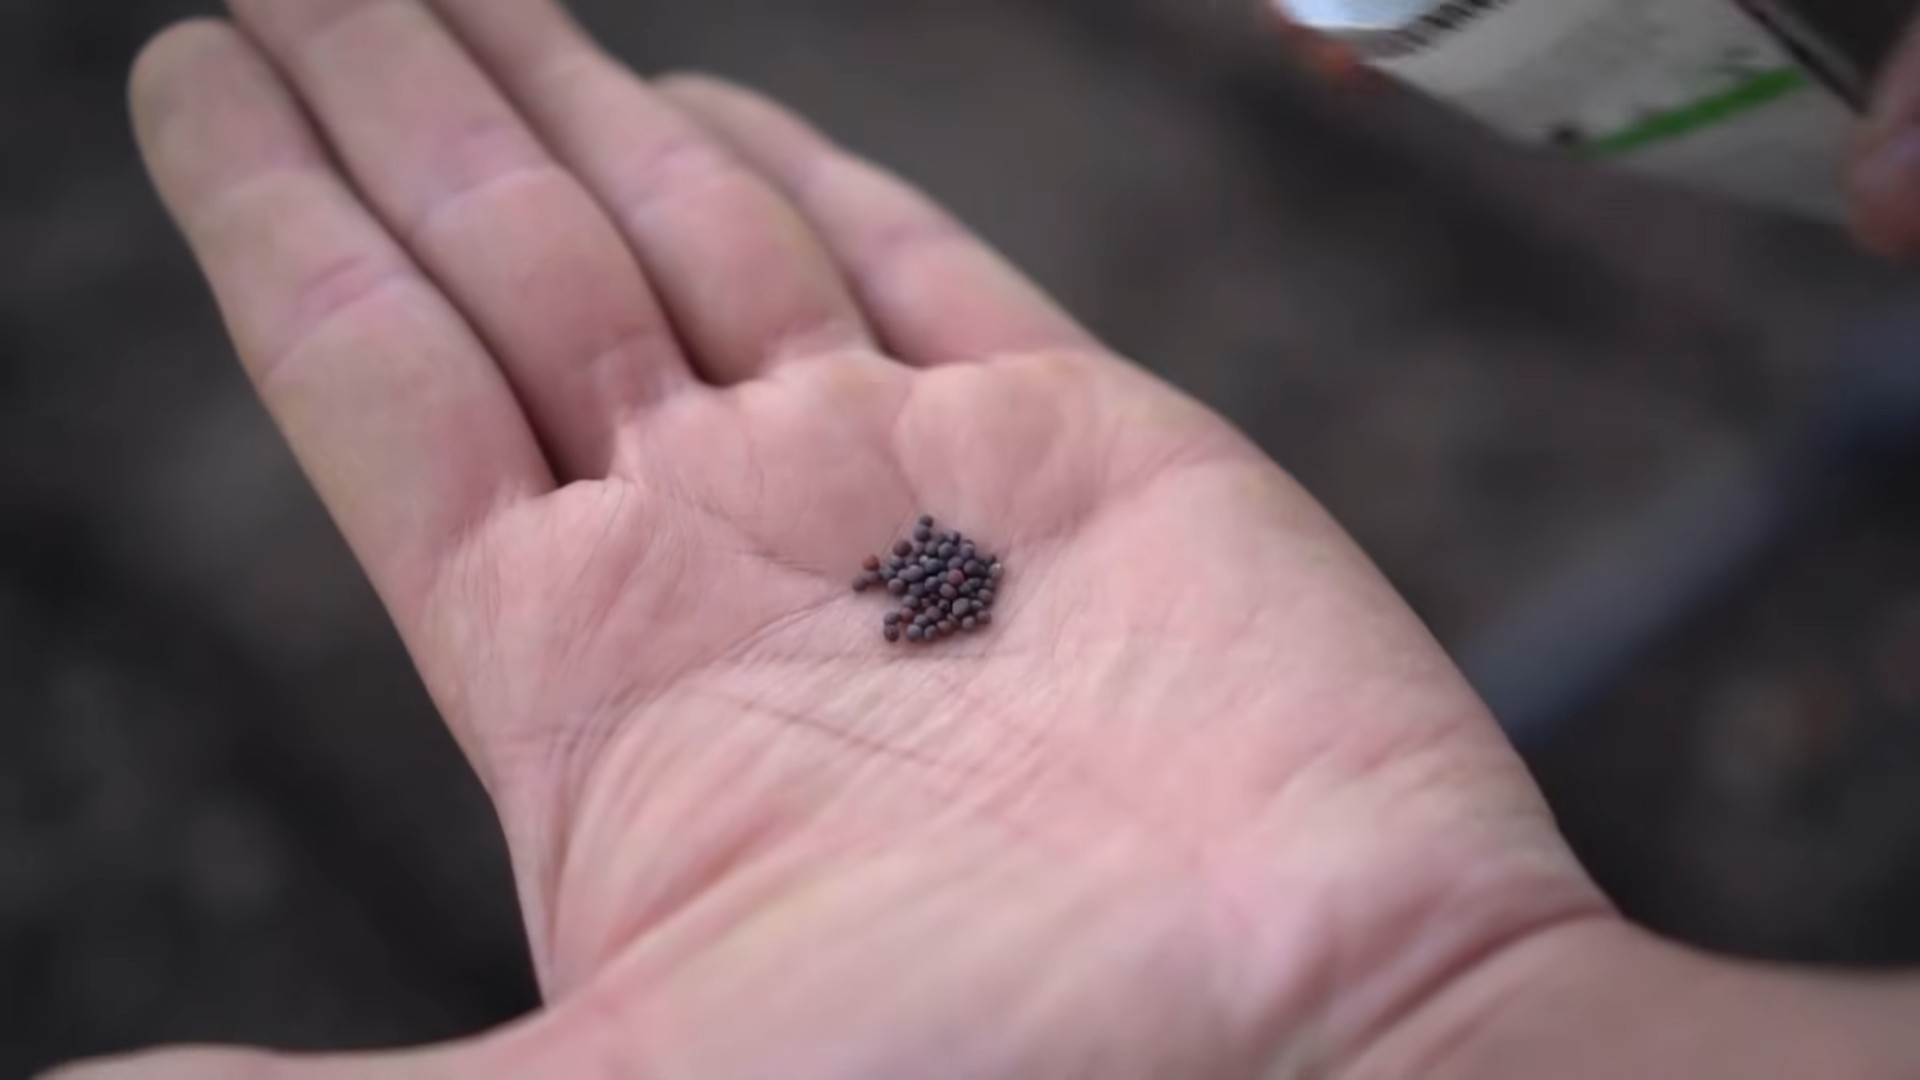
* Turnip Seeds: Choose a variety that suits your taste and climate. Some popular choices include ‘Purple Top White Globe,’ ‘Tokyo Cross,’ and ‘Golden Ball.’
* Gardening Gloves: Protect those precious hands!
* Hand Trowel or Garden Fork: For preparing the soil.
* Rake: To smooth the soil surface.
* Watering Can or Hose: For keeping the soil moist.
* Fertilizer (Optional): A balanced fertilizer can boost growth. I prefer organic options like compost or well-rotted manure.
* Row Covers (Optional): To protect against pests and frost.
* Measuring Tape or Ruler: To ensure proper spacing.
* Gardening Journal (Optional): To track your progress and learn from your experiences.
Choosing the Right Location:
Turnips are pretty adaptable, but they do have some preferences. Here’s what to keep in mind when selecting a spot for your turnip patch:
* Sunlight: Turnips need at least 6 hours of sunlight per day. More is always better!
* Soil: Well-drained, loose soil is crucial. Turnips don’t like soggy feet. Amend heavy clay soil with compost or other organic matter to improve drainage.
* Soil pH: Turnips prefer a slightly acidic to neutral soil pH (6.0 to 7.0). You can test your soil pH with a kit from your local garden center.
* Crop Rotation: Avoid planting turnips in the same spot where you recently grew other members of the brassica family (cabbage, broccoli, cauliflower, etc.) to prevent disease buildup.
Preparing the Soil:
This is a crucial step for happy turnips!
1. Clear the Area: Remove any weeds, rocks, or debris from the planting area.
2. Loosen the Soil: Use a hand trowel or garden fork to loosen the soil to a depth of at least 12 inches. This will allow the turnip roots to grow easily.
3. Amend the Soil: Incorporate compost, well-rotted manure, or other organic matter into the soil. This will improve drainage, fertility, and overall soil health. I usually add a generous layer, about 2-3 inches thick, and mix it in thoroughly.
4. Rake Smooth: Use a rake to smooth the soil surface and create a level planting bed. This will ensure even germination and growth.
Planting the Turnip Seeds:
Now for the fun part!
1. Timing is Key: Turnips are cool-season crops, so the best time to plant them is in early spring or late summer/early fall. For a spring crop, plant 2-4 weeks before the last expected frost. For a fall crop, plant 6-8 weeks before the first expected frost. Check your local frost dates to determine the best planting time for your area.
2. Sowing the Seeds: Sow the turnip seeds directly into the prepared soil. Plant them about ½ inch deep and 1 inch apart. You can use your finger or a small tool to create shallow furrows.
3. Cover the Seeds: Gently cover the seeds with soil and lightly pat down the surface.
4. Water Thoroughly: Water the planting area thoroughly with a watering can or hose. Keep the soil consistently moist until the seeds germinate.
Thinning the Seedlings:
Turnip seeds are tiny, and it’s easy to sow them too thickly. Thinning the seedlings is essential to give them enough space to grow.
1. Wait for True Leaves: Once the seedlings have developed their first true leaves (the second set of leaves), it’s time to thin them.
2. Thin to 3-4 Inches Apart: Carefully remove the weaker seedlings, leaving the strongest ones spaced about 3-4 inches apart. You can use small scissors to snip the seedlings at the soil line, or gently pull them out.
3. Don’t Waste the Greens!: The thinned seedlings are perfectly edible! Add them to salads or stir-fries for a fresh, peppery flavor.
Caring for Your Turnips:
With a little TLC, your turnips will thrive!
1. Watering: Keep the soil consistently moist, especially during dry periods. Water deeply and regularly, but avoid overwatering, which can lead to root rot.
2. Weeding: Regularly remove weeds from the planting area. Weeds compete with turnips for water, nutrients, and sunlight.
3. Fertilizing (Optional): If your soil is poor, you can fertilize your turnips with a balanced fertilizer. Follow the instructions on the fertilizer package. I prefer to side-dress with compost or well-rotted manure every few weeks.
4. Pest Control: Keep an eye out for pests such as flea beetles, aphids, and cabbage worms. Row covers can help protect your turnips from these pests. You can also use organic pest control methods such as insecticidal soap or neem oil.
5. Bolting Prevention: Bolting (when the plant prematurely flowers) can occur in hot weather. To prevent bolting, keep the soil cool and moist, and harvest your turnips before they get too large.
Harvesting Your Turnips:
The moment we’ve all been waiting for!
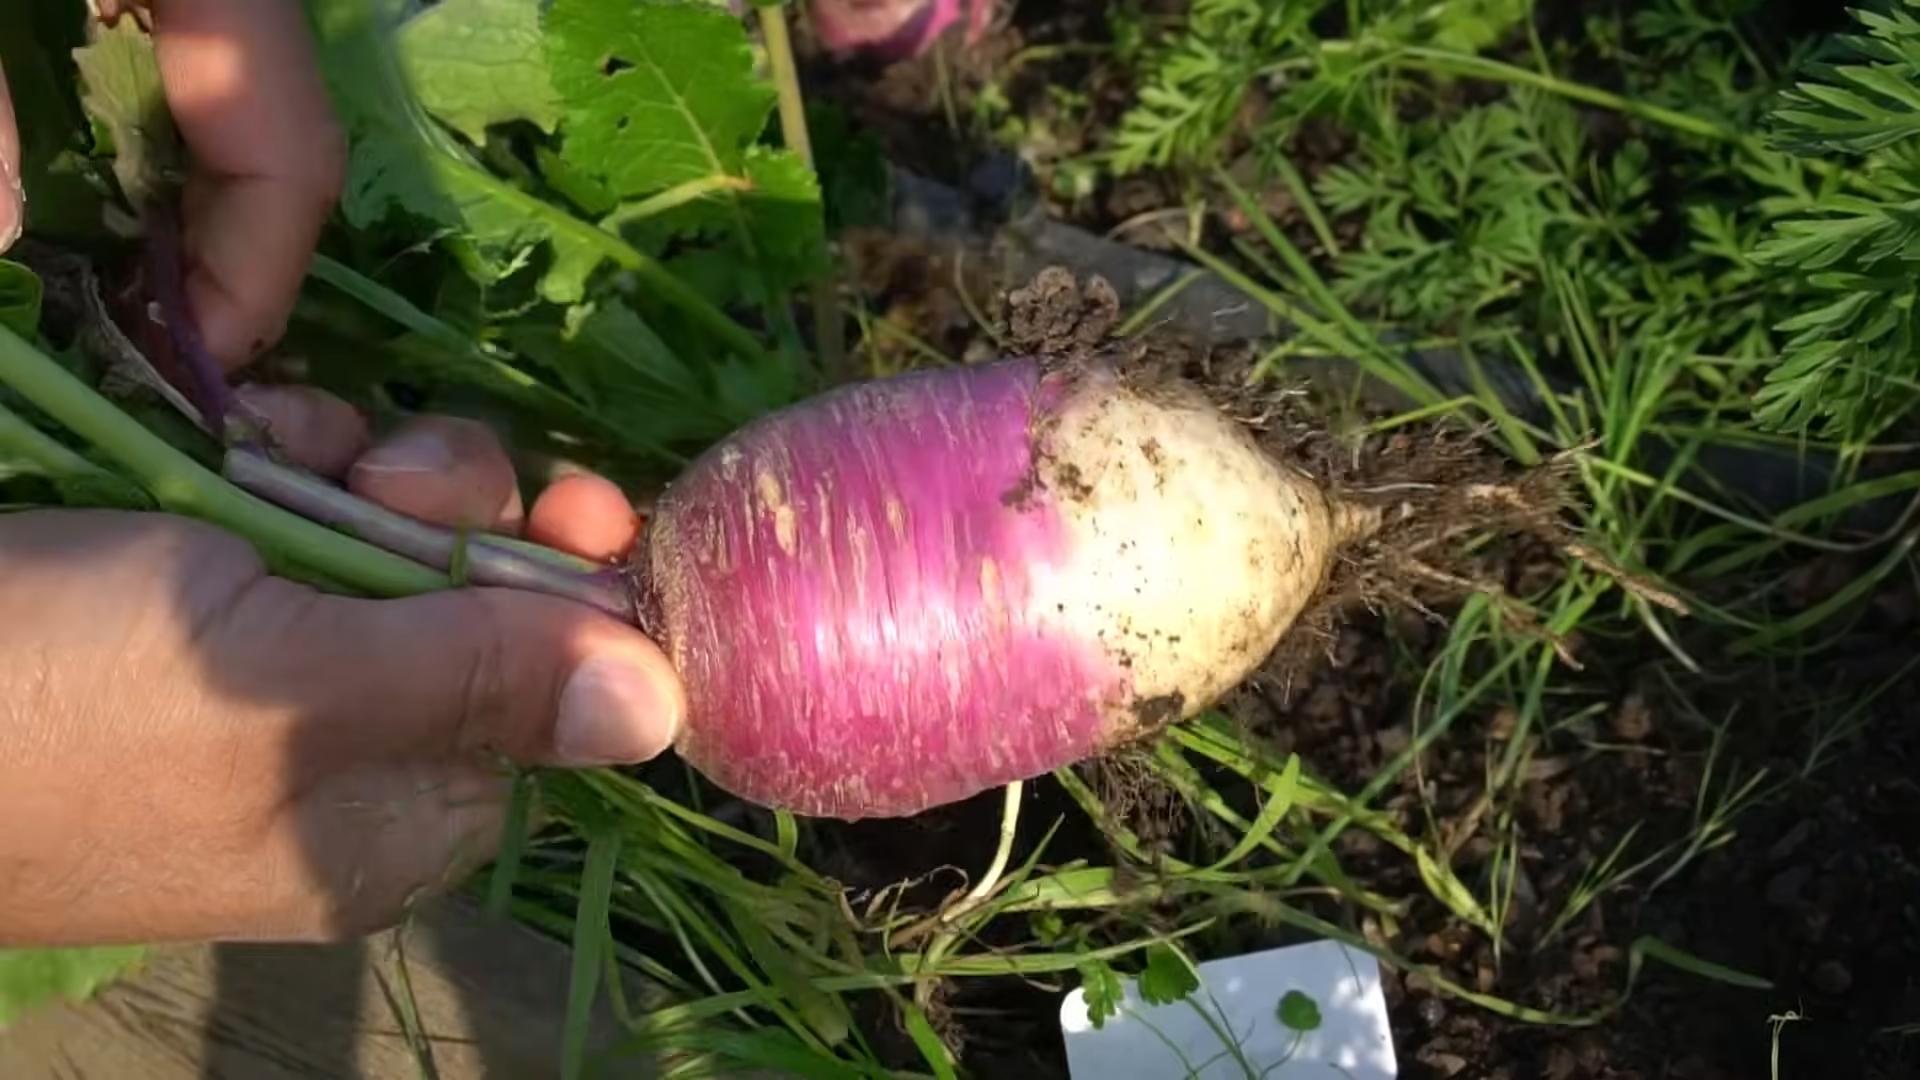
1. Harvest Time: Turnips are typically ready to harvest 50-60 days after planting. The size of the turnips will depend on the variety you’re growing.
2. Check the Size: Check the size of the turnip roots by gently brushing away the soil around the base of the plant. They should be about 2-3 inches in diameter for most varieties.
3. Pull or Dig: To harvest, gently pull the turnips from the soil. If they’re difficult to pull, you can use a garden fork to loosen the soil around them.
4. Harvest the Greens: You can also harvest the turnip greens. Simply cut off the outer leaves, leaving the inner leaves to continue growing.
5. Wash and Store: Wash the turnips and greens thoroughly. Store the turnips in the refrigerator for up to 2 weeks. Store the greens in the refrigerator for up to 3 days.
Enjoying Your Harvest:
Now comes the best part – enjoying the fruits (or rather, roots and greens!) of your labor.
* Turnip Roots: Turnip roots can be eaten raw, roasted, mashed, boiled, or added to soups and stews. They have a slightly sweet and peppery flavor.
* Turnip Greens: Turnip greens can be eaten raw in salads, or cooked like spinach or kale. They have a slightly bitter and peppery flavor.
Troubleshooting:
Even with the best planning, sometimes things don’t go as expected. Here are a few common problems you might encounter and how to deal with them:
* Poor Germination: If your turnip seeds don’t germinate well, it could be due to several factors: old seeds, soil that’s too dry or too wet, or temperatures that are too hot or too cold. Make sure to use fresh seeds, keep the soil consistently moist, and plant at the appropriate time of year.
* Small Roots: If your turnip roots are small, it could be due to overcrowding, poor soil, or insufficient watering. Thin the seedlings to the proper spacing, amend the soil with compost or manure, and water regularly.
* Bitter Taste: Turnips can develop a bitter taste if they’re grown in hot weather or if they’re not watered properly. Keep the soil cool and moist, and harvest your turnips before they get too large.
* Pest Problems: Pests can be a nuisance, but there are many ways to control them. Use row covers to protect your turnips from pests, and use organic pest control methods such as insecticidal soap or neem oil.
Extra Tips for Turnip Success:
* Succession Planting: Plant turnips every 2-3 weeks for a continuous harvest throughout the growing season.
* Companion Planting: Plant turnips with other vegetables such as beans, peas, and carrots. These plants can help improve soil health and deter pests.
* Experiment with Varieties: Try growing different varieties
Conclusion
So, there you have it! Growing turnips at home is not only surprisingly simple but also incredibly rewarding. From the crisp, peppery bite of the roots to the tender, nutritious greens, you’re getting a two-for-one deal that’s hard to beat. Forget those bland, store-bought turnips that have been sitting on shelves for weeks. Imagine the vibrant flavor of freshly harvested turnips, bursting with freshness and packed with vitamins. This DIY project is a game-changer for anyone looking to add a touch of homegrown goodness to their meals.
Why is this a must-try? Because it puts you in control. You choose the variety, you control the growing conditions, and you reap the benefits of knowing exactly where your food comes from. Plus, it’s a fantastic way to connect with nature, de-stress, and learn a new skill. It’s a win-win-win!
Looking for variations? Consider these ideas:
* **Spicy Turnips:** Add a touch of heat by interplanting your turnips with radishes or by incorporating a pinch of cayenne pepper into the soil.
* **Companion Planting Power:** Plant turnips alongside legumes like beans or peas to help fix nitrogen in the soil, benefiting both crops. Marigolds are also great companions, deterring pests.
* **Succession Planting for Continuous Harvest:** Plant a new batch of turnip seeds every two to three weeks for a continuous supply throughout the growing season. This ensures you always have fresh turnips ready to harvest.
* **Turnip Greens Galore:** Don’t forget about the greens! Experiment with different ways to prepare them – sautéed with garlic, added to soups, or even blended into smoothies for a nutritional boost.
Growing turnips at home is an adventure waiting to happen. It’s a chance to get your hands dirty, learn something new, and enjoy the delicious rewards of your labor. We wholeheartedly encourage you to give it a try. Start small, experiment with different varieties, and don’t be afraid to make mistakes. That’s all part of the fun!
Once you’ve experienced the joy of harvesting your own homegrown turnips, we’d love to hear about it! Share your experiences, tips, and photos in the comments below. Let’s build a community of turnip-growing enthusiasts and inspire others to embrace the joys of gardening. Happy growing!
Frequently Asked Questions (FAQ)
What is the best time of year to plant turnips?
Turnips are a cool-season crop, meaning they thrive in cooler temperatures. The best time to plant them is either in the early spring or late summer/early fall. For a spring crop, sow seeds as soon as the ground can be worked, typically 2-4 weeks before the last expected frost. For a fall crop, plant seeds about 6-8 weeks before the first expected frost. This allows the turnips enough time to mature before the weather gets too cold. In warmer climates, you can often grow turnips throughout the winter.
How much sunlight do turnips need?
Turnips need at least 6 hours of direct sunlight per day to grow well. While they can tolerate some shade, especially in hotter climates, insufficient sunlight will result in smaller roots and less vigorous growth. Choose a planting location that receives plenty of sunlight throughout the day.
What kind of soil is best for growing turnips?
Turnips prefer well-drained, fertile soil with a pH between 6.0 and 7.0. Amend heavy clay soil with compost or other organic matter to improve drainage and aeration. Sandy soil can also benefit from the addition of organic matter to help retain moisture and nutrients. Before planting, work the soil to a depth of at least 6 inches and remove any rocks or debris. A soil test can help you determine if your soil needs any amendments.
How often should I water my turnips?
Turnips need consistent moisture to grow properly. Water deeply and regularly, especially during dry periods. Aim to keep the soil consistently moist but not waterlogged. A good rule of thumb is to water when the top inch of soil feels dry to the touch. Mulching around the plants can help retain moisture and suppress weeds.
How long does it take for turnips to mature?
Turnips are a relatively fast-growing crop. Most varieties mature in 50-60 days from planting. However, you can harvest the greens earlier, as soon as they are large enough to eat. Baby turnips can also be harvested earlier for a more tender and delicate flavor. Check the seed packet for specific maturity dates for the variety you are growing.
How do I know when my turnips are ready to harvest?
The size of the turnip root is a good indicator of maturity. Most varieties are ready to harvest when the roots are 2-3 inches in diameter. You can gently loosen the soil around the turnip and pull it out of the ground. If the roots are too small, leave them in the ground for a few more days. The greens can be harvested at any time, but they are most tender when they are young.
Can I eat both the turnip roots and the greens?
Yes, both the turnip roots and the greens are edible and nutritious. The roots have a slightly peppery flavor and can be eaten raw, roasted, boiled, or mashed. The greens are similar in flavor to mustard greens and can be sautéed, steamed, or added to soups and stews. Both the roots and the greens are a good source of vitamins, minerals, and fiber.
What are some common pests and diseases that affect turnips?
Some common pests that can affect turnips include aphids, flea beetles, and root maggots. Diseases that can affect turnips include clubroot and powdery mildew. To prevent pest and disease problems, practice good garden hygiene, such as removing weeds and debris, and rotate your crops regularly. You can also use organic pest control methods, such as insecticidal soap or neem oil, to control pests. Choose disease-resistant varieties whenever possible.
How do I store turnips after harvesting?
To store turnips, remove the greens and wash the roots thoroughly. Store the roots in a cool, dark, and humid place, such as a root cellar or refrigerator. They can be stored for several months under the right conditions. The greens can be stored in the refrigerator for a few days.
Can I grow turnips in containers?
Yes, turnips can be grown in containers, but you will need to choose a large enough container to accommodate the roots. A container that is at least 12 inches deep and 12 inches wide is recommended. Use a well-draining potting mix and water regularly. Container-grown turnips may need to be fertilized more frequently than those grown in the ground.
What are some good turnip varieties to grow?
There are many different turnip varieties to choose from, each with its own unique characteristics. Some popular varieties include ‘Purple Top White Globe,’ ‘Golden Ball,’ ‘Tokyo Cross,’ and ‘Hakurei.’ ‘Purple Top White Globe’ is a classic variety with a mild flavor. ‘Golden Ball’ has a sweet, nutty flavor. ‘Tokyo Cross’ is a fast-maturing variety that is good for baby turnips. ‘Hakurei’ is a Japanese turnip with a mild, sweet flavor that is often eaten raw. Consider your taste preferences and growing conditions when choosing a variety.
Leave a Comment