
Growing bean sprouts peanuts at home might sound like a quirky science experiment, but trust me, it’s a rewarding and surprisingly simple way to add fresh, nutritious greens to your diet! Forget those bland, store-bought sprouts – we’re talking about cultivating your own crunchy, flavorful bean sprouts peanuts right in your kitchen.
Sprouting, in general, has a rich history, dating back thousands of years in various cultures, particularly in Asia. It was a clever way to ensure a consistent supply of vitamins and minerals, especially during harsh winters or long voyages. Think of it as ancient astronaut food, packed with goodness!
But why should you bother with growing bean sprouts peanuts? Well, for starters, it’s incredibly cost-effective. A handful of peanuts can yield a surprisingly large harvest of sprouts. More importantly, it’s about control. You know exactly what’s going into your food – no pesticides, no preservatives, just pure, homegrown goodness. Plus, it’s a fun and educational activity for the whole family. I’ve found that even the pickiest eaters are more likely to try something they’ve helped grow themselves. So, let’s dive in and discover the secrets to successfully growing bean sprouts peanuts at home. I promise, you’ll be hooked!

DIY: Erdnuss-Sprossen ziehen – So einfach geht’s!
Hey Leute! Habt ihr schon mal Erdnuss-Sprossen probiert? Sie sind super knackig, nussig und vollgepackt mit Nährstoffen. Und das Beste: Ihr könnt sie ganz einfach zu Hause ziehen! Ich zeige euch, wie es geht. Keine Sorge, es ist wirklich kinderleicht und macht total Spaß. Lasst uns loslegen!
Was du brauchst:
* Rohe, ungeröstete und ungesalzene Erdnüsse (am besten Bio-Qualität)
* Ein Sprossenglas oder ein anderes Gefäß mit guter Belüftung (z.B. ein Einmachglas mit Gaze oder einem speziellen Sprossendeckel)
* Sauberes Wasser
* Ein dunkler Ort (z.B. ein Küchenschrank)
* Optional: Ein Sieb oder ein feines Tuch zum Abspülen
Warum Erdnuss-Sprossen?
Erdnuss-Sprossen sind nicht nur lecker, sondern auch richtig gesund! Sie sind reich an Proteinen, Ballaststoffen, Vitaminen und Mineralstoffen. Außerdem sind sie eine tolle Ergänzung für Salate, Sandwiches, Suppen oder einfach als gesunder Snack zwischendurch. Und im Vergleich zu gekauften Sprossen wisst ihr genau, was drin ist – nämlich nur Erdnüsse und Wasser!
Schritt-für-Schritt-Anleitung:
1. Die Erdnüsse vorbereiten:
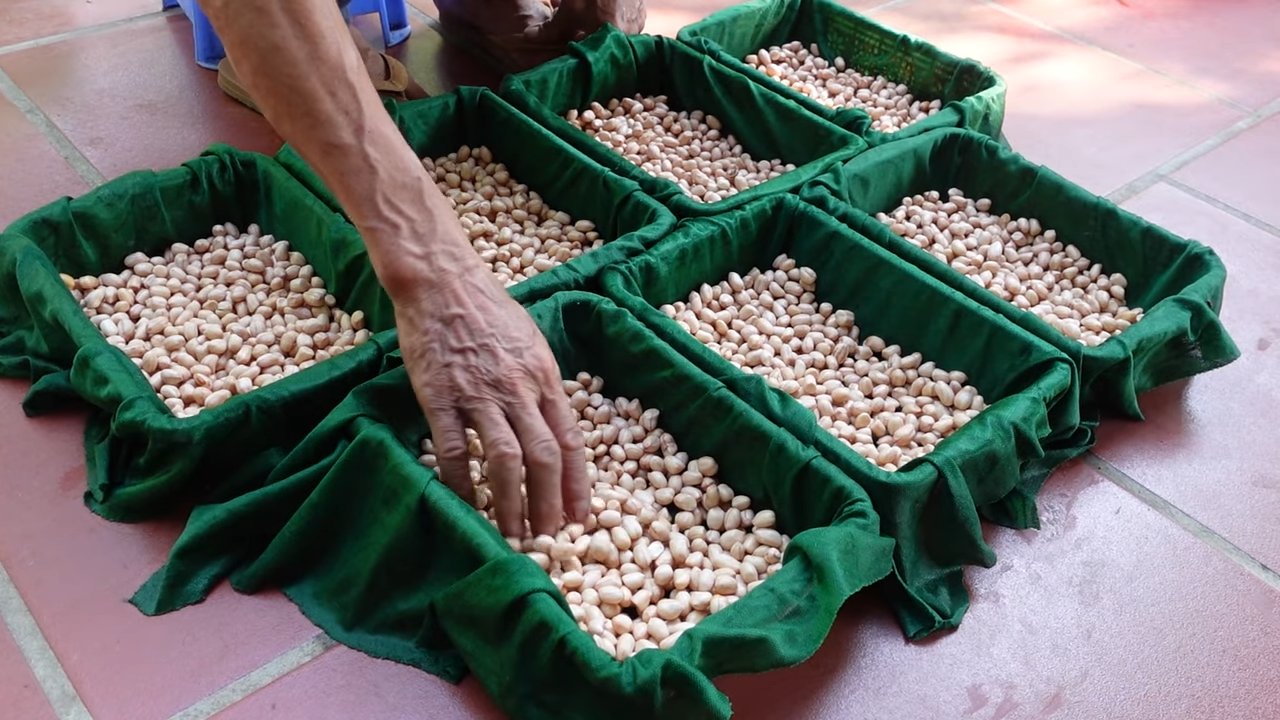
* Zuerst müsst ihr die Erdnüsse gründlich waschen. Gebt sie in ein Sieb und spült sie unter fließendem Wasser ab, bis das Wasser klar ist.
* Sortiert beschädigte oder verfärbte Erdnüsse aus. Nur die besten kommen in den Sprossentopf!
* Weicht die Erdnüsse dann in einer Schüssel mit sauberem Wasser ein. Die Einweichzeit beträgt 8-12 Stunden. Ich mache das meistens über Nacht. Die Erdnüsse quellen dabei auf und werden weicher, was den Keimprozess beschleunigt.
* Achtet darauf, dass die Erdnüsse komplett mit Wasser bedeckt sind.
* Nach dem Einweichen gießt ihr das Wasser ab und spült die Erdnüsse noch einmal gründlich ab.
2. Das Sprossenglas vorbereiten:
* Reinigt euer Sprossenglas oder das Gefäß eurer Wahl gründlich mit heißem Wasser und Spülmittel. Spült es danach gut aus, um alle Spülmittelreste zu entfernen.
* Wenn ihr ein Einmachglas verwendet, könnt ihr es mit einem Stück Gaze oder einem speziellen Sprossendeckel verschließen. Wichtig ist, dass das Glas gut belüftet ist, damit die Sprossen nicht schimmeln.
* Ich persönlich mag Sprossengläser mit einem integrierten Sieb, weil sie die Handhabung erleichtern.
3. Die Erdnüsse ins Sprossenglas geben:
* Gebt die eingeweichten und abgespülten Erdnüsse in das vorbereitete Sprossenglas.
* Achtet darauf, dass das Glas nicht zu voll ist. Die Erdnüsse brauchen Platz zum Keimen und Wachsen. Ich fülle das Glas meistens nur zu etwa einem Viertel.
4. Das Spülen:
* Das ist der wichtigste Schritt! Die Erdnüsse müssen regelmäßig gespült werden, um Schimmelbildung zu vermeiden und den Keimprozess anzuregen.
* Spült die Erdnüsse mindestens zweimal täglich mit frischem Wasser. Ich mache das morgens und abends.
* Füllt das Glas mit Wasser, schwenkt die Erdnüsse darin herum und gießt das Wasser dann wieder ab. Achtet darauf, dass das Wasser gut abläuft.
* Wenn ihr ein Sprossenglas mit Sieb verwendet, ist das Spülen besonders einfach.
5. Der dunkle Ort:
* Stellt das Sprossenglas an einen dunklen Ort. Das kann ein Küchenschrank, eine Speisekammer oder ein anderer dunkler Raum sein.
* Die Dunkelheit fördert die Keimung und verhindert, dass die Sprossen bitter werden.
* Achtet darauf, dass der Ort nicht zu warm ist. Eine Temperatur zwischen 18 und 22 Grad Celsius ist ideal.
6. Die Geduldsprobe:
* Jetzt heißt es warten! Die Erdnüsse brauchen ein paar Tage, um zu keimen und zu wachsen.
* Spült die Erdnüsse weiterhin zweimal täglich und achtet darauf, dass sie nicht austrocknen.
* Nach etwa 2-4 Tagen sollten die ersten kleinen Sprossen sichtbar sein.
7. Das Licht:
* Sobald die Sprossen etwa 1-2 cm lang sind, könnt ihr das Sprossenglas an einen helleren Ort stellen, aber vermeidet direkte Sonneneinstrahlung.
* Das Licht fördert die Chlorophyllbildung und lässt die Sprossen grün werden.
* Wenn ihr die Sprossen lieber weiß mögt, könnt ihr sie weiterhin im Dunkeln ziehen.
8. Die Ernte:
* Nach etwa 5-7 Tagen sind die Erdnuss-Sprossen erntereif. Sie sollten dann etwa 3-5 cm lang sein.
* Spült die Sprossen vor dem Verzehr noch einmal gründlich ab.
* Entfernt eventuell noch vorhandene Schalenreste.
9. Die Lagerung:
* Bewahrt die geernteten Erdnuss-Sprossen im Kühlschrank auf. Sie halten sich dort etwa 2-3 Tage.
* Am besten lagert ihr sie in einem luftdichten Behälter.
Häufige Probleme und Lösungen:
* Schimmelbildung: Schimmelbildung ist das häufigste Problem beim Sprossen ziehen. Um Schimmel zu vermeiden, ist es wichtig, die Erdnüsse regelmäßig zu spülen und für eine gute Belüftung zu sorgen. Wenn ihr Schimmel entdeckt, solltet ihr die betroffenen Sprossen sofort entsorgen.
* Austrocknung: Wenn die Erdnüsse austrocknen, keimen sie nicht richtig. Achtet darauf, dass sie immer feucht sind, aber nicht im Wasser stehen.
* Bitterer Geschmack: Ein bitterer Geschmack kann entstehen, wenn die Sprossen zu viel Licht bekommen. Zieht sie am besten im Dunkeln oder an einem schattigen Ort.
* Keine Keimung: Wenn die Erdnüsse gar nicht keimen, kann das an der Qualität der Erdnüsse liegen. Verwendet am besten frische, ungeröstete und ungesalzene Erdnüsse in Bio-Qualität.
Tipps und Tricks:
* Verwendet nur hochwertige Erdnüsse. Die Qualität der Erdnüsse beeinflusst das Ergebnis maßgeblich.
* Achtet auf eine gute Hygiene. Saubere Hände und saubere Utensilien sind wichtig, um Schimmelbildung zu vermeiden.
* Experimentiert mit verschiedenen Sprossengläsern und Gefäßen. Findet heraus, was für euch am besten funktioniert.
* Probiert verschiedene Sorten von Erdnüssen aus. Es gibt viele verschiedene Sorten, die alle einen etwas anderen Geschmack haben.
* Verwendet die Erdnuss-Sprossen in euren Lieblingsgerichten. Sie passen gut zu Salaten, Sandwiches, Suppen, Currys oder einfach als gesunder Snack.
* Lasst euch nicht entmutigen, wenn es beim ersten Mal nicht klappt. Sprossen ziehen ist learning by doing!
Rezepte mit Erdnuss-Sprossen:
* Erdnuss-Sprossen-Salat: Mischt Erdnuss-Sprossen mit Gurke, Tomaten, Paprika und einem Dressing eurer Wahl.
* Erdnuss-Sprossen-Sandwich: Belegt ein Sandwich mit Erdnuss-Sprossen, Avocado, Salat und einem Dip eurer Wahl.
* Erdnuss-Sprossen-Suppe: Gebt Erdnuss-Sprossen in eure Lieblingssuppe. Sie verleihen der Suppe eine knackige Textur und einen nussigen Geschmack.
* Erdnuss-Sprossen-Curry: Verwendet Erdnuss-Sprossen in eurem Lieblingscurry. Sie passen gut zu Kokosmilch, Gemüse und Reis.
Ich hoffe, diese Anleitung hilft euch dabei, eure eigenen Erdnuss-Sprossen zu ziehen. Es ist wirklich ein tolles Gefühl, seine eigenen Lebensmittel anzubauen und zu wissen, was drin ist. Viel Spaß beim Sprossen ziehen! Lasst mich wissen, wie es bei
Conclusion
So, there you have it! Growing your own bean sprouts from peanuts is not just a fun experiment; it’s a gateway to incredibly fresh, nutritious, and surprisingly delicious additions to your meals. Forget those bland, store-bought sprouts that have traveled miles and lost their vitality. With this simple DIY trick, you can cultivate a vibrant, living food source right in your own kitchen.
Why is this a must-try? Because it’s economical, sustainable, and empowering. You’re reducing food waste by utilizing peanuts you might otherwise discard, minimizing your carbon footprint by avoiding transportation, and gaining control over the quality and freshness of your food. Plus, the satisfaction of watching those tiny sprouts emerge and flourish is genuinely rewarding.
But the adventure doesn’t stop there! Feel free to experiment with different types of peanuts. While raw, unsalted peanuts are ideal, you can try using roasted peanuts for a slightly different flavor profile – just be mindful of the salt content and adjust your rinsing schedule accordingly. You can also play around with the sprouting environment. Try different containers, varying the amount of light exposure (indirect sunlight is best), or even adding a touch of organic fertilizer to the water to boost growth.
Consider incorporating your peanut sprouts into a variety of dishes. They’re fantastic in salads, adding a crunchy texture and nutty flavor. Stir-fries benefit from their crispness and subtle sweetness. You can even blend them into smoothies for a nutritional boost. Don’t be afraid to get creative and discover your own favorite ways to enjoy these homegrown gems.
We wholeheartedly encourage you to give this DIY peanut sprout growing method a try. It’s easier than you think, and the results are well worth the effort. Once you’ve experienced the joy of harvesting your own fresh sprouts, you’ll never look at store-bought sprouts the same way again.
And most importantly, we want to hear about your experiences! Share your photos, tips, and variations in the comments below. Let’s build a community of sprout enthusiasts and inspire others to embrace the magic of growing their own food. Let us know if you have any questions about growing bean sprouts peanuts. Happy sprouting!
Frequently Asked Questions (FAQ)
What kind of peanuts should I use for sprouting?
The best peanuts for sprouting are raw, unsalted, and unroasted peanuts. These are most likely to germinate successfully. Roasted or salted peanuts may not sprout due to the heat treatment or the presence of salt, which can inhibit germination. Look for peanuts specifically labeled as “raw” or “for sprouting” at health food stores or online retailers. Avoid peanuts that have been treated with pesticides or fungicides, as these chemicals can be harmful to your health.
How long does it take for peanut sprouts to grow?
The sprouting process typically takes between 3 to 7 days, depending on the temperature and humidity of your environment. Warmer temperatures (around 70-75°F or 21-24°C) will generally speed up the process. You’ll start to see tiny sprouts emerging from the peanuts within the first 24-48 hours. Continue rinsing and draining the peanuts regularly to keep them moist and prevent mold growth. The sprouts are ready to harvest when they are about 1-2 inches long.
How often should I rinse the peanuts?
Rinsing is crucial for successful sprouting. You should rinse the peanuts at least twice a day, preferably three times, with fresh, cool water. This helps to keep them hydrated, prevents the growth of mold and bacteria, and removes any accumulated toxins. Make sure to drain the peanuts thoroughly after each rinsing to prevent them from becoming waterlogged.
What if my peanuts start to mold?
Mold growth is a common problem when sprouting, especially in humid environments. If you notice any mold, immediately remove the affected peanuts to prevent it from spreading to the rest of the batch. Increase the frequency of rinsing and ensure that the peanuts are well-drained after each rinsing. You can also add a tablespoon of apple cider vinegar to the rinsing water to help inhibit mold growth. If the mold persists, it’s best to discard the entire batch and start over with fresh peanuts.
Are peanut sprouts safe to eat?
Yes, peanut sprouts are generally safe to eat, as long as they are grown properly and free from mold or bacteria. However, some people may be allergic to peanuts, so it’s important to be aware of this risk before consuming them. If you have a peanut allergy, you should avoid eating peanut sprouts. Even if you don’t have a known allergy, it’s always a good idea to start with a small amount to see how your body reacts.
How should I store peanut sprouts?
Once your peanut sprouts are ready to harvest, you can store them in the refrigerator for up to a week. To store them properly, rinse them thoroughly and drain them well. Then, place them in a clean, airtight container lined with a paper towel. The paper towel will help to absorb any excess moisture and prevent the sprouts from becoming soggy. Change the paper towel every day or two to keep the sprouts fresh.
Can I grow peanut sprouts in soil?
While you can technically grow peanut sprouts in soil, it’s not the most efficient or practical method. Sprouting in water is much faster and easier, and it allows you to monitor the growth process more closely. Growing in soil requires more space and resources, and it can be more difficult to control the moisture levels and prevent mold growth.
What are the nutritional benefits of peanut sprouts?
Peanut sprouts are a nutritional powerhouse, packed with vitamins, minerals, and enzymes. They are a good source of protein, fiber, and healthy fats. They also contain vitamins A, B, C, and E, as well as minerals like calcium, iron, and potassium. Sprouting increases the bioavailability of these nutrients, making them easier for your body to absorb. Peanut sprouts are also rich in antioxidants, which can help protect your cells from damage.
Can I use a sprouting jar or bag for growing bean sprouts peanuts?
Yes, you can definitely use a sprouting jar or bag for growing peanut sprouts. These containers are designed to provide optimal drainage and ventilation, which can help to prevent mold growth. Just make sure to choose a jar or bag that is large enough to accommodate the growing sprouts, and that it has a mesh lid or screen to allow for proper airflow. Follow the same rinsing and draining instructions as you would with any other sprouting method.
What if my peanut sprouts taste bitter?
A slightly bitter taste is normal for some sprouts, including peanut sprouts. This bitterness is often due to the presence of certain compounds that are released during the sprouting process. However, if the sprouts taste excessively bitter, it could be a sign that they are not being rinsed frequently enough or that they are starting to spoil. Make sure to rinse the sprouts thoroughly and drain them well, and discard any sprouts that have an off-putting odor or appearance. You can also try soaking the sprouts in fresh water for a few hours before eating them to help reduce the bitterness.
Leave a Comment