
Growing butternut squash tires can feel like a Herculean task, right? I get it! You envision those beautiful, tan-skinned gourds gracing your autumn table, but the reality often involves sprawling vines, powdery mildew, and a general sense of overwhelm. But don’t despair, fellow gardeners! This isn’t just another article on planting seeds; it’s your ultimate guide to conquering the butternut squash challenge with clever DIY tricks and hacks that will have you harvesting a bumper crop in no time.
Butternut squash, a New World native, has been a culinary staple for centuries. Indigenous peoples of the Americas cultivated squash as a vital source of nutrition, and its versatility quickly made it a beloved ingredient worldwide. Today, we still cherish its sweet, nutty flavor in everything from soups and stews to roasted side dishes and even desserts.
So, why do you *need* these DIY tricks? Because let’s face it, traditional gardening methods can be time-consuming and resource-intensive. These hacks are designed to simplify the process, maximize your yield, and minimize the frustration. I’m going to share my favorite tips for growing butternut squash tires, including soil preparation secrets, pest control strategies, and even clever trellising techniques to save space and improve air circulation. Get ready to transform your garden into a butternut squash paradise!
DIY Butternut Squash Trellis: Vertical Gardening for Bountiful Harvests
Hey there, fellow gardeners! Are you tired of your butternut squash vines taking over your entire garden? Do you dream of a more organized and productive squash patch? Well, I’ve got just the solution for you: a DIY butternut squash trellis! Growing butternut squash vertically not only saves space but also improves air circulation, reduces disease, and makes harvesting a breeze. Trust me, once you try this, you’ll never go back to sprawling vines again.
Why Trellis Butternut Squash?
Before we dive into the how-to, let’s quickly cover why trellising butternut squash is such a game-changer:
* Space Saving: Butternut squash vines can be incredibly long and unruly. Trellising keeps them contained and allows you to grow more in a smaller area.
* Improved Air Circulation: Vertical growth promotes better airflow around the leaves and fruits, reducing the risk of fungal diseases like powdery mildew.
* Easier Harvesting: No more searching through a tangled mess of vines to find your ripe squash! Trellising makes harvesting much simpler and more efficient.
* Pest Control: By lifting the squash off the ground, you reduce their exposure to soil-borne pests and diseases.
* Sunlight Exposure: Trellising allows for more even sunlight exposure, leading to better fruit development and ripening.
Choosing the Right Trellis Design
There are several trellis designs you can use for butternut squash, but I’m going to show you how to build a sturdy and reliable A-frame trellis. This design is strong enough to support the weight of the squash and provides ample space for the vines to climb.
Materials You’ll Need
Here’s a list of everything you’ll need to build your own A-frame butternut squash trellis:
* Lumber:
* Four 8-foot long 2x4s (for the A-frame legs)
* One 8-foot long 2×4 (for the top support)
* Several 8-foot long 1x2s or 1x4s (for the horizontal supports – the more, the better!)
* Hardware:
* 3-inch exterior wood screws
* 2-inch exterior wood screws
* Heavy-duty staples (if using wire mesh)
* Tools:
* Measuring tape
* Pencil
* Circular saw or hand saw
* Drill with drill bits
* Screwdriver
* Staple gun (if using wire mesh)
* Level
* Safety glasses
* Gloves
Step-by-Step Instructions: Building Your A-Frame Trellis
Okay, let’s get building! Follow these steps carefully, and you’ll have a sturdy trellis ready for your butternut squash in no time.
1. Cutting the Lumber
* Measure and Cut the Legs: Take two of your 8-foot 2x4s and cut them in half, so you have four 4-foot pieces. These will be the legs of your A-frame.
* Cut the Top Support: Cut the 8-foot 2×4 in half, so you have two 4-foot pieces. You will only need one of these for the top support.
* Cut the Horizontal Supports: Decide how far apart you want your horizontal supports to be. I recommend spacing them about 6-8 inches apart. Cut your 1x2s or 1x4s to the desired length. The length will depend on how wide you want your A-frame to be at the base. A good starting point is around 4 feet. You’ll need enough of these to cover both sides of the A-frame. I usually use about 10-12 per side.
2. Assembling the A-Frame
* Forming the A-Frame: Take two of your 4-foot 2×4 legs and stand them up so they form an “A” shape. Adjust the angle until the base is about 4 feet wide.
* Securing the Top: Place the 4-foot 2×4 top support horizontally across the top of the “A”. Use 3-inch wood screws to attach the legs to the top support. Make sure the screws are driven in at an angle for maximum strength. Repeat this process for the other side of the A-frame.
* Reinforcing the Joints: For added stability, you can add small pieces of scrap wood to the inside corners of the A-frame where the legs meet the top support. This will help prevent the trellis from wobbling.
3. Adding the Horizontal Supports
* Attaching the First Support: Start by attaching the first horizontal support (a 1×2 or 1×4) about 6 inches from the bottom of the A-frame. Use 2-inch wood screws to secure it to the legs. Make sure the support is level.
* Spacing and Attaching the Remaining Supports: Continue adding the horizontal supports, spacing them about 6-8 inches apart. Use a measuring tape to ensure consistent spacing. Make sure each support is level before screwing it in. Repeat this process for the other side of the A-frame.
* Consider Wire Mesh (Optional): Instead of horizontal supports, you could use heavy-duty wire mesh. Simply staple the mesh to the inside of the A-frame using a staple gun. This provides a continuous surface for the squash vines to grab onto.
4. Reinforcing the Trellis (Important!)
Butternut squash are heavy! You need to make sure your trellis is super sturdy.
* Cross Bracing: Cut two more pieces of 1×2 or 1×4 lumber. Attach one end of each piece to the middle of one leg and the other end to the opposite leg, forming an “X” shape. This will significantly increase the stability of the trellis. Use 2-inch wood screws to secure the cross braces.
* Ground Anchors (Optional): For extra security, especially in windy areas, you can use ground anchors to secure the trellis to the ground. These can be metal stakes or even just pieces of rebar driven into the soil. Attach the anchors to the legs of the trellis using wire or rope.
Planting and Training Your Butternut Squash
Now that your trellis is built, it’s time to plant your butternut squash and train the vines to climb.
1. Preparing the Soil
* Choose a Sunny Location: Butternut squash needs at least 6-8 hours of sunlight per day.
* Amend the Soil: Butternut squash are heavy feeders, so amend the soil with plenty of compost or well-rotted manure. This will provide the nutrients the plants need to thrive.
* Ensure Good Drainage: Butternut squash doesn’t like soggy soil, so make sure the planting area has good drainage.
2. Planting the Squash
* Direct Sowing or Transplants: You can either direct sow the butternut squash seeds or start them indoors and transplant them later. If direct sowing, wait until the soil has warmed up to at least 60°F.
* Spacing: Plant the squash seeds or transplants about 12-18 inches apart at the base of the trellis.
* Watering: Water the plants thoroughly after planting.
3. Training the Vines
* Guiding the Vines: As the butternut squash vines grow, you’ll need to gently guide them onto the trellis. Use soft twine or plant ties to secure the vines to the horizontal supports or wire mesh.
* Pruning (Optional): You can prune the vines to encourage more fruit production. Remove any side shoots that don’t have flowers or fruits.
* Supporting the Fruits: As the butternut squash fruits develop, they can become quite heavy. You may need to provide additional support to prevent them from breaking off the vine. You can use slings made from old pantyhose or netting to support the fruits. Tie the slings to the trellis.
Caring for Your Trellised Butternut Squash
Once your butternut squash is trellised, here are a few tips for keeping them healthy and productive:
* Watering: Water deeply and regularly, especially during dry periods. Avoid overhead watering, as this can promote fungal diseases.
* Fertilizing: Fertilize the plants every few weeks with a balanced fertilizer.
* Pest and Disease Control: Monitor the plants regularly for pests and diseases. Use organic pest control methods, such as insecticidal soap or neem oil, to control pests. Prevent fungal diseases by ensuring good air circulation and avoiding overhead watering.
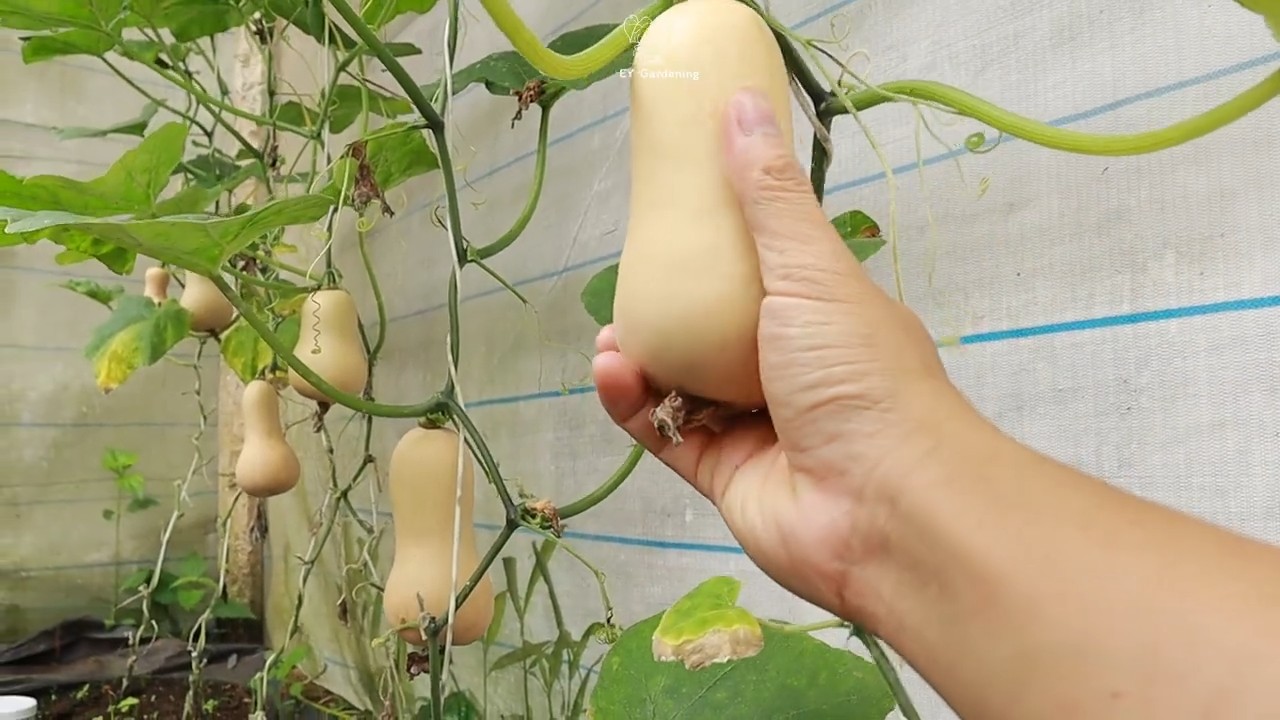
* Harvesting: Butternut squash are ready to harvest when the skin is hard and the stem is dry and brown. Cut the squash from the vine, leaving a few inches of stem attached.
Troubleshooting
* Trellis Not Strong Enough: If
Conclusion
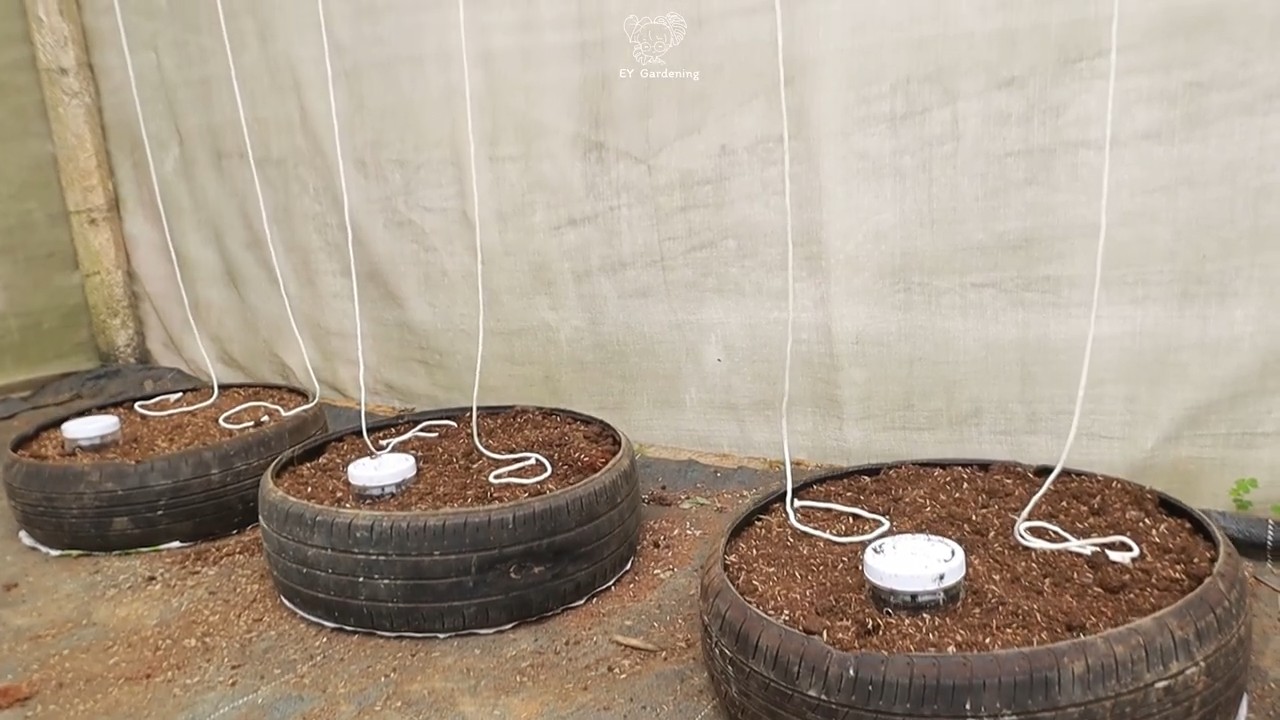
So, there you have it! Transforming old tires into thriving butternut squash planters is not just a clever upcycling project; it’s a game-changer for your garden. We’ve walked you through the simple steps, highlighting how this method can significantly improve drainage, retain heat, and ultimately, boost your butternut squash yield. Forget struggling with compacted soil and inconsistent watering – this DIY trick offers a practical and sustainable solution to common gardening challenges.
Butternut squash, with its sweet, nutty flavor, is a fall favorite, and growing your own allows you to enjoy it fresh from the vine. Imagine the satisfaction of harvesting plump, healthy squash that you nurtured from seed to table, all thanks to a few repurposed tires. This method is particularly beneficial for those with limited garden space or poor soil conditions, as it creates a contained and optimized growing environment.
Beyond the basic setup, there’s plenty of room for customization. Consider painting the tires in bright, cheerful colors to add a touch of personality to your garden. You could also experiment with different soil amendments to further enhance the growing medium. Adding compost, aged manure, or even a slow-release fertilizer can provide your butternut squash plants with the extra nutrients they need to thrive. Another variation is to stack two tires on top of each other for an even deeper planting bed, which is especially useful in areas with very hot summers as it helps to keep the roots cooler. You can also use different sizes of tires depending on the space you have available and the number of plants you want to grow in each container.
We understand that trying something new can sometimes feel daunting, but we assure you that this DIY project is incredibly rewarding. The benefits of using tires for growing butternut squash are numerous, from improved drainage and heat retention to reduced weeding and pest control. Plus, you’re contributing to a more sustainable lifestyle by giving old tires a new purpose.
Don’t just take our word for it – we encourage you to give this DIY trick a try! We are confident that you’ll be amazed by the results. Once you’ve experienced the joy of growing your own bountiful butternut squash crop in repurposed tires, you’ll never look at old tires the same way again.
We’d love to hear about your experiences! Share your photos, tips, and tricks in the comments below. Let’s build a community of gardeners who are passionate about sustainable practices and delicious, homegrown butternut squash. Let us know if you found this **DIY butternut squash** growing method helpful and what variations you tried. Happy gardening!
FAQ
Why should I use tires to grow butternut squash?
Using tires offers several advantages. First, they provide excellent drainage, preventing waterlogging and root rot, which are common problems when growing butternut squash directly in the ground. The dark color of the tires also helps to absorb and retain heat, creating a warmer microclimate that promotes faster growth and higher yields, especially in cooler climates. Furthermore, the tires act as a barrier against weeds and some soil-borne pests, reducing the need for herbicides and pesticides. Finally, it’s a fantastic way to upcycle old tires, keeping them out of landfills and giving them a new purpose.
What kind of tires can I use?
Almost any size tire can be used, but larger tires (like those from cars or light trucks) are generally better as they provide more space for the roots to grow. Avoid using tires that are heavily damaged or have exposed steel belts, as these can be difficult to work with and may pose a safety hazard. Also, ensure the tires are clean before using them. A good scrub with soap and water will remove any dirt, oil, or debris.
Are tires safe to use for growing food?
This is a common concern. While some studies have shown that tires can leach small amounts of chemicals into the soil, the levels are generally considered to be very low and unlikely to pose a significant health risk, especially when growing vegetables like butternut squash, where you are not consuming the roots. To further minimize any potential risk, you can line the inside of the tires with a layer of plastic or landscape fabric before adding soil. This will create a barrier between the soil and the tire, preventing any direct contact. Using organic soil and fertilizers will also help to ensure that your butternut squash is healthy and safe to eat.
What kind of soil should I use?
Butternut squash thrives in rich, well-draining soil. A good mix would be equal parts of topsoil, compost, and aged manure. The topsoil provides a base, the compost adds nutrients and improves drainage, and the aged manure provides a slow-release source of nitrogen. You can also add a handful of slow-release fertilizer to the mix to give your plants an extra boost. Avoid using heavy clay soil, as it can become waterlogged and suffocate the roots.
How many butternut squash plants can I grow in one tire?
A good rule of thumb is to plant one to two butternut squash plants per tire, depending on the size of the tire. If you’re using a smaller tire, stick to just one plant. If you’re using a larger tire, you can plant two, but make sure to space them adequately to allow for proper growth and air circulation. Overcrowding can lead to disease and reduced yields.
How often should I water my butternut squash plants in tires?
Watering frequency will depend on the weather and the type of soil you’re using. Generally, you should water deeply whenever the top inch of soil feels dry to the touch. Butternut squash plants need consistent moisture, especially during hot weather and when the fruits are developing. Avoid overwatering, as this can lead to root rot. Using a soaker hose or drip irrigation system can help to deliver water directly to the roots, minimizing water waste and reducing the risk of fungal diseases.
Do I need to fertilize my butternut squash plants in tires?
Yes, butternut squash plants are heavy feeders and benefit from regular fertilization. Start with a slow-release fertilizer at planting time, and then supplement with a liquid fertilizer every two to three weeks during the growing season. Choose a fertilizer that is high in phosphorus and potassium, as these nutrients are essential for fruit development. You can also add compost tea to the soil every few weeks to provide a boost of beneficial microbes and nutrients.
How do I protect my butternut squash plants from pests and diseases?
Regularly inspect your plants for signs of pests and diseases. Common pests that affect butternut squash include squash bugs, squash vine borers, and aphids. You can control these pests by handpicking them off the plants, using insecticidal soap, or applying neem oil. Common diseases include powdery mildew and downy mildew. To prevent these diseases, ensure good air circulation around the plants, avoid overhead watering, and apply a fungicide if necessary.
How do I know when my butternut squash is ready to harvest?
Butternut squash is typically ready to harvest in the fall, about 90-100 days after planting. The squash should be a deep tan color and the skin should be hard and difficult to puncture with your fingernail. The stem should also be dry and brown. Use a sharp knife or pruning shears to cut the squash from the vine, leaving a few inches of stem attached. Curing the squash for a week or two in a warm, dry place will help to improve its flavor and storage life.
Leave a Comment