
Growing cabbage without a garden? Absolutely! Forget the sprawling fields and perfectly tilled soil you might picture. I’m here to tell you that fresh, crisp cabbage is within reach, even if your “garden” is a sunny balcony, a small patio, or even just a well-lit corner indoors.
For centuries, cabbage has been a staple in diets around the world, from the hearty stews of Eastern Europe to the vibrant slaws of North America. Its versatility and nutritional value have made it a beloved vegetable across cultures. But what if you don’t have the traditional space to cultivate this leafy green? That’s where the magic of DIY gardening comes in!
Let’s face it, not everyone has access to a large garden plot. Apartment living, busy schedules, and limited outdoor space can make traditional gardening seem impossible. But don’t let that stop you from enjoying the satisfaction of growing your own food! This article is packed with clever DIY tricks and hacks that will empower you to successfully growing cabbage without a garden. Imagine the pride of harvesting your own cabbage, knowing you nurtured it from seed to table, all within the confines of your own home. We’ll explore container gardening techniques, soil selection, pest control strategies, and everything you need to know to bring your cabbage dreams to life, no matter how small your space. So, grab your gardening gloves (or maybe just a pair of kitchen gloves!), and let’s get started!
Growing Cabbage Without a Garden: Your DIY Guide for Balcony or Terrace Cultivation
Hey garden friends! Who says you need a huge garden to harvest fresh cabbage? I’ll show you how you can grow magnificent heads of cabbage on your balcony or terrace. It’s easier than you think and really fun!
What you need: The Material List
Before we get started, here is a list of everything you’ll need for your cabbage-growing adventure:
- Cabbage seeds or young plants: Decide on a cabbage variety that you like. Red cabbage, white cabbage, savoy cabbage, or cauliflower – the selection is huge! Young plants are easier, especially for beginners, as they already have a head start on growth.
- Large containers: Cabbage needs space! Choose pots or tubs with a diameter of at least 30 cm (12 inches) and a depth of 30 cm (12 inches). Bigger is better, especially if you want to grow several plants in one container.
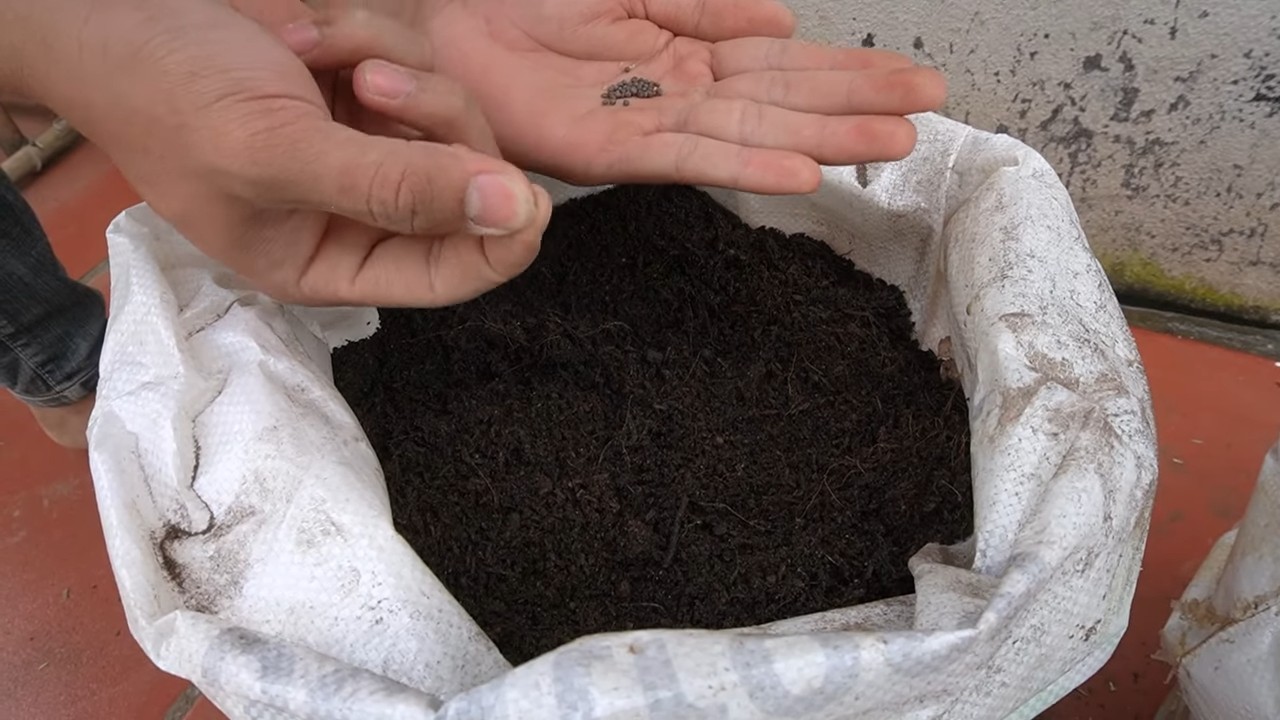
- High-quality potting soil: Use a nutrient-rich, well-draining potting soil. Special vegetable soil is ideal, but a mixture of potting soil and compost also works well.
- Compost or organic fertilizer: Cabbage is a heavy feeder and needs regular fertilization. Compost is a natural and sustainable option, but organic fertilizer specifically for vegetables is also great.
- Watering can or garden hose: Cabbage needs regular watering, especially during its growth phase.
- Snail bait or a snail barrier: Snails love cabbage! Protect your plants from these voracious visitors.
- Trowel: For repotting and planting the cabbage plants.
- Possibly: A trellis for varieties that tend to fall over (e.g., Brussels sprouts).
The Preparation: The Right Location and Containers
- Choose the right location: Cabbage needs a lot of sun! At least 6 hours of direct sunlight per day is ideal. Make sure the location is sheltered from the wind, as strong winds can damage the plants.
- Prepare the containers: Ensure that the containers have drainage holes so that excess water can run off. Fill the containers with potting soil, but leave about 5 cm (2 inches) of space to the rim.
- Moisten the soil: Water the soil thoroughly before planting. This gives the roots a good start.
The Planting: Step by Step to Cabbage Happiness
- Sow cabbage seeds (optional): If you want to grow cabbage from seed, sow the seeds about 6-8 weeks before the last frost in seed trays or small pots. Keep the soil moist and place the trays in a bright, warm place. Once the seedlings are large enough (about 5-7 cm or 2-3 inches), you can transplant them into larger pots.
- Plant young plants: Use a trowel to dig a hole in the soil that is large enough to accommodate the root ball of the young plant.
- Plant the young plant: Carefully place the young plant in the hole and fill it with soil. Press the soil down lightly. Make sure that the root collar (the transition between the root and the stem) is not covered with soil.
- Water the plants: Water the freshly planted cabbage plants thoroughly.
- Protect the plants from snails: Distribute snail bait around the plants or use a snail barrier.
The Care: Watering, Fertilizing, and Protecting
- Water regularly: Cabbage needs regular watering, especially during its growth phase. The soil should always be slightly moist, but not wet. It’s best to water in the morning or evening to avoid evaporation.
- Fertilize regularly: Cabbage is a heavy feeder and needs regular fertilization. Start fertilizing about 2-3 weeks after planting. Use compost or organic fertilizer according to the instructions on the package. I fertilize my cabbage plants every 2-3 weeks.
- Combat pests and diseases: Cabbage can be affected by various pests and diseases. Watch for signs like holes in the leaves, yellow leaves, or fungal infections. If necessary, you can use organic pesticides or fungicides. Cabbage white butterflies are often a problem; a net over the plants helps here.
- Remove weeds: Keep the containers free of weeds, as they rob the cabbage plants of nutrients and water.
- Support (optional): Some cabbage varieties, like Brussels sprouts, can grow very tall and tend to fall over. In this case, you can support the plants with a trellis or stakes.
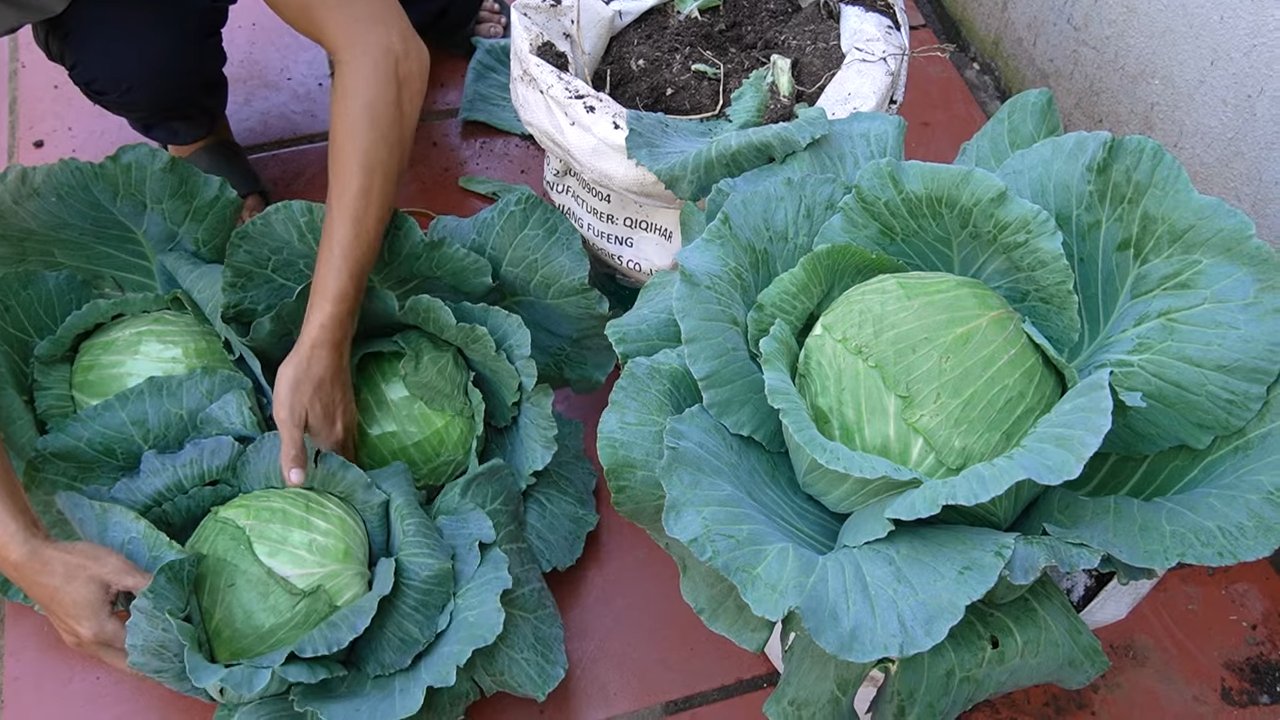
The Harvest: The Reward for Your Effort
- Recognize the right time: The time of harvest depends on the cabbage variety. White and red cabbage are ready to harvest when the heads are firm and closed. Savoy cabbage can be a bit looser. Cauliflower is ready to harvest when the head has a nice, uniform color and the florets are still closed. You harvest Brussels sprouts when the sprouts are firm and closed.
- Harvest cabbage: Cut the cabbage head with a sharp knife or pruning shears. Leave a few leaves on the stalk to protect the plant from drying out.
- Harvest Brussels sprouts: Pick the Brussels sprouts from the bottom up as soon as they are firm and closed.
Special Tips for Different Cabbage Varieties
- Red Cabbage: Red cabbage needs acidic soil. You can acidify the soil with a little peat or rhododendron soil.
- White Cabbage: White cabbage is relatively undemanding and grows well in normal potting soil.
- Savoy Cabbage: Savoy cabbage is frost-hardy and can also be grown in the fall and winter.
- Cauliflower: Cauliflower needs a lot of sun and regular fertilization. Protect the head from direct sunlight by tying the leaves over it. This keeps it nice and white.
- Brussels Sprouts: Brussels sprouts need a lot of space and regular fertilization. Remove the lower leaves to encourage the formation of sprouts.
Common Problems and Solutions
- Snail infestation: Snail bait or snail barriers help to protect the plants.
- Cabbage white butterflies: A net over the plants prevents the butterflies from laying their eggs.
- Clubroot: This fungal disease affects the roots and leads to growth problems. Use resistant varieties and ensure good soil health.
- Aphids: Aphids can be rinsed off with a jet of water or controlled with organic insecticides.
A Few Final Tips
- Observe crop rotation: Do not grow cabbage in the same location every year to prevent diseases and pests.
- Companion planting: Plant cabbage together with other plants that protect it from pests or promote its growth. Good partners are, for example, marigolds, nasturtiums, or sage.
- Experiment: Try out different cabbage varieties and cultivation methods to find out what works best for you.
I hope this guide helps you to successfully grow cabbage on your balcony or terrace. Have fun gardening and enjoy your meal!
Conclusion
So, you’ve reached the end of our guide, and hopefully, you’re brimming with excitement to embark on your own cabbage-growing adventure, even without a traditional garden! We’ve explored the ins and outs of container gardening, highlighting how accessible and rewarding it can be to cultivate fresh, delicious cabbage right on your balcony, patio, or even a sunny windowsill.
This isn’t just about saving money on groceries; it’s about connecting with your food, understanding its journey from seed to table, and experiencing the satisfaction of nurturing something from scratch. Imagine the pride you’ll feel serving a salad featuring cabbage you personally grew!
The beauty of growing cabbage without a garden lies in its adaptability. You’re not confined by soil conditions or limited space. You have complete control over the environment, ensuring your cabbage receives the optimal nutrients and care it needs to thrive. Plus, container gardening offers a fantastic solution for those living in apartments or with limited outdoor space.
But the benefits extend beyond convenience. Container-grown cabbage is often less susceptible to soilborne diseases and pests, giving you a healthier, more robust harvest. And let’s not forget the aesthetic appeal! A vibrant, leafy cabbage plant adds a touch of greenery and life to any space.
Why is this DIY trick a must-try? Because it empowers you to grow fresh, healthy cabbage regardless of your living situation. It’s a sustainable, cost-effective, and incredibly rewarding experience. It’s about taking control of your food source and enjoying the fruits (or rather, vegetables!) of your labor.
Ready to take it to the next level? Consider experimenting with different varieties of cabbage. Red cabbage adds a beautiful splash of color to your garden and your plate. Savoy cabbage offers a milder, sweeter flavor. And for a quicker harvest, try growing smaller, early-maturing varieties. You can also companion plant your cabbage with herbs like rosemary or thyme to deter pests naturally. Another variation is to try different types of containers. While we’ve discussed plastic pots, terracotta pots can also be used, although they may require more frequent watering. Fabric pots are another excellent option, promoting better aeration and drainage.
Don’t be afraid to get creative with your setup. Vertical gardening systems can maximize space, while self-watering containers can simplify the watering process. The possibilities are endless!
We wholeheartedly encourage you to try this DIY trick. Growing cabbage without a garden is easier than you might think, and the rewards are well worth the effort. So, grab your seeds, your containers, and your potting mix, and get ready to embark on a fulfilling gardening journey.
And most importantly, we want to hear about your experience! Share your photos, tips, and challenges in the comments below. Let’s create a community of urban gardeners, supporting each other and celebrating the joy of growing our own food. Let us know what worked for you, what didn’t, and any unique approaches you took. Your insights can help others succeed in their own cabbage-growing endeavors. Happy gardening!
Frequently Asked Questions (FAQ)
1. What type of container is best for growing cabbage without a garden?
The ideal container for growing cabbage should be at least 12 inches in diameter and 12 inches deep to accommodate the plant’s root system. Plastic pots are a popular and affordable option, but terracotta pots and fabric pots also work well. Terracotta pots offer better aeration but may dry out more quickly, requiring more frequent watering. Fabric pots promote excellent drainage and aeration, preventing root rot. Consider the size of the mature cabbage variety you’re planting when choosing your container size. Larger varieties will need larger containers. Ensure the container has drainage holes to prevent waterlogging.
2. What kind of soil should I use for growing cabbage in containers?
Cabbage thrives in well-draining, nutrient-rich soil. A good potting mix specifically formulated for vegetables is ideal. Avoid using garden soil, as it can be too heavy and compact in containers, hindering drainage and root growth. You can also create your own potting mix by combining equal parts of peat moss (or coconut coir), perlite, and compost. The compost provides essential nutrients, while the peat moss (or coconut coir) helps retain moisture, and the perlite improves drainage. Adding a slow-release fertilizer to the potting mix at planting time will provide a steady supply of nutrients throughout the growing season.
3. How much sunlight does cabbage need when grown in containers?
Cabbage requires at least 6 hours of direct sunlight per day to thrive. Choose a location that receives ample sunlight, such as a south-facing balcony or patio. If you don’t have a spot that gets enough natural light, you can supplement with grow lights. Place the grow lights a few inches above the plants and keep them on for 12-14 hours per day. Rotate the containers regularly to ensure all sides of the plant receive adequate sunlight. Insufficient sunlight can result in leggy growth and smaller heads.
4. How often should I water my container-grown cabbage?
Water cabbage regularly, keeping the soil consistently moist but not waterlogged. Check the soil moisture level daily by sticking your finger about an inch into the soil. If the soil feels dry to the touch, it’s time to water. Water deeply, allowing the water to drain out of the drainage holes. Avoid overhead watering, as this can promote fungal diseases. Instead, water at the base of the plant. The frequency of watering will depend on the weather conditions, the type of container, and the size of the plant. During hot, dry weather, you may need to water daily.
5. How do I fertilize my container-grown cabbage?
Cabbage is a heavy feeder and requires regular fertilization. Use a balanced fertilizer specifically formulated for vegetables, following the instructions on the package. You can use a liquid fertilizer every two weeks or a slow-release fertilizer at planting time and then again halfway through the growing season. Look for a fertilizer with a higher nitrogen content, as nitrogen promotes leafy growth. Avoid over-fertilizing, as this can lead to excessive foliage growth at the expense of head formation.
6. What are some common pests and diseases that affect cabbage, and how can I prevent them?
Common pests that affect cabbage include cabbage worms, aphids, and flea beetles. To prevent these pests, inspect your plants regularly and remove any pests you find by hand. You can also use insecticidal soap or neem oil to control infestations. Row covers can also be used to protect your plants from pests. Common diseases that affect cabbage include black rot and clubroot. To prevent these diseases, use disease-resistant varieties, practice crop rotation, and avoid overhead watering. Ensure good air circulation around your plants to prevent fungal diseases.
7. How do I know when my cabbage is ready to harvest?
Cabbage is ready to harvest when the head is firm and compact. The size of the head will vary depending on the variety. Check the seed packet or plant tag for the expected size of the mature head. To harvest, use a sharp knife to cut the head from the stem, leaving a few outer leaves intact. You can store harvested cabbage in the refrigerator for several weeks.
8. Can I grow cabbage indoors if I don’t have a balcony or patio?
Yes, you can grow cabbage indoors, but it requires a sunny location and supplemental lighting. Place your cabbage plants near a south-facing window that receives at least 6 hours of direct sunlight per day. Supplement with grow lights if necessary. Ensure good air circulation around your plants to prevent fungal diseases. Indoor-grown cabbage may not grow as large as outdoor-grown cabbage, but you can still enjoy a harvest of fresh, homegrown cabbage.
9. What are some companion plants for cabbage?
Companion planting can help deter pests, attract beneficial insects, and improve the overall health of your cabbage plants. Good companion plants for cabbage include:
* **Herbs:** Rosemary, thyme, sage, dill, and mint can help deter pests.
* **Flowers:** Marigolds and nasturtiums attract beneficial insects that prey on cabbage pests.
* **Vegetables:** Onions and garlic can help deter pests.
Avoid planting cabbage near other members of the brassica family, such as broccoli, cauliflower, and kale, as they can attract the same pests and diseases.
10. Can I grow cabbage from seed in containers?
Yes, you can grow cabbage from seed in containers. Start seeds indoors 6-8 weeks before the last expected frost. Sow seeds ¼ inch deep in seed-starting mix. Keep the soil moist and warm. Once the seedlings have developed a few true leaves, transplant them into individual containers. Harden off the seedlings by gradually exposing them to outdoor conditions before transplanting them into their final containers. You can also direct sow cabbage seeds in containers after the last frost.


Leave a Comment