
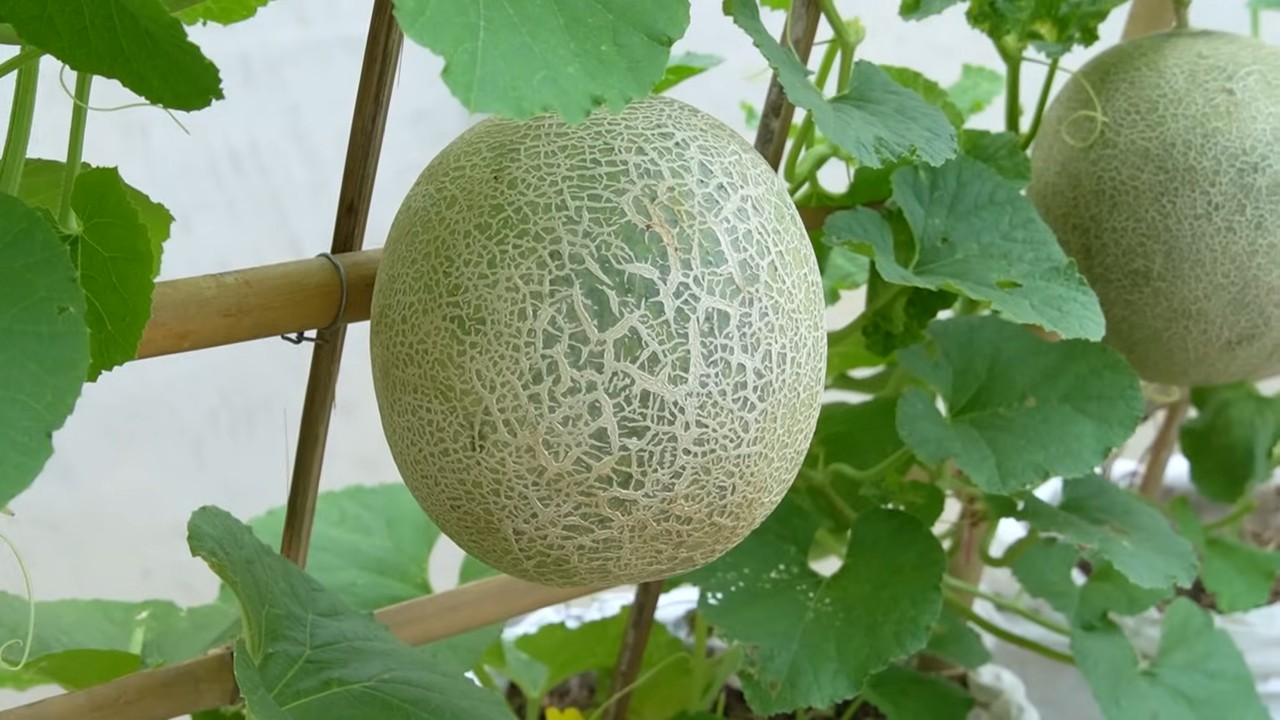
Growing cantaloupes in bags might sound a little unconventional, right? But trust me, it’s a game-changer for anyone with limited space or challenging soil! I’m so excited to share this simple yet effective DIY trick that will have you harvesting sweet, juicy cantaloupes right from your patio or balcony.
For centuries, cantaloupes have been cherished for their refreshing flavor and nutritional benefits. Originating in Africa and India, these delightful melons eventually made their way to Europe and the Americas, becoming a summertime staple. But traditionally, growing them required a sprawling garden and a lot of patience. Not anymore!
Let’s face it, not everyone has access to a large garden. Apartment dwellers, urban gardeners, and those with poor soil often miss out on the joy of growing their own food. That’s where this DIY hack comes in. Growing cantaloupes in bags allows you to bypass these limitations and enjoy the satisfaction of harvesting your own delicious melons, no matter where you live. Plus, it’s a fantastic way to control the soil quality and protect your plants from pests and diseases. So, are you ready to ditch the garden plot and embrace the bag? Let’s get started!
Growing Watermelons in Bags: A DIY Guide for the Garden
Hello dear garden friends! Do you also have a small garden or just a balcony, but still want fresh, homegrown watermelons? Then I have just the thing for you: growing watermelons in bags! Sounds crazy? Maybe a little, but it works great and is a fantastic way to harvest delicious melons even in the smallest of spaces. I’ll show you how it’s done!
What you need:
- Watermelon seeds: Choose a variety that is suitable for container growing. Smaller varieties like “Sugar Baby” or “Bush Sugar Baby” are ideal.
- Large bags: Sturdy jute sacks, grow bags, or even large trash bags (doubled up!) work well. They should have at least a 50-liter (about 13-gallon) capacity, or even better, 70-80 liters (18-21 gallons).
- High-quality potting soil: A mixture of garden soil, compost, and some sand ensures good drainage and nutrient supply.
- Compost or organic fertilizer: For a good start and a bountiful harvest.
- Watering can or hose: For regular watering.
- Stakes or a trellis: To support the growing vines.
- Knife or scissors: For cutting the bags and removing side shoots.
- Mulch material: Straw, wood chips, or grass clippings to retain moisture in the soil and suppress weeds.
- Patience and love: The most important thing of all!
Preparation is Everything: Preparing the Bags
- Select and prepare the bags: Take your chosen bags and make sure they are clean and undamaged. If you are using trash bags, be sure to double them up so they are more stable and less likely to tear.
- Add drainage holes: This is super important! Cut or poke several holes in the bottom of the bags. This allows excess water to drain and prevents waterlogging. Waterlogging is the death of every watermelon!
- Fill the bags: Mix your potting soil with compost or organic fertilizer. The ratio should be about 2:1 (2 parts soil, 1 part compost). Fill the bags to about 10 cm (4 inches) below the rim.
- Water the soil: Water the soil in the bags thoroughly so that it is well moistened. Let the water drain before you start planting.
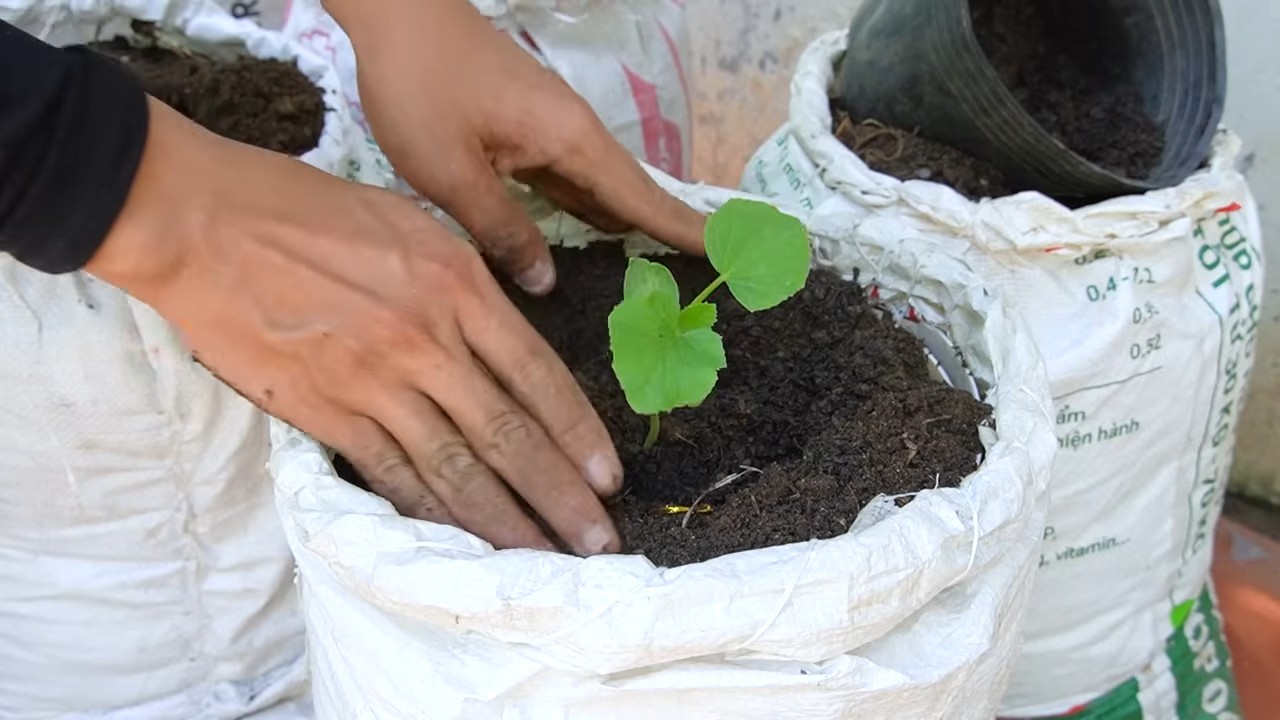
Sowing and Starting: The Beginning of Melon Life
- Sow the seeds: Use your finger to make small depressions in the soil (approx. 2-3 cm / 1 inch deep). Place 2-3 seeds in each depression. This gives you a higher chance that at least one seed will germinate.
- Cover the seeds: Gently cover the seeds with soil and press down lightly.
- Water again: Gently water the soil again so that it is moist but not wet.
- Keep warm and bright: Place the bags in a warm and bright location. A greenhouse or a sunny spot on a windowsill is ideal. Germination usually takes 7-14 days.
- Thinning (optional): If several seeds have germinated, you can remove the weakest seedlings, leaving only the strongest one per bag. This is called thinning.
Care and Growth: Raising the Melons
- Water regularly: Watermelons need a lot of water, especially during fruit formation. Water the plants regularly, but avoid waterlogging. The soil should always be slightly moist. On hot days, it may be necessary to water daily.
- Fertilize: Fertilize the plants every 2-3 weeks with an organic fertilizer or a special melon fertilizer. Pay attention to the dosage instructions on the packaging.
- Install a trellis: Watermelons form long vines that need support. Attach stakes or a trellis to the bags so the vines can climb up them.
- Remove side shoots: Regularly remove the side shoots that grow from the leaf axils. This helps the plant concentrate on forming the main fruit.
- Mulch: Cover the soil in the bags with mulch material. This keeps the moisture in the soil, suppresses weeds, and protects the roots from overheating.
- Pollination: Watermelons depend on pollination by bees and other insects. If you have few insects in your garden, you can also pollinate the flowers yourself. To do this, take a soft brush and transfer the pollen from the male to the female flowers. You can recognize the female flowers by the small fruit at the base of the blossom.
- Support fruit development: When the first fruits form, you can support them with small nets or fabric slings to prevent them from breaking off.
Harvest Time: Enjoying the Fruits of Your Labor
- Recognizing ripeness: You can tell a watermelon is ripe by several factors:
- The rind loses its shine and becomes duller.
- The spot where the melon rests on the ground turns from white to yellowish.
- When you tap the melon, it should sound hollow.
- The tendril closest to the melon will become dry and brown.
- Harvesting: Carefully cut the ripe melon from the vine with a sharp knife or scissors.
- Enjoy: Enjoy your homegrown watermelon! It’s best served chilled and shared with friends and family.
Additional Tips and Tricks:
- Sun protection: On very hot days, it may be a good idea to protect the bags with a sun sail or shade cloth to prevent the roots from overheating.
- Pests and diseases: Watch for signs of pests or diseases and treat them with organic methods if necessary.
- Variety selection: Try out different watermelon varieties to find your favorite. There are many different types with various flavors and sizes.
- Creativity: Be creative with the design of your bags. Paint them with bright colors or decorate them with patterns. This will make them a real eye-catcher in your garden or on your balcony.
- Upcycling: Use old jute sacks or fabric scraps to make your own grow bags. This is not only environmentally friendly but also a great way to reuse old materials.
Avoiding Common Mistakes:
- Too little water: Watermelons need a lot of water, especially during fruit formation. Make sure to water the plants regularly.
- Waterlogging: Avoid waterlogging by ensuring good drainage.
- Too little fertilizer: Fertilize the plants regularly to ensure a good supply of nutrients.
- Wrong location: Watermelons need a sunny location. Place the bags in a spot where they will get at least 6 hours of sun per day.
- Bags are too small: Use sufficiently large bags so the roots have enough space to grow.
I hope this guide helps you to grow your own watermelons in bags. It’s really easier than you think and a lot of fun! Good luck and a bountiful harvest! Let me know how it goes for you!
Conclusion
So, there you have it! Growing cantaloupes in bags isn’t just a quirky gardening experiment; it’s a game-changer for anyone looking to maximize their yield, combat space constraints, or simply enjoy the satisfaction of nurturing these sweet melons from seed to harvest. We’ve explored the ins and outs of this method, from selecting the right bag and soil to providing the necessary support and care.
Why is this DIY trick a must-try? Because it offers a multitude of benefits. You gain unparalleled control over the growing environment, protecting your precious cantaloupes from soilborne diseases and pests. The confined space encourages efficient nutrient uptake, leading to sweeter, more flavorful fruits. And let’s not forget the sheer convenience – you can move your cantaloupe bags to chase the sun, shelter them from harsh weather, or even bring them indoors during unexpected frosts.
But the beauty of this method lies in its adaptability. Feel free to experiment with different bag sizes to find what works best for your space and the specific cantaloupe variety you’re growing. Consider adding a layer of mulch to the top of the soil to retain moisture and suppress weeds. You can also try companion planting herbs like basil or marigolds around the base of the bags to deter pests naturally. If you live in a particularly hot climate, consider using lighter-colored bags to reflect sunlight and prevent the soil from overheating.
Don’t be afraid to get creative with your support systems. While we suggested using trellises or stakes, you could also repurpose old ladders or even build your own custom structures. The key is to provide adequate support for the growing vines and developing melons, preventing them from touching the ground and rotting.
Growing cantaloupes in bags is a rewarding experience that connects you with nature and provides you with delicious, homegrown fruit. It’s a testament to the fact that you don’t need acres of land to enjoy the bounty of a garden. With a little planning, preparation, and care, you can transform your balcony, patio, or even a sunny corner of your yard into a thriving cantaloupe patch.
We wholeheartedly encourage you to give this DIY trick a try. Start small, experiment with different techniques, and most importantly, have fun! We’re confident that you’ll be amazed by the results. And once you’ve harvested your first batch of homegrown cantaloupes, be sure to share your experience with us. We’d love to hear your tips, tricks, and success stories. Share your photos and stories on social media using #CantaloupeInBags or leave a comment below. Let’s build a community of bag-growing cantaloupe enthusiasts!
Ready to embark on your cantaloupe-growing adventure?
Don’t wait any longer. Gather your supplies, choose your favorite cantaloupe variety, and get ready to experience the joy of growing your own delicious melons. Happy gardening!
Frequently Asked Questions (FAQ)
What is the best size bag for growing cantaloupes?
The ideal bag size for growing cantaloupes is typically between 10 and 20 gallons. A 10-gallon bag is suitable for smaller cantaloupe varieties, while a 20-gallon bag provides ample space for larger varieties to develop a robust root system. Consider the mature size of the cantaloupe variety you choose when selecting your bag size. Ensure the bag is sturdy and has drainage holes to prevent waterlogging.
What type of soil should I use for growing cantaloupes in bags?
A well-draining, nutrient-rich potting mix is essential for successful cantaloupe growth in bags. Avoid using garden soil, as it can become compacted and hinder drainage. A good potting mix should contain a blend of peat moss, perlite, and vermiculite. You can also amend the potting mix with compost or aged manure to provide additional nutrients. Aim for a slightly acidic to neutral pH level (around 6.0 to 7.0).
How often should I water cantaloupes growing in bags?
Cantaloupes require consistent moisture, especially during fruit development. Water deeply whenever the top inch of soil feels dry to the touch. The frequency of watering will depend on factors such as weather conditions, bag size, and plant size. In hot, dry weather, you may need to water daily. Avoid overwatering, as this can lead to root rot. Ensure the bag has adequate drainage to prevent water from pooling at the bottom.
How much sunlight do cantaloupes need when grown in bags?
Cantaloupes thrive in full sun, requiring at least 6 to 8 hours of direct sunlight per day. Choose a location for your cantaloupe bags that receives ample sunlight throughout the day. If you live in a particularly hot climate, consider providing some afternoon shade to prevent the plants from overheating. You can also rotate the bags periodically to ensure even sun exposure.
What type of support system is best for cantaloupes in bags?
Cantaloupe vines can become quite heavy, so a sturdy support system is crucial. Trellises, stakes, or cages are all effective options. Train the vines to climb the support structure as they grow. For larger cantaloupe varieties, you may need to provide additional support for the developing fruits. This can be done by using slings made from netting or fabric to cradle the melons and prevent them from breaking off the vine.
How do I fertilize cantaloupes growing in bags?
Cantaloupes are heavy feeders and require regular fertilization to produce abundant, high-quality fruit. Start by incorporating a slow-release fertilizer into the potting mix at planting time. Then, supplement with liquid fertilizer every 2 to 3 weeks throughout the growing season. Choose a fertilizer that is high in phosphorus and potassium, as these nutrients are essential for fruit development. Avoid over-fertilizing, as this can lead to excessive foliage growth at the expense of fruit production.
How do I protect cantaloupes from pests and diseases when growing them in bags?
Growing cantaloupes in bags can help reduce the risk of soilborne pests and diseases. However, it’s still important to take preventative measures. Inspect your plants regularly for signs of pests or diseases. Common cantaloupe pests include aphids, squash bugs, and vine borers. Control pests by handpicking, using insecticidal soap, or introducing beneficial insects. To prevent fungal diseases, ensure good air circulation around the plants and avoid overhead watering. You can also apply a fungicide if necessary.
When is the best time to harvest cantaloupes grown in bags?
Cantaloupes are typically ready to harvest 75 to 90 days after planting. The best way to determine ripeness is to observe the stem where the fruit attaches to the vine. When the cantaloupe is ripe, the stem will begin to crack and separate from the fruit. The skin of the cantaloupe will also change color from green to tan or yellow, depending on the variety. The cantaloupe should also have a sweet aroma. Gently lift the cantaloupe from the vine; if it comes off easily, it’s ready to harvest.
Can I grow different varieties of cantaloupe in bags?
Yes, you can grow different varieties of cantaloupe in bags. Consider the mature size of each variety when selecting your bag size and support system. Some popular cantaloupe varieties for container gardening include ‘Sugar Cube,’ ‘Minnesota Midget,’ and ‘Bush Star.’ Be sure to provide each variety with the appropriate growing conditions and care.
What are some common problems when growing cantaloupes in bags and how can I fix them?
Some common problems include blossom end rot (caused by calcium deficiency), powdery mildew (a fungal disease), and pest infestations. Blossom end rot can be prevented by ensuring consistent watering and adding calcium to the soil. Powdery mildew can be controlled by improving air circulation and applying a fungicide. Pest infestations can be managed by handpicking, using insecticidal soap, or introducing beneficial insects. Regular monitoring and prompt action are key to addressing these problems effectively.
Leave a Comment