
Growing corn in soil bags might sound unconventional, but trust me, it’s a game-changer for home gardeners like us! Are you dreaming of sweet, juicy corn on the cob, but limited by space or less-than-ideal soil conditions? Well, you’re in the right place. Forget sprawling fields; we’re bringing the farm to your patio, balcony, or even your driveway!
Corn, a staple crop with roots stretching back thousands of years in Mesoamerica, has always been a symbol of abundance and sustenance. From ancient civilizations to modern-day barbecues, corn holds a special place in our hearts (and stomachs!). But let’s face it, not everyone has the space or the green thumb to cultivate a traditional cornfield.
That’s where this DIY trick comes in. Growing corn in soil bags offers a fantastic solution for urban gardeners, renters, or anyone looking for a simple, effective way to enjoy homegrown corn. It’s a cost-effective, space-saving method that allows you to control the soil quality and growing conditions, leading to healthier, more productive plants. Plus, it’s incredibly satisfying to harvest your own corn, knowing you nurtured it from seed to table. So, grab your soil bags, and let’s get started on this exciting gardening adventure!
Growing Corn in a Grow Bag: Your DIY Guide for a Bountiful Harvest
Hey everyone! Do you also have a small garden or maybe just a balcony, but still fancy fresh, homegrown corn? Then you’ve come to the right place! I’ll show you how to easily grow corn in grow bags. This is super space-saving and works really well. Let’s get started!
What you need:
- Grow bags: Preferably those made of robust material with at least a 60-liter capacity. The larger, the better for the corn roots.
- High-quality potting soil: Corn is a heavy feeder, so it needs nutrient-rich soil.
- Compost or organic fertilizer: For that extra nutrient kick.
- Corn kernels: Preferably ones specifically suited for garden cultivation. Pay attention to the variety description; some are better suited for smaller gardens.
- Watering can or hose: For regular watering.
- Support stakes (optional): Especially in windy locations, corn plants can use some support.
- Scissors or a knife: For thinning out the plants.
- Patience and love: The most important thing of all!
Step-by-Step Guide: Growing Corn in a Grow Bag
1. Preparing the Grow Bags:
- First, you need to move the grow bags to their desired location. Remember that corn needs a lot of sun, at least 6-8 hours a day.
- Unroll the bags and stand them upright.
- If your bags don’t have holes at the bottom, you should cut a few to allow water to drain well and prevent waterlogging.
- Now, fill the bags about two-thirds full with potting soil.
- Mix a generous portion of compost or organic fertilizer into the soil. This ensures a good supply of nutrients right from the start.
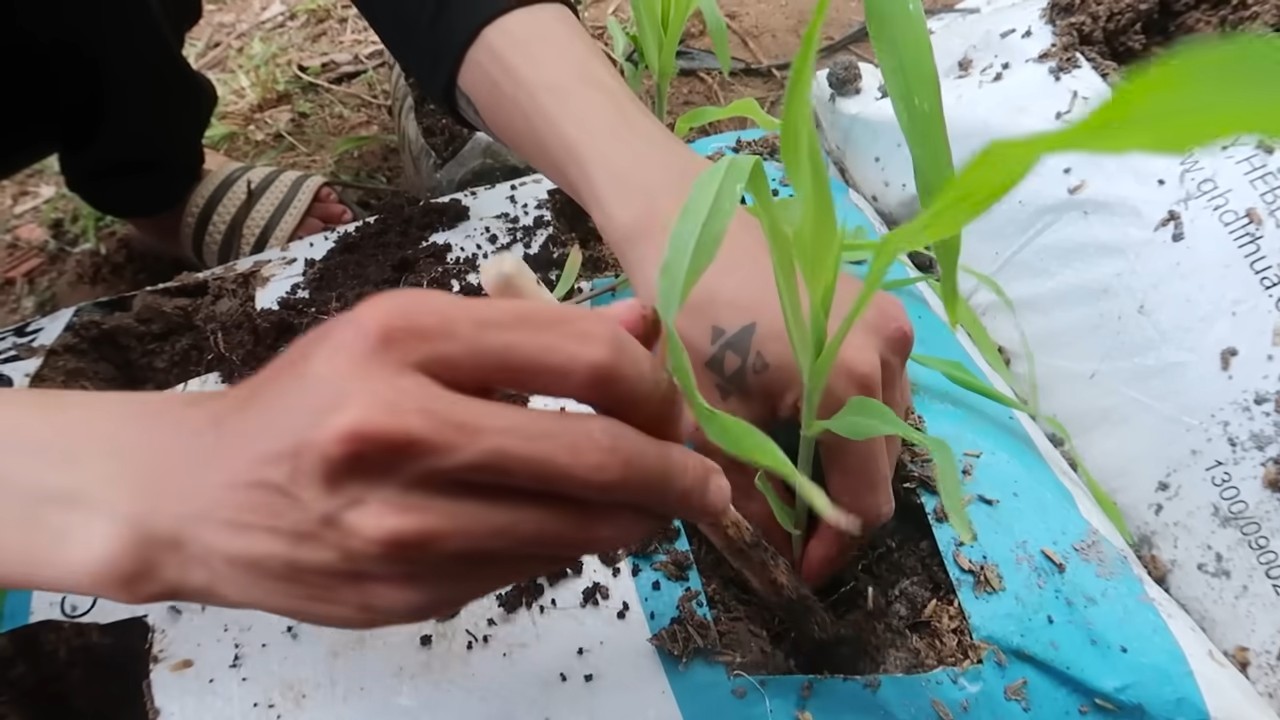
2. Sowing the Corn Kernels:
- Now comes the exciting part: sowing the corn kernels!
- Make holes about 3-5 cm deep in the soil with your finger or a small stick.
- Place 2-3 corn kernels in each hole. This increases the chance that at least one plant will sprout.
- Carefully cover the holes with soil and press down lightly.
- Water the soil thoroughly, but avoid waterlogging.
3. Caring for the Young Corn Plants:
- Germination takes about 7-14 days, depending on the variety and temperature. Be patient!
- As soon as the first seedlings sprout from the soil, you need to water them regularly. The soil should always be slightly moist, but not wet.
- If several plants have sprouted in each hole, you must thin them out. Leave only the strongest plant per hole. This gives the plants enough space to grow.
- Watch out for pests like slugs or aphids. You can use organic pesticides if necessary.
4. Fertilizing and Watering:
- Corn is a heavy feeder, which means it needs a lot of nutrients to grow well.
- Start fertilizing about 4-6 weeks after germination.
- Use an organic fertilizer or a special corn fertilizer. Pay attention to the dosage instructions on the package.
- Fertilize the plants every 2-3 weeks.
- Water the plants regularly, especially during the flowering period and when the cobs are forming.
- On hot days, it may be necessary to water the plants daily.
5. Supporting the Plants (optional):
- Especially in windy locations, corn plants can easily bend or break.
- To prevent this, you can use support stakes.
- Stick the stakes into the soil and gently tie the plants to them.
- Make sure the plants are not tied too tightly, so they still have room to grow.
6. Assisting Pollination:
- Corn is a cross-pollinator, meaning it needs pollen from other corn plants to form cobs.
- If you only have a few plants, you can assist pollination by transferring the pollen from the male flowers (the tassels at the top of the plant) to the female flowers (the silks on the cobs).
- The best way to do this is by gently shaking the tassels or dabbing the pollen onto the silks with a brush.
- It’s best to do this on a dry, calm day.
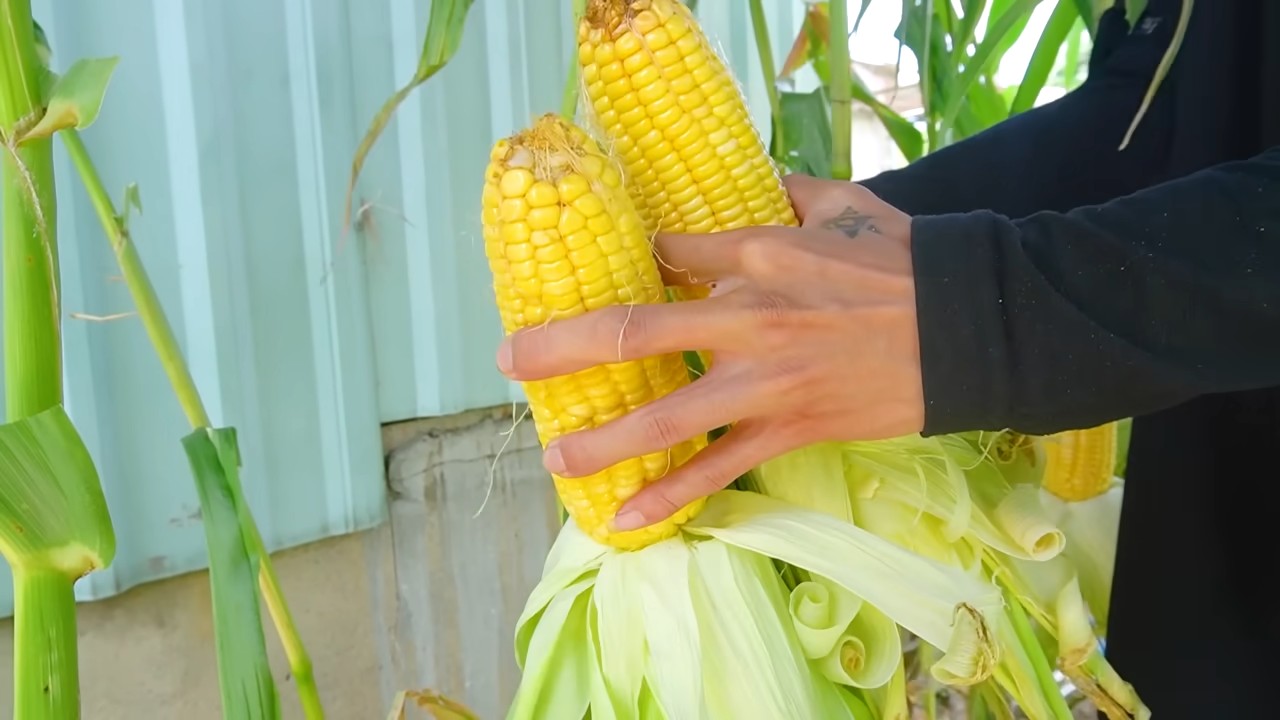
7. Harvest Time:
- The harvest time depends on the variety and weather conditions.
- Generally, the corn cobs are ready to harvest when the silks are brown and dry, and the cobs feel plump.
- To test if the cobs are ripe, you can pierce a kernel with your fingernail. If a milky liquid comes out, they are ripe.
- Carefully break the cobs off the plant.
Additional Tips and Tricks:
- Variety selection: Choose a corn variety that is suitable for growing in a pot or grow bag. There are special varieties that grow more compactly and require less space.
- Location: Corn needs a lot of sun. Choose a location that gets at least 6-8 hours of sun per day.
- Soil: Use high-quality potting soil that is well-draining and contains plenty of nutrients.
- Watering: Water the plants regularly, especially during the flowering period and when the cobs are forming.
- Fertilizing: Fertilize the plants regularly with an organic fertilizer or a special corn fertilizer.
- Pests: Watch out for pests like slugs or aphids. You can use organic pesticides if necessary.
- Wind: Protect the plants from strong wind by securing them to support stakes.
- Neighbors: Talk to your neighbors; maybe they are also growing corn and can help with pollination.
- Experiment: Try out different varieties and growing methods to find out what works best for you.
Common Problems and Solutions:
- Plants are not growing: The soil may be too poor in nutrients, or the plants may not be getting enough sun. Fertilize the plants and move them to a sunnier location.
- Leaves are turning yellow: This can be a sign of a nutrient deficiency. Fertilize the plants with an organic fertilizer or a special corn fertilizer.
- Pests: Combat pests like slugs or aphids with organic pesticides.
- Plants are falling over: Support the plants with stakes.
- No cobs are forming: Pollination may have been unsuccessful. Assist pollination by transferring pollen from the male flowers to the female flowers.
Conclusion:
With a little patience and love, you can grow fresh corn even in a small space. It’s a great feeling to harvest and enjoy your own corn cobs. I hope this guide has helped and inspired you. Happy gardening! And don’t forget to share your successes with me! I’m excited to see your corn harvest!
Conclusion
So, there you have it! Growing corn in soil bags is not just a quirky gardening experiment; it’s a game-changer for anyone with limited space, poor soil conditions, or simply a desire for a more controlled and convenient growing environment. We’ve explored the ins and outs of this method, highlighting its simplicity, efficiency, and the surprisingly bountiful harvest it can yield.
Why is this DIY trick a must-try? Because it democratizes corn cultivation. No longer is a sprawling field a prerequisite for enjoying the sweet taste of homegrown corn. Apartment dwellers, balcony gardeners, and even those with challenging clay soil can now partake in the joy of nurturing their own corn stalks from seedling to harvest. The mobility of the soil bags also offers unparalleled flexibility. You can chase the sun, shelter your plants from harsh weather, and even move them indoors during unexpected frosts. This level of control is simply unmatched by traditional in-ground planting.
Beyond the practical benefits, growing corn in soil bags is also incredibly rewarding. There’s a unique satisfaction in watching these towering plants thrive in such a contained space, a testament to the power of resourcefulness and a little bit of gardening know-how. Plus, the visual appeal of a row of corn-filled bags adds a touch of rustic charm to any outdoor space.
But don’t just take our word for it! We encourage you to embark on your own corn-in-a-bag adventure. Experiment with different corn varieties to find your favorites. Try adding companion plants like beans or squash to the bags to create a mini-ecosystem. Consider using different types of soil mixes to see which yields the best results. The possibilities are endless!
And speaking of variations, consider these ideas to personalize your corn-growing experience:
* Vertical Support: For taller varieties, provide additional support with stakes or trellises to prevent the stalks from toppling over in strong winds.
* Self-Watering Bags: Modify your soil bags to create a self-watering system by adding a reservoir at the bottom. This can significantly reduce the frequency of watering, especially during hot weather.
* Succession Planting: Plant new batches of corn every few weeks to ensure a continuous harvest throughout the growing season.
* Organic Amendments: Incorporate organic amendments like compost or worm castings into your soil mix to boost nutrient levels and promote healthy growth.
Ultimately, the success of your corn-in-a-bag project hinges on your willingness to experiment and adapt. Observe your plants closely, pay attention to their needs, and don’t be afraid to try new things. Remember, gardening is a journey, not a destination.
So, grab some soil bags, corn seeds, and get ready to experience the magic of growing your own corn, no matter where you live. We are confident that you will find this method to be both enjoyable and rewarding.
We’d love to hear about your experiences! Share your photos, tips, and challenges in the comments below. Let’s create a community of corn-in-a-bag enthusiasts and learn from each other. Happy gardening! This innovative approach to growing corn is sure to bring you a bountiful harvest.
Frequently Asked Questions (FAQ)
What size soil bag is best for growing corn?
The ideal size soil bag for growing corn is typically between 10 and 20 gallons. A 10-gallon bag can accommodate 2-3 corn plants, while a 20-gallon bag can comfortably support 4-5 plants. The larger the bag, the more room the roots have to grow, which translates to healthier and more productive plants. However, keep in mind that larger bags will also be heavier and more difficult to move. Consider the space you have available and your ability to handle the weight when choosing the bag size. Also, ensure the bag is sturdy enough to hold the weight of the soil and mature plants.
What type of soil should I use in the soil bags?
A well-draining and nutrient-rich soil mix is crucial for successful corn cultivation in soil bags. A good starting point is a mix of equal parts potting soil, compost, and perlite or vermiculite. The potting soil provides a base for the plants to grow, the compost adds essential nutrients and improves soil structure, and the perlite or vermiculite enhances drainage and aeration. You can also amend the soil with slow-release fertilizer to provide a steady supply of nutrients throughout the growing season. Avoid using garden soil directly in the bags, as it can be too heavy and compact, hindering root growth.
How often should I water corn grown in soil bags?
Watering frequency depends on several factors, including the weather, the size of the bag, and the stage of plant growth. Generally, corn grown in soil bags needs to be watered more frequently than corn grown in the ground, as the soil in the bags tends to dry out faster. Check the soil moisture level daily by sticking your finger about an inch into the soil. If the soil feels dry to the touch, it’s time to water. Water deeply until the water drains out of the bottom of the bag. During hot and dry weather, you may need to water daily or even twice a day. Avoid overwatering, as this can lead to root rot.
How much sunlight does corn need when grown in soil bags?
Corn is a sun-loving plant and requires at least 6-8 hours of direct sunlight per day to thrive. When growing corn in soil bags, choose a location that receives ample sunlight throughout the day. If you live in a particularly hot climate, you may want to provide some afternoon shade to prevent the plants from getting scorched. The beauty of using soil bags is that you can easily move the plants to follow the sun or provide them with shade as needed.
What kind of fertilizer should I use for corn in soil bags?
Corn is a heavy feeder and requires a steady supply of nutrients to produce a good harvest. Use a balanced fertilizer with an NPK ratio (nitrogen, phosphorus, potassium) of around 10-10-10 or 14-14-14. You can either use a slow-release fertilizer that is incorporated into the soil mix at planting time or a water-soluble fertilizer that is applied every few weeks. Follow the instructions on the fertilizer package carefully to avoid over-fertilizing, which can damage the plants. Consider supplementing with organic fertilizers like compost tea or fish emulsion to provide additional micronutrients.
How do I prevent pests and diseases when growing corn in soil bags?
While growing corn in soil bags can reduce the risk of some soilborne pests and diseases, it’s still important to take preventative measures. Inspect your plants regularly for signs of pests or diseases, such as aphids, corn earworms, or fungal infections. Remove any affected leaves or plants immediately. You can also use organic pest control methods, such as insecticidal soap or neem oil, to control pests. Ensure good air circulation around the plants to prevent fungal diseases. Crop rotation, even with soil bags, can also help to minimize the buildup of pests and diseases in the soil.
When is the right time to harvest corn grown in soil bags?
The time to harvest corn depends on the variety and the growing conditions. Generally, corn is ready to harvest about 60-90 days after planting. A good indicator of ripeness is when the silks turn brown and dry. You can also gently peel back the husk and check the kernels. The kernels should be plump and milky when punctured. If the kernels are too hard or dry, the corn is overripe. To harvest, simply twist the ear of corn downward and pull it away from the stalk.
Can I reuse the soil bags for growing corn next year?
Yes, you can reuse the soil bags for growing corn next year, but it’s important to replenish the soil with nutrients. After harvesting the corn, remove any remaining plant debris from the bags. Amend the soil with fresh compost and fertilizer to restore its fertility. You may also want to consider replacing a portion of the soil with fresh potting mix. Store the bags in a dry place over the winter to prevent them from deteriorating.
Leave a Comment