
Growing Ginger Year Round might seem like a tropical dream reserved for sun-drenched climates, but I’m here to tell you it’s absolutely achievable, no matter where you live! Forget those sad, shriveled ginger roots languishing in the grocery store – imagine harvesting your own fresh, vibrant ginger whenever you need it.
Ginger, with its fiery zest and incredible health benefits, has been cherished for centuries. Originating in South Asia, it’s been used in traditional medicine and culinary practices across cultures for millennia. From soothing upset stomachs to adding a kick to your favorite dishes, ginger is a true powerhouse. But why rely on store-bought when you can cultivate your own supply?
This DIY guide is your passport to a year-round ginger bounty. We’ll unlock the secrets to successfully growing ginger year round, even if you’re battling frosty winters or limited space. I’ll walk you through everything from selecting the perfect rhizome to creating the ideal growing environment, ensuring you have a constant supply of this amazing spice right at your fingertips. Say goodbye to expensive grocery store ginger and hello to fresh, homegrown flavor!

Growing Ginger Indoors: A Year-Round Guide
Hey there, fellow plant enthusiasts! Ever dreamt of having fresh ginger on hand whenever you need it? Well, you can! Growing ginger indoors is surprisingly easy and rewarding. I’ve been doing it for a while now, and I’m excited to share my secrets with you. This guide will walk you through everything you need to know to cultivate your own ginger supply, no matter the season.
Choosing Your Ginger Rhizome
The first step to a successful ginger harvest is selecting the right rhizome. A rhizome is basically the underground stem of the ginger plant, and it’s what you’ll be planting.
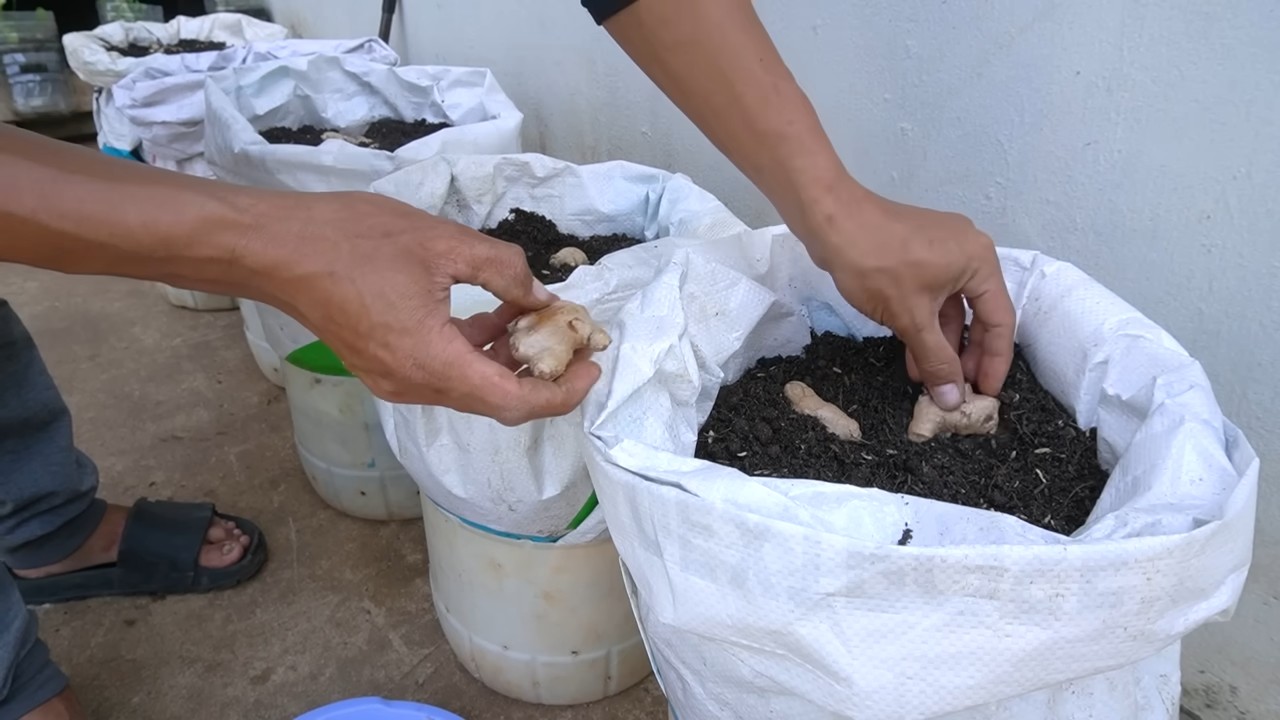
* Look for plump, healthy rhizomes: Head to your local grocery store or Asian market and pick out a few ginger rhizomes. You want them to be firm, plump, and free from wrinkles or signs of shriveling.
* Check for “eyes”: Just like potatoes, ginger rhizomes have “eyes” or buds. These are the little bumps that will eventually sprout into new shoots. Choose rhizomes with visible eyes, preferably ones that are already starting to turn green.
* Organic is best: Opt for organic ginger if possible. Non-organic ginger may have been treated with growth inhibitors to prevent sprouting during shipping.
* Consider size: A rhizome about 2-3 inches long is a good starting point. You can even break larger rhizomes into smaller pieces, ensuring each piece has at least one or two eyes.
Preparing Your Ginger for Planting
Before you can plant your ginger, you need to wake it up and encourage those eyes to sprout. This process is called pre-sprouting.
* Soaking the rhizome: Soak the ginger rhizome in lukewarm water for 12-24 hours. This rehydrates the rhizome and helps to stimulate growth. I usually use a small bowl and make sure the ginger is fully submerged.
* Finding the right spot: After soaking, place the rhizome in a warm, humid location. A sunny windowsill or a spot near a humidifier works well.
* Patience is key: It can take a few weeks for the eyes to sprout, so don’t get discouraged if you don’t see anything happening right away. Just keep the rhizome in a warm, humid environment and be patient.
Planting Your Ginger
Now for the fun part – planting!
* Choosing the right pot: Ginger needs plenty of room to grow, so select a pot that is at least 12 inches in diameter and 12 inches deep. A wider pot is better than a deeper one, as ginger rhizomes tend to spread horizontally.
* Selecting the right soil: Ginger prefers well-draining soil that is rich in organic matter. A good potting mix for ginger would be a combination of potting soil, compost, and perlite or vermiculite. This will provide the necessary nutrients and drainage.
* Planting depth: Fill the pot with your chosen soil mix, leaving a few inches of space at the top. Place the ginger rhizome on top of the soil, with the eyes facing upwards. Cover the rhizome with about 1-2 inches of soil.
* Watering after planting: Water the soil thoroughly after planting, making sure the entire pot is moistened.
Caring for Your Ginger Plant
Once your ginger is planted, it’s important to provide it with the right care to ensure healthy growth.
* Watering: Ginger needs consistent moisture, but it doesn’t like to be waterlogged. Water the plant when the top inch of soil feels dry to the touch. Avoid overwatering, as this can lead to root rot. I usually water mine about once a week, but this will vary depending on the humidity and temperature in your home.
* Light: Ginger thrives in bright, indirect light. Avoid placing your plant in direct sunlight, as this can scorch the leaves. A spot near an east-facing window is ideal. If you don’t have enough natural light, you can supplement with a grow light.
* Temperature: Ginger prefers warm temperatures, ideally between 65-80°F (18-27°C). Avoid exposing your plant to cold drafts or sudden temperature changes.
* Humidity: Ginger loves humidity! If your home is dry, you can increase the humidity around your plant by misting it regularly, placing it on a pebble tray filled with water, or using a humidifier.
* Fertilizing: Feed your ginger plant every 2-3 weeks with a balanced liquid fertilizer. Dilute the fertilizer to half strength to avoid burning the roots. I like to use an organic fertilizer, such as fish emulsion or seaweed extract.
* Pest control: Ginger is relatively pest-resistant, but it can occasionally be affected by aphids or spider mites. If you notice any pests, you can treat them with insecticidal soap or neem oil.
Harvesting Your Ginger
The best part of growing ginger is, of course, harvesting it!
* When to harvest: You can start harvesting ginger about 8-10 months after planting. The leaves will start to turn yellow and die back, which is a sign that the rhizomes are mature.
* How to harvest: To harvest ginger, gently dig around the plant and lift the rhizomes out of the soil. You can harvest the entire plant at once, or you can harvest just a portion of the rhizomes and leave the rest to continue growing.
* Storing your harvest: Freshly harvested ginger can be stored in the refrigerator for several weeks. You can also freeze ginger for longer storage. To freeze ginger, peel it and chop it into small pieces, then store it in an airtight container in the freezer.
Troubleshooting
Even with the best care, you might encounter some challenges when growing ginger indoors. Here are a few common problems and how to fix them:
* Yellowing leaves: Yellowing leaves can be caused by a number of factors, including overwatering, underwatering, nutrient deficiencies, or pests. Check the soil moisture and adjust your watering accordingly. If the soil is dry, water the plant thoroughly. If the soil is waterlogged, allow it to dry out before watering again. If you suspect a nutrient deficiency, fertilize the plant with a balanced liquid fertilizer. If you see any pests, treat them with insecticidal soap or neem oil.
* Root rot: Root rot is a fungal disease that can occur when the soil is constantly waterlogged. To prevent root rot, make sure your pot has good drainage and avoid overwatering. If you suspect root rot, remove the plant from the pot and inspect the roots. If the roots are brown and mushy, cut them off with a clean knife. Repot the plant in fresh, well-draining soil.
* Lack of growth: If your ginger plant isn’t growing, it could be due to a lack of light, nutrients, or warmth. Make sure your plant is getting enough bright, indirect light. Fertilize the plant every 2-3 weeks with a balanced liquid fertilizer. Keep the plant in a warm location, ideally between 65-80°F (18-27°C).
Propagating Ginger
Once you’ve successfully grown ginger, you can easily propagate it to create more plants.
* Dividing the rhizomes: The easiest way to propagate ginger is by dividing the rhizomes. When you harvest your ginger, you can break the rhizomes into smaller pieces, ensuring each piece has at least one or two eyes. Plant each piece in its own pot, following the same instructions as above.
* Starting from seed: While it’s possible to grow ginger from seed, it’s a much slower and more challenging process. Ginger seeds are not readily available, and they can take a long time to germinate. If you want to try growing ginger from seed, you’ll need to find a reputable source for seeds and be prepared to be patient.
Enjoying Your Homegrown Ginger
Now that you’ve successfully grown and harvested your own ginger, it’s time to enjoy the fruits (or rather, rhizomes) of your labor!
* Culinary uses: Fresh ginger is a versatile ingredient that can be used in a variety of dishes. It adds a warm, spicy flavor to stir-fries, soups, curries, and teas. You can also use it to make ginger ale, ginger beer, or candied ginger.
* Medicinal uses: Ginger has been used for centuries for its medicinal properties. It’s known to help with nausea, indigestion, and inflammation. You can make ginger tea by steeping fresh ginger in hot water.
* Other uses: Ginger can also be used in homemade beauty products, such as face masks and hair treatments. It’s believed to have antioxidant and anti-inflammatory properties that can benefit the skin and hair.
Tips for Success
Here are a few extra tips to help you succeed in growing ginger indoors:
* Use a well-draining potting mix: This is crucial for preventing root rot.
* Don’t overwater: Ginger prefers consistent moisture,
Conclusion
So, there you have it! Mastering the art of growing ginger year-round is not only achievable but also incredibly rewarding. Imagine the satisfaction of harvesting fresh, vibrant ginger from your own home, regardless of the season. This DIY trick transforms a simple spice into a continuous source of flavor and wellness.
Why is this a must-try? Because it empowers you to control the quality and freshness of your ginger. Store-bought ginger can sometimes be lackluster, lacking the intense aroma and zing that freshly grown ginger possesses. By cultivating your own, you guarantee a superior product, bursting with flavor and packed with beneficial compounds. Plus, it’s a sustainable practice, reducing your reliance on commercially grown ginger and minimizing your environmental footprint.
But the benefits extend beyond just flavor and sustainability. Growing ginger is a therapeutic activity. Nurturing a plant from rhizome to harvest is a calming and fulfilling experience. It connects you to the natural world and provides a sense of accomplishment as you witness your efforts bear fruit (or in this case, rhizome!).
Don’t be afraid to experiment with variations! Try different varieties of ginger, such as the spicier Chinese ginger or the milder Hawaiian ginger. Play around with different soil mixes to find what works best for your climate and growing conditions. Consider adding companion plants to your ginger pots, such as marigolds to deter pests or herbs like basil to enhance the overall ecosystem. You can even explore hydroponic ginger growing for a more controlled and efficient system.
We encourage you to embark on this ginger-growing adventure. It’s easier than you might think, and the rewards are well worth the effort. Start small, with just a few rhizomes, and gradually expand your operation as you gain confidence and experience. Remember to document your progress, take photos, and share your successes (and even your challenges!) with fellow gardening enthusiasts.
The key to successful year-round ginger cultivation lies in providing the right environment: warmth, humidity, and well-draining soil. With a little attention and care, you can enjoy a continuous supply of fresh ginger, adding a zesty kick to your culinary creations and a boost to your overall well-being. So, grab some ginger rhizomes, prepare your pots, and get ready to experience the joy of growing your own ginger year-round. We are confident that this DIY trick will become a staple in your gardening repertoire.
Now, go forth and grow! We can’t wait to hear about your ginger-growing journey. Share your tips, tricks, and triumphs in the comments below. Let’s create a community of ginger-growing enthusiasts, sharing our knowledge and inspiring each other to cultivate this amazing spice.
Frequently Asked Questions (FAQ)
What kind of ginger should I use to start growing?
You can use ginger from the grocery store, but make sure it’s plump, healthy-looking, and preferably organic. Avoid ginger that is shriveled, moldy, or has been treated with growth inhibitors. Organic ginger is more likely to sprout. Look for rhizomes with visible “eyes” or buds, as these are the points from which new shoots will emerge. If you can find a local nursery that sells ginger rhizomes specifically for planting, that’s even better, as they are often more vigorous and disease-free.
How long does it take for ginger to sprout?
Sprouting time can vary depending on factors like temperature, humidity, and the quality of the ginger rhizome. Generally, it takes anywhere from 2 to 8 weeks for ginger to sprout. To speed up the process, you can soak the rhizome in water overnight before planting. Keep the soil consistently moist but not waterlogged, and provide a warm environment (around 70-75°F or 21-24°C). Be patient, and don’t give up if you don’t see sprouts right away.
What kind of soil is best for growing ginger?
Ginger thrives in well-draining, nutrient-rich soil. A good mix consists of equal parts potting soil, compost, and perlite or vermiculite. The potting soil provides a base, the compost adds essential nutrients, and the perlite or vermiculite improves drainage and aeration. Avoid heavy clay soils, as they can become waterlogged and lead to root rot. You can also add a slow-release fertilizer to the soil mix to provide a steady supply of nutrients throughout the growing season.
How much sunlight does ginger need?
Ginger prefers partial shade, especially during the hottest part of the day. Direct sunlight can scorch the leaves. A location that receives morning sun and afternoon shade is ideal. If you’re growing ginger indoors, place it near a bright window but shield it from direct sunlight with a sheer curtain or blinds. You can also use grow lights to supplement natural light, especially during the winter months.
How often should I water my ginger plant?
Water ginger plants regularly, keeping the soil consistently moist but not waterlogged. Allow the top inch of soil to dry out slightly between waterings. Overwatering can lead to root rot, while underwatering can stunt growth. Adjust your watering schedule based on the weather and the humidity levels in your area. During hot, dry periods, you may need to water more frequently.
How do I harvest ginger?
You can start harvesting ginger about 8-10 months after planting. To harvest, gently dig around the plant and lift the rhizomes from the soil. You can harvest the entire plant or just a portion of the rhizomes, leaving the rest to continue growing. If you only harvest a portion, be careful not to damage the remaining roots. After harvesting, wash the ginger rhizomes and store them in a cool, dry place.
Can I grow ginger in containers?
Yes, growing ginger in containers is a great option, especially if you live in a colder climate. Choose a container that is at least 12 inches deep and wide to allow the rhizomes plenty of room to grow. Make sure the container has drainage holes to prevent waterlogging. You can move the container indoors during the winter months to protect the ginger from frost.
How do I overwinter ginger in cold climates?
In cold climates, ginger needs to be protected from frost. You can either bring the container indoors or dig up the rhizomes and store them in a cool, dry place until spring. If you bring the container indoors, reduce watering and allow the plant to go dormant. If you dig up the rhizomes, clean them and store them in a paper bag or wrapped in newspaper in a cool, dark place, like a basement or garage. Replant the rhizomes in the spring after the last frost.
What are some common pests and diseases that affect ginger?
Ginger can be susceptible to pests like aphids, spider mites, and nematodes. To prevent pest infestations, keep your plants healthy and well-watered. You can also use organic pest control methods, such as neem oil or insecticidal soap. Common diseases that affect ginger include root rot and fungal leaf spots. To prevent these diseases, ensure good drainage and avoid overwatering. If you notice any signs of disease, remove the affected leaves or rhizomes and treat the plant with a fungicide.
Can I eat the ginger leaves?
Yes, ginger leaves are edible and have a mild ginger flavor. You can use them in salads, stir-fries, or as a garnish. They are also a good source of vitamins and minerals. However, it’s best to harvest the leaves sparingly, as removing too many leaves can weaken the plant.

Leave a Comment