
Growing green onions in bottles might sound like something out of a science fiction movie, but trust me, it’s a super simple and rewarding DIY project that anyone can tackle! I’m so excited to share this clever trick with you because it’s a game-changer for fresh herb lovers like myself. Imagine never having to run to the store for green onions again – they’re always right there, happily growing in your kitchen!
The beauty of this method lies in its simplicity and sustainability. While the exact origins of regrowing vegetables are hard to pinpoint, the practice of propagating plants from scraps has been around for centuries, reflecting a resourceful approach to food and gardening. It’s a testament to our ancestors’ ingenuity and their deep connection with nature.
Let’s be honest, we’ve all bought a bunch of green onions, used a few, and watched the rest wilt away in the fridge. It’s such a waste! That’s where this DIY hack comes in. Growing green onions in bottles not only saves you money and reduces food waste, but it also provides a constant supply of fresh, flavorful green onions for all your culinary creations. Plus, it’s a fun and educational project for kids (and adults!) to learn about plant growth. So, ditch the wilting greens and let’s get started on this easy and eco-friendly gardening adventure!
Grow Green Onions Indoors: A Simple DIY Bottle Garden
Hey there, fellow plant enthusiasts! Ever find yourself needing just a sprinkle of green onion and realizing you’re all out? Or maybe you’re just looking for a super easy and rewarding gardening project? Well, I’ve got the perfect solution for you: growing green onions in bottles! It’s a fantastic way to recycle, save money, and have fresh green onions right at your fingertips. Trust me, it’s easier than you think!
What You’ll Need
Before we dive in, let’s gather our supplies. This is a pretty low-key project, so you probably already have most of this stuff lying around:
* Plastic Bottles: Think soda bottles, water bottles, juice bottles – anything will work! I usually go for the 2-liter soda bottles because they offer more space for the roots, but smaller bottles are great too, especially if you want to create a whole little green onion army.
* Green Onions: The stars of the show! You can use store-bought green onions. Just make sure they have the root ends still attached. If you’ve already used the green tops, don’t toss the bottoms! They’re perfect for this.
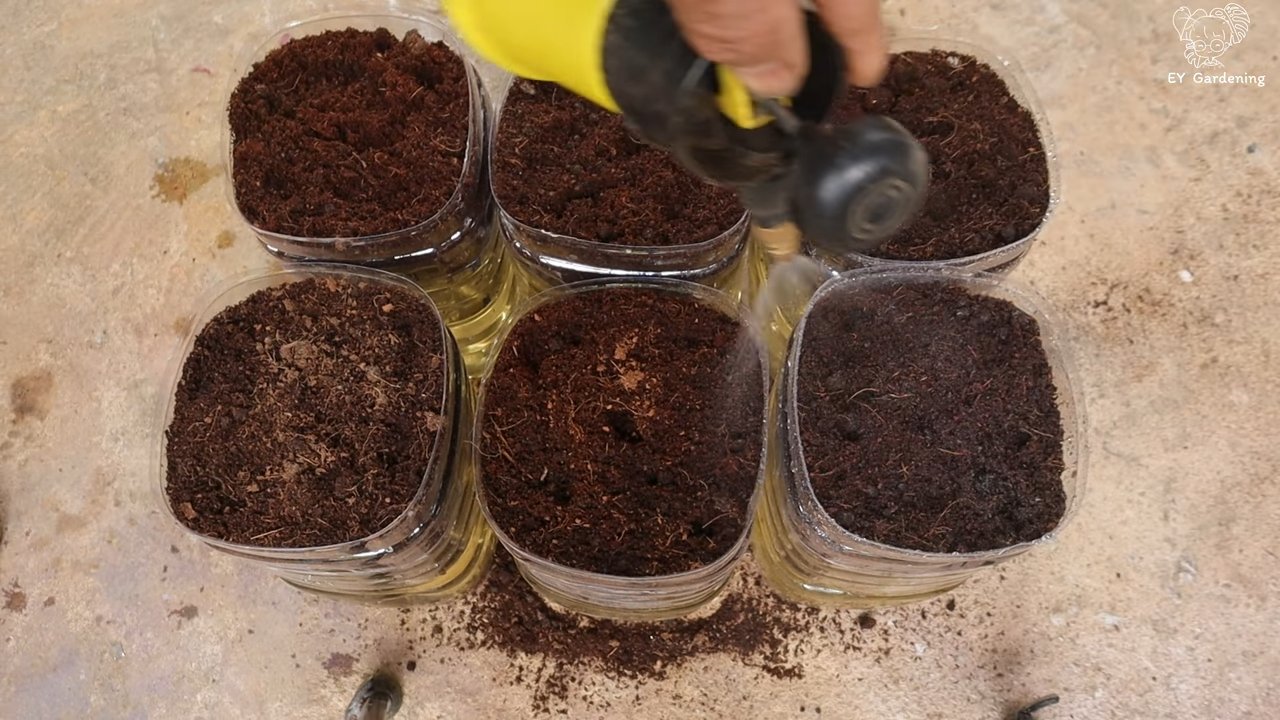
* Potting Mix: Regular potting mix is ideal. It provides the nutrients and drainage that your green onions need to thrive.
* Water: Tap water is fine, but if your tap water is heavily chlorinated, let it sit out for 24 hours before using it.
* Scissors or a Utility Knife: For cutting the plastic bottles. Be careful!
* Optional: Pebbles or Gravel: These can be added to the bottom of the bottle for improved drainage.
* Optional: Liquid Fertilizer: A diluted liquid fertilizer can give your green onions an extra boost, but it’s not essential.
Preparing Your Bottles
Okay, let’s get our bottles ready for their green onion residents. This is where we transform those discarded containers into mini-gardens.
1. Clean the Bottles: First things first, give your bottles a good rinse with soap and water. Make sure to remove any sticky residue or labels. A clean bottle is a happy bottle!
2. Cut the Bottles: Now, decide how you want to cut your bottles. There are a couple of options:
* Option 1: Single Planter: Cut the bottle in half horizontally. You’ll be using the bottom half as your planter. The top half can be discarded or used for another project.
* Option 2: Self-Watering Planter (My Favorite!): Cut the bottle about two-thirds of the way up. Invert the top portion and place it inside the bottom portion. This creates a self-watering system where the roots can draw water from the bottom reservoir. You’ll need to drill a few small holes in the bottle cap to allow water to wick up.
3. Add Drainage (Optional): If you’re using the single planter method, consider adding a layer of pebbles or gravel to the bottom of the bottle. This will help with drainage and prevent the roots from sitting in soggy soil.
Planting Your Green Onions
Alright, the bottles are prepped, and it’s time to get our hands dirty (well, not too dirty!). This is the fun part where we actually plant the green onions.
1. Fill with Potting Mix: Fill your prepared bottle with potting mix, leaving about an inch or two of space at the top. Don’t pack the soil down too tightly; you want it to be loose and airy.
2. Prepare the Green Onions: If you’re using store-bought green onions, trim off the very bottom of the root end, just to freshen it up. If you’re using the leftover bottoms, make sure they’re clean and free of any dead or mushy parts.
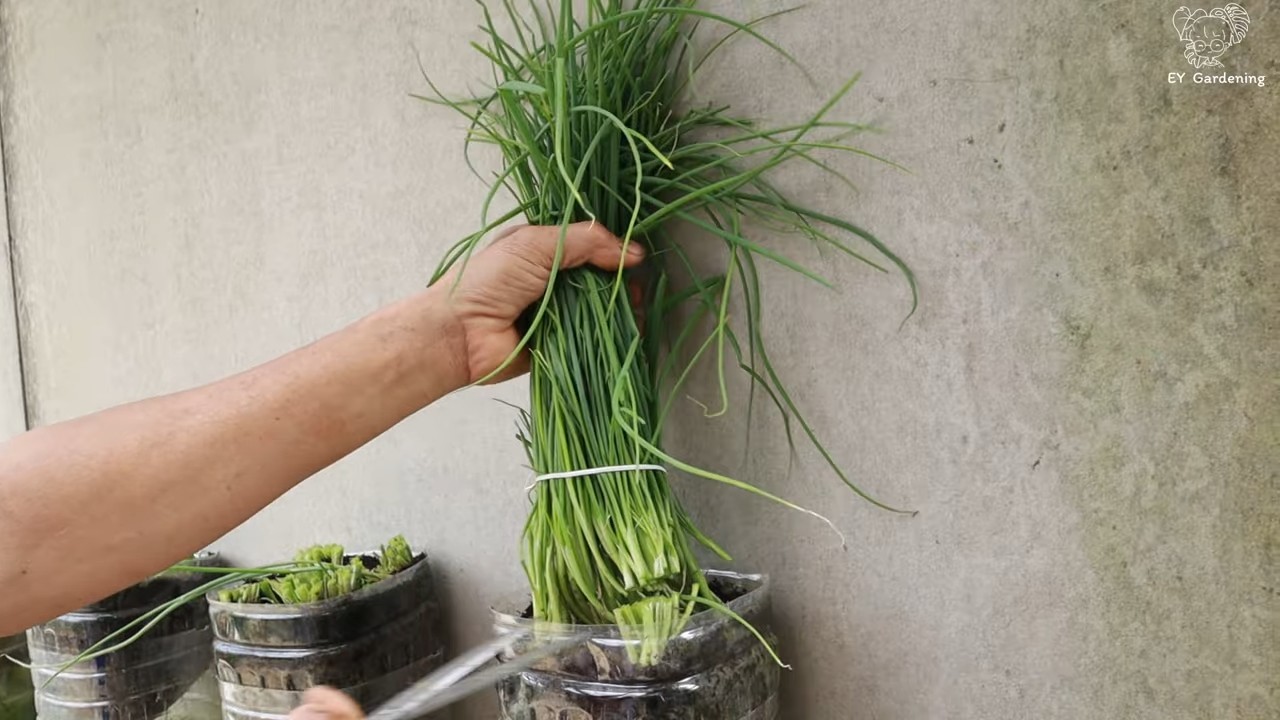
3. Plant the Green Onions: Make a small hole in the potting mix for each green onion. Plant the root end about an inch deep, making sure the white part of the onion is covered with soil. Space the green onions about an inch or two apart.
4. Water Thoroughly: After planting, give your green onions a good watering. Make sure the soil is evenly moist, but not waterlogged. If you’re using the self-watering method, fill the bottom reservoir with water.
Caring for Your Green Onions
Now that your green onions are planted, it’s time to give them some TLC. Don’t worry, they’re pretty low-maintenance.
1. Location: Place your bottle garden in a sunny spot. Green onions need at least 6 hours of sunlight per day. A windowsill is perfect! If you don’t have a sunny spot, you can use a grow light.
2. Watering: Keep the soil consistently moist, but not soggy. Water when the top inch of soil feels dry to the touch. If you’re using the self-watering method, check the water level in the reservoir regularly and refill as needed.
3. Fertilizing (Optional): If you want to give your green onions an extra boost, you can fertilize them every few weeks with a diluted liquid fertilizer. Follow the instructions on the fertilizer label.
4. Harvesting: The best part! You can start harvesting your green onions when they’re about 6-8 inches tall. Simply snip off the green tops with scissors, leaving about an inch or two of the green part intact. The green onions will continue to grow, so you can harvest them multiple times.
Troubleshooting
Even with the easiest projects, sometimes things don’t go exactly as planned. Here are a few common issues you might encounter and how to fix them:
* Yellowing Leaves: This could be a sign of overwatering or underwatering. Check the soil moisture and adjust your watering accordingly. It could also be a sign of nutrient deficiency. Try fertilizing with a diluted liquid fertilizer.
* Leggy Growth: This means your green onions aren’t getting enough sunlight. Move them to a sunnier location or use a grow light.
* Slow Growth: This could be due to a number of factors, including lack of sunlight, poor soil, or nutrient deficiency. Make sure your green onions are getting enough sunlight, use a good quality potting mix, and fertilize them regularly.
* Root Rot: This is caused by overwatering. Make sure your bottles have good drainage and don’t let the soil stay soggy. If you suspect root rot, remove the affected green onions and replant the healthy ones in fresh soil.
Tips and Tricks for Green Onion Success
Here are a few extra tips to help you get the most out of your bottle garden:
* Rotate Your Bottles: To ensure even growth, rotate your bottles regularly so that all sides get equal sunlight.
* Succession Planting: Plant new green onions every few weeks to ensure a continuous supply.
* Use Different Bottle Sizes: Experiment with different bottle sizes to see what works best for you.
* Get Creative with Decoration: Decorate your bottles with paint, markers, or stickers to add a personal touch.
* Compost the Old Roots: When the green onions stop producing, compost the old roots and start with fresh ones.
Why This Works So Well
You might be wondering why this simple method is so effective. Here’s the breakdown:
* Recycling: It’s a fantastic way to reuse plastic bottles that would otherwise end up in the landfill.
* Convenience: Having fresh green onions readily available in your kitchen is incredibly convenient.
* Cost-Effective: You’ll save money on groceries by growing your own green onions.
* Easy and Fun: It’s a simple and rewarding project that anyone can do, even if you don’t have a green thumb.
* Educational: It’s a great way to teach kids about gardening and where their food comes from.
Beyond Green Onions: What Else Can You Grow?
Once you’ve mastered growing green onions in bottles, you might be inspired to try other herbs and vegetables. Here are a few ideas:
* Lettuce: Loose-leaf lettuce varieties are easy to grow in containers.
* Spinach: Similar to lettuce, spinach thrives in small spaces.
* Herbs: Basil, mint, parsley, and chives are all great options for container gardening.
* Strawberries: Dwarf strawberry varieties can be grown in hanging baskets or containers.
So there you have it! Growing green onions in bottles is a simple, fun, and rewarding project that anyone can do. Give it a try, and you’ll be amazed at how easy it is to have fresh green onions right at your fingertips. Happy gardening!
Conclusion
So, there you have it! Transforming humble plastic bottles into a thriving green onion garden is not just a fun project; it’s a sustainable, cost-effective, and incredibly rewarding way to ensure you always have fresh green onions at your fingertips. Forget those sad, wilted bunches from the grocery store – with this simple DIY trick, you can cultivate vibrant, flavorful green onions right in your own home, regardless of whether you have a sprawling garden or a tiny apartment balcony.
This method is a game-changer for anyone who loves to cook and appreciates the convenience of having fresh herbs readily available. Think of all the dishes that will benefit from a sprinkle of freshly snipped green onions: soups, salads, stir-fries, omelets, tacos – the possibilities are endless! Plus, you’re reducing food waste by regrowing the ends of green onions you’ve already used, and you’re giving those plastic bottles a new lease on life, contributing to a more sustainable lifestyle.
But the benefits don’t stop there. This DIY project is also incredibly versatile. Feel free to experiment with different types of bottles – larger bottles can accommodate more green onion starts, while smaller bottles are perfect for a windowsill herb garden. You can also get creative with the growing medium. While water works perfectly well, you can also try using a nutrient-rich solution or even a small amount of soil mixed with water for added support.
Consider adding a touch of visual appeal to your green onion bottle garden. Paint the bottles with vibrant colors, decorate them with fun patterns, or even create a vertical garden by hanging them from a wall or balcony railing. This is a fantastic way to personalize your space and add a touch of greenery to your home.
And don’t limit yourself to just green onions! This method can also be used to regrow other vegetables, such as celery, leeks, and even romaine lettuce. With a little experimentation, you can create a thriving indoor garden that provides you with a constant supply of fresh produce.
The key to success with this DIY trick is consistency. Remember to change the water regularly, provide adequate sunlight, and harvest your green onions as needed. With a little care and attention, you’ll be amazed at how quickly and easily you can grow your own supply of fresh, flavorful green onions.
We wholeheartedly encourage you to give this DIY green onion growing method a try. It’s a simple, affordable, and incredibly rewarding project that will transform the way you think about fresh herbs. And once you’ve experienced the joy of harvesting your own homegrown green onions, we’re confident that you’ll be hooked!
Don’t forget to share your experiences with us! We’d love to see photos of your green onion bottle gardens and hear about any variations or tips you’ve discovered along the way. Share your successes (and any challenges you encounter) in the comments below, and let’s inspire each other to create a more sustainable and flavorful world, one green onion at a time. Embrace the simplicity and sustainability of growing your own green onions in bottles – you won’t regret it!
Frequently Asked Questions (FAQ)
How long does it take for green onions to regrow in water?
Generally, you’ll start to see new growth within a few days. Within a week or two, you should have a noticeable amount of green onion ready to harvest. The speed of growth depends on factors like sunlight, water quality, and the initial health of the green onion scraps. Warmer temperatures also tend to promote faster growth.
What kind of water should I use?
Tap water is generally fine, but letting it sit out for a few hours to allow chlorine to dissipate can be beneficial. Filtered water is also a good option. Avoid using distilled water, as it lacks the minerals that plants need to thrive. Changing the water every 1-2 days is crucial to prevent bacterial growth and ensure the green onions have access to fresh nutrients.
How much sunlight do green onions need?
Green onions thrive in bright, indirect sunlight. A spot near a sunny window is ideal. If you don’t have a lot of natural light, you can supplement with a grow light. Insufficient sunlight can lead to leggy, weak growth. Aim for at least 6 hours of sunlight per day.
Can I use soil instead of water?
Yes, you can use soil! A well-draining potting mix is best. Plant the green onion scraps about an inch deep in the soil. Keep the soil consistently moist, but not waterlogged. Using soil can provide more nutrients and support for the green onions, potentially leading to stronger growth. However, water is a simpler and cleaner method for beginners.
How often should I harvest the green onions?
Harvest the green onions as needed, snipping off the green parts with scissors. Leave about an inch or two of the green part intact to allow for continued growth. Regular harvesting encourages the plant to produce more shoots.
What if my green onions start to turn yellow or brown?
Yellowing or browning can indicate a few things:
* **Lack of nutrients:** Try adding a diluted liquid fertilizer to the water or soil.
* **Overwatering:** If using soil, ensure it’s well-draining and avoid overwatering. If using water, change it more frequently.
* **Insufficient sunlight:** Move the green onions to a sunnier location.
* **Root rot:** This is more common in soil. If the roots are mushy and brown, it’s likely root rot. You may need to start with fresh green onion scraps and a clean container.
Can I grow green onions from seed in bottles?
While this article focuses on regrowing from scraps, you can certainly grow green onions from seed in bottles. Use a well-draining potting mix and sow the seeds according to the package instructions. Keep the soil consistently moist and provide plenty of sunlight. This method takes longer than regrowing from scraps, but it allows you to start with a wider variety of green onion types.
How do I prevent the water from getting slimy or smelly?
The key is to change the water frequently – every 1-2 days. You can also add a small piece of charcoal to the water to help absorb odors. Make sure the bottle is clean before starting, and avoid overcrowding the bottle with too many green onion scraps.
Are there any other vegetables I can regrow using this method?
Yes! Celery, leeks, romaine lettuce, and even bok choy can be regrown using a similar method. Simply place the base of the vegetable in a shallow dish of water and wait for new roots to emerge. Once roots have formed, you can transplant the vegetable into soil or continue growing it in water.
Is this method sustainable long-term?
While you can regrow green onions multiple times from the same scraps, eventually, the growth will slow down and the quality of the green onions may decline. It’s a good idea to start new green onion scraps every few weeks to ensure a continuous supply of fresh herbs. This method is a great way to reduce food waste and enjoy fresh green onions, but it’s not necessarily a permanent solution. You can also consider planting some of the regrown green onions in soil to allow them to mature and produce seeds for future planting.
Leave a Comment