
Growing Kale in Plastic Bottles: Sounds unconventional, right? But trust me, it’s a game-changer for anyone looking to maximize their gardening space and enjoy fresh, homegrown kale all year round! I’m so excited to share this simple yet effective DIY trick with you.
For centuries, humans have cultivated kale, a nutritional powerhouse, in various ways. From sprawling fields to carefully tended garden beds, this leafy green has been a staple in diets worldwide. But what if you don’t have a sprawling field? What if you’re limited to a balcony, a patio, or even just a sunny windowsill? That’s where this ingenious method comes in!
In today’s world, where space is a premium and sustainability is key, finding innovative ways to grow our own food is more important than ever. Growing Kale in Plastic Bottles is not only a fantastic way to recycle and reduce waste, but it also allows you to control the growing environment, protect your kale from pests, and enjoy a continuous harvest, even in small spaces. Plus, it’s incredibly rewarding to see those little seedlings thrive in their repurposed homes. I’ve found this method to be incredibly effective, and I know you will too!
Ready to ditch the store-bought kale and embrace the joy of homegrown goodness? Let’s dive into this easy-to-follow DIY guide and unlock the secrets to successfully growing kale in plastic bottles!

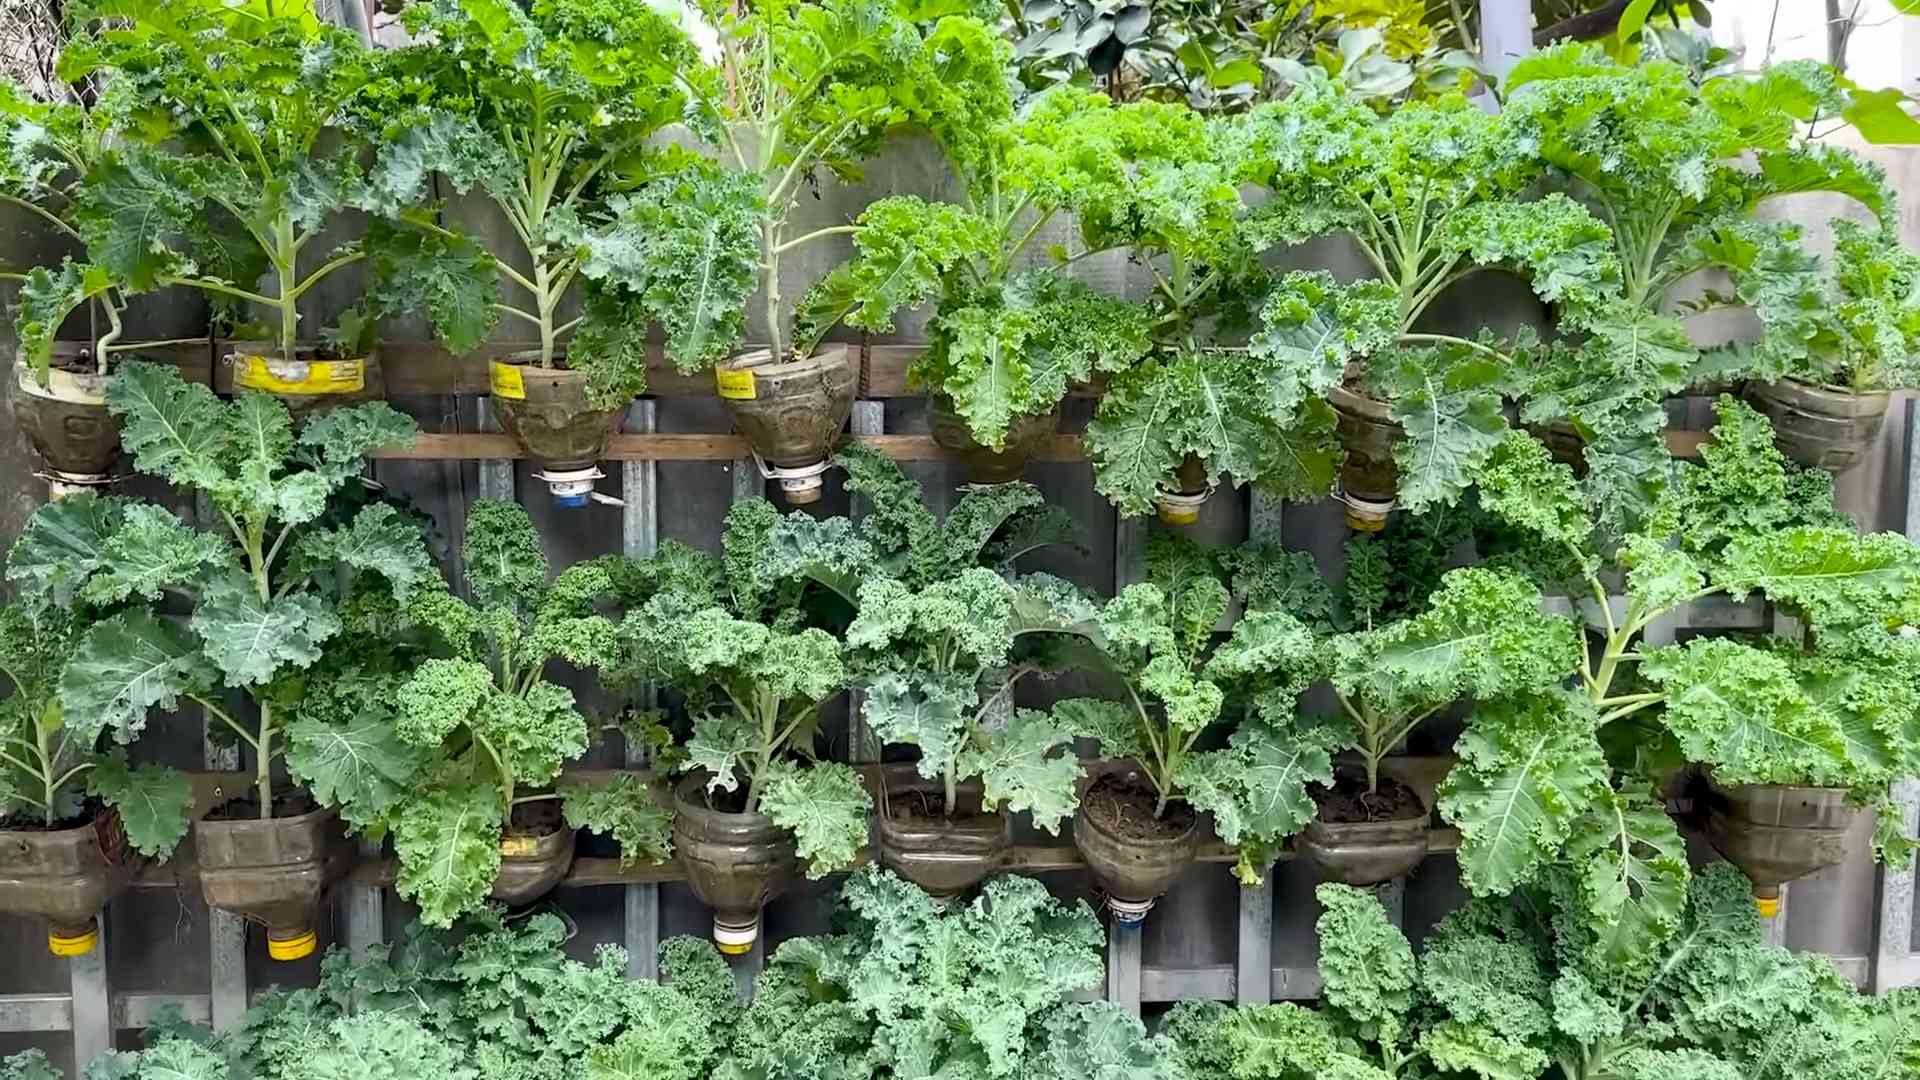
DIY Vertical Kale Garden: From Plastic Bottles to Leafy Greens!
Hey there, fellow gardening enthusiasts! I’m super excited to share a fun and eco-friendly project with you: growing kale in recycled plastic bottles. Not only is this a great way to reduce waste, but it also allows you to create a compact and visually appealing vertical garden, perfect for small spaces like balconies or patios. Get ready to enjoy fresh, homegrown kale right at your fingertips!
Materials You’ll Need
Before we dive in, let’s gather all the necessary supplies. Trust me, having everything ready beforehand will make the process much smoother.
* Plastic Bottles: The star of the show! Look for sturdy plastic bottles, preferably 2-liter soda bottles or similar sizes. The number of bottles you’ll need depends on how big you want your vertical garden to be. I usually aim for at least 6-8 bottles to start.
* Kale Seeds or Seedlings: You can start from seeds or buy small kale seedlings from your local nursery. I personally prefer starting from seeds because it’s more rewarding to watch them sprout and grow. Plus, it’s usually more cost-effective.
* Potting Soil: Choose a good quality potting mix that’s well-draining and rich in nutrients. Kale needs a good foundation to thrive.
* Scissors or Utility Knife: For cutting the plastic bottles. Be careful and always use appropriate safety measures.
* Drill or Nail and Hammer: To create drainage holes in the bottles.
* Rope or Twine: To hang the bottles vertically. Jute twine or nylon rope works well.
* Measuring Tape or Ruler: To ensure consistent spacing between the bottles.
* Marker: To mark cutting lines on the bottles.
* Watering Can or Spray Bottle: For watering your kale plants.
* Gloves (Optional): To keep your hands clean while working with soil.
* Safety Glasses (Optional): To protect your eyes when drilling or cutting.
Preparing the Plastic Bottles
This is where the transformation begins! We’re turning those discarded bottles into cozy homes for our kale plants.
1. Clean the Bottles: Thoroughly wash the plastic bottles with soap and water to remove any residue. Rinse them well and let them dry completely. This is important to prevent any contamination that could harm your plants.
2. Cut the Bottles: Using a marker, draw a horizontal line around each bottle, about 4-5 inches from the top. This will be your cutting line. Carefully cut along the line with scissors or a utility knife. You’ll be creating a “pocket” for the soil and kale.
3. Create Drainage Holes: Now, we need to make sure the water can drain properly. Use a drill or a nail and hammer to create several small drainage holes in the bottom of each bottle. I usually make about 4-5 holes per bottle. This prevents waterlogging, which can lead to root rot.
4. Prepare the Hanging System: Decide how you want to hang your bottles. You can either create individual hangers for each bottle or connect them in a vertical chain. For a chain, drill two holes on each side of the bottle, near the top. These holes will be used to thread the rope or twine through. Make sure the holes are large enough for your chosen rope or twine to pass through easily.
Planting Your Kale
Now for the fun part – planting the kale!
1. Fill the Bottles with Soil: Fill each bottle “pocket” with potting soil, leaving about an inch of space at the top. Gently pat the soil down to remove any air pockets.
2. Plant the Seeds or Seedlings: If you’re starting from seeds, sow a few seeds in each bottle, following the instructions on the seed packet. Cover the seeds with a thin layer of soil and gently water them. If you’re using seedlings, carefully remove them from their containers and plant one seedling in each bottle. Make sure the roots are well covered with soil.
3. Water Thoroughly: After planting, water the soil thoroughly until water drains out of the drainage holes. This will help settle the soil and provide the kale plants with the moisture they need to get started.
Assembling Your Vertical Garden
Time to put it all together and create your beautiful vertical kale garden!
1. Thread the Rope or Twine: If you’re creating a vertical chain, thread the rope or twine through the holes you drilled in the bottles. Start with the bottom bottle and work your way up, securing each bottle in place. Make sure the bottles are spaced evenly apart to allow for adequate sunlight and air circulation. I usually leave about 6-8 inches between each bottle.
2. Hang Your Garden: Find a sunny spot to hang your vertical garden. A balcony railing, a fence, or even a sturdy hook on your patio will work. Make sure the location receives at least 6 hours of sunlight per day. Kale loves sunshine!
3. Secure the Bottom: To prevent the bottom bottle from swinging in the wind, you can attach a weight to it, such as a small rock or a bag of sand. This will help stabilize the entire structure.
Caring for Your Kale
Now that your vertical kale garden is set up, it’s important to provide the plants with the care they need to thrive.
* Watering: Water your kale plants regularly, especially during hot and dry weather. Check the soil moisture by sticking your finger into the soil. If the top inch feels dry, it’s time to water. Avoid overwatering, as this can lead to root rot.
* Fertilizing: Kale is a heavy feeder, so it’s important to fertilize your plants regularly. Use a balanced liquid fertilizer, following the instructions on the label. I usually fertilize my kale plants every two weeks.
* Sunlight: Make sure your kale plants receive at least 6 hours of sunlight per day. If you live in a particularly hot climate, you may need to provide some afternoon shade to prevent the leaves from scorching.
* Pest Control: Keep an eye out for pests, such as aphids, cabbage worms, and slugs. If you notice any pests, you can try spraying your plants with insecticidal soap or neem oil. You can also handpick the pests off the plants.
* Harvesting: You can start harvesting kale leaves when they are about 4-6 inches long. Simply cut off the outer leaves, leaving the inner leaves to continue growing. This will encourage the plant to produce more leaves.
Troubleshooting Tips
Even with the best care, you might encounter some challenges along the way. Here are a few troubleshooting tips to help you out:
* Yellowing Leaves: Yellowing leaves can be a sign of overwatering, underwatering, or nutrient deficiency. Check the soil moisture and adjust your watering schedule accordingly. If the soil is consistently dry, water more frequently. If the soil is consistently wet, water less frequently. You may also need to fertilize your plants to provide them with the nutrients they need.
* Leggy Growth: Leggy growth, where the plants are tall and spindly, is usually a sign of insufficient sunlight. Move your vertical garden to a sunnier location or supplement with artificial light.
* Slow Growth: Slow growth can be caused by a variety of factors, including poor soil, insufficient sunlight, and pest infestations. Make sure your plants are getting enough sunlight, water, and nutrients. Check for pests and take appropriate action if necessary.
* Root Rot: Root rot is a fungal disease that can occur when the soil is consistently wet. To prevent root rot, make sure your pots have adequate drainage and avoid overwatering. If you suspect root rot, you can try repotting your plants in fresh soil.
Extra Tips for Success
Here are a few extra tips to help you maximize your kale-growing success:
* Choose the Right Kale Variety: There are many different varieties of kale to choose from, each with its own unique flavor and texture. Some popular varieties include Curly Kale, Lacinato Kale (also known as Dinosaur Kale), and Red Russian Kale. Experiment with different varieties to find your favorite.
* Succession Planting: To ensure a continuous harvest of kale, try succession planting. Sow new seeds or plant new seedlings every few weeks. This will stagger the harvest and prevent you from being overwhelmed with kale all at once.
* Companion Planting: Companion planting is the practice of planting different plants together to benefit each other. Some good companion plants for kale include onions, garlic, and marigolds. These plants can help deter pests and improve the soil.
* Protect from Frost: Kale is a relatively hardy plant, but it can be damaged by frost. If you live in an area with cold winters, you may need to protect your kale plants from frost by covering them with a blanket or bringing them indoors.
* Enjoy Your Harvest: The best part of growing your own kale is enjoying the delicious and nutritious harvest! Kale can be used in a variety of dishes, including salads, smoothies, soups, and stir
Conclusion
So, there you have it! Growing kale in plastic bottles isn’t just a quirky gardening experiment; it’s a genuinely effective and rewarding way to cultivate fresh, nutritious greens, even if you’re short on space or resources. We’ve walked you through the entire process, from preparing your bottles to harvesting your bountiful kale.
Why is this DIY trick a must-try? Because it democratizes gardening. It breaks down the barriers of entry, making fresh, healthy food accessible to everyone, regardless of their living situation or gardening experience. Imagine the satisfaction of snipping off a handful of vibrant kale leaves, knowing you nurtured them from seed in a recycled plastic bottle. It’s a small act with a big impact, both on your health and the environment.
Beyond the practicality, growing kale in plastic bottles is incredibly versatile. Feel free to experiment with different varieties of kale. Curly kale, Lacinato kale (also known as dinosaur kale), and Red Russian kale all thrive in container environments. You can also adjust the size of your plastic bottles to suit your needs. Smaller bottles are perfect for starting seedlings, while larger bottles can accommodate more mature plants.
Consider adding companion plants to your bottle gardens. Herbs like basil, thyme, and oregano not only deter pests but also enhance the flavor of your kale. Marigolds are another excellent choice, adding a splash of color and attracting beneficial insects.
Don’t be afraid to get creative with your bottle gardens. Paint the bottles with vibrant colors, decorate them with stencils, or even create a vertical garden by hanging them from a fence or balcony. The possibilities are endless!
The key takeaway here is that growing kale in plastic bottles is more than just a gardening hack; it’s a sustainable, empowering, and ultimately delicious way to connect with nature and nourish your body. It’s a testament to the fact that you don’t need a sprawling garden to enjoy the benefits of fresh, homegrown produce.
We wholeheartedly encourage you to give this DIY trick a try. It’s a simple, affordable, and incredibly rewarding project that will bring a touch of green to your life. And most importantly, it will provide you with a constant supply of fresh, healthy kale for salads, smoothies, soups, and more.
Once you’ve embarked on your plastic bottle kale-growing adventure, we’d love to hear about your experience! Share your photos, tips, and challenges in the comments below. Let’s create a community of bottle gardeners, inspiring each other to grow more food and live more sustainably. Your success story could be the inspiration someone else needs to start their own journey of growing kale in plastic bottles.
Frequently Asked Questions (FAQ)
What kind of plastic bottles are best for growing kale?
Ideally, you should use food-grade plastic bottles, such as those that previously contained water, juice, or soda. Avoid bottles that held harsh chemicals or cleaning products, as these may leach harmful substances into the soil. PET (polyethylene terephthalate) bottles, commonly used for water and soda, are a good choice. Make sure to thoroughly wash and rinse the bottles before using them. Also, consider the size of the bottle. Larger bottles (2-3 liters) are better for mature kale plants, while smaller bottles (500ml-1 liter) are suitable for starting seedlings.
What type of soil should I use for growing kale in plastic bottles?
A well-draining potting mix is essential for growing healthy kale in containers. Avoid using garden soil, as it tends to compact and doesn’t provide adequate drainage. A good potting mix will contain a blend of peat moss, perlite, and vermiculite. You can also add compost to enrich the soil and provide essential nutrients. Look for a potting mix specifically formulated for vegetables or herbs.
How often should I water my kale plants in plastic bottles?
The frequency of watering depends on several factors, including the weather, the size of the bottle, and the type of soil. Generally, you should water your kale plants when the top inch of soil feels dry to the touch. Avoid overwatering, as this can lead to root rot. During hot, sunny weather, you may need to water your plants daily. In cooler weather, you may only need to water them every few days. Make sure the bottles have adequate drainage holes to prevent water from accumulating at the bottom.
How much sunlight does kale need when grown in plastic bottles?
Kale thrives in full sun, which means at least 6 hours of direct sunlight per day. If you don’t have a sunny spot, you can supplement with grow lights. Place your plastic bottle gardens in a location that receives ample sunlight, such as a south-facing window or balcony. If you live in a particularly hot climate, you may need to provide some afternoon shade to prevent the leaves from scorching.
How do I fertilize kale grown in plastic bottles?
Kale is a heavy feeder, so it’s important to fertilize regularly. You can use a liquid fertilizer specifically formulated for vegetables or herbs. Follow the instructions on the fertilizer label for application rates. Alternatively, you can add slow-release fertilizer granules to the potting mix at planting time. Compost tea is another excellent option for fertilizing kale, providing a gentle and natural source of nutrients. Fertilize every 2-3 weeks during the growing season.
How do I protect my kale plants from pests and diseases?
Regularly inspect your kale plants for signs of pests or diseases. Common pests that affect kale include aphids, cabbage worms, and flea beetles. You can control these pests by handpicking them off the plants, spraying with insecticidal soap, or using neem oil. To prevent diseases, ensure good air circulation around the plants and avoid overwatering. If you notice any signs of disease, such as yellowing leaves or spots, remove the affected leaves immediately.
When is the best time to harvest kale grown in plastic bottles?
You can start harvesting kale leaves when they are about 4-6 inches long. Harvest the outer leaves first, leaving the inner leaves to continue growing. This will encourage the plant to produce more leaves. You can harvest kale throughout the growing season, even into the winter in mild climates. The flavor of kale actually improves after a frost.
Can I grow kale indoors in plastic bottles?
Yes, you can grow kale indoors in plastic bottles, but you’ll need to provide adequate light. Place the bottles near a sunny window or use grow lights to supplement natural light. Make sure the plants receive at least 6 hours of light per day. Indoor kale may not grow as quickly or produce as many leaves as outdoor kale, but it’s still a viable option for those with limited outdoor space.
How do I overwinter kale grown in plastic bottles?
In mild climates, kale can survive the winter outdoors. In colder climates, you can move the plastic bottle gardens indoors or protect them with a cold frame or row covers. Cut back on watering and fertilizing during the winter months, as the plants will grow more slowly. With proper care, your kale plants can continue to produce leaves throughout the winter.
Can I reuse the plastic bottles for growing kale again?
Yes, you can reuse the plastic bottles for growing kale multiple times. However, it’s important to thoroughly clean and disinfect the bottles before reusing them. Wash them with soap and water, and then rinse them with a solution of bleach and water (1 part bleach to 9 parts water). This will help prevent the spread of diseases. You may also need to replace the potting mix, as it can become depleted of nutrients over time.
Leave a Comment