
Growing kale in soil bags might sound unconventional, but trust me, it’s a game-changer for any home gardener, whether you’re a seasoned pro or just starting out! Are you dreaming of fresh, vibrant kale gracing your table but lack the space for a traditional garden? Or perhaps you’re battling poor soil conditions that make growing anything a challenge? Well, fret no more! This DIY guide will unlock the secrets to cultivating a thriving kale patch, all within the humble confines of a soil bag.
The concept of container gardening, including using soil bags, has roots stretching back centuries. From the hanging gardens of Babylon to the resourceful window boxes of urban dwellers, people have always found creative ways to grow food in limited spaces. Today, with increasing urbanization and a renewed focus on sustainable living, the practice is experiencing a vibrant resurgence. Growing kale in soil bags is more than just a trend; it’s a practical and accessible solution for anyone seeking fresh, healthy produce without the constraints of a traditional garden.
I know what you’re thinking: “Why soil bags?” Well, imagine bypassing the back-breaking work of tilling, amending, and weeding a garden bed. Soil bags offer excellent drainage, prevent soil compaction, and allow you to easily move your kale plants to chase the sun or shelter them from harsh weather. Plus, it’s incredibly budget-friendly! This DIY trick is perfect for apartment dwellers, balcony gardeners, or anyone looking for a low-effort, high-yield way to enjoy the delicious and nutritious benefits of homegrown kale. So, let’s dive in and discover how easy it is to transform a simple soil bag into a kale-growing powerhouse!
Growing Cabbage in Grow Bags: A Simple DIY Guide
Hello dear garden friends! Today I’m going to show you how you can easily grow cabbage in grow bags in a space-saving way. This is a great solution if you don’t have a large garden or just want to be flexible. Let’s get started!
What you need:
- Grow bags (made of jute, felt, or plastic – depending on your preference)
- High-quality potting soil
- Cabbage seedlings (kale, lacinato kale, Brussels sprouts, etc.)
- Watering can or garden hose
- Optional: Slow-release fertilizer or compost
- Optional: Mulch material (straw, wood chips)
- Garden shears
Why Cabbage in a Grow Bag?
- Space-saving: Ideal for balconies, terraces, or small gardens.
- Flexible: You can easily move the bags depending on the amount of sunlight.
- Good drainage: Grow bags prevent waterlogging, which is very beneficial for cabbage.
- Easy harvest: You always have the cabbage within reach.
- Fewer weeds: The soil in the bag is less prone to weed growth.
Step-by-Step Guide:
1. Choosing the Right Grow Bag:
- There are different types of grow bags. Jute and felt bags are breathable and ensure good root aeration. Plastic bags are cheaper but can lead to waterlogging if they don’t have sufficient drainage holes. I personally prefer jute bags as they are also more visually appealing.
- The size of the grow bag depends on the cabbage variety. For kale or lacinato kale, I recommend bags with a volume of at least 40 liters. For Brussels sprouts, which need a bit more space, it should be closer to 60 liters.
- Make sure the grow bag is stable and stands up well.
2. Preparing the Grow Bag:
- Before you fill it with soil, you should place the grow bag in its final location. It’s heavy to move once filled.
- If your grow bag doesn’t have drainage holes, you should poke a few holes in the bottom to prevent waterlogging.
- You can optionally place a layer of gravel or clay shards at the bottom of the bag to improve drainage, but this is not strictly necessary.
3. Filling with Soil:
- Use high-quality potting soil. Cabbage is a heavy feeder and requires a lot of nutrients.
- Fill the grow bag about two-thirds full with soil.
- If you like, you can now mix in slow-release fertilizer or compost. This provides the cabbage with additional nutrients. I like to use horn shavings as they are released slowly and supply the cabbage with nitrogen over a longer period.
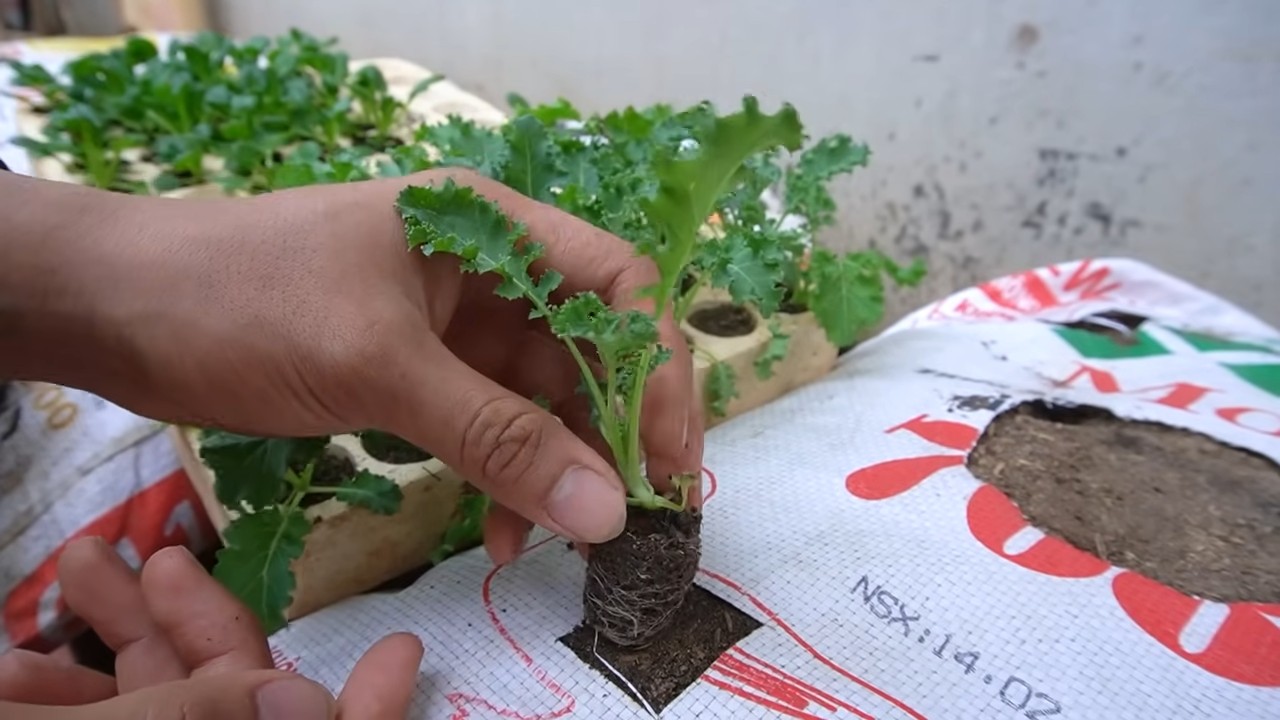
4. Planting the Cabbage Seedlings:
- Make small holes in the soil, large enough to accommodate the root balls of the seedlings.
- Carefully remove the seedlings from their pots and gently loosen the roots.
- Place the seedlings in the holes and fill them with soil. Make sure the seedlings are not planted too deep. The top edge of the root ball should be level with the soil surface.
- Lightly press the soil around the seedlings.
- The distance between seedlings should vary depending on the cabbage variety. For kale and lacinato kale, about 40-50 cm is sufficient; for Brussels sprouts, it should be more like 60-70 cm.
5. Watering:
- Water the seedlings thoroughly after planting. The soil should be well moistened.
- In the coming weeks, make sure the soil always stays moist, but not wet. Cabbage does not like waterlogging.
- It’s best to water in the morning or evening when the sun is not as strong. This way, the water doesn’t evaporate as quickly.
6. Care:
- Cabbage is a heavy feeder and requires regular fertilizing. You can add liquid fertilizer to the watering can every two to three weeks or reapply slow-release fertilizer as needed.
- Regularly remove any weeds that grow in the bag.
- Check the plants regularly for pests like cabbage white butterflies or aphids. You can use organic pesticides if necessary.
- Mulch the soil around the cabbage plants with straw or wood chips. This keeps the soil moist, suppresses weeds, and protects the plants from water splashing.
Specific Tips for Different Cabbage Varieties:
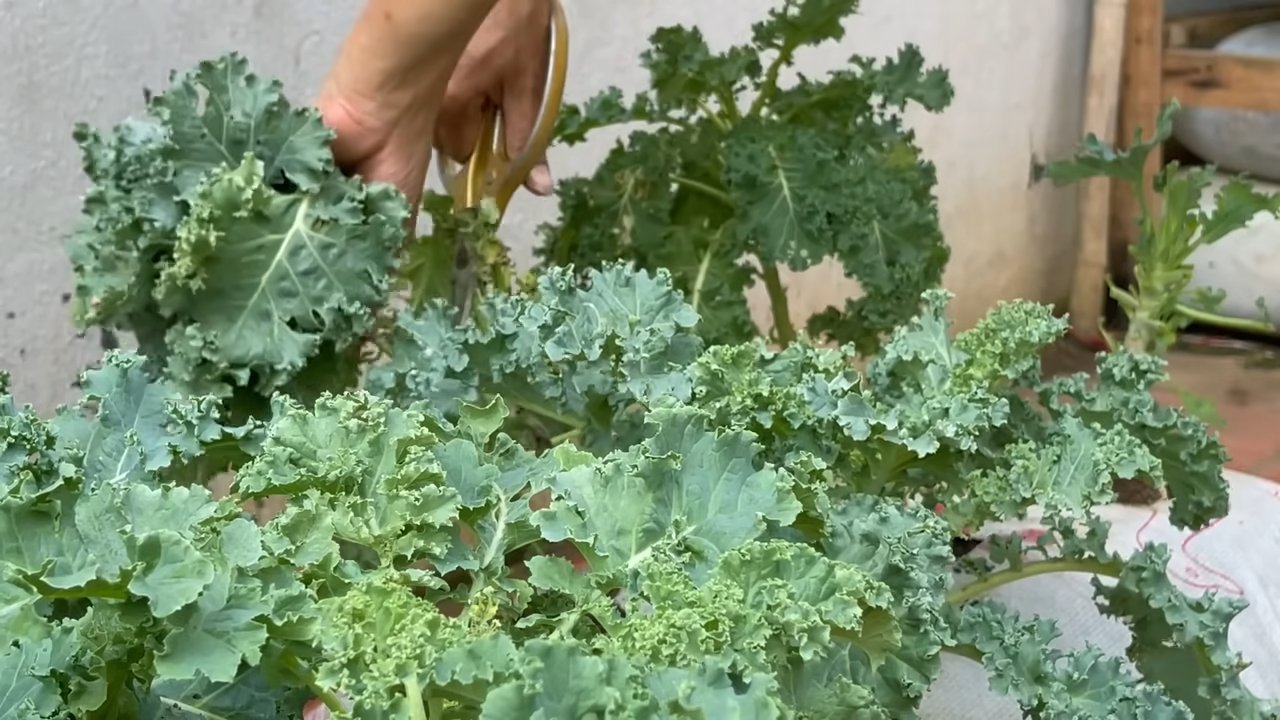
- Kale: Kale is very robust and easy to care for. It also tolerates frost well. You can harvest the leaves as needed, from the bottom up.
- Lacinato Kale (Cavolo Nero): Lacinato kale is also very robust and easy to care for. It has a slightly nutty flavor. The leaves are harvested from the bottom up, just like with kale.
- Brussels Sprouts: Brussels sprouts require a bit more care than kale and lacinato kale. They need a lot of sun and regular fertilization. The sprouts are harvested when they are firm and closed.
- Cauliflower: Cauliflower is a bit more demanding and requires a consistent water supply. The heads are harvested when they have reached the desired size and are still firm.
- White/Red Cabbage: These cabbage varieties need a lot of space and a good supply of nutrients. The heads are harvested when they are firm and closed.
Protection Against Pests:
Unfortunately, cabbage is susceptible to various pests. Here are a few tips on how you can protect your plants:
- Cabbage White Butterfly: The caterpillars of the cabbage white butterfly eat the leaves of the cabbage. You can pick off the caterpillars or cover the plants with a net.
- Flea Beetles: Flea beetles eat small holes in the leaves. You can cover the plants with a fleece or sprinkle them with diatomaceous earth.
- Aphids: Aphids suck the sap from the leaves. You can spray the aphids off with a jet of water or combat them with a biological insecticide.
- Cabbage Fly: The larvae of the cabbage fly feed on the roots. You can protect the plants with a cabbage collar or use nematodes.
Harvest Time:
The harvest time depends on the cabbage variety and the time of sowing. Kale and lacinato kale can often be harvested in the fall, while Brussels sprouts are not ready until winter. Cauliflower and white/red cabbage are harvested when the heads have reached the desired size.
Additional Tips:
- Observe crop rotation: Do not grow cabbage in the same location every year. Rotate your crops to avoid diseases and pests.
- Companion plants: Plant companion plants like marigolds, nasturtiums, or tagetes next to the cabbage. They repel pests and attract beneficial insects.
- Cabbage in winter: Some cabbage varieties, like kale and lacinato kale, can also be harvested in winter. They tolerate frost well and even taste better after the first frost.
Conclusion:
Growing cabbage in a grow bag is an easy and rewarding way to harvest fresh vegetables in a small space. With the right care and a little patience, you can soon look forward to a bountiful harvest. Happy gardening!
Conclusion
So, there you have it! Growing kale in soil bags is not just a gardening trend; it’s a game-changer for anyone looking to enjoy fresh, nutritious greens with minimal effort and maximum yield. We’ve explored the simplicity, cost-effectiveness, and space-saving benefits of this method, highlighting how even the most novice gardener can achieve impressive results.
But why is this DIY trick a must-try? Because it democratizes access to fresh, healthy food. No sprawling garden? No problem! Limited budget? Soil bags are incredibly affordable. Short on time? The low-maintenance nature of this method frees you up to focus on other things. Plus, the satisfaction of harvesting your own kale, knowing exactly where it came from and how it was grown, is simply unparalleled.
Beyond the basic method, there’s plenty of room for experimentation. Consider adding companion plants like marigolds or basil to your soil bags to deter pests naturally. You could also try different varieties of kale – from the curly leafed types to the Tuscan or dinosaur kale – to discover your personal favorites. For those in colder climates, moving the soil bags to a sheltered location or even indoors during the harshest months can extend your growing season significantly. You can even experiment with different soil mixes to see what works best for your local climate and the specific type of kale you’re growing.
The beauty of growing kale in soil bags lies in its adaptability. It’s a blank canvas for your gardening creativity. You can tailor the method to suit your specific needs, preferences, and resources. Whether you’re a seasoned gardener or a complete beginner, this is a project that promises a rewarding experience and a bountiful harvest.
We wholeheartedly encourage you to give this DIY trick a try. It’s a simple, effective, and incredibly satisfying way to enjoy fresh, homegrown kale. And once you’ve experienced the joy of harvesting your own greens, we’re confident you’ll be hooked.
Don’t forget to share your experiences with us! We’d love to hear about your successes, your challenges, and any variations you’ve tried. Share your photos, tips, and tricks in the comments section below. Let’s build a community of soil bag kale growers and inspire others to embrace this simple and rewarding gardening method. Let’s all enjoy the benefits of fresh, homegrown **kale**!
Frequently Asked Questions (FAQ)
What type of soil bag should I use?
The best type of soil bag to use for growing kale is a heavy-duty polypropylene bag, often referred to as a grow bag. These bags are durable, breathable, and allow for good drainage. Avoid using thin plastic bags, as they can easily tear and don’t provide adequate drainage. Look for bags that are specifically designed for growing plants, as they will be UV-resistant and designed to withstand the elements. The size of the bag will depend on the variety of kale you’re growing and how many plants you want to put in each bag. A good starting point is a 10-20 gallon bag.
How often should I water my kale plants in soil bags?
Watering frequency depends on several factors, including the weather, the type of soil you’re using, and the size of your plants. Generally, you should water your kale plants when the top inch of soil feels dry to the touch. During hot, dry weather, you may need to water daily, while during cooler, wetter periods, you may only need to water every few days. Be sure to water thoroughly, allowing the water to drain out of the bottom of the bag. Avoid overwatering, as this can lead to root rot. A good way to check if your plants need water is to lift the bag. If it feels light, it’s likely time to water.
What kind of fertilizer should I use for kale grown in soil bags?
Kale is a heavy feeder, so it’s important to provide it with adequate nutrients. A balanced, slow-release fertilizer is a good option for soil bags. Look for a fertilizer with an NPK ratio (nitrogen, phosphorus, potassium) of around 10-10-10 or 14-14-14. You can also supplement with organic fertilizers like compost tea or fish emulsion. Apply fertilizer according to the package directions, being careful not to over-fertilize, which can burn the roots. Consider side-dressing your plants with compost or worm castings every few weeks to provide a steady supply of nutrients.
How do I protect my kale plants from pests and diseases?
Growing kale in soil bags can actually help reduce pest and disease problems, as the plants are often more isolated than in a traditional garden. However, it’s still important to take precautions. Regularly inspect your plants for signs of pests like aphids, cabbage worms, and flea beetles. Handpick any pests you find, or use insecticidal soap or neem oil to control infestations. To prevent diseases, ensure good air circulation around your plants and avoid overwatering. Consider using companion plants like marigolds or nasturtiums to deter pests naturally. If you notice any signs of disease, remove the affected leaves immediately.
Can I grow kale in soil bags indoors?
Yes, you can grow kale in soil bags indoors, but you’ll need to provide adequate light. Kale requires at least 6 hours of sunlight per day, so if you don’t have a sunny window, you’ll need to supplement with grow lights. Place the grow lights a few inches above the plants and keep them on for 12-14 hours per day. Indoor kale may also require more frequent watering, as the air inside is often drier than outdoors. Be sure to monitor the soil moisture and water accordingly.
How long does it take to grow kale in soil bags?
The time it takes to grow kale in soil bags depends on the variety of kale you’re growing and the growing conditions. Generally, you can expect to start harvesting leaves about 6-8 weeks after planting. Kale is a cut-and-come-again crop, meaning you can harvest leaves as needed, and the plant will continue to produce more. Harvest the outer leaves first, leaving the inner leaves to continue growing. With proper care, you can harvest kale from your soil bags for several months.
What are the benefits of growing kale in soil bags compared to traditional gardening?
Growing kale in soil bags offers several advantages over traditional gardening:
* **Space-saving:** Soil bags are ideal for small spaces like balconies, patios, and decks.
* **Portability:** You can easily move soil bags to follow the sun or protect them from harsh weather.
* **Improved drainage:** Soil bags provide excellent drainage, preventing root rot.
* **Weed control:** Soil bags are less prone to weed infestations than traditional gardens.
* **Soil control:** You can use a custom soil mix that is specifically tailored to kale’s needs.
* **Reduced pest and disease problems:** Soil bags can help isolate plants and reduce the risk of pests and diseases.
* **Easy harvesting:** Soil bags make it easy to harvest leaves without disturbing the rest of the plant.
Can I reuse the soil bags after harvesting my kale?
Yes, you can reuse soil bags after harvesting your kale, but it’s important to prepare them properly. Remove any remaining plant debris and amend the soil with compost or other organic matter to replenish nutrients. You may also want to sterilize the soil by solarizing it (covering it with clear plastic in the sun for several weeks) to kill any potential pathogens. If the bags are damaged, you can repair them with duct tape or replace them altogether.
Leave a Comment