
Growing Lettuce in Coconut Shells: Sounds a bit quirky, right? But trust me, this isn’t just some fleeting internet trend; it’s a surprisingly effective and utterly charming way to cultivate fresh greens right at home! For centuries, resourceful gardeners around the world have been finding innovative ways to repurpose natural materials, and using coconut shells is a beautiful example of this ingenuity. Think of it as a miniature, eco-friendly garden with a tropical twist!
I know what you might be thinking: “Why coconut shells?” Well, besides being readily available in many regions and a fantastic way to reduce waste, coconut shells offer excellent drainage and aeration for your lettuce plants. Plus, let’s be honest, they look absolutely adorable hanging on a balcony or nestled in a sunny corner of your kitchen. Who wouldn’t want a little piece of paradise bringing fresh, homegrown lettuce to their table?
In this DIY guide, I’m going to walk you through every step of growing lettuce in coconut shells, from preparing the shells to nurturing your leafy greens. Whether you’re a seasoned gardener or a complete beginner, this project is a fun, rewarding, and sustainable way to enjoy fresh, delicious lettuce all season long. So, grab your tools, find some coconut shells, and let’s get growing!
DIY: Grow Lettuce in Coconut Shells – A Tropical Touch for Your Garden!
Hello dear garden friends! Do you feel like giving your garden an exotic touch while also doing something for the environment? Then I have just the thing for you: growing lettuce in coconut shells! It’s not only super easy but also a great way to reduce waste and give your lettuce patch a unique look. Let’s get started!
What you need:
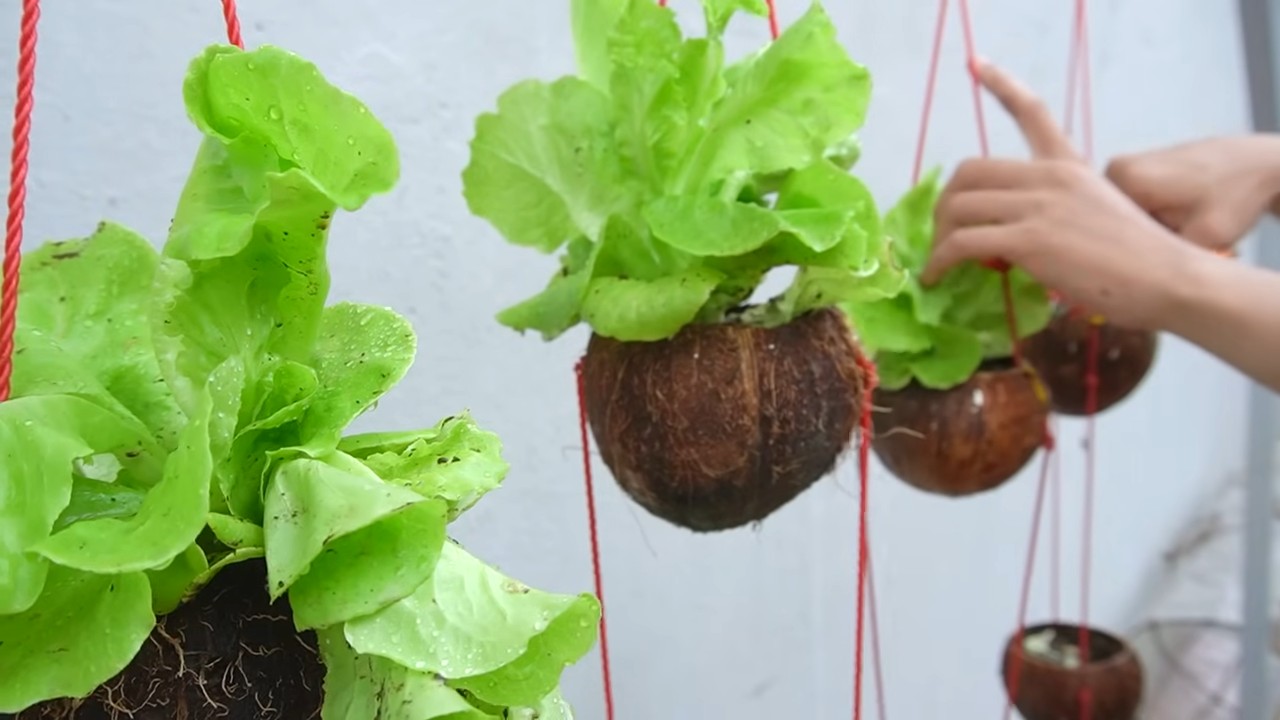
- Empty coconut shells: Half shells are best, which you can either get from fresh coconuts yourself or find at a craft store. Make sure they are clean and dry.
- Drill or screwdriver: For drilling drainage holes.
- Soil: High-quality potting soil or special seed-starting mix.
- Lettuce seeds: Choose your favorite variety! Leaf lettuce, head lettuce, romaine lettuce – anything is possible.
- Watering can or spray bottle: For watering.
- Optional: Coconut coir or gravel for better drainage.
- Optional: Natural fertilizer (e.g., compost or horn shavings).
Preparation of the Coconut Shells:
- Cleaning: If you have obtained the coconut shells from fresh coconuts yourself, first remove the flesh thoroughly. Then rinse the shells with warm water and a little dish soap to remove all residues. Let them dry completely.
- Drilling drainage holes: This is a super important step! Lettuce does not like waterlogged soil. Use a drill or a screwdriver to drill 3-4 small holes in the bottom of each coconut shell. The holes should be about 0.5 cm (about 0.2 inches) in diameter.
- Optional: Improve drainage: To further improve drainage, you can place a layer of coconut coir or gravel at the bottom of the shell before filling it with soil. This prevents the soil from clogging the drainage holes.
Sowing the Lettuce:
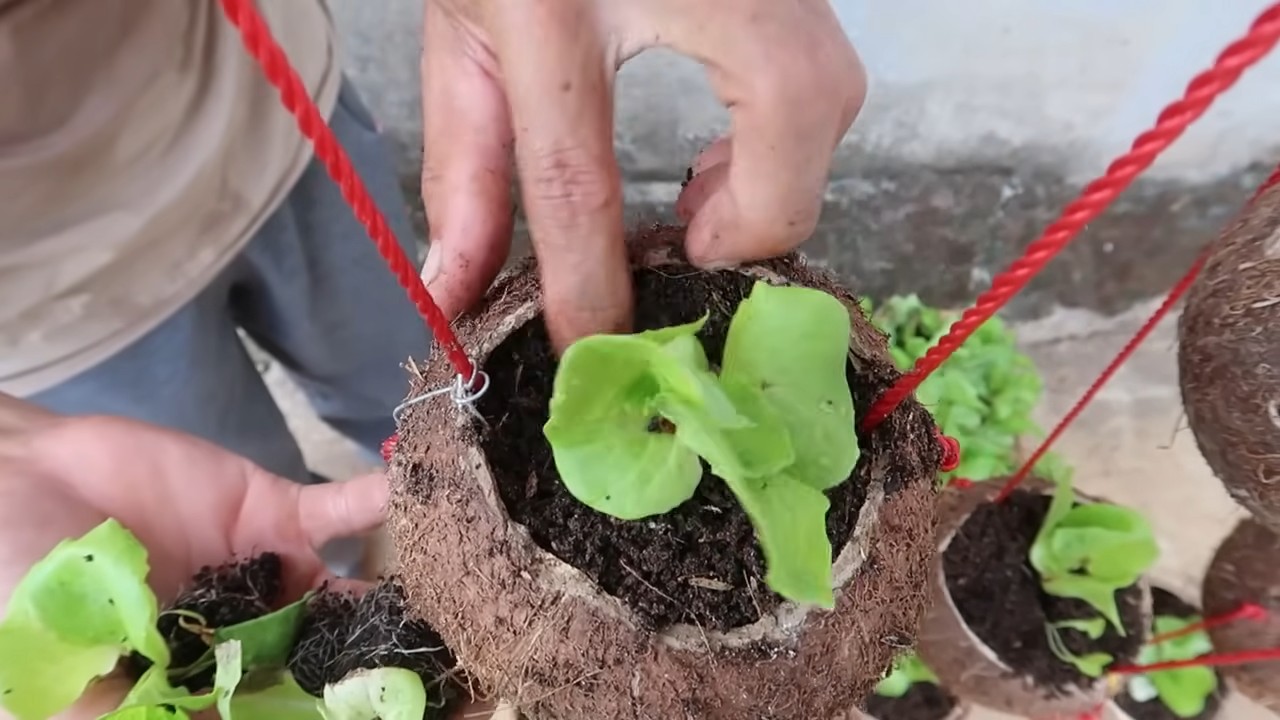
- Fill with soil: Fill the coconut shells with soil. Leave about 2-3 cm (about an inch) of space to the rim. Lightly press the soil down.
- Sow the seeds: Distribute the lettuce seeds evenly on the soil. Follow the instructions on the seed packet regarding sowing density. Usually, it is sufficient to lightly press the seeds down and not bury them too deeply.
- Cover with soil: Cover the seeds with a thin layer of soil (approx. 0.5 cm or 0.2 inches).
- Watering: Moisten the soil gently with a watering can or spray bottle. Make sure the soil is evenly moist, but not soaked.
Care of the Lettuce:
- Location: Place the coconut shells in a bright, but not full-sun, location. Lettuce prefers partial shade.
- Watering: Keep the soil consistently moist, but avoid waterlogging. Water regularly, especially on warm days. Check the moisture of the soil by sticking your finger into it. If it feels dry, it’s time to water.
- Fertilizing: If you wish, you can regularly fertilize your lettuce with a natural fertilizer. Compost or horn shavings are a good choice. Follow the dosage instructions on the packaging.
- Protection from pests: Regularly check your lettuce plants for pests like snails or aphids. If necessary, you can use natural pest control methods.
- Harvest: Depending on the lettuce variety, you can harvest your lettuce after about 4-8 weeks. You can harvest leaf lettuce gradually by picking the outer leaves. You harvest head lettuce when it has formed a firm head.
Additional Tips and Tricks:
- Different lettuce varieties: Experiment with different lettuce varieties! This way you’ll always have a colorful mix on your plate.
- Coconut shells as decoration: The coconut shells not only look great but can also serve as a decorative element in your garden. You can, for example, hang them up or arrange them in groups.
- Upcycling: If you don’t have coconut shells, you can also use other containers, such as old yogurt cups or tin cans. However, make sure to drill drainage holes here as well.
- Starting indoors: You can also start your lettuce indoors before planting it outside. Place the coconut shells on a bright windowsill.
- Protection from frost: If it freezes outside, you should protect your lettuce plants. You can cover them with a fleece, for example, or bring them indoors.
Step-by-Step Guide in Detail
Here are the individual steps explained in great detail, so that nothing can go wrong:
Step 1: Preparing the Coconut Shells
The be-all and end-all is the proper preparation of the coconut shells. As mentioned, you can either empty them yourself (which is a bit of work, but also fun!) or you can buy them ready-made from a craft store. The important thing is that they are clean. Imagine you want to cook in a clean pot – it’s the same with lettuce! So, rinse thoroughly and let them dry.
Step 2: Drainage Holes – Lifesavers for Your Lettuce
Lettuce likes it moist, but it hates waterlogging! It’s like with us humans – we need water, but we don’t want to live in a swimming pool. So, the drainage holes are super important. Take your drill (or the screwdriver, if you like it old-school) and drill 3-4 small holes in the bottom of each shell. Make sure the holes are not too big, otherwise the soil will fall out.
Step 3: Improve Drainage – The Extra for Pros
This step is optional, but it can really make a difference. If you have coconut coir or gravel, put a small layer of it at the bottom of the shell before you add the soil. This provides even better drainage and prevents the soil from clogging the holes. Imagine it’s like a filter that drains the water away.
Step 4: Soil, March!
Now the soil goes into the shell. It’s best to use high-quality potting soil or special seed-starting mix. Fill the shell to about 2-3 cm (about an inch) below the rim. Press the soil down lightly, but not too firmly. It should remain loose and airy so that the roots of the lettuce can grow well.
Step 5: Sowing Seeds – The Beginning of a New Life
Now comes the most exciting part: sowing the seeds! Distribute the lettuce seeds evenly on the soil. Pay attention to the instructions on the seed packet. Usually, it’s enough to lightly press the seeds down and not bury them too deeply. Imagine you are gently tucking the seeds into a bed.
Step 6: Cover with Soil and Water
Cover the seeds with a thin layer of soil (approx. 0.5 cm or 0.2 inches). Water the soil gently with a watering can or spray bottle. Make sure the soil is evenly moist, but not soaked. Imagine you are giving the seeds a gentle rain shower.
Step 7: The Right Location – Where Your Lettuce Feels at Home
Place the coconut shells in a bright, but not full-sun, location. Lettuce likes it partially shaded. A windowsill or a balcony with some shade is ideal. Imagine you are looking for a cozy spot for your lettuce where it can relax and grow.
Conclusion
So, there you have it! Growing lettuce in coconut shells isn’t just a quirky gardening trend; it’s a practical, sustainable, and visually appealing way to bring fresh greens to your table. We’ve explored the numerous benefits, from the natural drainage and aeration provided by the coconut shell to the reduced need for transplanting and the overall aesthetic appeal. This method truly embodies the spirit of resourceful gardening, transforming a discarded item into a thriving mini-ecosystem.
But why is this DIY trick a must-try? Beyond the environmental advantages, consider the sheer convenience. Imagine having a collection of these little lettuce gardens, neatly arranged on your patio or balcony, providing a constant supply of fresh, organic greens right at your fingertips. No more last-minute trips to the grocery store for wilted lettuce! Plus, it’s a fantastic conversation starter and a unique way to showcase your gardening skills.
Variations and Suggestions:
Don’t limit yourself to just lettuce! While this method is particularly well-suited for lettuce varieties, you can also experiment with other shallow-rooted greens like spinach, arugula, or even herbs like parsley and cilantro. Consider painting the coconut shells with vibrant colors to add a personal touch and protect them from the elements. You can also drill small holes near the top and hang them, creating a stunning vertical garden. For added nutrients, try incorporating compost tea into your watering routine. Remember to adjust your watering schedule based on the weather and the specific needs of your chosen greens.
Ready to Get Started?
We wholeheartedly encourage you to give this DIY trick a try. It’s a simple, rewarding project that can transform your gardening experience and provide you with a constant supply of fresh, delicious lettuce. The process of growing lettuce in coconut shells is incredibly satisfying, from preparing the shells to watching your little seedlings sprout and flourish.
Don’t be afraid to experiment and adapt the method to suit your own needs and preferences. The beauty of DIY gardening lies in its flexibility and the opportunity to learn and grow along the way.
We’re confident that you’ll be amazed by the results. And most importantly, we want to hear about your experience! Share your photos, tips, and stories with us in the comments below. Let’s create a community of coconut shell gardeners and inspire others to embrace sustainable and creative gardening practices. Happy growing!
Frequently Asked Questions (FAQ)
What type of lettuce grows best in coconut shells?
Loose-leaf lettuce varieties like Romaine, Butterhead, and Oakleaf are ideal for growing in coconut shells. These types of lettuce have shallow root systems and don’t require a lot of space to thrive. They also tend to mature quickly, allowing you to harvest fresh leaves regularly. Avoid head lettuce varieties like iceberg, as they require more space and may not perform as well in the limited confines of a coconut shell.
How often should I water my lettuce growing in coconut shells?
Watering frequency depends on several factors, including the weather, the type of potting mix you’re using, and the size of the coconut shell. Generally, you should water your lettuce when the top inch of soil feels dry to the touch. During hot, sunny weather, you may need to water daily, while during cooler or cloudy weather, you can water every other day. Ensure the coconut shell has adequate drainage to prevent waterlogging, which can lead to root rot. A good rule of thumb is to water thoroughly until you see water draining from the bottom of the shell.
What kind of soil should I use for growing lettuce in coconut shells?
A well-draining potting mix is essential for growing healthy lettuce in coconut shells. Avoid using garden soil, as it can be too heavy and compact, hindering drainage and aeration. A good potting mix should contain a blend of peat moss, perlite, and vermiculite. You can also add compost to provide extra nutrients. Consider using a potting mix specifically formulated for vegetables or herbs for optimal results.
Do I need to fertilize my lettuce growing in coconut shells?
Yes, lettuce growing in coconut shells will benefit from regular fertilization. Since the coconut shell provides a limited amount of space and nutrients, you’ll need to supplement with fertilizer to ensure healthy growth. Use a balanced liquid fertilizer diluted to half strength and apply it every two to three weeks. Alternatively, you can use a slow-release fertilizer at the time of planting. Avoid over-fertilizing, as this can lead to leaf burn and other problems.
How much sunlight does lettuce growing in coconut shells need?
Lettuce thrives in full sun, but it can also tolerate partial shade. Aim for at least six hours of sunlight per day for optimal growth. If you live in a hot climate, providing some afternoon shade can help prevent the lettuce from bolting (going to seed prematurely). If you’re growing your lettuce indoors, use grow lights to provide adequate light.
How do I prevent pests and diseases from affecting my lettuce?
To prevent pests and diseases, start with healthy seedlings and use a well-draining potting mix. Regularly inspect your lettuce plants for signs of pests like aphids, slugs, and snails. You can remove these pests by hand or use organic pest control methods like insecticidal soap or neem oil. To prevent fungal diseases, ensure good air circulation around your plants and avoid overwatering. If you notice any signs of disease, remove the affected leaves immediately.
How long does it take for lettuce to grow in coconut shells?
The time it takes for lettuce to grow in coconut shells depends on the variety and growing conditions. Generally, you can expect to harvest your first lettuce leaves in about 30 to 45 days from planting. Loose-leaf lettuce varieties can be harvested continuously by picking individual leaves as needed.
Can I reuse the coconut shells after harvesting the lettuce?
Yes, you can reuse the coconut shells multiple times. After harvesting the lettuce, remove any remaining plant debris and wash the shell thoroughly. You may want to sterilize the shell with a diluted bleach solution to kill any potential pathogens. Allow the shell to dry completely before reusing it.
How do I prepare the coconut shell for planting?
First, ensure the coconut shell is clean and free of any remaining coconut meat. Drill drainage holes in the bottom of the shell to prevent waterlogging. You can also add a layer of gravel or small stones to the bottom of the shell to further improve drainage. Fill the shell with a well-draining potting mix and you’re ready to plant your lettuce seedlings.
What are the benefits of growing lettuce in coconut shells compared to traditional methods?
Growing lettuce in coconut shells offers several benefits, including improved drainage and aeration, reduced need for transplanting, and a more sustainable gardening practice. The coconut shell provides a natural container that helps regulate moisture levels and prevents root rot. It also eliminates the need to transplant seedlings, which can stress the plants and slow down their growth. Furthermore, reusing coconut shells is an environmentally friendly way to reduce waste and promote sustainable gardening.
Leave a Comment