
Growing peanuts at home might sound like a whimsical dream reserved for sprawling farms, but I’m here to tell you it’s an achievable and incredibly rewarding project, even in a small garden or container! Forget the store-bought variety for a moment and imagine the satisfaction of harvesting your own homegrown peanuts, bursting with fresh, nutty flavor.
Peanuts, also known as groundnuts, have a rich history, dating back thousands of years to South America. They weren’t always a staple in Western diets, but their journey across continents and cultures has made them a beloved snack and ingredient worldwide. From ancient Incan tombs to modern-day ballparks, the humble peanut has a fascinating story to tell.
But why should you bother with the effort of growing your own? Well, for starters, the taste is simply unparalleled. Freshly harvested peanuts have a sweetness and depth of flavor that you just can’t find in commercially produced ones. Plus, growing peanuts at home is a fantastic way to connect with nature, learn about the life cycle of a plant, and enjoy a truly unique gardening experience. In this article, I’ll share some simple DIY tricks and hacks that will help you successfully cultivate these delicious legumes, regardless of your gardening experience. Get ready to dig in and discover the joy of homegrown peanuts!
Growing Peanuts at Home: Your DIY Guide for a Successful Harvest
Hey garden friends! Have you ever wondered how peanuts actually grow? And even better: have you imagined growing them right in your own garden or even on your balcony? I’ll show you how it’s done! It’s easier than you think, and the sense of accomplishment from harvesting your own peanuts is simply priceless. Let’s get started!
What you need: The Preparation
Before we start planting, we naturally need the right materials and a little preparation. Don’t worry, you probably already have most of these things at home!
- Peanuts: Yes, obviously! But be careful: use raw, unroasted, and unsalted peanuts. The ones from the supermarket intended for direct consumption usually do not germinate. It’s best to get seed peanuts from a specialty store or online.
- Pots or a garden bed: Peanuts need space! Choose large pots (at least 30 cm / 12 inches in diameter and depth) or a garden bed with loose, well-draining soil.
- Soil: A mixture of garden soil, compost, and sand is ideal. The soil should be nutrient-rich but not too heavy.
- Sunlight: Peanuts love the sun! Choose a location that gets at least 6-8 hours of sun per day.
- Water: Regular watering is important, especially during the flowering period.
- Patience: Peanuts take time to mature. Be patient and don’t get discouraged if it doesn’t work out right away.
The Sowing: How to Get the Peanuts in the Ground
Now let’s get down to it! Sowing is the first step to your very own peanut harvest.
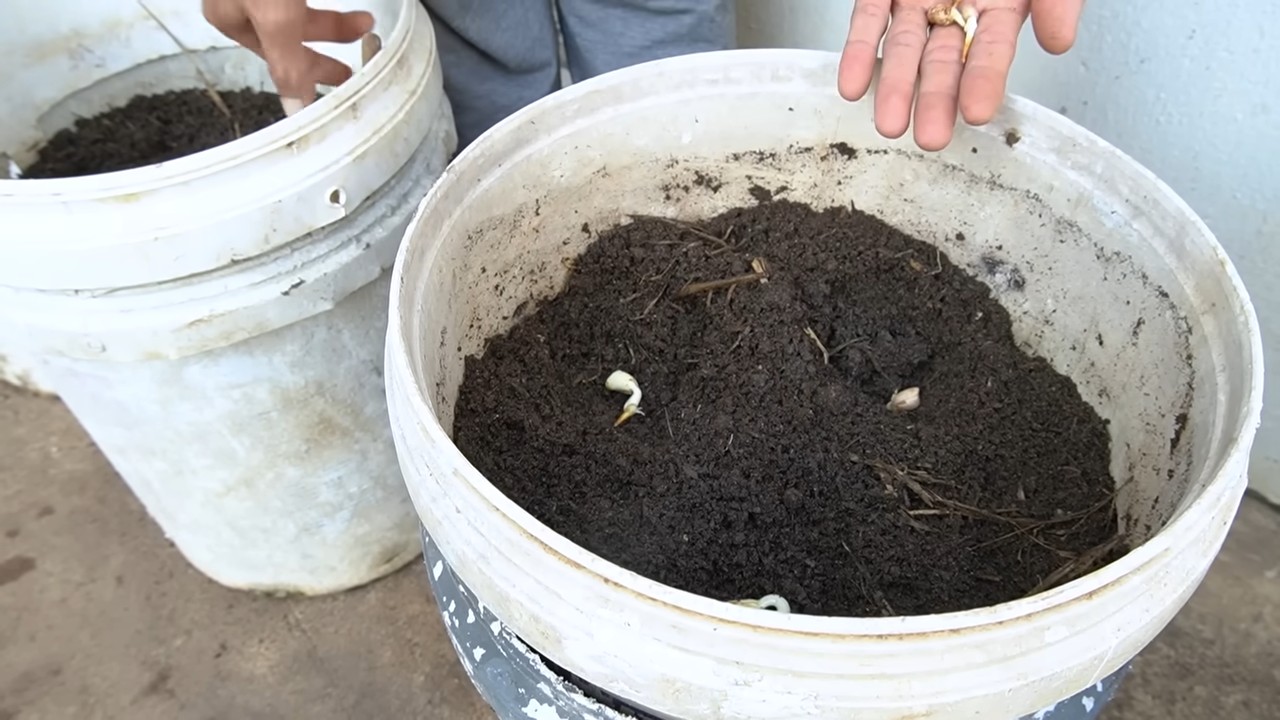
- Prepare the peanuts: Soak the peanuts in lukewarm water for 24 hours before sowing. This helps to speed up germination.
- Prepare pots or bed: Fill the pots with the prepared soil or loosen the soil in the garden bed.
- Sow the peanuts: Place the peanuts about 5 cm (2 inches) deep in the soil, with a spacing of about 15-20 cm (6-8 inches) between them.
- Water in: Gently water the soil so that it is well moistened.
- Keep warm: Peanuts germinate best at temperatures between 20 and 25 degrees Celsius (68-77°F). If it’s still too cold outside, you can start the pots indoors.
The Care: How to Keep Your Peanut Plants Healthy and Happy
After sowing, proper care is crucial for a bountiful harvest.
- Watering: Water the peanut plants regularly, especially during the flowering period. The soil should always be slightly moist, but not wet. Avoid waterlogging!
- Fertilizing: Fertilize the peanut plants every few weeks with an organic fertilizer. A fertilizer with a high phosphorus content promotes flower formation and the development of peanuts.
- Weeding: Keep the bed or pots free of weeds. Weeds compete with the peanut plants for nutrients and water.
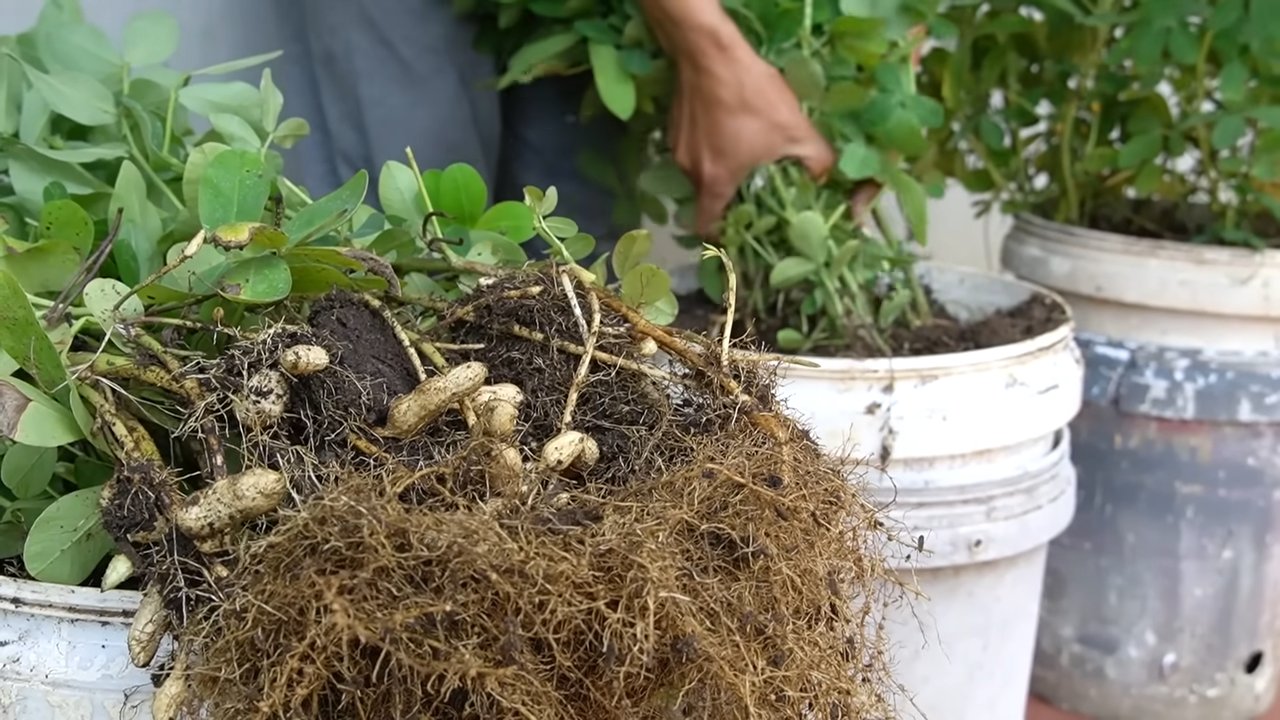
- Hilling: This is an important step! When the peanut plants bloom, they form what are called “pegs.” These are small stems that burrow into the soil and form the peanuts there. Let’s help them! Mound the soil up around the plants so the pegs can more easily penetrate the soil. It’s best to repeat this process every few weeks.
- Pests and diseases: Watch out for pests like aphids or spider mites. If necessary, you can use biological pesticides. Peanuts are relatively robust, but fungal diseases can occur in overly wet weather. Ensure good ventilation and avoid waterlogging.
The Harvest: The Reward for Your Effort
After about 4-5 months, the time has finally come: the harvest is just around the corner!
- The right time: The best time to harvest is when the leaves of the peanut plants turn yellow and die back. This is a sign that the peanuts are ripe.
- The harvest: Gently pull the peanut plants out of the soil. The peanuts will be hanging on the roots.
- Cleaning: Shake the soil off the peanuts and wash them thoroughly.
- Drying: Lay the peanuts out to dry in a warm, dry, and well-ventilated place. This can be in the garden, on the balcony, or in a well-ventilated room. The peanuts should dry for about 2-3 weeks.
- Storing: Store the dried peanuts in a cool, dry, and dark place. They will keep for several months this way.
Additional Tips for a Successful Peanut Harvest
Here are a few more tips that can help you optimize your peanut harvest:
- Variety selection: There are different varieties of peanuts that differ in size, taste, and maturation time. Find out which variety is best suited for your region.
- Soil improvement: If your soil is very clayey or sandy, you can improve it with compost or other organic materials. This ensures better drainage and nutrient supply.
- Crop rotation: Do not plant peanuts in the same location every year. Crop rotation helps to keep the soil healthy and prevent diseases.
- Bird protection: Birds love peanuts! If you have problems with birds, you can protect the plants with a net.
- Experiment: Don’t be afraid to experiment! Try different cultivation methods and find out what works best for you.
Avoiding Common Mistakes: How to Guarantee Success
To ensure your peanut harvest is a complete success, you should avoid these common mistakes:
- Wrong peanuts: Only use raw, unroasted, and unsalted peanuts.
- Too little sun: Peanuts need a lot of sun to grow.
- Too much water: Waterlogging can lead to fungal diseases.
- Not enough hilling: Hilling is important so that the pegs can penetrate the soil.
- Harvesting too early: Wait until the leaves turn yellow and die back before you harvest.
Conclusion: Growing Your Own Peanuts is a Great Experience!
I hope this guide has encouraged you to grow your own peanuts. It’s a wonderful experience to see how magnificent plants grow from small peanuts, ultimately yielding a delicious harvest. With a little patience and care, you can soon be enjoying your very own homegrown peanuts! Good luck and have fun gardening!
Conclusion
So, there you have it! Growing peanuts at home is not only achievable but also a deeply rewarding experience. Forget the store-bought, often bland, and potentially pesticide-laden peanuts. Imagine the satisfaction of harvesting your own crop, knowing exactly where they came from and how they were grown. This DIY project transforms your garden into a source of fresh, flavorful, and healthy snacks.
Why is this a must-try? Because it connects you to the food you eat in a tangible way. It’s an educational experience for the whole family, teaching valuable lessons about plant life cycles, sustainable gardening, and the sheer joy of nurturing something from seed to harvest. Plus, the taste of homegrown peanuts is simply unparalleled. They are sweeter, nuttier, and bursting with flavor that you just can’t find in commercially grown varieties.
But the benefits don’t stop there. Growing peanuts can also improve your soil. As legumes, peanut plants fix nitrogen in the soil, enriching it for future crops. They also provide ground cover, helping to suppress weeds and retain moisture. It’s a win-win situation for your garden ecosystem.
Feeling adventurous? Consider these variations to spice up your peanut-growing journey. Try different peanut varieties! Virginia peanuts are known for their large size and are great for roasting. Spanish peanuts are smaller and have a reddish skin, perfect for peanut butter. Valencia peanuts are sweet and often used for boiling. Experimenting with different varieties will allow you to discover your personal favorite.
You can also explore different roasting methods. While oven roasting is the most common, try roasting your peanuts in a skillet for a more intense flavor. Or, for a truly unique experience, try smoking your peanuts on a grill or smoker. The smoky flavor adds a whole new dimension to this already delicious snack.
Don’t be afraid to get creative with your peanut harvest. Use them in homemade peanut butter, add them to salads, stir-fries, or even desserts. The possibilities are endless!
We understand that embarking on a new gardening project can be daunting, but we assure you that growing peanuts at home is easier than you might think. With a little planning, preparation, and patience, you’ll be enjoying your own homegrown peanuts in no time.
So, what are you waiting for? Grab some peanut seeds, find a sunny spot in your garden, and get ready to experience the joy of growing your own peanuts. We are confident that you’ll find it to be a fulfilling and delicious adventure.
We encourage you to try this DIY trick and share your experience with us. Let us know what variety you grew, what challenges you faced, and what delicious creations you made with your harvest. Share your photos and stories on social media using #HomegrownPeanuts. We can’t wait to see what you create!
Ready to Grow Your Own?
Don’t delay! Start planning your peanut patch today. The satisfaction of harvesting your own homegrown peanuts is an experience you won’t want to miss.
FAQ
What is the best time to plant peanuts?
The ideal time to plant peanuts is after the last frost, when the soil temperature has warmed to at least 65 degrees Fahrenheit (around 18 degrees Celsius). This is typically in late spring or early summer, depending on your climate. Planting too early can result in poor germination and stunted growth. In warmer climates with longer growing seasons, you may even be able to get two crops of peanuts in a single year.
How much space do peanut plants need?
Peanut plants need adequate space to spread and develop their underground pods. A good rule of thumb is to space plants about 6-8 inches apart in rows that are 2-3 feet apart. This allows for sufficient sunlight, air circulation, and room for the plants to grow without overcrowding. Overcrowding can lead to reduced yields and increased susceptibility to diseases.
What kind of soil is best for growing peanuts?
Peanuts thrive in well-drained, sandy loam soil. This type of soil allows the pegs (the structures that develop into peanut pods) to easily penetrate the ground. Avoid heavy clay soils, as they can become compacted and hinder pod development. The soil should also be slightly acidic, with a pH between 6.0 and 6.5. Before planting, amend your soil with compost or other organic matter to improve drainage and fertility.
How often should I water my peanut plants?
Peanut plants need consistent moisture, especially during flowering and pod development. Water deeply and regularly, aiming for about 1 inch of water per week. Avoid overwatering, as this can lead to root rot and other fungal diseases. Monitor the soil moisture levels and adjust your watering schedule accordingly. During periods of drought, you may need to water more frequently.
Do peanut plants need fertilizer?
While peanuts are legumes and can fix nitrogen in the soil, they still benefit from fertilization. Apply a balanced fertilizer (e.g., 10-10-10) at planting time, following the instructions on the fertilizer package. Avoid over-fertilizing with nitrogen, as this can promote excessive foliage growth at the expense of pod development. You can also side-dress your plants with compost tea or other organic fertilizers during the growing season.
How long does it take for peanuts to mature?
Peanuts typically take 120-150 days to mature, depending on the variety and growing conditions. You’ll know your peanuts are ready to harvest when the foliage begins to yellow and the pods are mature and plump. To check for maturity, dig up a few plants and examine the pods. The inside of the pods should be dark and the kernels should be fully developed.
How do I harvest peanuts?
Harvesting peanuts involves digging up the entire plant, including the roots and pods. Use a garden fork or shovel to carefully lift the plants from the ground. Shake off any excess soil and allow the plants to dry in the sun for a few days. This will help to cure the peanuts and improve their flavor.
How do I cure and store peanuts?
After drying the peanut plants in the sun, you can cure the peanuts by hanging them in a well-ventilated area for several weeks. This allows the peanuts to dry completely and develop their full flavor. Once cured, you can remove the peanuts from the plants and store them in airtight containers in a cool, dry place. Properly cured and stored peanuts can last for several months.
Can I grow peanuts in containers?
Yes, you can grow peanuts in containers, but you’ll need to choose a large container (at least 18 inches in diameter) to accommodate the plant’s root system. Use a well-draining potting mix and provide plenty of sunlight and water. Container-grown peanuts may not produce as many pods as those grown in the ground, but they can still provide a satisfying harvest.
Are there any common pests or diseases that affect peanut plants?
Yes, peanut plants can be susceptible to various pests and diseases, including aphids, spider mites, leaf spot, and root rot. Monitor your plants regularly and take action to control any infestations or diseases as soon as they appear. Use organic pest control methods whenever possible, such as insecticidal soap or neem oil. Ensure good air circulation and avoid overwatering to prevent fungal diseases. Crop rotation can also help to reduce the risk of soilborne diseases.
Leave a Comment