
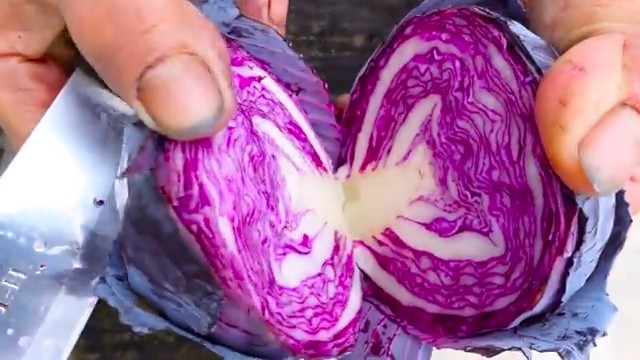
Growing Queen Cabbage might sound like something reserved for royalty, but trust me, you don’t need a green thumb blessed by a king to cultivate these beauties in your own backyard! Have you ever dreamed of harvesting cabbages so vibrant and impressive they’d make your neighbors green with envy? Well, this DIY guide is your royal decree to cabbage-growing success!
Cabbage, in its various forms, has been a staple food for centuries, gracing tables from ancient Rome to medieval Europe. It’s a symbol of sustenance and simple, wholesome living. But let’s be honest, store-bought cabbage can sometimes be… underwhelming. That’s where the magic of home gardening comes in.
I’m going to let you in on some secrets to growing Queen Cabbage that will transform your garden into a cabbage kingdom. We’ll explore simple yet effective DIY tricks and hacks that will help you nurture healthy, robust plants, even if you’re a complete beginner. Imagine the satisfaction of serving up a delicious, homegrown cabbage dish, knowing you nurtured it from seed to table. This article will give you the knowledge to do just that. So, grab your gardening gloves, and let’s get started on this exciting journey!
Growing Tree Kale Yourself: Your Comprehensive DIY Guide
Hey garden friends! Have you ever heard of tree kale? It’s not just any cabbage, but a real superfood that is incredibly versatile and also looks amazing. I’ll show you how to grow this giant in your own garden. Don’t worry, it’s easier than you think!
What is Tree Kale Anyway?
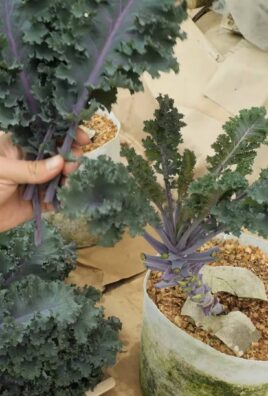
Tree kale, also known as tree cabbage (Brassica oleracea var. ramosa), is a type of kale that can grow up to 3 meters (almost 10 feet) high! The leaves are edible and very nutritious. It is winter-hardy and can provide you with fresh vegetables even in the cold months. Plus, it’s a real eye-catcher in the garden.
Why Grow Tree Kale Yourself?
- Fresh and healthy harvest: You know exactly what’s in your kale – no pesticides, no unnecessary additives.
- Sustainability: Short transport routes protect the environment.
- Cost savings: Once planted, tree kale will provide you with a harvest for years to come.
- Unique eye-catcher: Tree kale is a real standout in any garden.
- Versatile use: Whether in smoothies, chips, stews, or salads – tree kale is super versatile.
The Right Preparation is Everything
Before we get started, we need to make sure we have everything we need. Here is a list of the most important things:
- Tree kale seeds: Preferably from a trusted supplier. Look for organic quality!
- Seed starting mix: Special soil for starting young plants.
- Seedling pots or trays: Small containers for sowing.
- Garden soil: Good, nutrient-rich soil for the final location in the garden.
- Compost or organic fertilizer: To improve soil quality.
- Watering can or spray bottle: For watering.
- Plant stakes: To support the young plants.
- Slug pellets or fences: For protection against slugs.
- Patience: Tree kale needs some time to grow.
Sowing and Starting: The Beginning of the Kale Adventure
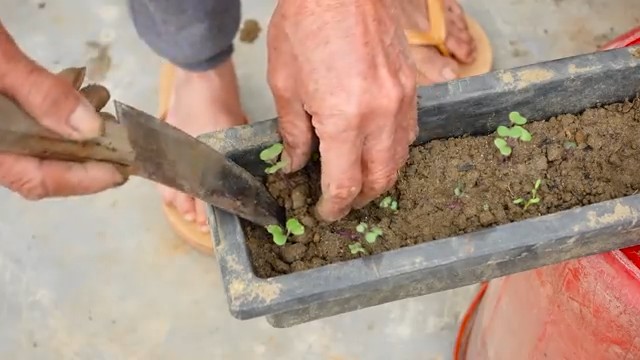
Starting the seeds is the first step to your own tree kale. I recommend starting the seeds indoors in the spring (March/April).
- Preparation of the seedling pots: Fill the seedling pots or trays with seed starting mix. Lightly press the soil down.
- Sowing the seeds: Place 1-2 seeds in each pot. Cover the seeds with a thin layer of soil (approx. 0.5 cm / 0.2 inches).
- Watering: Moisten the soil gently with a spray bottle or watering can. The soil should be moist, but not wet.
- Location: Place the seedling pots in a bright and warm place (approx. 18-20°C / 64-68°F). A windowsill or a greenhouse is ideal.
- Moisture: Keep the soil evenly moist. Avoid waterlogging.
- Germination: The seeds should germinate after about 1-2 weeks.
- Pricking out: As soon as the young plants have 2-3 true leaves, you can prick them out. This means transplanting the plants into larger pots so they have more space to grow.
Transplanting into the Garden: The Tree Kale Moves Out
Once the young plants are strong enough (approx. 15-20 cm / 6-8 inches high), they can move into the garden. This is usually the case in May/June, when there is no more danger of frost.
- Preparation of the soil: Choose a sunny location for your tree kale. The soil should be well-draining and rich in nutrients. Loosen the soil and remove weeds. Mix in compost or organic fertilizer to improve the soil quality.
- Planting distance: Tree kale needs a lot of space. Plan for a distance of at least 1 meter (about 3 feet) between plants.
- Planting holes: Dig planting holes that are large enough to accommodate the root balls of the young plants.
- Placing the plants: Carefully remove the young plants from their pots and place them in the planting holes. Be careful not to damage the root balls.
- Filling the planting holes: Fill the planting holes with soil and press it down lightly.
- Watering: Water the plants thoroughly.
- Staking: Since tree kale can get very tall, it is advisable to support the plants with stakes.
Care of Tree Kale: So It Thrives Beautifully
Caring for tree kale is relatively simple, but there are a few things you should keep in mind.
- Watering: Tree kale needs regular water, especially in dry periods. Make sure the soil is always moist, but avoid waterlogging.
- Fertilizing: Fertilize the tree kale regularly with compost or organic fertilizer. This ensures healthy growth and a rich harvest.
- Weed control: Regularly remove weeds from around the plants. Weeds compete with the tree kale for nutrients and water.
- Pest protection: Tree kale is susceptible to various pests, such as slugs, cabbage white butterflies, and aphids.
- Slugs: Sprinkle slug pellets around the plants or use slug fences.
- Cabbage whites: Regularly check the plants for caterpillars and remove them if necessary. You can also stretch a net over the plants to keep the butterflies away.
- Aphids: Spray the plants with a natural insecticide or use beneficial insects like ladybugs.
- Removing old leaves: Regularly remove old and yellow leaves. This promotes the growth of new leaves and prevents diseases.
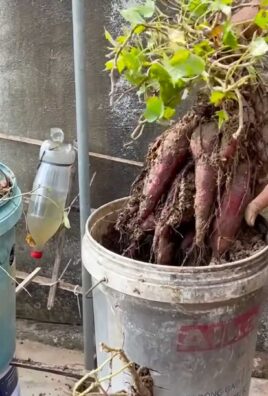
Harvesting Tree Kale: The Reward for Your Efforts
The harvest of tree kale can take place over a long period. You can harvest the leaves as needed as soon as they are large enough.
- Harvest time: The harvest can be from late summer into winter. The leaves are tastiest when they are still young and tender.
- Harvesting method: Break or cut the leaves off from the bottom up. Leave the top leaves so the plant can continue to grow.
- Storage: Tree kale leaves do not last long. It is best to process them immediately after harvesting. They can be stored in the refrigerator for a few days.
Using Tree Kale: Versatile and Delicious
Tree kale is incredibly versatile and can be prepared in many different ways.
- Smoothies: Add a few leaves of tree kale to your smoothie for an extra nutrient boost.
- Chips: Bake tree kale leaves in the oven to make crispy chips.
- Stews: Use tree kale in stews and soups.
- Salads: Cut tree kale into fine strips and add it to salads.
- Cooked: Steam or boil tree kale as a side dish for meat or fish.
Common Problems and Solutions
Even when growing tree kale, problems can occur.
Conclusion
So, there you have it! Growing your own Queen Cabbage isn’t just a gardening project; it’s an investment in flavor, freshness, and a deeper connection with the food you eat. We’ve walked through the process, highlighting the key steps to ensure your success, from selecting the right seeds to harvesting your prize-winning cabbage.
But why should you bother with all this effort when you can simply buy a cabbage at the store? The answer lies in the unparalleled quality and satisfaction that comes from nurturing something from seed to table. Store-bought cabbages, while convenient, often lack the vibrant flavor and crisp texture of a homegrown Queen Cabbage. Plus, you have complete control over the growing process, ensuring that your cabbage is free from harmful pesticides and grown with the utmost care.
Think of the possibilities! Imagine using your homegrown Queen Cabbage in a variety of delicious dishes. From classic coleslaw and sauerkraut to hearty soups and stir-fries, the versatility of this vegetable is truly remarkable. And the taste? Unmatched. The sweetness and subtle peppery notes of a freshly harvested Queen Cabbage will elevate your culinary creations to a whole new level.
Don’t be afraid to experiment with different varieties of Queen Cabbage. While we’ve focused on the traditional green variety, there are also red and savoy types that offer unique flavors and textures. Consider trying a red Queen Cabbage for a vibrant addition to your salads or a savoy Queen Cabbage for its tender leaves and slightly milder flavor. You can also adjust the growing conditions to influence the size and density of your cabbage heads. For example, providing ample sunlight and water will encourage larger, more robust growth.
We understand that gardening can sometimes seem daunting, especially for beginners. But with a little patience and attention to detail, you can successfully grow your own Queen Cabbage. Remember to start with good quality seeds, provide well-drained soil, and protect your plants from pests and diseases. And don’t be afraid to ask for help! There are many online resources and gardening communities that can offer valuable advice and support.
The real magic of growing your own Queen Cabbage lies in the journey itself. From the moment you sow the seeds to the day you harvest your first cabbage, you’ll experience a sense of accomplishment and connection to nature that is truly rewarding. So, grab your gardening gloves, get your hands dirty, and embark on this exciting adventure.
We are confident that you’ll be amazed by the results. And once you’ve tasted the difference between a store-bought cabbage and a homegrown Queen Cabbage, you’ll never go back.
We encourage you to try this DIY trick and share your experience with us. Post photos of your Queen Cabbage on social media using #HomegrownQueenCabbage and let us know how it turned out. We can’t wait to see your beautiful cabbages and hear about your culinary creations! Happy gardening!
Frequently Asked Questions (FAQ)
What exactly is a Queen Cabbage and why should I grow it?
Queen Cabbage isn’t a specific variety, but rather a term we’re using to emphasize the superior quality and experience of growing your own cabbage from seed. It represents the best possible cabbage you can cultivate at home. You should grow it because the flavor and freshness are unmatched compared to store-bought options. You have complete control over the growing process, ensuring it’s free from pesticides and grown with care. Plus, it’s incredibly rewarding to nurture something from seed to table!
How long does it take to grow a Queen Cabbage?
The time it takes to grow a Queen Cabbage depends on the variety you choose and the growing conditions. Generally, you can expect it to take anywhere from 70 to 120 days from seed to harvest. Early varieties mature faster, while later varieties require a longer growing season. Be sure to check the seed packet for specific information on the variety you’re growing. Factors like sunlight, temperature, and soil fertility also play a role in the growth rate.
What are the best growing conditions for Queen Cabbage?
Queen Cabbage thrives in cool weather with plenty of sunlight. Aim for at least 6 hours of direct sunlight per day. The ideal temperature range is between 60°F and 70°F (15°C and 21°C). The soil should be well-drained and rich in organic matter. Amend the soil with compost or aged manure before planting to improve its fertility and drainage. Cabbage also prefers a slightly acidic to neutral soil pH, around 6.0 to 7.0.
How often should I water my Queen Cabbage?
Water your Queen Cabbage regularly, especially during dry periods. Aim to keep the soil consistently moist but not waterlogged. Water deeply at the base of the plant, avoiding wetting the leaves, which can increase the risk of fungal diseases. Mulching around the plants can help retain moisture in the soil and suppress weed growth. The frequency of watering will depend on the weather conditions and the type of soil you have. Check the soil moisture regularly and water when the top inch feels dry to the touch.
What are some common pests and diseases that affect Queen Cabbage?
Queen Cabbage can be susceptible to various pests and diseases, including cabbage worms, aphids, flea beetles, clubroot, and black rot. To prevent pest and disease problems, practice good garden hygiene, such as removing plant debris and weeds. Use row covers to protect young plants from pests. Inspect your plants regularly for signs of infestation or disease and take action promptly. Organic pest control methods, such as insecticidal soap or neem oil, can be effective against many common pests. For diseases, ensure good air circulation and avoid overhead watering. If necessary, use a fungicide labeled for use on cabbage.
Can I grow Queen Cabbage in containers?
Yes, you can grow Queen Cabbage in containers, but you’ll need to choose a large container that is at least 12 inches in diameter and 12 inches deep. Use a well-draining potting mix and provide regular watering and fertilization. Container-grown cabbages may require more frequent watering than those grown in the ground. Choose a sunny location for your container and protect the plants from strong winds.
How do I know when my Queen Cabbage is ready to harvest?
Your Queen Cabbage is ready to harvest when the head is firm and solid to the touch. The size of the head will vary depending on the variety you’re growing, but generally, it should be about 6 to 8 inches in diameter. To harvest, use a sharp knife to cut the cabbage head from the stem, leaving a few outer leaves intact.
What are some creative ways to use my homegrown Queen Cabbage?
The possibilities are endless! You can use your homegrown Queen Cabbage in classic dishes like coleslaw, sauerkraut, and stuffed cabbage rolls. It’s also delicious in soups, stews, stir-fries, and salads. Try shredding it and adding it to tacos or using it as a topping for burgers. You can even grill or roast cabbage wedges for a simple and flavorful side dish. Don’t forget to experiment with different seasonings and sauces to create your own unique cabbage recipes.
What if my Queen Cabbage doesn’t form a tight head?
Several factors can contribute to a cabbage not forming a tight head, including insufficient sunlight, lack of water, poor soil fertility, or pest infestations. Ensure that your plants are receiving at least 6 hours of direct sunlight per day and are being watered regularly. Amend the soil with compost or aged manure to improve its fertility. Protect your plants from pests and diseases. If your cabbage still doesn’t form a tight head, it may be due to the variety you’re growing. Some varieties are simply looser than others.
Can I save seeds from my Queen Cabbage for next year?
Saving seeds from cabbage can be a bit challenging, as cabbage is a biennial plant, meaning it typically takes two years to produce seeds. Also, cabbage readily cross-pollinates with other members of the Brassica family, such as broccoli and kale, so you’ll need to isolate your cabbage plants to prevent cross-pollination. If you’re determined to save seeds, choose a healthy, disease-free plant and allow it to overwinter. In the second year, the plant will produce flowers and then seeds. Collect the seeds when they are dry and brown. Store them in a cool, dry place. However, keep in mind that the seeds may not produce plants that are true to type due to the risk of cross-pollination. For best results, it’s generally recommended to purchase fresh seeds each year.
Leave a Comment