
Growing water spinach in bottles? Yes, you read that right! Forget sprawling gardens and endless weeding; we’re diving into a super-efficient, space-saving, and frankly, pretty cool way to cultivate this delicious leafy green. Have you ever dreamed of fresh, organic veggies right outside your kitchen window, even if you live in a tiny apartment? Well, dream no more!
Water spinach, also known as Ong Choy or Kang Kong, has been a staple in Asian cuisine for centuries. From stir-fries to soups, its mild flavor and crisp texture make it incredibly versatile. But traditionally, growing it required a dedicated garden plot or a flooded paddy. Not anymore! We’re taking this age-old vegetable and giving it a modern, DIY twist.
In today’s fast-paced world, many of us crave a connection to nature, but lack the time or space for traditional gardening. That’s where this DIY trick comes in. Growing water spinach in bottles is the perfect solution for urban dwellers, apartment residents, or anyone looking to maximize their harvest in a minimal footprint. It’s also a fantastic way to recycle plastic bottles and reduce waste. Plus, imagine the satisfaction of harvesting your own fresh greens, knowing exactly where they came from and what went into them. So, grab your empty bottles, and let’s get started on this exciting gardening adventure!
Growing Water Spinach at Home: A DIY Guide for Bottle Gardeners
Hello dear plant friends! Do you fancy fresh, crunchy water spinach straight from your kitchen? Then you’ve come to the right place! I’ll show you how you can easily grow this delicious and fast-growing green in recycled plastic bottles. It’s a great project for beginners, saves space, and is a lot of fun!
What you need:
- Plastic bottles: 1.5-liter or 2-liter bottles are best. The bigger, the better, but smaller bottles work too.
- Water spinach seeds: These are available online or in well-stocked garden centers. Make sure the seeds are fresh.
- Coconut coir or seed starting mix: This is your substrate in which the seeds will germinate and the plants will grow. Coconut coir is a sustainable alternative to peat.
- Expanded clay or gravel: For drainage at the bottom of the bottle.
- Scissors or a knife: For cutting the bottles.
- Water: Clear water for soaking the seeds and for watering.
- Dark foil or paint (optional): To protect the bottles from algae growth.
- Spray bottle: For moistening the soil.
Preparation is everything: Prepping the bottles
- Clean bottles: First, you need to clean the plastic bottles thoroughly. Remove all labels and rinse them with warm water and dish soap. Make sure no soap residue is left behind.
- Cut bottles: Now comes the fun part! There are several ways to cut the bottles. I prefer to cut the bottle about 10-15 cm below the bottle neck. This gives you an upper part (with the neck) and a lower part (the body of the bottle). The upper part will later be inverted and placed into the lower part.
- Drill drainage holes: Now drill a few drainage holes in the lower part of the bottle (the body). This is important so that excess water can drain away and the roots do not rot. Make sure the holes are not too large, so the soil doesn’t fall out.
- Darken bottles (optional): Water spinach grows best when its roots are in the dark. To prevent algae formation, you can wrap the bottles with dark foil or paint them with a dark color. However, leave the upper part of the bottle (the neck) clear so that light can reach the leaves.
Bringing the seeds to life: Sowing and germination
- Soak seeds: Before you sow the seeds, you should soak them in lukewarm water for about 12-24 hours. This speeds up germination.
- Add drainage: Now, put a layer of expanded clay or gravel in the lower part of the bottle (the body). This ensures good drainage and prevents waterlogging.
- Fill with substrate: Fill the upper part of the bottle (the neck) with coconut coir or seed starting mix. Leave about 2-3 cm of space to the rim.
- Sow seeds: Distribute the soaked water spinach seeds evenly on the soil. Press them down lightly and cover them with a thin layer of soil.
- Water and moisten: Gently water the soil with a spray bottle. The soil should be moist, but not wet.
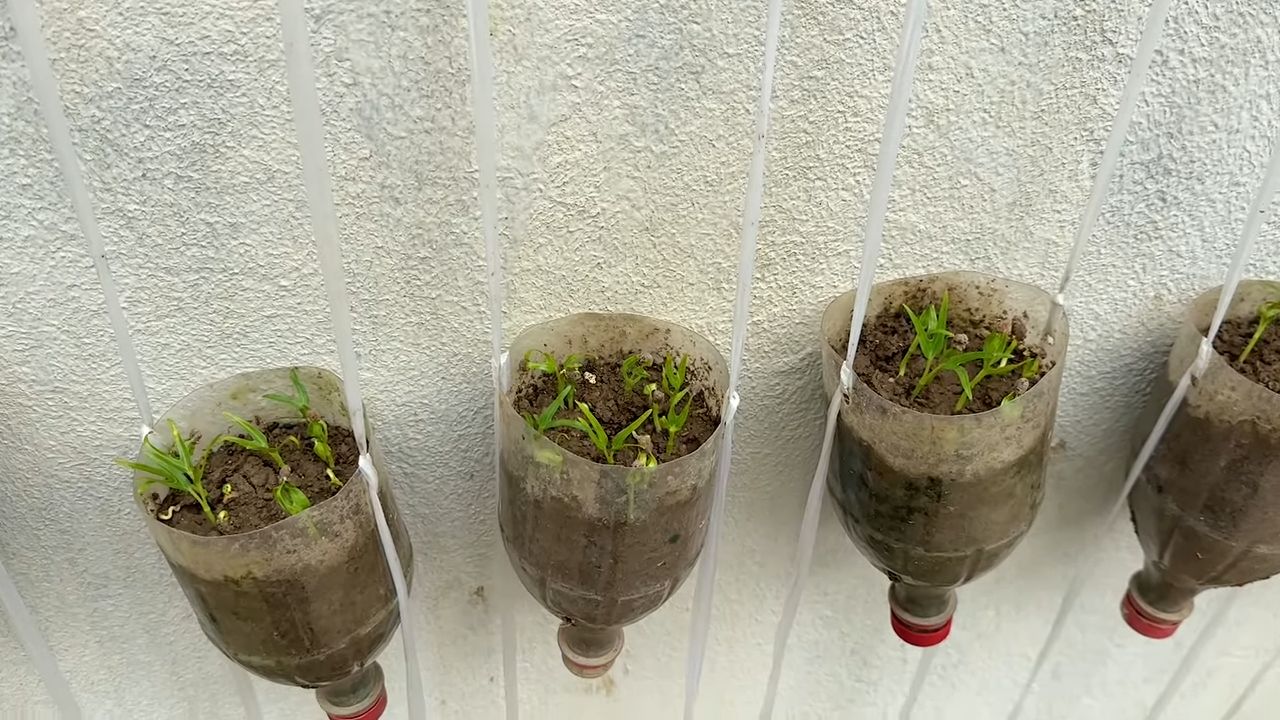
- Assemble the bottles: Insert the upper part of the bottle (with the soil and seeds) upside down into the lower part of the bottle (with the drainage).
- Choose a location: Place the bottles in a bright, warm place. Water spinach needs a lot of light to grow well. A windowsill is ideal.
Care and harvest: From seed to salad
- Check moisture: Make sure the soil always stays moist. Water regularly with a spray bottle or pour water into the lower part of the bottle so the soil can soak it up from below.
- Fertilize (optional): If you like, you can fertilize the water spinach every few weeks with an organic liquid fertilizer. This promotes growth.
- Light: Water spinach needs a lot of light. If you don’t have enough natural light, you can use a plant lamp.
- Ventilation: Ensure good ventilation to prevent mold growth.
- Harvest: After about 4-6 weeks, you can harvest the first water spinach. Simply cut the leaves with scissors. The water spinach will grow back again, so you can harvest several times.
Common Problems and Solutions
- Algae growth: If algae forms in the bottle, you can wrap the bottle with dark foil or paint it with a dark color.
- Mold growth: If mold forms on the soil, provide better ventilation and water less.
- Yellow leaves: Yellow leaves can be a sign of a nutrient deficiency. Fertilize the water spinach with an organic liquid fertilizer.
- Pests: Water spinach is relatively resistant to pests. If you do find pests, you can combat them with a biological pesticide.
Additional Tips and Tricks
- Different varieties: There are different varieties of water spinach. Try out different kinds to find out which one you like best.
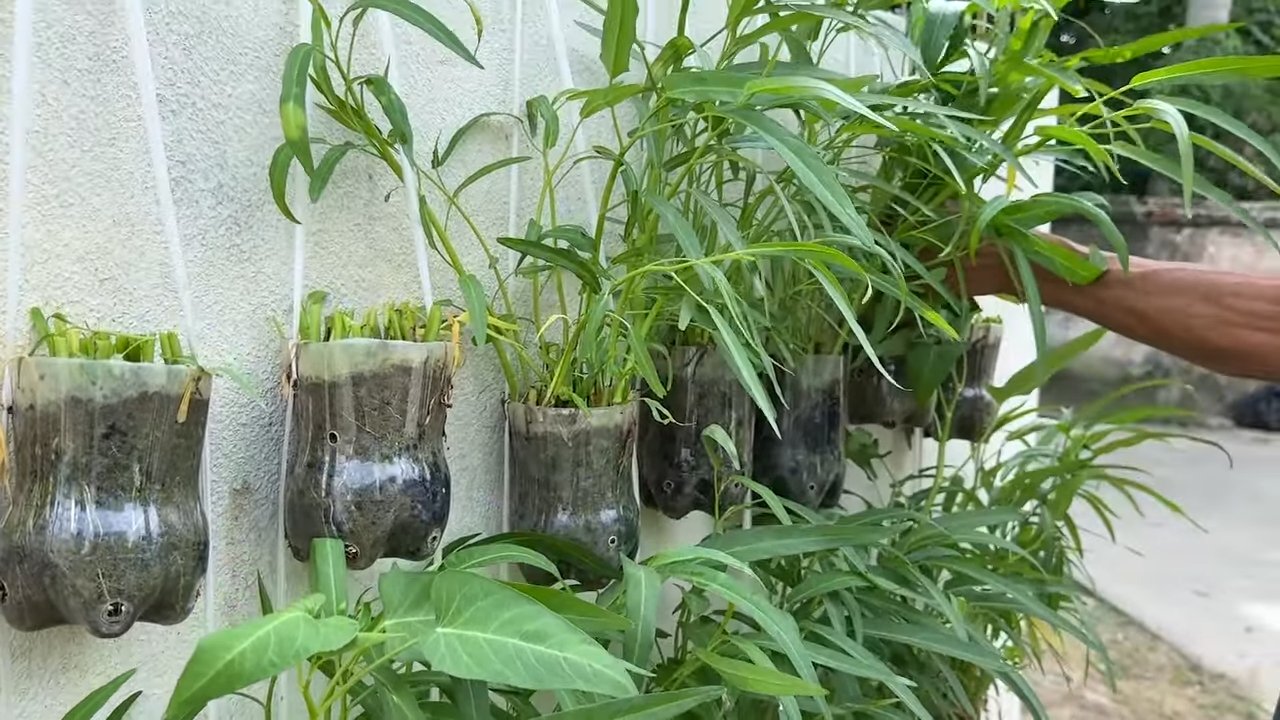
- Vertical gardening: You can also attach the bottles to a wall to create a vertical garden bed.
- Combination with other plants: Water spinach combines well with other plants, e.g., with herbs or lettuce.
- Regular harvesting: By harvesting regularly, you encourage the growth of the water spinach.
Conclusion
I hope this guide has helped you to grow your own water spinach in bottles. It is a simple, inexpensive, and sustainable project that provides you with fresh, delicious greens. Happy gardening!
Conclusion
So, there you have it! Growing water spinach in bottles isn’t just a quirky gardening experiment; it’s a genuinely rewarding and practical way to bring fresh, nutritious greens right to your doorstep, even if you’re short on space. We’ve walked you through the simple steps, highlighting the ease and accessibility of this method. Forget complicated setups and expensive equipment – all you need are some recycled bottles, a sunny spot, and a little bit of patience.
But why is this DIY trick a must-try? Beyond the sheer convenience, consider the benefits: you’re reducing waste by repurposing plastic bottles, you’re controlling the growing environment, minimizing the risk of pests and diseases, and you’re enjoying the unparalleled flavor of homegrown water spinach. Store-bought varieties simply can’t compare to the crispness and freshness you’ll achieve with your own bottle garden. Plus, it’s incredibly satisfying to nurture a plant from seed to harvest, knowing you’ve played an active role in providing healthy food for yourself and your family.
Looking for variations? Absolutely! Experiment with different bottle sizes and configurations. Try using larger water cooler bottles for a more substantial yield, or create a vertical garden by stacking multiple bottles. You can also explore different growing mediums. While we recommended a soil-based mix, hydroponics is another viable option. Simply use a nutrient-rich water solution instead of soil, and ensure proper aeration for the roots. Consider adding companion plants like basil or mint to deter pests and enhance the flavor of your water spinach. You can even try growing different varieties of water spinach, such as the green-stemmed or white-stemmed types, to see which you prefer.
Don’t be afraid to get creative and personalize your bottle garden. The beauty of this DIY project lies in its adaptability. It’s a fantastic way to introduce children to gardening and teach them about the importance of sustainable living. It’s also a great conversation starter and a unique addition to any balcony, patio, or windowsill.
We wholeheartedly encourage you to give this **growing water spinach** in bottles method a try. It’s a simple, affordable, and incredibly rewarding way to enjoy fresh, homegrown greens. Once you experience the satisfaction of harvesting your own water spinach, you’ll wonder why you didn’t start sooner.
And most importantly, we want to hear about your experiences! Share your photos, tips, and challenges in the comments below. Let’s build a community of bottle gardeners and inspire others to embrace this sustainable and delicious way of growing their own food. What bottle types did you use? What growing medium worked best for you? Did you encounter any unexpected challenges? Your insights will be invaluable to other aspiring bottle gardeners. So, get started today, and let’s grow together!
Frequently Asked Questions (FAQ)
What kind of water spinach seeds should I use?
You can use any variety of water spinach seeds, but the most common types are the green-stemmed and white-stemmed varieties. Green-stemmed water spinach tends to be more vigorous and heat-tolerant, while white-stemmed water spinach is often considered to have a slightly milder flavor. Purchase your seeds from a reputable source to ensure good germination rates and healthy plants. Look for seeds that are specifically labeled for edible use.
How often should I water my water spinach plants in bottles?
Water spinach thrives in moist conditions, so you’ll need to water your plants regularly. The frequency of watering will depend on the climate, the size of the bottle, and the type of growing medium you’re using. As a general rule, check the soil moisture daily and water when the top inch feels dry to the touch. In hot weather, you may need to water more frequently, even twice a day. Ensure that the bottles have adequate drainage to prevent waterlogging, which can lead to root rot.
What kind of fertilizer should I use for my bottle garden?
Water spinach is a heavy feeder, so it benefits from regular fertilization. You can use a balanced liquid fertilizer, such as a 20-20-20 formula, diluted to half strength. Apply the fertilizer every two to three weeks, following the instructions on the product label. Alternatively, you can use organic fertilizers, such as compost tea or fish emulsion. These options provide essential nutrients while also improving the soil health. Avoid over-fertilizing, as this can lead to nutrient burn and damage the plants.
How much sunlight does water spinach need?
Water spinach needs at least six hours of direct sunlight per day to thrive. Choose a location for your bottle garden that receives plenty of sunlight throughout the day. If you live in a particularly hot climate, you may need to provide some afternoon shade to prevent the plants from scorching. If you don’t have access to enough natural sunlight, you can supplement with grow lights.
How long does it take for water spinach to grow in bottles?
Water spinach is a fast-growing plant, and you can typically start harvesting within four to six weeks of planting the seeds. The exact time will depend on the growing conditions, such as temperature, sunlight, and nutrient availability. Harvest the stems when they are about 12-18 inches long, cutting them a few inches above the soil line. This will encourage the plant to produce new shoots, allowing for continuous harvesting.
How do I prevent pests and diseases in my bottle garden?
Growing water spinach in bottles can help minimize the risk of pests and diseases, but it’s still important to take preventative measures. Regularly inspect your plants for any signs of infestation or disease. Common pests that may affect water spinach include aphids, spider mites, and whiteflies. You can control these pests by spraying the plants with insecticidal soap or neem oil. To prevent fungal diseases, ensure good air circulation and avoid overwatering. Remove any dead or diseased leaves promptly to prevent the spread of infection.
Can I grow water spinach indoors in bottles?
Yes, you can grow water spinach indoors in bottles, but you’ll need to provide adequate lighting. Place the bottles near a sunny window that receives at least six hours of direct sunlight per day. If you don’t have access to enough natural sunlight, you can supplement with grow lights. Use full-spectrum LED grow lights for best results. Ensure that the plants have good air circulation to prevent fungal diseases.
How do I harvest water spinach from bottles?
Harvesting water spinach is easy. Once the stems reach about 12-18 inches in length, use scissors or a sharp knife to cut them a few inches above the soil line. This will encourage the plant to produce new shoots, allowing for continuous harvesting. Harvest regularly to prevent the plants from becoming leggy and to encourage bushier growth.
What are some ways to use homegrown water spinach?
Water spinach is a versatile vegetable that can be used in a variety of dishes. It’s commonly used in stir-fries, soups, and salads. It can also be steamed, boiled, or sautéed. Water spinach has a mild, slightly sweet flavor that pairs well with garlic, ginger, and chili peppers. It’s a popular ingredient in Asian cuisine, particularly in Southeast Asia.
Is growing water spinach in bottles sustainable?
Absolutely! **Growing water spinach** in bottles is a highly sustainable practice. By repurposing plastic bottles, you’re reducing waste and minimizing your environmental impact. You’re also reducing your reliance on commercially grown produce, which often involves long-distance transportation and the use of pesticides and herbicides. Homegrown water spinach is a fresh, healthy, and environmentally friendly food source.

Leave a Comment