
Hanging bottle celery garden: Sounds intriguing, right? Imagine fresh, crisp celery stalks dangling gracefully from your balcony or kitchen window, ready to be snipped and added to your favorite soup or salad. Forget those wilted, expensive bunches from the grocery store! This isn’t just a gardening project; it’s a sustainable, space-saving, and downright cool way to grow your own food.
For centuries, humans have cultivated celery, tracing its origins back to the Mediterranean. While initially valued for its medicinal properties, celery gradually became a culinary staple. Now, we’re taking this ancient vegetable and giving it a modern, DIY twist!
Why should you try this hanging bottle celery garden hack? Well, let’s face it, not everyone has a sprawling backyard. Apartment dwellers, urban gardeners, and even those with limited mobility can enjoy the satisfaction of growing their own produce. Plus, repurposing plastic bottles is a fantastic way to reduce waste and contribute to a greener planet. I’m excited to share this simple yet effective method that will bring a touch of freshness and sustainability to your home. Get ready to transform those empty bottles into a thriving vertical garden!
Vertical Celery Garden from Plastic Bottles: A DIY Project for Everyone
Hello dear garden friends! Do you have very little space on your balcony or in your garden, but still want fresh celery? Then I have just the thing for you: a vertical celery garden made from recycled plastic bottles! This is not only super sustainable but also a real eye-catcher. And the best part: it’s incredibly easy to replicate! Let’s get started!
What you need:
- Plastic bottles: Large PET bottles (e.g., from water or juice) are best. Depending on how tall you want your vertical garden to be, you will need a corresponding number of bottles. I recommend at least 5-6 bottles for a good start.
- Celery: You can either buy celery at the supermarket and use the bases or get starter plants directly from a garden center.
- Soil: Regular potting soil is perfectly sufficient.
- Scissors or utility knife: For cutting the bottles. Please be careful!
- Drill or a nail and hammer: To make the holes for hanging.
- Sturdy rope or wire: For hanging the bottles.
- Watering can or hose: To water your plants.
- Optional: Spray paint or markers for decorating the bottles.
- Optional: Gravel or expanded clay pebbles for drainage.
Step-by-Step Guide:
1. Preparation of the Plastic Bottles
- Cleaning: First, you must clean the plastic bottles thoroughly. Remove all labels and rinse them with warm water and dish soap. Make sure no residue remains.
- Cutting: Now comes the tricky part. You need to cut the bottles so that they can be stacked on top of each other later and the celery has enough space to grow.
- The top bottle: For this one, you cut off the entire neck of the bottle. This will be your top planter.
- The remaining bottles: For the rest of the bottles, you cut a large hole in the side. This hole should be large enough for the celery to grow out of later. I recommend an oval shape, about 10-15 cm (4-6 inches) long and 5-8 cm (2-3 inches) wide. Make sure the hole is not too close to the bottom of the bottle, so the soil doesn’t fall out.
- Important: Leave the bottle neck on every bottle (except the top one). This serves as a “funnel” that directs water to the bottle below.
- Drainage holes: Drill or poke small holes in the bottom of each bottle with a nail and hammer. These holes ensure that excess water can drain away and waterlogging is avoided. Waterlogging is toxic to celery!
- Optional: Decoration: If you wish, you can now decorate the bottles with spray paint or markers. Let your creativity run wild! For example, you can paint them in different colors or add patterns. However, make sure the paint is non-toxic in case it comes into contact with the soil.
2. Planting the Celery
- Drainage: Fill a layer of gravel or expanded clay pebbles into each bottle (except the top one). This improves drainage and prevents the soil from clogging the drainage holes.
- Add soil: Now fill the bottles with soil. Make sure the soil is loose and airy. Do not press it down too firmly.
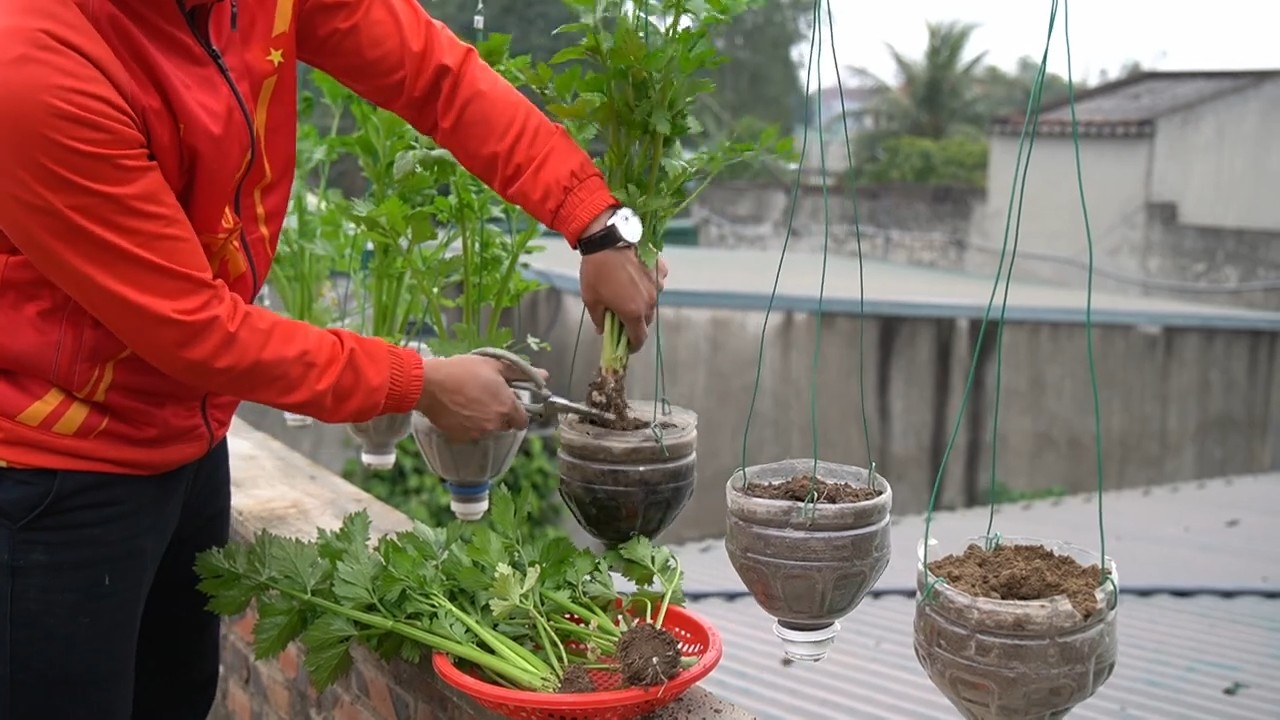
- Plant the celery: Now it’s the celery’s turn.
- Growing from bases: If you want to grow celery from the bases, place the celery bases in a glass of water. Change the water daily. After a few days, roots should start to form. Once the roots are about 2-3 cm (about an inch) long, you can plant the bases in the prepared bottles.
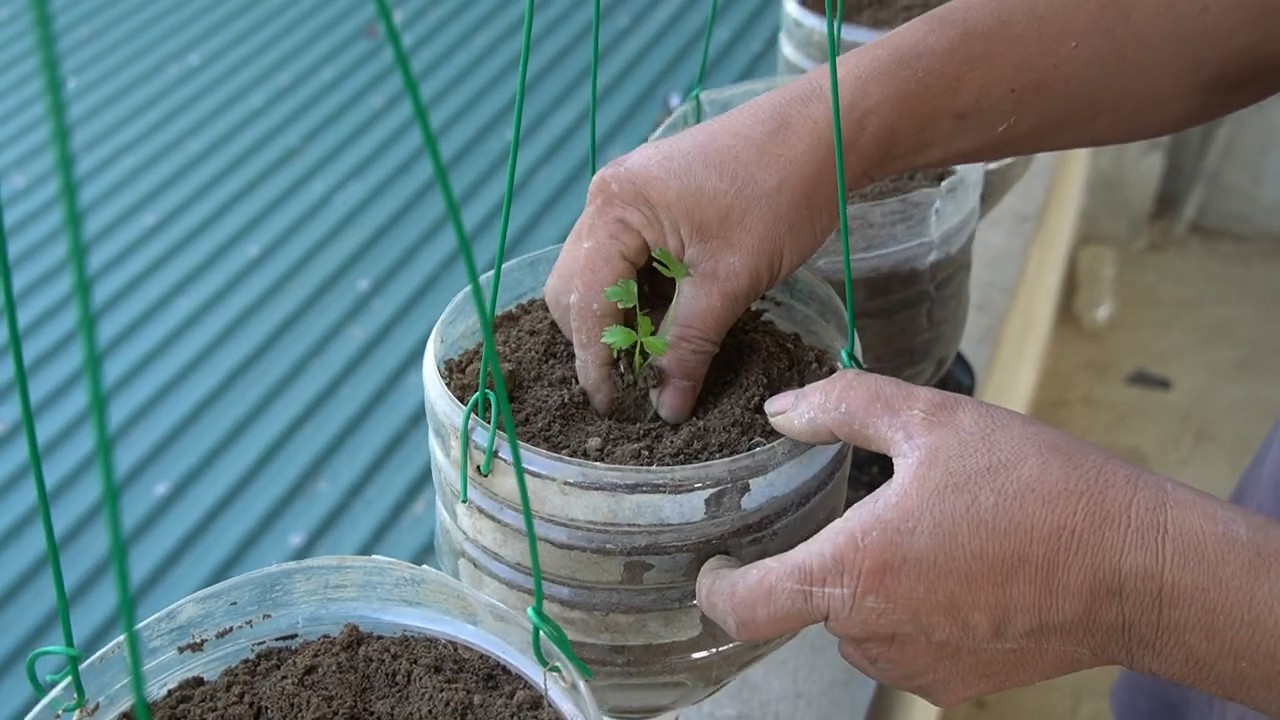
- Using starter plants: If you are using starter plants, simply place them in the soil and press the soil down lightly.
- Watering: Water the plants thoroughly after planting. Make sure the soil is well-moistened.
3. Assembling the Vertical Garden
- Stack the bottles: Now stack the bottles on top of each other. The top bottle (without the neck) goes at the very top. The remaining bottles are stacked so that the neck of the upper bottle protrudes into the hole of the lower bottle. This is how the water is directed from top to bottom.
- Drill hanging holes: Drill or poke holes in the sides of the top bottle with a nail and hammer. These holes are for attaching the rope or wire.
- Hanging: Thread the rope or wire through the holes and hang the vertical garden in a suitable place. Make sure the location is sunny, but not in the direct midday sun. Celery likes it bright, but not too hot.
4. Caring for the Celery
- Watering: Water the celery regularly. The soil should always be slightly moist, but not wet. On hot days, you may need to water daily.
- Fertilizing: Fertilize the celery every few weeks with an organic fertilizer. This ensures healthy growth and a bountiful harvest.
- Pests: Watch out for pests like aphids or snails. If infested, you can use natural pest control methods.
- Harvesting: You can harvest the celery as soon as it reaches the desired size. Simply cut off the stalks you need. The celery will keep regrowing.
Additional Tips and Tricks:
- Location: Choose a sunny location for your vertical garden. Celery needs at least 6 hours of sunlight per day.
- Wind protection: Protect the vertical garden from strong winds. Wind can dry out and damage the plants.
- Variety selection: There are different varieties of celery. Choose a variety that is suitable for growing in a pot.
- Combination with other plants: You can also combine celery with other plants, e.g., with herbs like parsley or chives.
- Winterizing: Celery is not winter-hardy. If you want to overwinter it, you must move it to a frost-free location.
- Upcycling: Use old T-shirts or fabric scraps to wrap the bottles. This not only looks good but also protects the roots from too much sun.
- Labeling: Label the bottles with the name of the plant. This helps you keep track.
- Involve the kids: Involve your children in the project. This is a great way to bring them closer to nature and get them excited about gardening.
I hope this guide helps you build your own vertical celery garden. It’s a great project that is not only fun but also brings fresh celery to your table. Good luck and have fun gardening!
Conclusion
So, there you have it! Transforming discarded plastic bottles into a thriving celery garden is not just a clever upcycling project; it’s a sustainable solution that brings fresh, flavorful celery right to your doorstep. This DIY hanging bottle celery garden is a game-changer for urban gardeners, space-conscious foodies, and anyone looking to reduce waste while enjoying the fruits (or rather, vegetables) of their labor.
Why is this a must-try? Because it’s incredibly simple, cost-effective, and yields impressive results. Imagine snipping fresh celery stalks for your soups, salads, and snacks, knowing you grew them yourself in a repurposed bottle. The satisfaction is unparalleled! Plus, it’s a fantastic way to teach children about sustainability and the life cycle of plants.
But the beauty of this project lies in its adaptability. Feel free to experiment with different bottle sizes and configurations. Create a vertical garden wall by hanging multiple bottles at varying heights, adding a touch of greenery and visual appeal to your balcony or patio. Consider using different types of soil mixes to see which yields the best results for your specific climate and growing conditions.
For a spicier twist, try growing other herbs alongside your celery, such as parsley or chives. These companion plants can enhance the flavor of your celery and create a more diverse and aromatic garden. You could even dedicate a few bottles to growing other vegetables like lettuce or spinach, creating a miniature salad garden right at your fingertips.
Don’t be afraid to get creative with the aesthetics too. Paint the bottles with vibrant colors, add decorative labels, or even wrap them in twine for a rustic look. The possibilities are endless!
We wholeheartedly encourage you to embark on this rewarding DIY adventure. Building your own hanging bottle celery garden is not only a fun and engaging project, but it’s also a step towards a more sustainable and self-sufficient lifestyle.
Once you’ve created your own thriving celery oasis, we’d love to hear about your experience! Share your photos, tips, and variations in the comments below. Let’s inspire each other to embrace the joy of homegrown goodness and the power of upcycling. Let’s cultivate a community of resourceful gardeners who are passionate about reducing waste and growing their own food. Your success story could be the inspiration someone else needs to start their own journey towards a greener, more flavorful future. So, grab those bottles, get your hands dirty, and let the celery-growing magic begin! Remember, the key to a successful hanging bottle celery garden is patience, consistent watering, and a little bit of love. Happy gardening!
Frequently Asked Questions (FAQ)
What type of plastic bottles are best for this project?
Ideally, you should use food-grade plastic bottles, such as those that previously contained water, juice, or soda. Ensure the bottles are thoroughly cleaned and sanitized before use to prevent any contamination of your celery plants. Avoid using bottles that have contained harsh chemicals or pesticides. The size of the bottle will depend on the size of the celery you want to grow. Larger bottles will accommodate larger celery varieties.
How often should I water my hanging bottle celery garden?
The watering frequency will depend on several factors, including the climate, the type of soil mix you’re using, and the size of the bottle. As a general rule, check the soil moisture daily. If the top inch of soil feels dry to the touch, it’s time to water. Water thoroughly until excess water drains out of the bottom of the bottle. Avoid overwatering, as this can lead to root rot. During hotter months, you may need to water more frequently.
What type of soil mix should I use for growing celery in bottles?
A well-draining potting mix is essential for growing healthy celery in bottles. You can use a commercially available potting mix or create your own by combining equal parts of peat moss, perlite, and vermiculite. Adding some compost to the mix will provide additional nutrients for your celery plants. Avoid using garden soil, as it can be too heavy and may not drain well in containers.
How much sunlight does my hanging bottle celery garden need?
Celery thrives in full sun, which means it needs at least 6-8 hours of direct sunlight per day. If you live in a particularly hot climate, you may need to provide some afternoon shade to prevent the celery from scorching. Place your hanging bottle garden in a location that receives ample sunlight throughout the day. If you don’t have access to enough natural light, you can supplement with grow lights.
How do I fertilize my celery plants in hanging bottles?
Celery is a heavy feeder, so it’s important to fertilize regularly to ensure healthy growth. You can use a balanced liquid fertilizer, such as a 10-10-10 formula, diluted to half strength. Fertilize every 2-3 weeks during the growing season. Alternatively, you can use a slow-release fertilizer incorporated into the soil mix at planting time.
How long does it take for celery to grow in hanging bottles?
Celery typically takes 80-100 days to mature from seed. However, you can start harvesting individual stalks as soon as they reach a usable size. The exact time will depend on the variety of celery you’re growing and the growing conditions.
Can I grow celery from the base of a store-bought celery stalk?
Yes, you can! This is a great way to propagate celery and reduce food waste. Simply cut off the base of the celery stalk, leaving about 2 inches of the root end intact. Place the base in a shallow dish of water, ensuring that the cut end is submerged. Place the dish in a sunny location and change the water every day. After a few days, you should see new roots and leaves emerging. Once the roots are well-developed, you can transplant the celery base into a hanging bottle filled with potting mix.
How do I prevent pests and diseases in my hanging bottle celery garden?
Regularly inspect your celery plants for signs of pests or diseases. Common pests that affect celery include aphids, spider mites, and celery leaf miners. You can control these pests by spraying the plants with insecticidal soap or neem oil. Diseases that can affect celery include early blight and late blight. To prevent these diseases, ensure good air circulation around the plants and avoid overhead watering. Remove any infected leaves promptly.
Can I grow celery indoors in hanging bottles?
Yes, you can grow celery indoors in hanging bottles, but you’ll need to provide adequate light. Place the bottles near a sunny window or use grow lights to supplement natural light. Ensure good air circulation and monitor the soil moisture regularly.
What are some variations I can try with my hanging bottle garden?
Besides celery, you can grow other herbs and vegetables in hanging bottles, such as lettuce, spinach, parsley, chives, and even strawberries. You can also experiment with different bottle sizes and configurations to create a unique and visually appealing garden. Consider adding decorative elements, such as paint, labels, or twine, to personalize your hanging bottle garden.


Leave a Comment