
Hanging Mint Container Gardening: Imagine stepping onto your balcony or into your garden and being greeted by the invigorating aroma of fresh mint. Sounds delightful, right? Well, you don’t need acres of land to make that dream a reality! I’m here to show you how easy and rewarding it is to create your very own hanging mint container garden.
Mint, with its rich history dating back to ancient Roman and Greek times, has always been prized for its medicinal and culinary uses. From flavoring teas and cocktails to adding a refreshing touch to desserts, mint is a versatile herb that deserves a place in every home. But let’s be honest, mint can be a bit of a garden bully, spreading like wildfire and taking over your precious flowerbeds. That’s where the genius of hanging container gardening comes in!
This DIY project isn’t just about aesthetics; it’s about control and convenience. By growing your mint in a hanging container, you’re effectively containing its enthusiastic growth habit, preventing it from becoming an invasive pest. Plus, a hanging garden adds a touch of vertical interest to your space, maximizing your growing area, especially if you’re short on ground space. I’ll guide you through the simple steps to create a thriving hanging mint container gardening setup, ensuring you have a constant supply of fresh mint right at your fingertips. Get ready to unleash your inner gardener and enjoy the refreshing benefits of homegrown mint!
DIY Hanging Mint Container Garden: Fresh Herbs at Your Fingertips!
Hey there, fellow plant lovers! I’m so excited to share this super easy and rewarding DIY project with you: creating your very own hanging mint container garden. Not only will you have a constant supply of fresh mint for mojitos, teas, and culinary creations, but it’ll also add a touch of green beauty to your balcony, patio, or even indoors! Plus, containing mint in a pot is crucial – this herb is notorious for spreading like wildfire if planted directly in the ground. Trust me, I learned that the hard way!
Here’s what we’ll cover:
* **Why a Hanging Mint Garden?** The benefits are numerous!
* **Materials You’ll Need:** A comprehensive list to get you started.
* **Step-by-Step Instructions:** A detailed guide to building your hanging garden.
* **Mint Care Tips:** Ensuring your mint thrives.
* **Troubleshooting:** Addressing common issues.
Why a Hanging Mint Garden?
Okay, let’s talk about why this project is so awesome. First off, it’s a space saver! If you’re like me and have limited gardening space, hanging containers are a lifesaver. They utilize vertical space, freeing up valuable real estate for other plants or outdoor furniture.
Secondly, it’s aesthetically pleasing. A lush, green hanging basket of mint adds a touch of natural beauty to any environment. It’s a simple way to brighten up a dull corner or create a more inviting outdoor space.
Thirdly, and perhaps most importantly, you’ll have fresh mint readily available whenever you need it. No more running to the grocery store for a sad, wilted bunch of mint! Imagine the possibilities: refreshing iced tea, flavorful cocktails, delicious sauces, and so much more.
Finally, containing mint in a pot prevents it from taking over your entire garden. Mint is an aggressive grower, and if left unchecked, it can quickly become a nuisance. A hanging container keeps it contained and manageable.
Materials You’ll Need
Alright, let’s gather our supplies. Don’t worry, you probably have some of these items already!
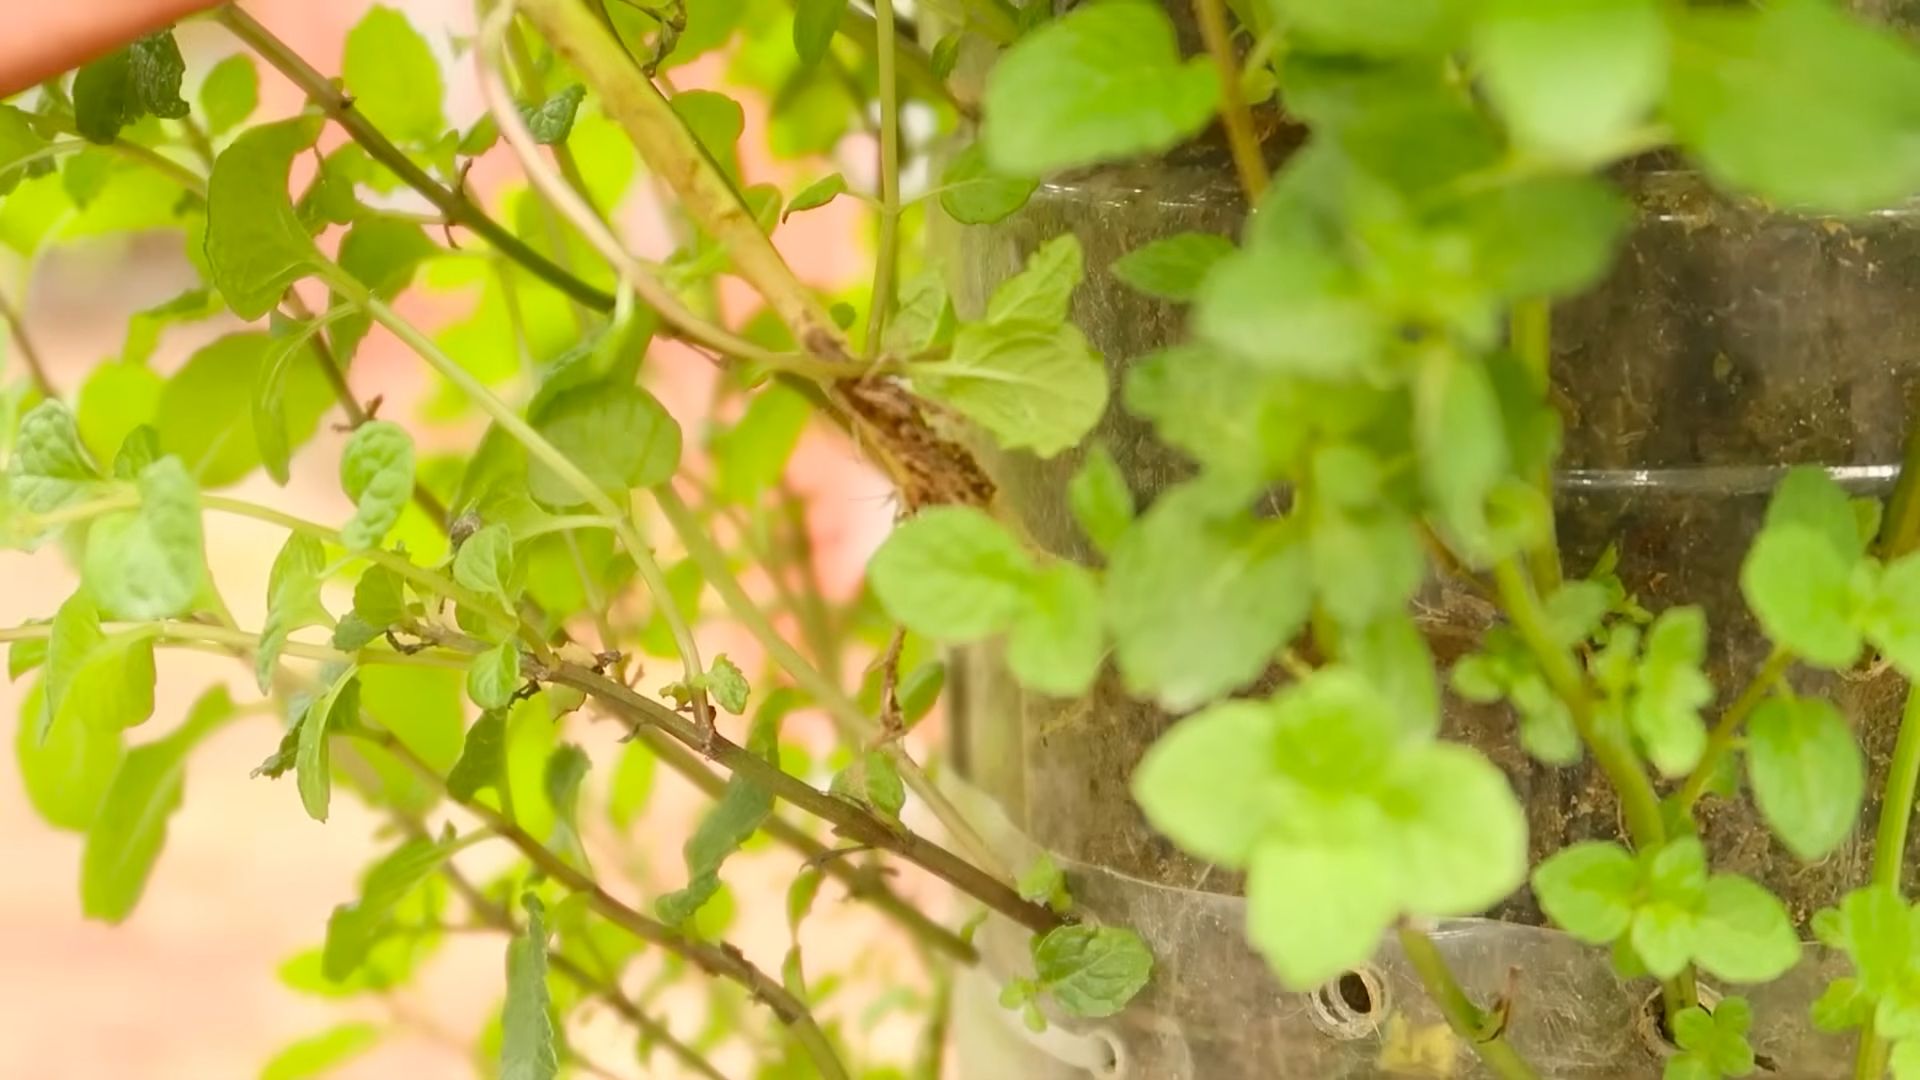
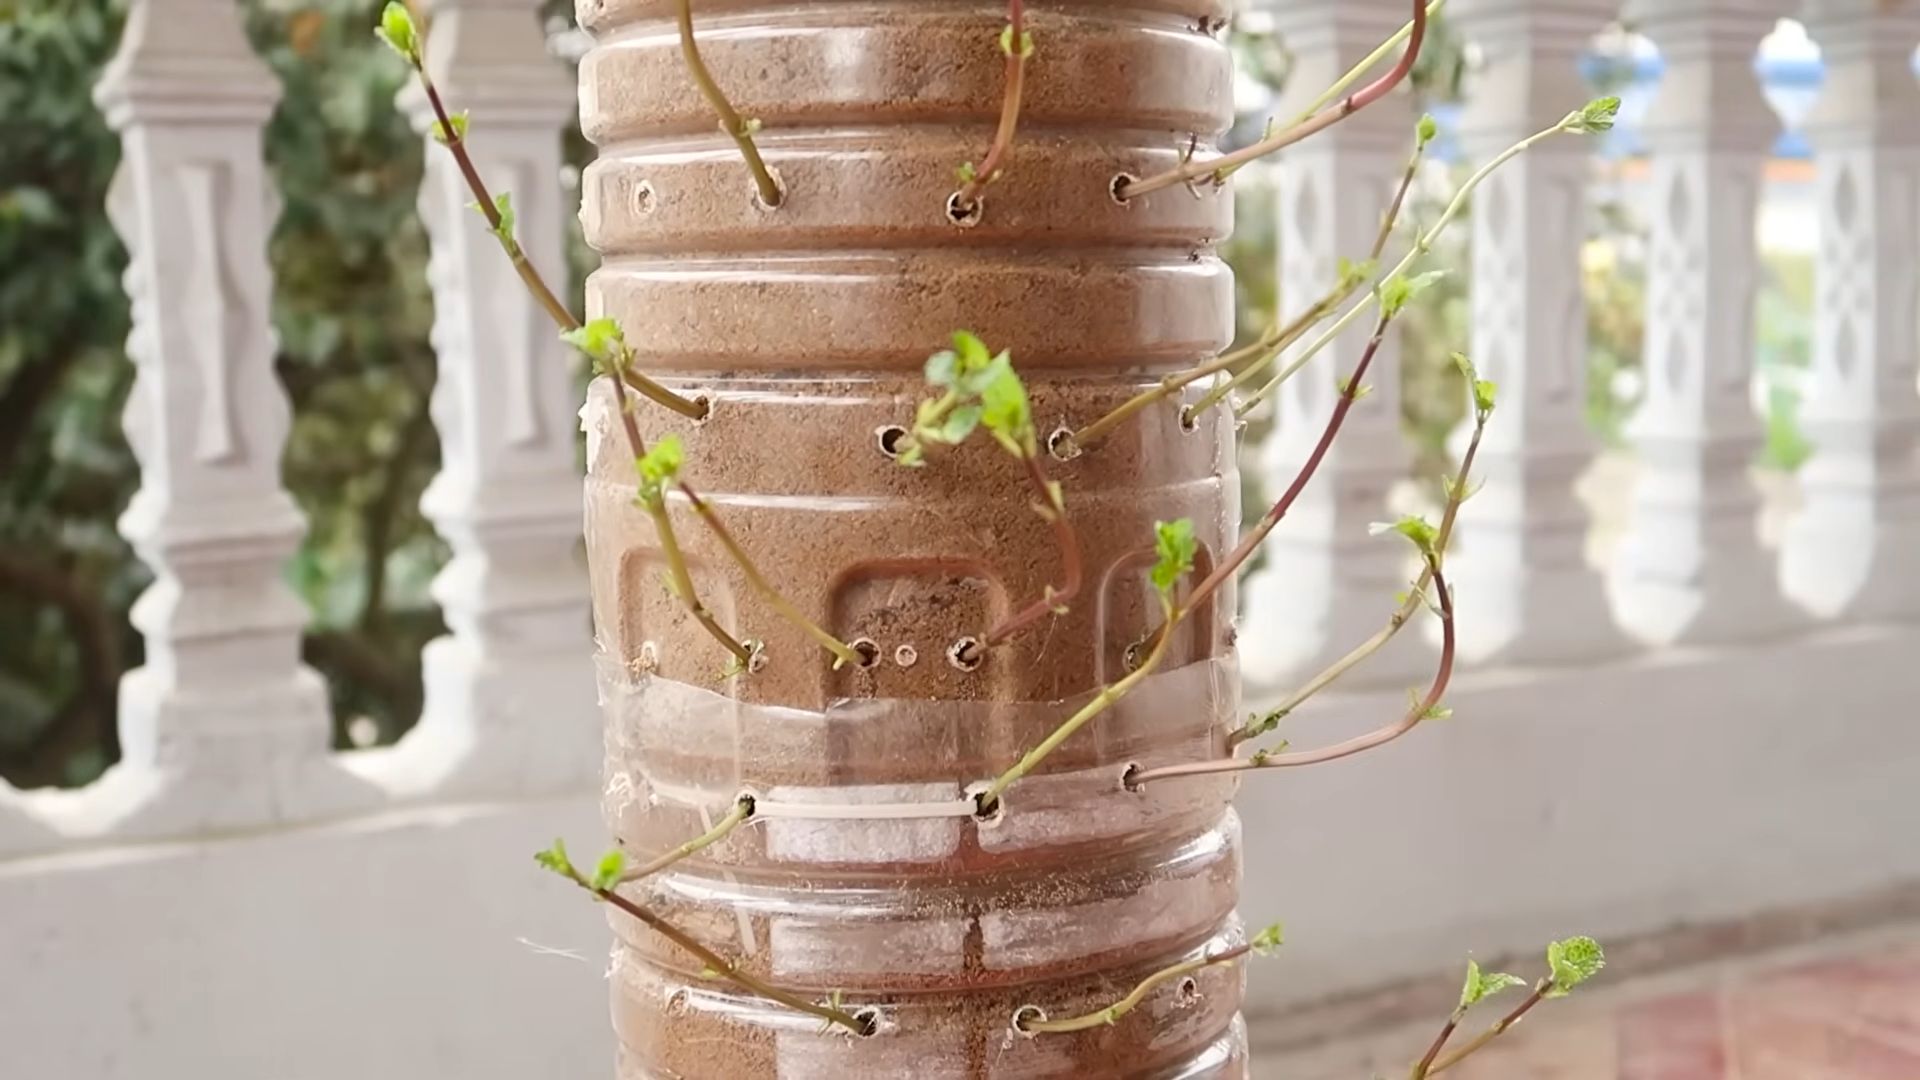
* **Hanging Basket:** You can use a pre-made hanging basket with a coco liner, a plastic hanging pot, or even repurpose an old bucket or basket. Just make sure it has drainage holes! I personally love the look of natural fiber baskets.
* **Potting Soil:** Use a good-quality potting mix that drains well. Avoid using garden soil, as it can become compacted in containers. I recommend a mix specifically formulated for herbs or vegetables.
* **Mint Seedlings or Cuttings:** You can purchase mint seedlings from your local nursery or propagate your own from cuttings. I’ll explain how to propagate from cuttings later.
* **Water-Absorbing Polymer Crystals (Optional):** These crystals help retain moisture in the soil, which is especially helpful in hot, dry climates.
* **Slow-Release Fertilizer (Optional):** A slow-release fertilizer will provide your mint with a steady supply of nutrients over time.
* **Gardening Gloves:** To protect your hands.
* **Trowel or Small Shovel:** For scooping and transferring soil.
* **Watering Can or Hose:** For watering your mint.
* **Scissors or Pruning Shears:** For trimming and harvesting mint.
* **Spray Bottle (Optional):** For misting your mint.
* **Hanging Hook or Bracket:** To hang your basket. Make sure it’s strong enough to support the weight of the filled container.
Step-by-Step Instructions
Okay, let’s get our hands dirty! Here’s how to create your hanging mint container garden:
1. **Prepare the Hanging Basket:** If you’re using a pre-made hanging basket with a coco liner, check the liner for any holes or tears. If necessary, add an extra layer of burlap or landscape fabric to prevent soil from leaking out. If you’re using a plastic pot, make sure it has adequate drainage holes. If not, drill a few more.
2. **Add Potting Soil:** Fill the hanging basket about two-thirds full with potting soil. If you’re using water-absorbing polymer crystals, mix them into the soil according to the package directions. If you’re using slow-release fertilizer, sprinkle it over the soil surface.
3. **Plant the Mint:** Gently remove the mint seedlings from their containers. Loosen the roots slightly before planting. Dig small holes in the soil and place the seedlings in the holes. Space the seedlings about 4-6 inches apart. If you’re using cuttings, skip to the propagation section below.
4. **Fill with Soil:** Fill in the remaining space around the seedlings with potting soil. Gently pat down the soil to secure the plants.
5. **Water Thoroughly:** Water the hanging basket thoroughly until water drains out of the drainage holes. This will help settle the soil and ensure that the roots are well-hydrated.
6. **Hang the Basket:** Choose a location that receives at least 4-6 hours of sunlight per day. Hang the basket securely from a sturdy hook or bracket.
7. **Water Regularly:** Water your mint regularly, especially during hot, dry weather. Check the soil moisture by sticking your finger into the soil. If the top inch of soil feels dry, it’s time to water.
8. **Fertilize as Needed:** If you didn’t use slow-release fertilizer, you can fertilize your mint every 2-4 weeks with a liquid fertilizer diluted to half strength.
9. **Harvest Regularly:** Harvest your mint regularly to encourage new growth. Simply snip off the stems with scissors or pruning shears.
Propagating Mint from Cuttings
If you don’t want to buy mint seedlings, you can easily propagate your own from cuttings. Here’s how:
1. **Take Cuttings:** Using clean scissors or pruning shears, take cuttings from a healthy mint plant. The cuttings should be about 4-6 inches long and have several leaves.
2. **Remove Lower Leaves:** Remove the leaves from the bottom inch of the cuttings. This will expose the nodes where roots will form.
3. **Root the Cuttings:** There are two ways to root mint cuttings:
* **Water Method:** Place the cuttings in a glass of water, making sure that the leaves are above the water line. Change the water every few days. Roots should start to form within a week or two.
* **Soil Method:** Dip the cut ends of the cuttings in rooting hormone (optional). Plant the cuttings in a small pot filled with moist potting soil. Cover the pot with a plastic bag to create a humid environment. Keep the soil moist and the cuttings out of direct sunlight. Roots should start to form within a few weeks.
4. **Transplant the Cuttings:** Once the cuttings have developed a good root system, you can transplant them into your hanging basket. Follow the planting instructions above.
Mint Care Tips
To keep your mint thriving, here are a few essential care tips:
* **Sunlight:** Mint prefers partial shade, especially in hot climates. Too much direct sunlight can scorch the leaves. Aim for 4-6 hours of sunlight per day.
* **Watering:** Water regularly, especially during hot, dry weather. Mint prefers consistently moist soil, but avoid overwatering, which can lead to root rot.
* **Fertilizing:** Fertilize every 2-4 weeks with a liquid fertilizer diluted to half strength, or use a slow-release fertilizer.
* **Pruning:** Prune your mint regularly to encourage new growth and prevent it from becoming leggy. Simply snip off the stems with scissors or pruning shears.
* **Pest Control:** Mint is generally pest-resistant, but it can occasionally be affected by aphids or spider mites. If you notice any pests, spray the plant with insecticidal soap.
* **Winter Care:** In colder climates, you may need to bring your hanging mint basket indoors during the winter. Place it in a sunny location and water it regularly. You can also cut back the plant and allow it to go dormant.
Troubleshooting
Even with the best care, you might encounter a few problems. Here are some common issues and how to address them:
* **Yellowing Leaves:** This can be caused by overwatering, underwatering, or nutrient deficiencies. Check the soil moisture and adjust your watering schedule accordingly. Fertilize the plant if necessary.
* **Brown Spots:** This can be caused by sunburn or fungal diseases. Move the plant to a shadier location and avoid getting the leaves wet when watering.
* **Leggy Growth:** This is usually caused by insufficient sunlight. Move the plant to a sunnier location or prune it back to encourage bushier growth.
* **Pests:** As mentioned earlier, aphids and spider mites can sometimes infest mint plants. Spray the plant with insecticidal soap to control these pests.
* **Root Rot:** This is caused by overwatering and poor drainage. Make sure your hanging basket has adequate drainage holes and avoid overwatering. If root rot is severe, you may need to repot the plant with fresh potting soil
Conclusion
So, there you have it! Creating your own hanging mint container garden is not just a fun project; it’s a game-changer for anyone who loves fresh herbs. Forget those sad, wilted bunches from the grocery store. With a little effort, you can have a thriving supply of fragrant, flavorful mint right outside your door, ready to elevate your culinary creations and refresh your favorite beverages.
Why is this DIY trick a must-try? Because it’s incredibly cost-effective, space-saving, and customizable. You’re in complete control of the growing environment, ensuring your mint receives the perfect amount of sunlight and water. Plus, let’s be honest, there’s something deeply satisfying about nurturing your own food source. It connects you to nature in a tangible way, even if you live in the heart of the city.
But the benefits don’t stop there. A hanging mint container garden is also a fantastic way to deter pests. Mint’s strong aroma naturally repels many unwanted insects, making it a welcome addition to any garden or patio. And because it’s contained, you can easily manage its growth, preventing it from spreading aggressively like it often does in the ground.
Looking for suggestions or variations? Absolutely! Consider using different types of mint to create a diverse and aromatic display. Chocolate mint, spearmint, peppermint, and even apple mint offer unique flavors and fragrances. You can also experiment with different container types. While a traditional hanging basket works perfectly, you could also repurpose old buckets, colanders, or even plastic bottles for a more eco-friendly approach. Just be sure to provide adequate drainage.
Another variation is to incorporate companion plants into your hanging container. Marigolds, for example, are known to deter pests and attract beneficial insects. Just be mindful of the space requirements and ensure that your mint doesn’t get overcrowded.
And don’t forget about the aesthetic appeal! Choose colorful containers and add decorative elements like pebbles, shells, or small figurines to personalize your hanging garden. It’s a chance to express your creativity and add a touch of charm to your outdoor space.
Ultimately, the success of your hanging mint container garden depends on your willingness to experiment and learn. Don’t be afraid to try different techniques and observe how your mint responds. With a little patience and attention, you’ll be rewarded with a bountiful harvest of fresh, flavorful mint.
We wholeheartedly encourage you to try this DIY trick and experience the joy of growing your own mint. It’s a simple, rewarding project that will enhance your cooking, your garden, and your overall well-being. And most importantly, we want to hear about your experiences! Share your photos, tips, and challenges in the comments below. Let’s create a community of mint-loving gardeners and inspire each other to grow our own fresh herbs. What are you waiting for? Get your hands dirty and start your hanging mint container garden today!
Frequently Asked Questions (FAQs)
What kind of container is best for a hanging mint garden?
The best container for a hanging mint garden is one that provides adequate drainage and is large enough to accommodate the plant’s root system. Hanging baskets made of coco coir, plastic, or metal are all suitable options. Ensure the container has drainage holes to prevent waterlogging, which can lead to root rot. The size of the container should be at least 10-12 inches in diameter to allow the mint to spread and thrive. You can also repurpose items like old buckets, colanders, or even plastic bottles, but make sure to drill drainage holes if they don’t already have them.
How much sunlight does a hanging mint garden need?
Mint thrives in partial shade to full sun. Ideally, your hanging mint garden should receive at least 4-6 hours of sunlight per day. However, in hotter climates, providing some afternoon shade can prevent the leaves from scorching. Observe your mint plants closely and adjust their location as needed. If the leaves appear pale or leggy, it may indicate that they’re not getting enough sunlight. Conversely, if the leaves are turning brown or crispy, they may be getting too much direct sun.
What type of soil is best for growing mint in a hanging container?
Mint prefers well-draining, fertile soil. A good potting mix for a hanging mint garden should be a blend of compost, peat moss, and perlite or vermiculite. This combination provides the necessary nutrients, moisture retention, and drainage. Avoid using garden soil, as it can be too heavy and compact, hindering root growth. You can also add a slow-release fertilizer to the potting mix to provide a steady supply of nutrients throughout the growing season.
How often should I water my hanging mint garden?
Water your hanging mint garden regularly, especially during hot, dry weather. The soil should be kept consistently moist but not waterlogged. Check the soil moisture by inserting your finger about an inch deep. If the soil feels dry, it’s time to water. Water thoroughly until excess water drains out of the drainage holes. Avoid overhead watering, as it can promote fungal diseases. Instead, water at the base of the plant. Hanging containers tend to dry out more quickly than in-ground gardens, so monitor the moisture levels closely.
How do I prevent mint from taking over my garden?
One of the main advantages of growing mint in a hanging container is that it prevents the plant from spreading aggressively. Mint is known for its invasive nature, and it can quickly take over a garden if planted directly in the ground. By growing it in a container, you can control its growth and prevent it from becoming a nuisance. Regularly prune your mint plants to encourage bushier growth and prevent them from flowering, which can lead to seed dispersal.
Can I grow different types of mint in the same hanging container?
While it’s possible to grow different types of mint in the same hanging container, it’s generally not recommended. Mint varieties can cross-pollinate, which can alter their flavor and characteristics. Additionally, some mint varieties are more vigorous than others and may outcompete their neighbors. If you do decide to grow multiple types of mint in the same container, choose varieties with similar growth habits and provide ample space between them.
How do I harvest mint from my hanging garden?
Harvest mint leaves as needed throughout the growing season. Simply pinch or cut off the stems just above a leaf node. This will encourage the plant to produce new growth. Avoid harvesting more than one-third of the plant at a time, as this can stress the plant. The best time to harvest mint is in the morning, after the dew has dried but before the sun gets too hot. This is when the leaves have the highest concentration of essential oils, resulting in the most intense flavor.
What are some common problems with growing mint in hanging containers?
Some common problems with growing mint in hanging containers include pests, diseases, and nutrient deficiencies. Aphids, spider mites, and whiteflies can infest mint plants, causing damage to the leaves. Treat infestations with insecticidal soap or neem oil. Fungal diseases, such as powdery mildew and rust, can also affect mint. Prevent these diseases by providing good air circulation and avoiding overhead watering. Nutrient deficiencies can manifest as yellowing or stunted growth. Fertilize your mint plants regularly with a balanced fertilizer to prevent deficiencies.
How do I overwinter my hanging mint garden?
In colder climates, you’ll need to overwinter your hanging mint garden to protect it from freezing temperatures. Bring the container indoors before the first frost and place it in a sunny location. Water sparingly during the winter months, allowing the soil to dry out slightly between waterings. You can also prune the plant back to a few inches above the soil line to encourage new growth in the spring. Alternatively, you can take cuttings from your mint plant and root them indoors to create new plants for the following growing season.
Can I use my hanging mint garden for more than just culinary purposes?
Absolutely! Mint has a wide range of uses beyond the kitchen. You can use fresh mint leaves to make tea, infuse water, or add to cocktails. Mint also has medicinal properties and can be used to soothe digestive issues, relieve headaches, and freshen breath. The strong aroma of mint can also repel insects, making it a natural pest repellent. You can even dry mint leaves and use them in potpourri or sachets to freshen your home. The possibilities are endless!
Leave a Comment