
Hanging mustard greens garden: Imagine stepping onto your balcony or into your backyard and being greeted by a lush, vibrant cascade of fresh, peppery mustard greens, ready to be snipped and added to your next meal. Sounds idyllic, right? Well, it’s more achievable than you think! For centuries, humans have cultivated food in creative ways, adapting to limited spaces and diverse environments. From the ancient Hanging Gardens of Babylon to modern-day urban farms, the desire to connect with nature and grow our own food has always been strong.
But let’s face it, not everyone has acres of land to dedicate to a traditional garden. That’s where the magic of DIY comes in! This article is your ultimate guide to creating your very own hanging mustard greens garden, even if you’re short on space or gardening experience. We’ll walk you through simple, step-by-step instructions, using readily available materials, to transform your balcony, patio, or even a sunny window into a thriving source of fresh, healthy greens.
Why mustard greens? Besides their delicious flavor and nutritional benefits, they’re surprisingly easy to grow in containers, making them perfect for hanging gardens. Plus, a hanging garden not only provides fresh produce but also adds a touch of beauty and tranquility to your living space. So, are you ready to ditch the store-bought greens and embark on this exciting DIY adventure? Let’s get started!
DIY Hanging Mustard Green Garden: A Step-by-Step Guide
Hello garden friends! I love fresh herbs and vegetables, especially when they grow right outside my door. Today I’m going to show you how to make your own hanging mustard green garden. It’s a great project to save space, add a green touch to your balcony or patio, and of course, to harvest fresh, spicy mustard green leaves!
What You Need: The Materials List
Before we get started, here is a list of all the materials you will need for your hanging mustard green garden:
- Hanging baskets: I recommend baskets with a diameter of at least 25 cm (10 inches). You can find them in various sizes and materials – coconut fiber, metal, plastic – choose what you like best and what fits your style.
- Coconut fiber liners or jute: These help to hold the soil in the basket and improve drainage.
- High-quality potting soil: Choose a soil that drains well and is rich in nutrients. Special vegetable soil is ideal.
- Mustard green seeds: You can try different varieties, depending on the flavor you prefer. There are mild and spicier options.
- Slow-release fertilizer: A slow-release fertilizer will provide your mustard green plants with nutrients over a longer period.
- Watering can or garden hose: For watering your plants.
- Garden shears or scissors: For harvesting the mustard green leaves.
- Gloves: To keep your hands clean.
- Optional: Drainage balls or gravel for the bottom of the basket.
Step-by-Step Guide: How to Build Your Hanging Garden
Now let’s get down to business! Follow these steps to create your own hanging mustard green garden:
- Preparing the Hanging Baskets:
- Place the coconut fiber liners or jute inside the hanging baskets. Make sure they fit well and cover the entire inside of the basket.
- If you like, you can add a layer of drainage balls or gravel to the bottom of the basket. This helps prevent waterlogging.
- Filling with Soil:
- Fill the hanging baskets with high-quality potting soil. Leave about 5 cm (2 inches) of space to the rim of the basket.
- Mix the slow-release fertilizer into the soil according to the instructions on the package.
- Sowing the Mustard Green Seeds:
- Spread the mustard green seeds evenly over the surface of the soil.
- Lightly cover the seeds with a thin layer of soil (approx. 0.5 cm or 1/4 inch).
- Gently press the soil down.
- Watering:
- Water the soil gently until it is well moistened. Avoid washing the seeds away.
- Make sure that water can drain from the drainage holes of the basket.
- Hanging the Baskets:
- Find a sunny spot for your hanging mustard green gardens. Mustard greens need at least 6 hours of sunlight per day.
- Hang the baskets on sturdy hooks or chains. Make sure they are securely fastened and cannot fall down.
- Care and Watering:
- Check the soil regularly for moisture. Water when the top layer feels dry.
- Avoid wetting the leaves to prevent fungal diseases.
- Regularly remove weeds and dead leaves.
- Fertilize the plants every few weeks with a liquid fertilizer to promote growth.
The Right Care for Lush Mustard Green Leaves
For your hanging mustard green garden to thrive, proper care is crucial. Here are a few tips I’ve learned over the years:
- Sunlight: Mustard greens love the sun! Make sure your plants get at least 6 hours of direct sunlight per day. If you don’t have a sunny spot, you can also use grow lights.
- Watering: Watering is a balancing act. Mustard greens like it moist, but not wet. Check the soil regularly and water when the top layer feels dry. Avoid waterlogging, as this can lead to root rot.
- Fertilizing: Mustard greens are heavy feeders and need sufficient nutrients to grow well. Use a slow-release fertilizer when planting and fertilize regularly with a liquid fertilizer. Be sure to choose a fertilizer that is high in nitrogen, as this promotes leaf growth.
- Pest Protection: Mustard greens can be affected by various pests, such as aphids, cabbage whites, and slugs. Check your plants regularly for pests and take action if necessary. You can use natural pesticides like neem oil or insecticidal soap.
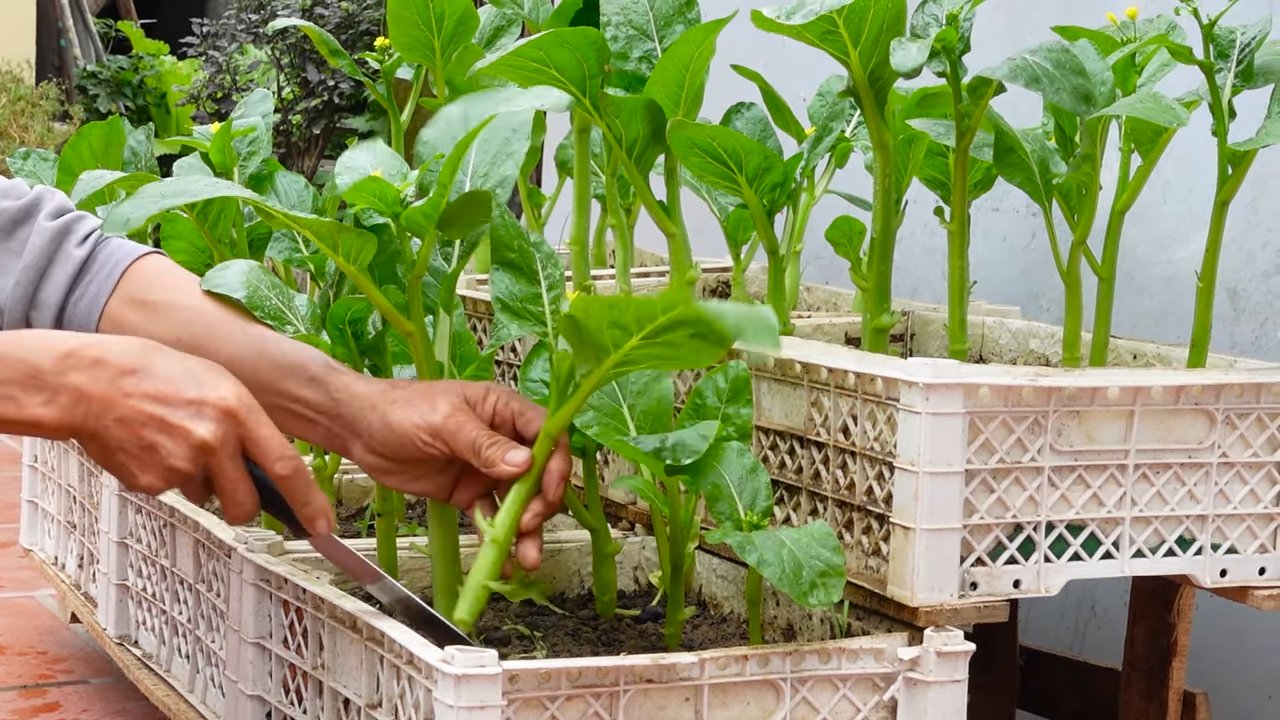
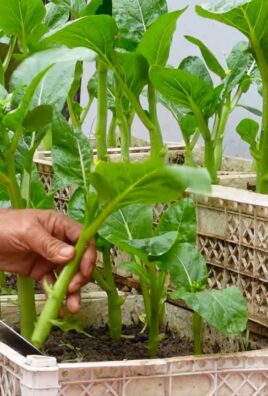
- Harvesting: Harvesting is the best part! You can harvest the mustard green leaves as soon as they reach a size of about 10-15 cm (4-6 inches). Cut off the outer leaves and let the inner leaves continue to grow. This way you can harvest over a longer period.
Harvest and Use: How to Enjoy Your Mustard Green Leaves
Harvesting your own mustard green leaves is a great feeling! Here are a few tips on how to make the most of your harvest:
- Harvest Time: You can harvest the mustard green leaves as soon as they reach a size of about 10-15 cm (4-6 inches). The leaves are tastiest when they are young and tender.
- Harvesting Technique: Cut off the outer leaves with garden shears or scissors. Let the inner leaves continue to grow so you can harvest over a longer period.
- Storage: Mustard green leaves do not keep for very long. It is best to use them immediately after harvesting. If you need to store them, wrap them in a damp paper towel and keep them in the refrigerator. They will last for about 2-3 days this way.
- Use: Mustard green leaves are very versatile. You can use them raw in salads, serve them as a side dish with meat or fish, or add them to soups, stews, and stir-fries. They have a spicy, slightly sharp taste that adds a special touch to many dishes.
Here are a few ideas on how to use your mustard green leaves:
- Mustard Green Salad: Mix mustard green leaves with other types of lettuce, tomatoes, cucumbers, and a light dressing.
- Mustard Green Pesto: Replace basil with mustard greens in your favorite pesto recipe.
- Mustard Green Soup: Add mustard green leaves to your favorite soup to give it a spicy flavor.
- Mustard Green Stir-Fry: Sauté mustard green leaves with garlic, ginger, and soy sauce.
Common Problems and Solutions
Problems can also arise when growing mustard greens. Here are some common problems and how you can solve them:
Yellow Leaves: Yellow leaves can be a sign of a nutrient deficiency. Fertilize your plants with a liquid fertilizer that is high in nitrogen.

Conclusion
So, there you have it! Creating your own hanging mustard greens garden is not just a trendy gardening project; it’s a game-changer for fresh produce enthusiasts, space-conscious gardeners, and anyone looking to add a touch of vibrant green to their surroundings. We’ve walked you through the simple steps, highlighting the benefits of this innovative approach to growing your own food. From maximizing space and deterring pests to adding a unique aesthetic appeal, a hanging mustard greens garden offers a multitude of advantages.
But why is this DIY trick a must-try? Because it empowers you to take control of your food source, ensuring you have access to fresh, flavorful, and nutritious mustard greens right at your fingertips. Imagine stepping outside your door and snipping off a handful of peppery greens to add to your salad, stir-fry, or even a green smoothie. The taste is unparalleled, the satisfaction immense.
Beyond the practical benefits, this project is incredibly rewarding. There’s something deeply fulfilling about nurturing a plant from seed to harvest, witnessing its growth, and ultimately enjoying the fruits (or in this case, the leaves) of your labor. It’s a connection to nature that can be incredibly grounding and therapeutic.
Looking for variations? Absolutely! While we’ve focused on mustard greens, the principles of this hanging garden can be applied to other leafy greens like spinach, lettuce, and even herbs like parsley and cilantro. Experiment with different container sizes and materials to find what works best for your space and aesthetic preferences. Consider adding companion plants like marigolds to deter pests naturally. You can also explore different hanging methods, from simple rope hangers to more elaborate macrame designs.
Don’t be afraid to get creative and personalize your hanging mustard greens garden to reflect your own style and preferences. The possibilities are endless!
We wholeheartedly encourage you to give this DIY trick a try. It’s a relatively inexpensive and easy project that yields significant rewards. Not only will you enjoy a bountiful harvest of fresh mustard greens, but you’ll also gain a sense of accomplishment and connection to the natural world.
And most importantly, we want to hear about your experience! Share your photos, tips, and challenges in the comments below. Let’s create a community of hanging garden enthusiasts and learn from each other. What varieties of mustard greens did you choose? What challenges did you encounter, and how did you overcome them? What creative variations did you implement? Your insights will be invaluable to other readers embarking on their own hanging garden journey. Let’s cultivate a thriving community of DIY gardeners, one hanging mustard greens garden at a time. So, grab your supplies, get your hands dirty, and start growing! You won’t regret it.
FAQ
What are the best varieties of mustard greens to grow in a hanging garden?
The best varieties for a hanging garden are those that tend to be more compact and don’t grow too large, making them easier to manage in a container. Some excellent choices include:
* Southern Giant Curled: This is a classic variety known for its large, frilly leaves and robust flavor. It’s relatively easy to grow and tolerates a wide range of conditions.
* Florida Broadleaf: A milder-flavored variety with smooth, broad leaves. It’s a good option for those who prefer a less intense mustard flavor.
* Red Giant: This variety adds a beautiful splash of color to your garden with its deep red leaves. It has a slightly spicier flavor than other varieties.
* Osaka Purple: Similar to Red Giant, Osaka Purple offers vibrant purple foliage and a peppery taste.
* Tendergreen: As the name suggests, this variety has tender, mild-flavored leaves that are perfect for salads.
Consider your taste preferences and the amount of sunlight your hanging garden will receive when choosing your mustard green varieties.
How often should I water my hanging mustard greens garden?
Watering frequency depends on several factors, including the weather, the type of container you’re using, and the size of your plants. As a general rule, check the soil moisture daily. If the top inch of soil feels dry to the touch, it’s time to water.
Hanging gardens tend to dry out more quickly than in-ground gardens, so you may need to water more frequently, especially during hot, sunny weather. Water thoroughly until water drains out of the bottom of the container. Avoid overwatering, as this can lead to root rot.
What type of soil is best for growing mustard greens in a hanging garden?
The ideal soil for a hanging mustard greens garden is a well-draining potting mix that is rich in organic matter. Avoid using garden soil, as it can be too heavy and compact for containers.
Look for a potting mix that contains ingredients like peat moss, perlite, and vermiculite. These ingredients help to improve drainage and aeration, which are essential for healthy root growth. You can also amend your potting mix with compost or other organic matter to provide additional nutrients.
How much sunlight do mustard greens need?
Mustard greens thrive in full sun, which means they need at least 6 hours of direct sunlight per day. However, they can also tolerate partial shade, especially in hot climates.
If your hanging garden is located in a shady area, you may need to supplement with artificial light to ensure your mustard greens get enough sunlight.
How do I fertilize my hanging mustard greens garden?
Mustard greens are heavy feeders, so it’s important to fertilize them regularly to ensure they get the nutrients they need. You can use a balanced liquid fertilizer or a slow-release granular fertilizer.
Follow the instructions on the fertilizer package carefully. Avoid over-fertilizing, as this can burn the roots of your plants.
How do I protect my hanging mustard greens garden from pests?
Hanging gardens are generally less susceptible to pests than in-ground gardens, but they can still be affected by common garden pests like aphids, flea beetles, and cabbage worms.
To protect your mustard greens from pests, you can use a variety of methods, including:
* Handpicking: Regularly inspect your plants for pests and remove them by hand.
* Insecticidal soap: Spray your plants with insecticidal soap to kill aphids and other soft-bodied insects.
* Neem oil: Neem oil is a natural insecticide that can be used to control a wide range of pests.
* Companion planting: Plant companion plants like marigolds and nasturtiums to deter pests.
* Floating row covers: Cover your plants with floating row covers to prevent pests from reaching them.
When is the best time to harvest mustard greens from my hanging garden?
You can start harvesting mustard greens as soon as the leaves are large enough to eat, typically when they are about 4-6 inches long. Harvest the outer leaves first, leaving the inner leaves to continue growing.
Regular harvesting will encourage your plants to produce more leaves. Mustard greens are best harvested in the morning, when the leaves are crisp and tender.
Can I grow mustard greens in a hanging garden year-round?
Whether you can grow mustard greens year-round depends on your climate. Mustard greens are a cool-season crop, so they grow best in the spring and fall. In mild climates, you may be able to grow them year-round.
In hot climates, mustard greens may bolt (go to seed) quickly in the summer. To extend the growing season, you can plant them in a shady location or use shade cloth to protect them from the sun.
How do I prevent my hanging garden from becoming too heavy?
The weight of your hanging garden will depend on the size of the container, the type of soil you’re using, and the size of your plants. To prevent your hanging garden from becoming too heavy, choose a lightweight container and use a well-draining potting mix.
You can also add perlite or vermiculite to your potting mix to reduce its weight. Be sure to use a sturdy hanging mechanism that can support the weight of your garden. Regularly check the hanging mechanism for wear and tear and replace it if necessary.
Leave a Comment