
Hanging strawberry planter DIY projects are a fantastic way to bring a burst of fresh, homegrown goodness right to your doorstep, even if you’re short on space! Imagine plucking juicy, sun-ripened strawberries straight from a vibrant, cascading planter – it’s a taste of summer that’s hard to beat. For centuries, vertical gardening techniques, including hanging planters, have been employed across cultures, from the Hanging Gardens of Babylon (though not necessarily strawberries!) to the ingenious rooftop farms of modern cities. These methods allow us to maximize yields in limited areas, transforming balconies, patios, and even small yards into thriving edible landscapes.
But why should you embark on a hanging strawberry planter DIY adventure? Well, besides the obvious benefit of delicious, organic strawberries, these planters are incredibly space-saving, deter pests like slugs and snails, and add a touch of whimsical beauty to any outdoor area. Plus, let’s be honest, there’s something deeply satisfying about creating something with your own two hands. I’m excited to share some simple, yet effective, DIY tricks and hacks that will have you enjoying a bountiful strawberry harvest in no time. Get ready to roll up your sleeves and transform your space into a strawberry paradise!

DIY Hanging Strawberry Planter: A Bountiful Berry Bonanza!
Hey there, fellow gardening enthusiasts! Are you dreaming of fresh, juicy strawberries right outside your door? Me too! And guess what? We can make that dream a reality with this super fun and surprisingly easy DIY hanging strawberry planter. It’s a fantastic way to maximize space, add a touch of charm to your patio or balcony, and, most importantly, grow a ton of delicious strawberries. Let’s get started!
What You’ll Need: The Supply List
Before we dive in, let’s gather all the necessary materials. Trust me, having everything ready beforehand will make the whole process smoother and more enjoyable.
* A Large Bucket or Container: I recommend a 5-gallon bucket, but you can use any large, sturdy container you like. Just make sure it’s made of plastic, as it will be exposed to the elements.
* Potting Soil: You’ll need a good quality potting mix specifically formulated for containers. This will provide the right nutrients and drainage for your strawberry plants.
* Strawberry Plants: Choose everbearing varieties for a continuous harvest throughout the season. I usually go for around 6-8 plants for a 5-gallon bucket.
* Drill with Hole Saw Attachment: This is crucial for creating the holes for your strawberry plants. A 2-inch hole saw is ideal.
* Landscape Fabric or Burlap: This will line the inside of the bucket and help retain moisture.
* Scissors or Utility Knife: For cutting the landscape fabric.
* Measuring Tape or Ruler: To ensure even spacing of the holes.
* Marker or Pen: For marking the hole locations.
* Hanging Hardware (Optional): If you want to hang your planter, you’ll need sturdy chain, rope, or wire, as well as hooks or S-hooks.
* Gloves: To protect your hands from the soil.
* Watering Can or Hose: For watering your newly planted strawberries.
Phase 1: Preparing the Bucket
This is where we transform a plain bucket into a strawberry-growing haven!
1. Clean the Bucket: Give your bucket a good scrub with soap and water to remove any dirt or debris. This will help prevent the spread of diseases to your strawberry plants.
2. Mark the Hole Locations: This is important for even growth. Using your measuring tape and marker, evenly space the holes around the sides of the bucket. I usually start about 4-5 inches from the bottom and space the holes about 6-8 inches apart, staggering them in rows. This will give your plants plenty of room to grow.
3. Drill the Holes: Now for the fun part! Carefully use your drill with the hole saw attachment to create the holes at the marked locations. Be sure to wear safety glasses to protect your eyes from any flying debris. Go slowly and steadily to avoid cracking the plastic.
4. Line the Bucket: Cut a piece of landscape fabric or burlap that’s large enough to line the entire inside of the bucket. This will help retain moisture and prevent soil from washing out through the holes. Secure the fabric to the inside of the bucket using staples, glue, or even just by tucking it in tightly. Make sure the fabric covers all the holes from the inside.
Phase 2: Planting the Strawberries
Time to get our hands dirty and bring those strawberry plants to life!
1. Add Soil to the Bottom: Pour a layer of potting soil into the bottom of the bucket, about 4-6 inches deep. This will provide a good base for the first row of strawberry plants.
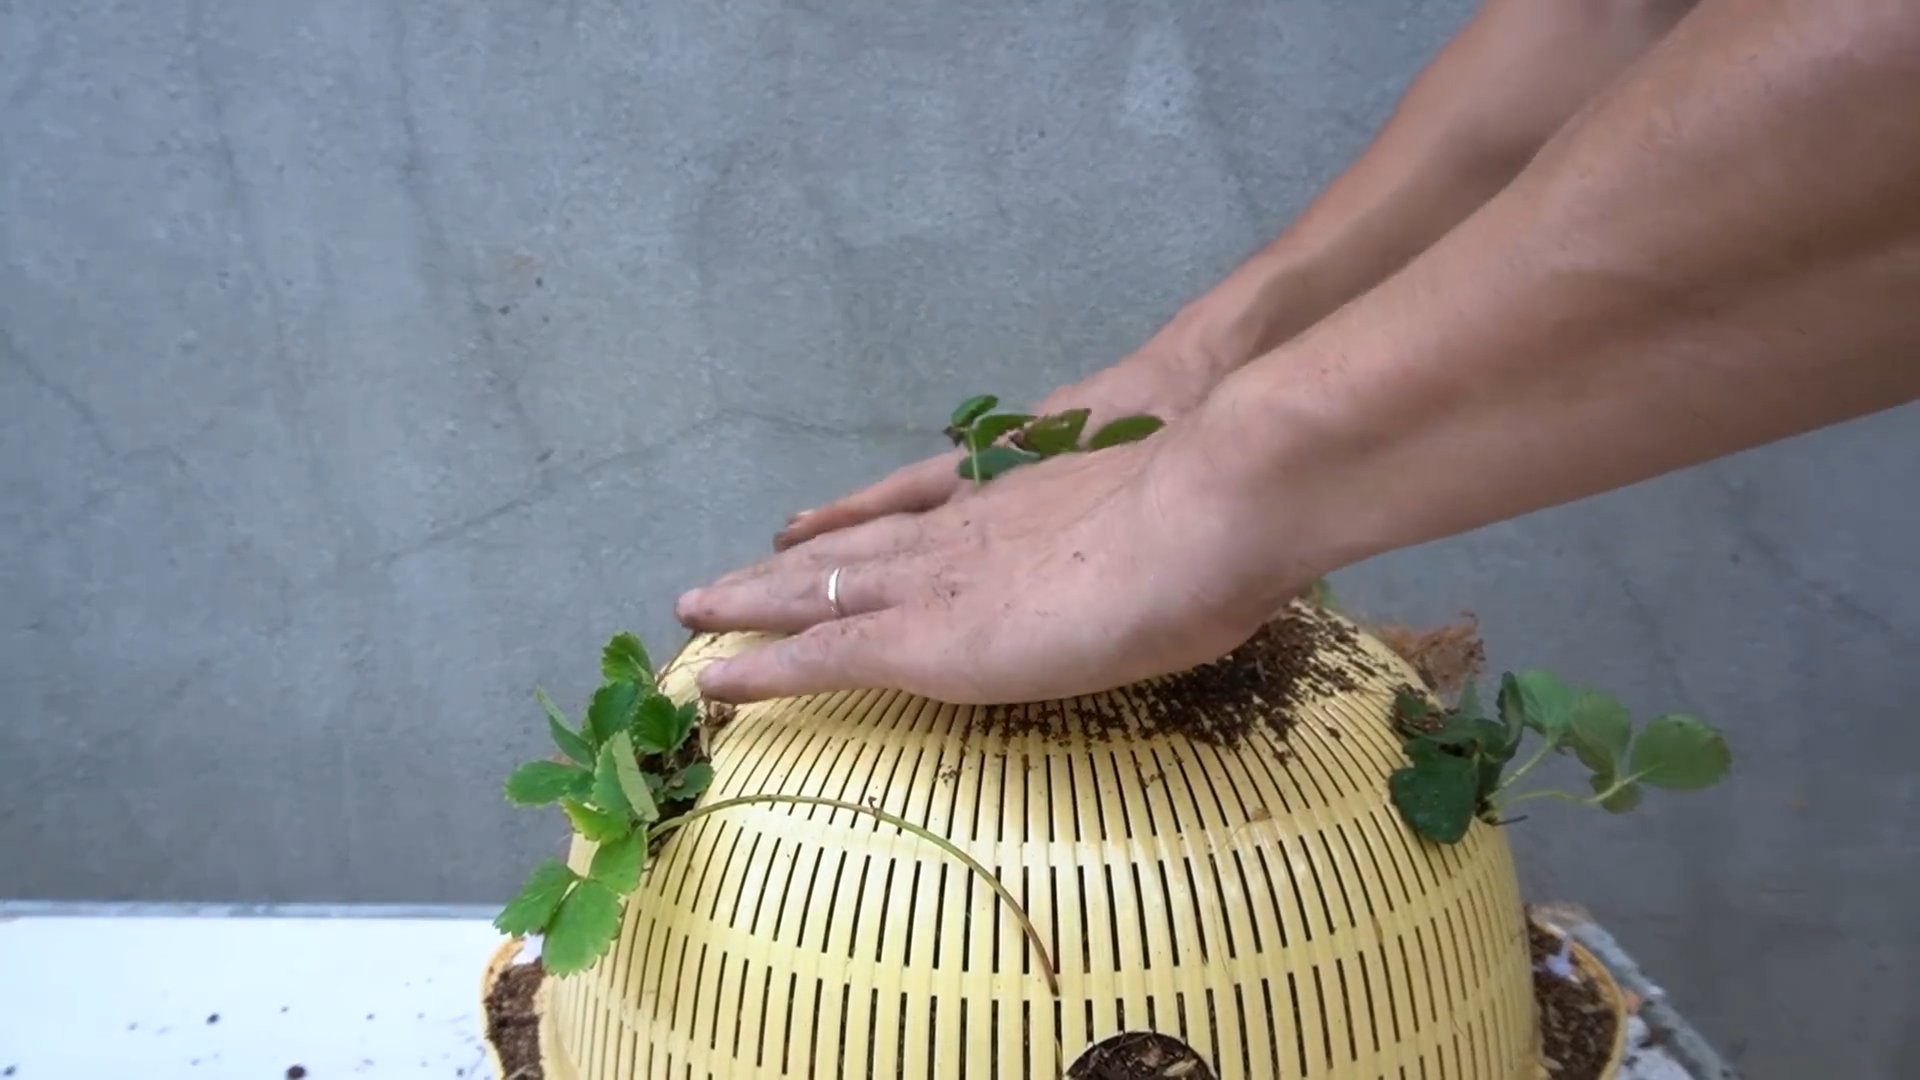
2. Plant the First Row: Gently remove a strawberry plant from its container and loosen the roots slightly. Carefully insert the plant through one of the holes, making sure the crown (where the stems meet the roots) is facing outward. Gently pack soil around the roots to secure the plant in place. Repeat this process for all the holes in the first row.
3. Add More Soil: Add another layer of potting soil, covering the roots of the first row of plants.
4. Plant the Remaining Rows: Repeat steps 2 and 3 for each row of holes, until you reach the top of the bucket.
5. Plant the Top: Fill the remaining space in the bucket with potting soil and plant a few more strawberry plants on top. This will create a lush, overflowing effect.
6. Water Thoroughly: Once all the plants are in place, water the planter thoroughly until water drains out of the bottom. This will help settle the soil and ensure the plants get a good start.
Phase 3: Hanging (Optional) and Caring for Your Strawberry Planter
If you’re opting for a hanging planter, now’s the time to set it up. Even if you’re keeping it on the ground, proper care is essential for a bountiful harvest.
1. Attach Hanging Hardware: If you’re hanging your planter, attach the chain, rope, or wire to the bucket. Make sure the hardware is strong enough to support the weight of the planter when it’s full of soil and plants. Distribute the weight evenly to prevent the bucket from tipping.
2. Find a Sunny Spot: Strawberries need at least 6-8 hours of sunlight per day to thrive. Choose a location that gets plenty of sun, but is also protected from strong winds.
3. Water Regularly: Strawberries need consistent moisture, especially when they’re actively growing and producing fruit. Water your planter regularly, especially during hot, dry weather. Check the soil moisture by sticking your finger into the soil. If it feels dry to the touch, it’s time to water.
4. Fertilize: Feed your strawberry plants with a balanced fertilizer every 2-3 weeks to promote healthy growth and abundant fruit production. Follow the instructions on the fertilizer package. I like to use a liquid fertilizer diluted in water for easy application.
5. Pest Control: Keep an eye out for pests like aphids, slugs, and snails. If you notice any pests, take action immediately to prevent them from damaging your plants. You can use organic pest control methods like insecticidal soap or diatomaceous earth.
6. Pruning: Remove any dead or yellowing leaves to keep your plants healthy and prevent the spread of diseases.
7. Harvesting: The best part! Harvest your strawberries when they are fully ripe and red. Gently twist the berries off the plant, being careful not to damage the stems.
Troubleshooting Tips
Even with the best planning, sometimes things don’t go exactly as expected. Here are a few common issues and how to address them:
* Yellowing Leaves: This could be a sign of overwatering, underwatering, or nutrient deficiency. Check the soil moisture and adjust your watering schedule accordingly. Fertilize your plants to provide them with the nutrients they need.
* Lack of Fruit: This could be due to insufficient sunlight, poor pollination, or nutrient deficiency. Make sure your plants are getting enough sunlight and consider hand-pollinating the flowers if you’re not seeing any bees. Fertilize your plants to provide them with the nutrients they need.
* Pest Infestation: Take action immediately to control pests before they damage your plants. Use organic pest control methods like insecticidal soap or diatomaceous earth.
* Root Rot: This is caused by overwatering and poor drainage. Make sure your potting mix is well-draining and avoid overwatering.
Extra Tips for Strawberry Success
* Choose the Right Variety: Everbearing strawberry varieties are best for hanging planters because they produce fruit throughout the growing season.
* Use High-Quality Potting Mix: A good quality potting mix will provide the right nutrients and drainage for your strawberry plants.
* Don’t Overcrowd: Give your plants enough space to grow by spacing the holes evenly around the bucket.
* Protect from Birds: Birds love strawberries just as much as we do! Cover your planter with netting to protect your berries from being eaten.
* Enjoy Your Harvest! There’s nothing quite like the taste of fresh, homegrown strawberries. Enjoy your harvest in smoothies, salads, desserts, or just eat them straight from the plant!
And there you have it! Your very own DIY hanging strawberry planter. With a little bit of effort and care, you’ll be enjoying a bountiful harvest of delicious strawberries all season long. Happy gardening!
Conclusion
So, there you have it! Creating your own hanging strawberry planter isn’t just a fun weekend project; it’s a gateway to enjoying fresh, delicious strawberries right outside your door. We’ve walked you through the simple steps, highlighting how accessible and rewarding this DIY endeavor can be. But why is this hanging strawberry planter DIY a must-try?
Firstly, it’s incredibly space-saving. If you’re limited on garden space, or even just have a balcony or patio, a hanging planter allows you to grow a significant amount of strawberries vertically. This is especially beneficial for urban dwellers who crave a touch of nature and homegrown goodness.
Secondly, it’s a cost-effective solution. Compared to buying pre-made hanging planters or constantly purchasing strawberries from the store, this DIY project allows you to control your costs and potentially save money in the long run. You can repurpose materials, choose affordable soil, and propagate your own strawberry plants over time.
Thirdly, it’s a fantastic way to deter pests. By elevating your strawberries off the ground, you reduce their exposure to common garden pests like slugs and snails. This means less need for pesticides and healthier, happier plants.
But the benefits don’t stop there! The aesthetic appeal of a hanging strawberry planter is undeniable. It adds a touch of charm and vibrancy to any outdoor space, creating a visually appealing and inviting atmosphere. Imagine the delight of watching your strawberries ripen and the satisfaction of harvesting your own fruit.
Now, let’s talk about variations. Feel free to experiment with different materials for your planter. While we suggested a plastic container, you could use a repurposed burlap sack for a rustic look, or even a tiered planter for maximum strawberry production. Consider adding companion plants like basil or marigolds to your planter to further deter pests and enhance the flavor of your strawberries. You can also adjust the size of the holes to accommodate different varieties of strawberries or even other herbs and flowers.
Don’t be afraid to get creative with the design and personalize your hanging strawberry planter to reflect your own style. Paint it, decorate it with stencils, or add decorative elements like pebbles or shells. The possibilities are endless!
This hanging strawberry planter DIY is more than just a project; it’s an investment in fresh, healthy food, a beautiful outdoor space, and a rewarding gardening experience.
We strongly encourage you to give this DIY trick a try. It’s easier than you think, and the rewards are well worth the effort. Once you’ve created your own hanging strawberry planter, we’d love to hear about your experience! Share your photos, tips, and any variations you’ve tried in the comments below. Let’s create a community of strawberry-loving gardeners and inspire others to embrace the joy of homegrown goodness. Happy planting!
Frequently Asked Questions (FAQ)
What type of strawberries are best for hanging planters?
Day-neutral and everbearing strawberry varieties are generally recommended for hanging planters. Day-neutral varieties produce fruit throughout the growing season, while everbearing varieties produce two or three crops per year. Some popular choices include ‘Tristan,’ ‘Tribute,’ ‘Seascape,’ and ‘Albion.’ These varieties tend to be compact and produce a good yield in a confined space. Avoid June-bearing varieties, as they produce a large crop all at once, which may not be ideal for a hanging planter. Consider your local climate and choose varieties that are well-suited to your region.
What kind of soil should I use for my hanging strawberry planter?
A well-draining potting mix is crucial for the success of your hanging strawberry planter. Avoid using garden soil, as it can become compacted and waterlogged in a container. Look for a potting mix that contains ingredients like peat moss, perlite, and vermiculite. These ingredients help to retain moisture while also providing good drainage. You can also amend your potting mix with compost to add nutrients and improve soil structure. A slightly acidic soil pH (around 6.0 to 6.5) is ideal for strawberries.
How often should I water my hanging strawberry planter?
Hanging planters tend to dry out more quickly than in-ground gardens, so it’s important to monitor the moisture levels regularly. Water your strawberry planter when the top inch of soil feels dry to the touch. Water deeply, until water drains out of the bottom of the planter. Avoid overwatering, as this can lead to root rot. The frequency of watering will depend on factors like the weather, the size of the planter, and the type of potting mix you’re using. During hot, dry weather, you may need to water your planter every day.
How much sunlight do strawberries need?
Strawberries need at least 6-8 hours of direct sunlight per day to produce a good crop of fruit. Choose a location for your hanging planter that receives plenty of sunlight. If you live in a hot climate, you may want to provide some afternoon shade to protect the plants from scorching. Insufficient sunlight can result in smaller, fewer strawberries.
How do I fertilize my hanging strawberry planter?
Strawberries are heavy feeders and benefit from regular fertilization. Use a balanced fertilizer specifically formulated for strawberries or fruits and vegetables. Follow the instructions on the fertilizer package for application rates and frequency. You can also use organic fertilizers like compost tea or fish emulsion. Fertilize your strawberries every 2-4 weeks during the growing season. Avoid over-fertilizing, as this can lead to excessive foliage growth and reduced fruit production.
How do I protect my strawberries from pests and diseases?
Hanging planters can help to deter some pests, but it’s still important to monitor your plants for signs of infestation or disease. Common strawberry pests include aphids, spider mites, and slugs. You can control these pests with insecticidal soap, neem oil, or diatomaceous earth. To prevent fungal diseases, ensure good air circulation around your plants and avoid overhead watering. Remove any dead or diseased leaves promptly. Consider using organic pest control methods whenever possible.
How do I overwinter my hanging strawberry planter?
In colder climates, you’ll need to protect your strawberry plants from freezing temperatures during the winter. You can bring your hanging planter indoors and place it in a cool, sunny location. Alternatively, you can insulate the planter by wrapping it in burlap or bubble wrap. Water sparingly during the winter months, allowing the soil to dry out slightly between waterings. In the spring, gradually acclimate your plants to outdoor conditions before placing them back in their permanent location.
Can I grow other plants in the same hanging planter as my strawberries?
Yes, you can grow companion plants with your strawberries in the same hanging planter. Some good companion plants for strawberries include basil, marigolds, and thyme. These plants can help to deter pests, attract beneficial insects, and improve the flavor of your strawberries. Avoid planting aggressive or invasive plants that could compete with your strawberries for resources. Ensure that all plants have similar sunlight and watering requirements.
How long will my strawberry plants last?
Strawberry plants are typically productive for 3-5 years. After that, their fruit production may decline. You can propagate new strawberry plants from runners (also known as stolons) that the plants produce. These runners will develop roots and can be transplanted into new containers or into the ground. Regularly removing runners from your existing plants can also help to improve their fruit production.
What do I do if my strawberries are not producing fruit?
There are several reasons why your strawberries may not be producing fruit. Insufficient sunlight, poor soil, lack of pollination, and pest or disease problems can all contribute to reduced fruit production. Ensure that your plants are receiving at least 6-8 hours of direct sunlight per day, are planted in well-draining soil, and are properly fertilized. Hand-pollinate your strawberries by gently shaking the flowers or using a small paintbrush to transfer pollen from one flower to another. Monitor your plants for pests and diseases and take appropriate action if necessary. With proper care, your strawberries should start producing fruit in no time.
Leave a Comment