
Home Hacks and Gadgets – ever feel like your house is a never-ending project? I know I do! From that leaky faucet to the eternally dusty shelves, there’s always something vying for our attention (and our wallets!). But what if I told you that tackling those pesky home improvement tasks could be easier, cheaper, and even…fun?
For centuries, people have been devising clever solutions to everyday household problems. Think about it – our grandparents probably had a whole arsenal of ingenious tricks passed down through generations, using simple ingredients and resourcefulness to keep their homes running smoothly. While we might not be churning butter or weaving our own rugs anymore, that spirit of DIY ingenuity is still alive and well!
That’s where this article comes in. We’re diving deep into the world of Home Hacks and Gadgets, uncovering some seriously brilliant DIY tricks that will save you time, money, and a whole lot of frustration. Whether you’re a seasoned DIY enthusiast or a complete beginner, I promise you’ll find something here to inspire you. From clever cleaning solutions to ingenious storage ideas, we’re going to transform your house into a haven of efficiency and style. So, grab your toolbox (or maybe just a spray bottle and some vinegar!), and let’s get started!
Zucchini Harvest Tips: From Garden to Table Like a Pro!
Okay, zucchini lovers, let’s talk about harvesting! There’s nothing quite like the satisfaction of pulling a perfectly ripe zucchini from your garden, ready to be transformed into delicious meals. But knowing when and how to harvest is key to getting the best flavor and yield. I’ve learned a few tricks over the years, and I’m excited to share them with you so you can become a zucchini harvesting whiz!
Knowing When to Harvest: The Size Matters (But Not Always!)
The biggest mistake I see people make is letting their zucchini get HUGE. While a giant zucchini might seem impressive, it often means the flesh is seedy, watery, and less flavorful. Plus, leaving those behemoths on the vine actually slows down the production of new zucchini. So, what’s the sweet spot?
* **Ideal Size:** Aim for zucchini that are 6-8 inches long. This is generally when they have the best flavor and texture.
* **Skin Test:** Gently press your thumbnail into the skin. If it’s easily punctured, it’s ready to harvest. If it’s tough and resistant, give it a few more days.
* **Variety Matters:** Keep in mind that some zucchini varieties naturally grow larger than others. Check your seed packet or plant tag for specific size recommendations.
* **Regular Checks:** Zucchini grow incredibly fast, especially in warm weather. I recommend checking your plants every day or two during peak season. You’ll be amazed at how much they can grow overnight!
* **Don’t Fear the Flowers:** You can even harvest zucchini blossoms! They’re delicious stuffed, fried, or added to soups. Just be sure to leave enough blossoms on the plant to ensure continued fruit production.
The Right Tools for the Job: Keep it Clean and Simple
You don’t need a ton of fancy equipment to harvest zucchini, but having the right tools will make the process easier and prevent damage to your plants.
* **Sharp Knife or Pruning Shears:** This is essential for making a clean cut and avoiding tearing the vine. I prefer pruning shears because they’re easy to maneuver and provide a good grip.
* **Gloves (Optional):** Zucchini plants can sometimes have prickly stems, so gloves can protect your hands.
* **Basket or Bag:** To carry your harvest back to the kitchen.
Harvesting Like a Pro: Step-by-Step Instructions
Alright, let’s get down to the nitty-gritty! Here’s my step-by-step guide to harvesting zucchini:
1. **Gather Your Supplies:** Grab your knife or pruning shears, gloves (if using), and your basket or bag.
2. **Locate Your Ripe Zucchini:** Carefully inspect your plants and identify the zucchini that are ready for harvest based on the size and skin test mentioned earlier.
3. **Make the Cut:** Using your sharp knife or pruning shears, cut the zucchini stem about 2-3 inches from the fruit. Make a clean, angled cut to prevent water from pooling on the cut surface, which can lead to rot.
4. **Handle with Care:** Gently lift the zucchini from the plant and place it in your basket or bag. Avoid dropping or bruising the fruit.
5. **Inspect the Plant:** While you’re there, take a moment to inspect the rest of the plant for any signs of pests or diseases. Early detection is key to preventing problems from spreading.
6. **Repeat:** Continue harvesting any other ripe zucchini on the plant.
7. **Store Properly:** Store your freshly harvested zucchini in the refrigerator. They’ll typically last for about a week.
Dealing with Giant Zucchini (Because It Happens!)
Okay, so you missed a few days of checking your plants and now you have a zucchini the size of a small child. Don’t panic! While it might not be ideal, you can still salvage it.
* **Seed Removal:** Cut the zucchini in half lengthwise and scoop out the seeds. They’ll likely be large and tough.
* **Peeling:** The skin of a large zucchini can be quite thick and bitter, so I recommend peeling it off.
* **Grate It:** Giant zucchini are great for grating and using in zucchini bread, muffins, or fritters. The moisture content actually works well in these recipes.
* **Compost It:** If the zucchini is truly inedible (very seedy, watery, and bitter), don’t feel bad about composting it. It’s better to compost it than to force yourself to eat something you don’t enjoy.
Extending Your Harvest: Tips for Continuous Production
Want to keep those zucchini coming all season long? Here are a few tips to maximize your harvest:
* **Regular Harvesting:** As mentioned earlier, harvesting zucchini regularly encourages the plant to produce more fruit. Don’t let them get too big!
* **Fertilizing:** Zucchini are heavy feeders, so fertilize them regularly with a balanced fertilizer. Follow the instructions on the fertilizer package.
* **Watering:** Keep the soil consistently moist, especially during hot weather. Water deeply at the base of the plant to avoid wetting the foliage, which can lead to fungal diseases.
* **Pest Control:** Keep an eye out for common zucchini pests like squash bugs and squash vine borers. Take action to control them as soon as you spot them.
* **Succession Planting:** Plant new zucchini seeds every few weeks to ensure a continuous harvest throughout the season.
Troubleshooting Common Zucchini Problems
Even with the best care, zucchini plants can sometimes encounter problems. Here are a few common issues and how to address them:
* **Blossom End Rot:** This is caused by a calcium deficiency and results in a dark, sunken spot on the blossom end of the zucchini. To prevent it, ensure your soil has adequate calcium and water consistently. You can also add calcium to the soil by incorporating bone meal or crushed eggshells.
* **Powdery Mildew:** This fungal disease appears as a white, powdery coating on the leaves. To prevent it, provide good air circulation around the plants and avoid overhead watering. If you see powdery mildew, you can treat it with a fungicide or a homemade solution of baking soda and water.
* **Squash Bugs:** These pests suck the sap from the leaves, causing them to wilt and die. Handpick them off the plants or use an insecticide.
* **Squash Vine Borers:** These pests bore into the stems of the plants, causing them to wilt and die. To prevent them, wrap the base of the stems with aluminum foil or netting. If you see signs of squash vine borers, you can try to remove them by slitting the stem and extracting the larvae.
Zucchini Recipes to Try: Beyond Zucchini Bread!
Now that you have a basket full of zucchini, it’s time to get cooking! Here are a few of my favorite zucchini recipes:
* **Zucchini Bread:** A classic for a reason! There are tons of variations, so find one that suits your taste.
* **Zucchini Fritters:** These are a delicious and easy way to use up shredded zucchini.
* **Stuffed Zucchini Blossoms:** A gourmet treat that’s surprisingly easy to make.
* **Zucchini Noodles (Zoodles):** A healthy and low-carb alternative to pasta.
* **Grilled Zucchini:** Simple and delicious, especially with a drizzle of olive oil and a sprinkle of herbs.
* **Zucchini Soup:** A creamy and comforting soup that’s perfect for a chilly evening.
* **Ratatouille:** A classic French vegetable stew that features zucchini as a key ingredient.
So there you have it! Everything you need to know to harvest zucchini like a pro. With a little practice, you’ll be enjoying a bountiful harvest of delicious zucchini all season long. Happy gardening!
Conclusion
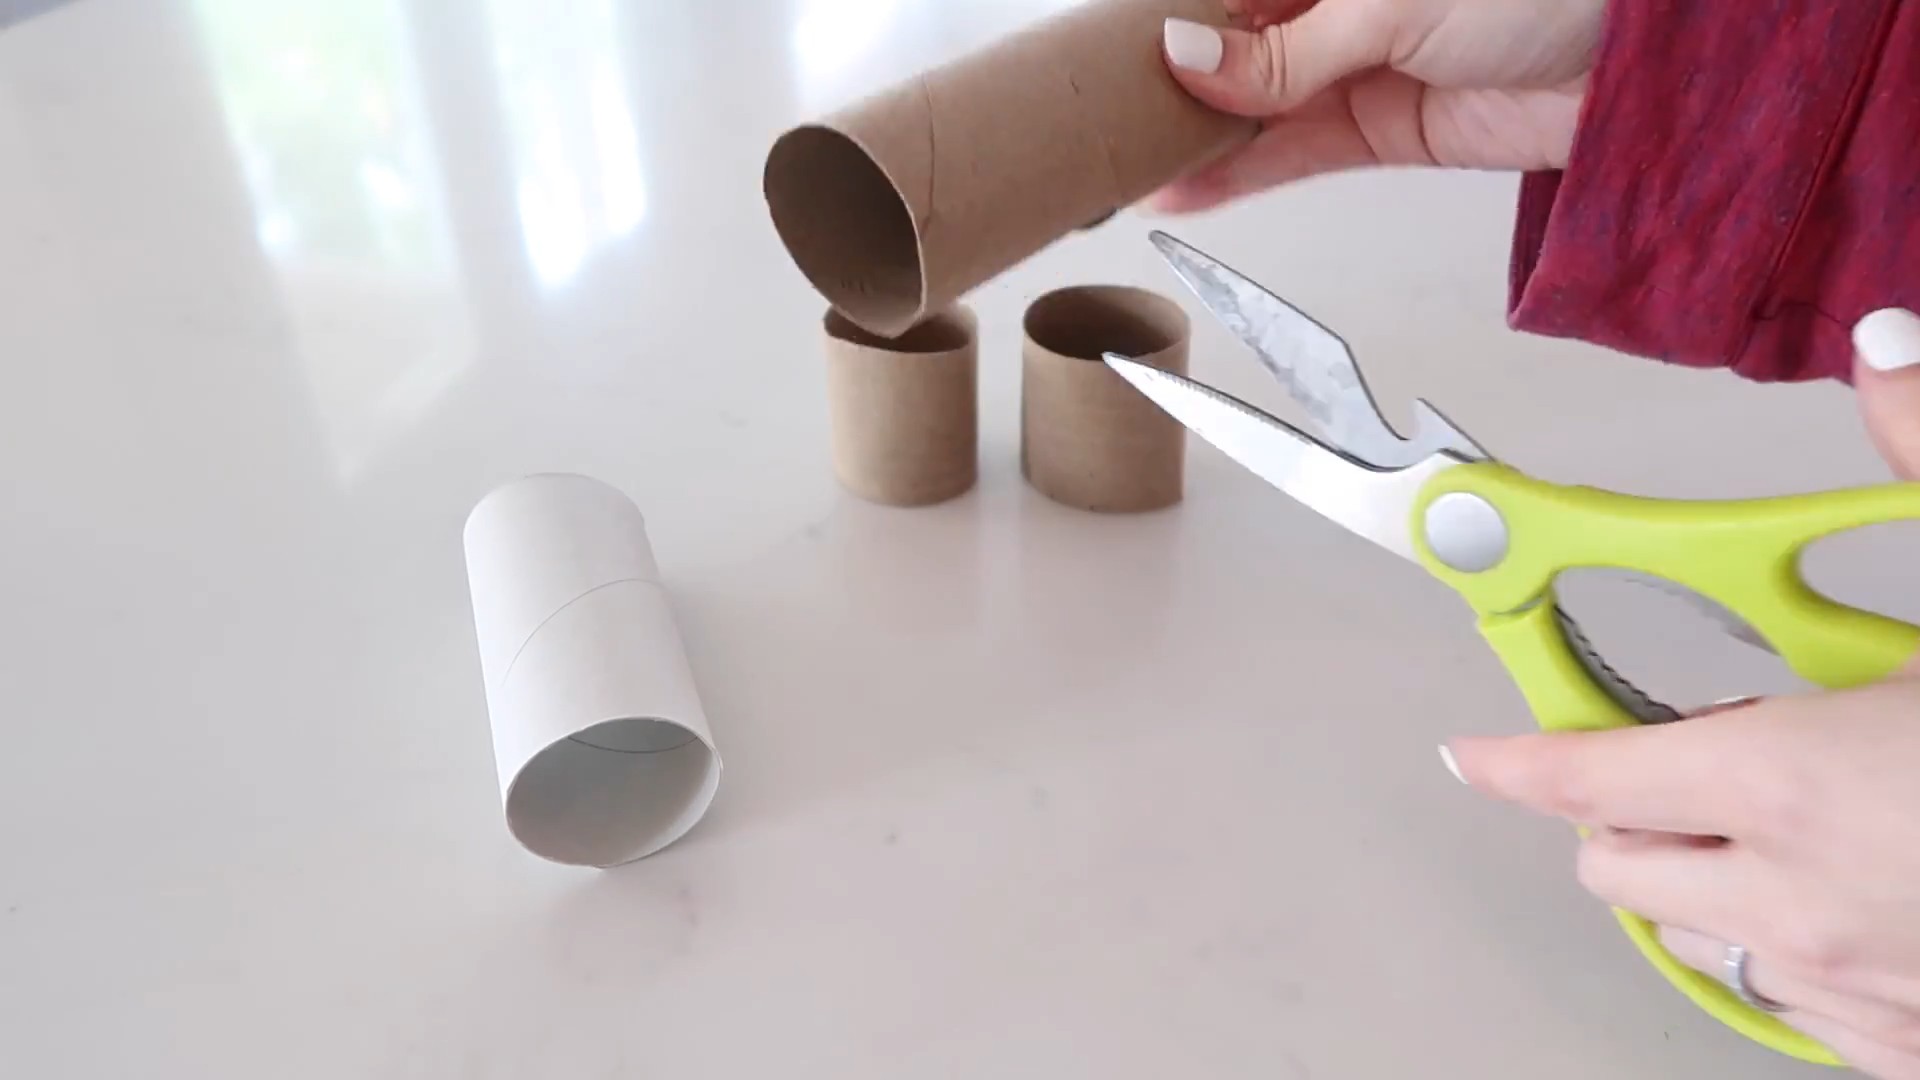
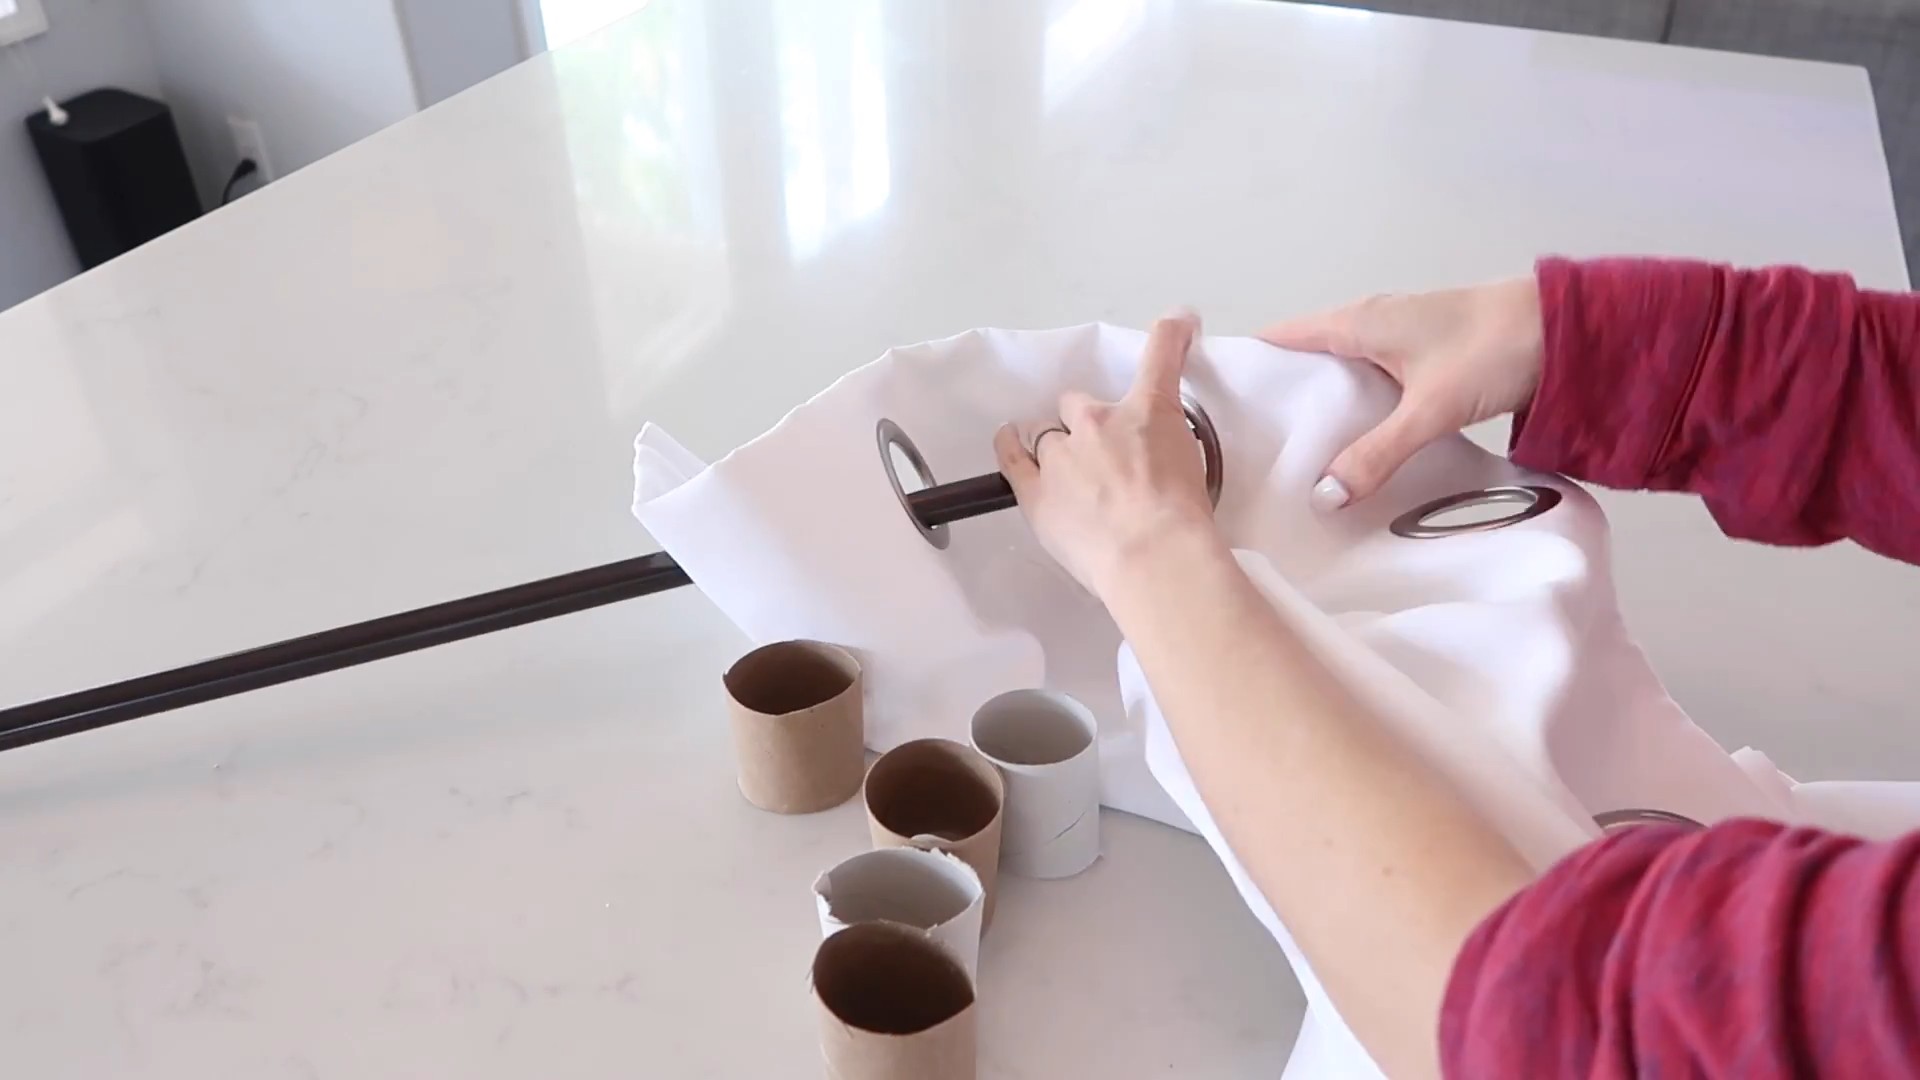
So, there you have it! This simple yet effective DIY trick for creating your own custom phone stand is more than just a fun project; it’s a game-changer for anyone who frequently uses their phone for video calls, watching content, or simply keeping it within easy reach. We’ve explored how to transform everyday materials into a functional and stylish accessory that rivals store-bought options, all while saving you money and reducing waste.
Why is this DIY phone stand a must-try? Because it’s incredibly versatile. You can tailor the design to perfectly match your phone’s size and your personal aesthetic. Tired of flimsy stands that topple over at the slightest touch? This method allows you to create a sturdy and reliable base that will keep your phone secure. Plus, the satisfaction of building something yourself is a reward in itself!
But the fun doesn’t stop there. Feel free to experiment with different materials. Cardboard provides a quick and easy starting point, but you could also use wood for a more durable and polished look. Get creative with the design! Add decorative paper, paint, or even fabric to personalize your stand and make it a true reflection of your style. Consider adding a small shelf or compartment to the base for storing small items like earbuds or charging cables. For a more ergonomic design, experiment with the angle of the phone stand to find the most comfortable viewing position for you. You can even create multiple stands with varying angles for different uses.
This DIY phone stand is also a fantastic project to do with kids. It’s a great way to teach them about resourcefulness, creativity, and basic construction skills. Plus, they’ll love having a custom-made stand for their own devices.
Ultimately, this DIY project is about more than just creating a phone stand; it’s about embracing a more sustainable and creative lifestyle. It’s about finding innovative ways to repurpose materials and reduce our reliance on mass-produced goods. It’s about empowering ourselves to create solutions that are tailored to our specific needs and preferences.
We are confident that you’ll find this DIY phone stand trick to be a valuable addition to your repertoire of home hacks and gadgets. It’s a simple, affordable, and rewarding project that will enhance your daily life.
So, what are you waiting for? Gather your materials, unleash your creativity, and start building your own custom phone stand today! We encourage you to try this DIY trick and share your creations with us. Post photos of your finished stands on social media using [Your Hashtag Here] and let us know what variations you came up with. We can’t wait to see what you create! Your feedback and experiences will help inspire others to embrace the joy of DIY and discover the endless possibilities of transforming everyday materials into functional and beautiful objects.
FAQ
Q: What materials do I need to make this DIY phone stand?
A: The beauty of this project is its simplicity! You can use readily available materials like cardboard, paper, scissors, glue or tape, and a ruler or measuring tape. For a more durable stand, consider using wood, plastic, or even metal. You’ll also need some basic tools like a craft knife or saw (depending on the material you choose), and potentially sandpaper for smoothing rough edges. Remember to always prioritize safety when using sharp tools.
Q: Is this DIY phone stand sturdy enough to hold larger phones or tablets?
A: The sturdiness of your phone stand will depend on the materials you use and the design you implement. For larger phones or tablets, we recommend using thicker cardboard or wood for the base and supports. Reinforcing the joints with extra glue or tape will also significantly improve stability. Consider adding a wider base for increased support and preventing tipping. Experiment with different designs to find the optimal balance between size, weight, and stability.
Q: Can I adjust the angle of the phone stand?
A: Absolutely! Adjustability is one of the key advantages of this DIY project. When designing your stand, consider incorporating a hinge or adjustable support that allows you to change the viewing angle. You can use simple mechanisms like a notched support or a pivoting arm to achieve this. Experiment with different angles to find the most comfortable viewing position for various activities like video calls, watching movies, or reading articles.
Q: How can I decorate my DIY phone stand?
A: The possibilities are endless! You can decorate your phone stand with paint, markers, stickers, wrapping paper, fabric, or even decoupage. Consider using stencils to create intricate patterns or adding embellishments like beads, buttons, or glitter. Let your creativity run wild and personalize your stand to match your style and décor. Remember to use non-toxic materials, especially if children are involved in the project.
Q: What if I don’t have all the tools or materials listed?
A: Don’t worry! This project is designed to be adaptable. If you don’t have a craft knife, you can use scissors or a utility knife (with caution). If you don’t have glue, you can use tape or even hot glue (if available). The key is to be resourceful and find creative solutions using the materials you have on hand. Remember, the goal is to create a functional phone stand, not to achieve perfection.
Q: How long does it take to make this DIY phone stand?
A: The time required will vary depending on the complexity of your design and the materials you use. A simple cardboard stand can be made in as little as 30 minutes, while a more elaborate wooden stand might take a few hours. Allow ample time for drying if you’re using glue or paint. Remember to enjoy the process and don’t rush things.
Q: Can I use this DIY phone stand for other devices, like tablets or e-readers?
A: Yes, absolutely! Simply adjust the dimensions of the stand to accommodate the size and weight of your device. Make sure the base is wide enough and the supports are strong enough to prevent tipping. You might also need to adjust the angle of the stand to provide optimal viewing for larger screens.
Q: Is this DIY phone stand environmentally friendly?
A: Yes, it can be! By using recycled materials like cardboard or scrap wood, you’re reducing waste and giving new life to discarded items. This project promotes sustainability and encourages a more eco-conscious lifestyle. Consider using non-toxic glues and paints to further minimize your environmental impact.
Q: Where can I find more inspiration for DIY phone stand designs?
A: The internet is a treasure trove of inspiration! Search for “DIY phone stand” on platforms like Pinterest, YouTube, and Google Images to find countless ideas and tutorials. You can also browse online craft forums and blogs for tips and tricks from experienced DIYers. Don’t be afraid to experiment and adapt existing designs to create your own unique phone stand.
Q: What if my DIY phone stand breaks?
A: The beauty of DIY is that you can easily repair or replace your creation! If your phone stand breaks, simply reinforce the damaged area with more glue or tape. If the damage is too severe, you can always build a new one using the same materials or try a different design. This project is a great way to learn about construction and problem-solving.


Leave a Comment