
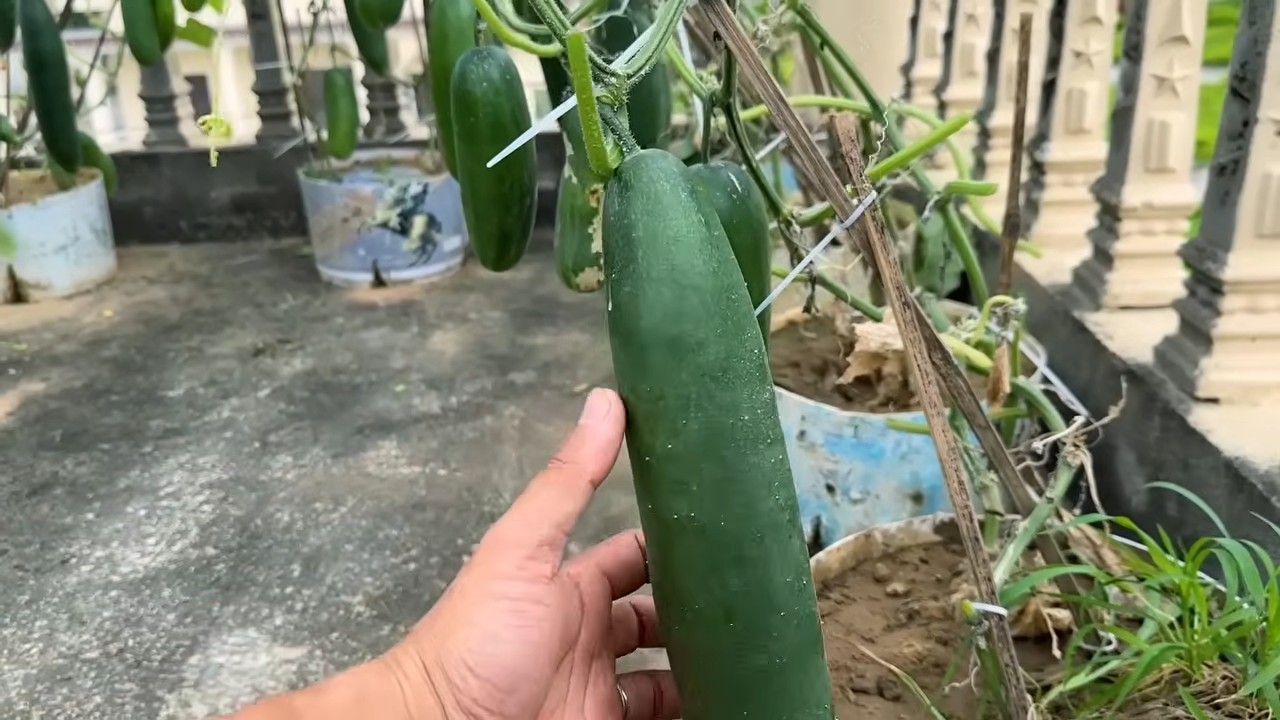
Improve Cucumber Harvest? Absolutely! Imagine biting into a crisp, juicy cucumber, bursting with flavor, knowing you grew it yourself. There’s nothing quite like the satisfaction of harvesting your own vegetables, and cucumbers are a fantastic choice for any home garden. But let’s be honest, sometimes getting a bountiful cucumber harvest can feel like a real challenge.
For centuries, cucumbers have been cultivated across the globe, from their origins in India to their widespread use in ancient Greece and Rome. They’re not just delicious; they’re packed with nutrients and have even been used in traditional medicine. But even with all this history, modern gardeners still face the same age-old problem: how to maximize their cucumber yield.
That’s where these DIY tricks and hacks come in! I’m going to share some simple, effective strategies that will help you improve cucumber harvest significantly. Whether you’re dealing with blossom drop, struggling with pests, or just not seeing the number of cucumbers you hoped for, these tips will give you the edge you need. I’ll walk you through everything from soil preparation to watering techniques, ensuring you get the most out of your cucumber plants. Get ready to enjoy a summer filled with delicious, homegrown cucumbers!
Growing Water Spinach (Kangkong) at Home: A DIY Guide
Hey there, fellow gardening enthusiasts! I’m so excited to share my experience growing water spinach, also known as kangkong or ong choy, right in my backyard. It’s surprisingly easy, incredibly rewarding, and you get a constant supply of fresh, delicious greens. Trust me, once you taste homegrown kangkong, you’ll never want to buy it from the store again!
This guide will walk you through everything you need to know, from choosing the right container to harvesting your bounty. Let’s get started!
What You’ll Need
Before we dive in, let’s gather our supplies. Here’s a list of everything you’ll need to successfully grow water spinach at home:
* Water Spinach Seeds or Cuttings: You can find seeds online or at your local garden center. Cuttings are another great option, especially if you know someone who already grows kangkong.
* A Large Container: A plastic tub, a large pot, or even a repurposed container will work. Aim for something at least 12 inches deep and wide.
* Potting Soil: A good quality potting mix is essential for healthy growth.
* Compost or Organic Fertilizer: This will provide your kangkong with the nutrients it needs.
* Water: Obviously! Kangkong loves water, so make sure you have a reliable source.
* Sunlight: Water spinach needs at least 6 hours of sunlight per day.
* Optional: A small pump or aerator to keep the water oxygenated (especially if you’re growing in a purely aquatic setup).
Choosing Your Growing Method
There are a few different ways to grow water spinach. I’ll cover two popular methods: growing in soil and growing hydroponically (or semi-hydroponically).
* Growing in Soil: This is the simplest method, especially for beginners. You’ll basically treat your kangkong like any other leafy green.
* Growing Hydroponically (or Semi-Hydroponically): This method involves growing your kangkong directly in water, with or without a small amount of soil or other growing medium. It can lead to faster growth and bigger yields, but it requires a bit more attention.
Growing Water Spinach in Soil: Step-by-Step
This is the method I recommend for beginners. It’s straightforward and forgiving.
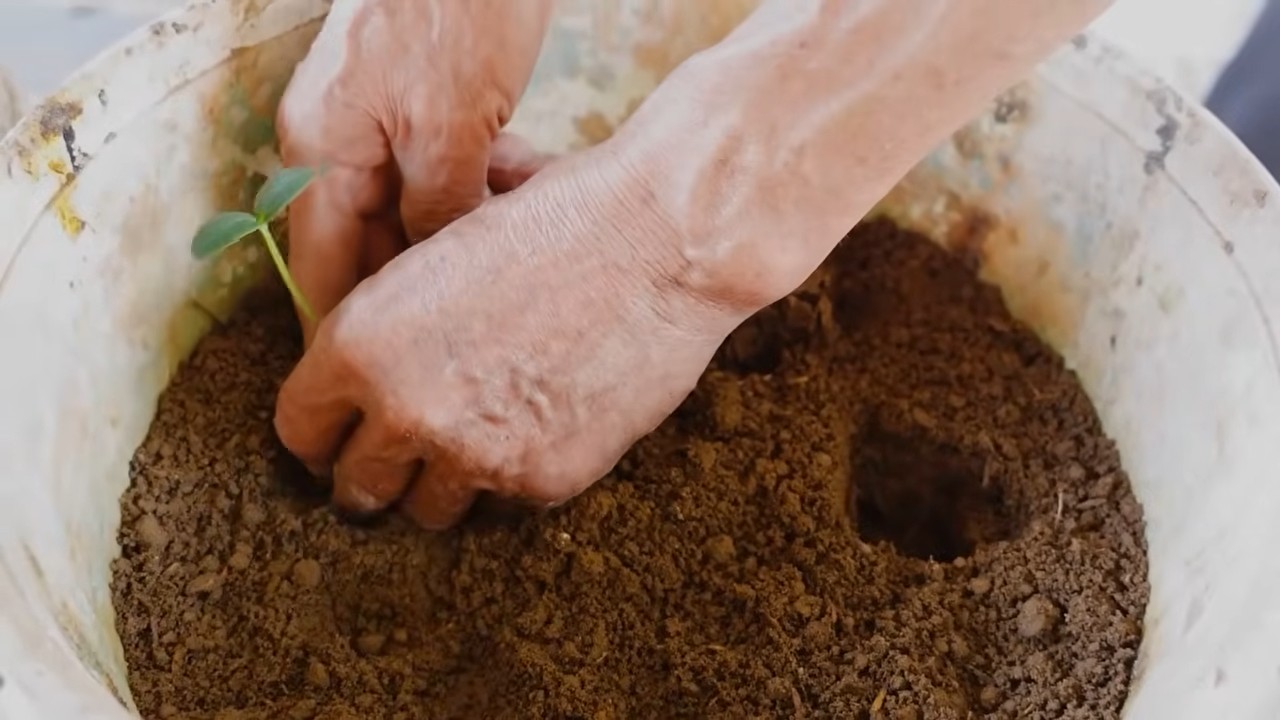
1. Prepare Your Container: Make sure your container has drainage holes. If not, drill a few. Fill the container with potting soil, leaving about an inch or two of space at the top.
2. Sow Your Seeds: Sprinkle the water spinach seeds evenly over the surface of the soil. Cover them with a thin layer of soil (about ¼ inch).
3. Water Thoroughly: Gently water the soil until it’s moist but not soggy.
4. Find a Sunny Spot: Place your container in a location that receives at least 6 hours of sunlight per day.
5. Keep the Soil Moist: Water your kangkong regularly, especially during hot weather. The soil should always be moist, but not waterlogged.
6. Fertilize Regularly: Feed your kangkong with compost tea or a diluted organic fertilizer every two weeks.
7. Harvest Your Kangkong: You can start harvesting your kangkong about 4-6 weeks after planting. Simply cut the stems a few inches above the soil. The plant will regrow, giving you multiple harvests.
Growing Water Spinach Hydroponically (or Semi-Hydroponically): Step-by-Step
This method is a bit more advanced, but it can be very rewarding. I’ve found that my kangkong grows much faster this way.
1. Prepare Your Container: Choose a container without drainage holes. This will hold the water.
2. Add a Growing Medium (Optional): You can grow kangkong directly in water, but I’ve found that adding a small amount of growing medium helps. You can use a few inches of soil, coco coir, or even gravel at the bottom of the container.
3. Plant Your Seeds or Cuttings: If you’re using seeds, sprinkle them over the growing medium (if using) or directly into the water. If you’re using cuttings, place them in the water, making sure that the nodes (the points where leaves grow) are submerged.
4. Add Water: Fill the container with water, making sure that the growing medium (if using) is submerged. The water level should be high enough to reach the roots of the cuttings or the seeds.
5. Find a Sunny Spot: Place your container in a location that receives at least 6 hours of sunlight per day.
6.
Hey there, fellow gardening enthusiasts! I’m so excited to share my experience growing water spinach, also known as kangkong or ong choy, right in my backyard. It’s surprisingly easy, incredibly rewarding, and you get a constant supply of fresh, delicious greens. Trust me, once you taste homegrown kangkong, you’ll never want to buy it from the store again!
This guide will walk you through everything you need to know, from choosing the right container to harvesting your bounty. Let’s get started!
What You’ll Need
Before we dive in, let’s gather our supplies. Here’s a list of everything you’ll need to successfully grow water spinach at home:
* Water Spinach Seeds or Cuttings: You can find seeds online or at your local garden center. Cuttings are another great option, especially if you know someone who already grows kangkong.
* A Large Container: A plastic tub, a large pot, or even a repurposed container will work. Aim for something at least 12 inches deep and wide.
* Potting Soil: A good quality potting mix is essential for healthy growth.
* Compost or Organic Fertilizer: This will provide your kangkong with the nutrients it needs.
* Water: Obviously! Kangkong loves water, so make sure you have a reliable source.
* Sunlight: Water spinach needs at least 6 hours of sunlight per day.
* Optional: A small pump or aerator to keep the water oxygenated (especially if you’re growing in a purely aquatic setup).
Choosing Your Growing Method
There are a few different ways to grow water spinach. I’ll cover two popular methods: growing in soil and growing hydroponically (or semi-hydroponically).
* Growing in Soil: This is the simplest method, especially for beginners. You’ll basically treat your kangkong like any other leafy green.
* Growing Hydroponically (or Semi-Hydroponically): This method involves growing your kangkong directly in water, with or without a small amount of soil or other growing medium. It can lead to faster growth and bigger yields, but it requires a bit more attention.
Growing Water Spinach in Soil: Step-by-Step
This is the method I recommend for beginners. It’s straightforward and forgiving.
1. Prepare Your Container: Make sure your container has drainage holes. If not, drill a few. Fill the container with potting soil, leaving about an inch or two of space at the top.
2. Sow Your Seeds: Sprinkle the water spinach seeds evenly over the surface of the soil. Cover them with a thin layer of soil (about ¼ inch).
3. Water Thoroughly: Gently water the soil until it’s moist but not soggy.
4. Find a Sunny Spot: Place your container in a location that receives at least 6 hours of sunlight per day.
5. Keep the Soil Moist: Water your kangkong regularly, especially during hot weather. The soil should always be moist, but not waterlogged.
6. Fertilize Regularly: Feed your kangkong with compost tea or a diluted organic fertilizer every two weeks.
7. Harvest Your Kangkong: You can start harvesting your kangkong about 4-6 weeks after planting. Simply cut the stems a few inches above the soil. The plant will regrow, giving you multiple harvests.
Growing Water Spinach Hydroponically (or Semi-Hydroponically): Step-by-Step
This method is a bit more advanced, but it can be very rewarding. I’ve found that my kangkong grows much faster this way.
1. Prepare Your Container: Choose a container without drainage holes. This will hold the water.
2. Add a Growing Medium (Optional): You can grow kangkong directly in water, but I’ve found that adding a small amount of growing medium helps. You can use a few inches of soil, coco coir, or even gravel at the bottom of the container.
3. Plant Your Seeds or Cuttings: If you’re using seeds, sprinkle them over the growing medium (if using) or directly into the water. If you’re using cuttings, place them in the water, making sure that the nodes (the points where leaves grow) are submerged.
4. Add Water: Fill the container with water, making sure that the growing medium (if using) is submerged. The water level should be high enough to reach the roots of the cuttings or the seeds.
5. Find a Sunny Spot: Place your container in a location that receives at least 6 hours of sunlight per day.
6. Change the Water Regularly: Change the water every few days to prevent algae growth and ensure that your kangkong has access to fresh nutrients.
7. Add Nutrients: Add a hydroponic nutrient solution to the water every week or two. Follow the instructions on the nutrient solution label.
8. Aerate the Water (Optional): If you’re growing in a purely aquatic setup, consider adding a small pump or aerator to keep the water oxygenated. This will help prevent root rot.
9. Harvest Your Kangkong: You can start harvesting your kangkong about 3-5 weeks after planting. Simply cut the stems a few inches above the water line. The plant will regrow, giving you multiple harvests.
Troubleshooting
Even with the best intentions, you might encounter a few problems along the way. Here are some common issues and how to address them:
* Yellowing Leaves: This could be a sign of nutrient deficiency. Try adding more fertilizer or compost. It could also be a sign of overwatering, especially if you’re growing in soil. Make sure your container has good drainage.
* Slow Growth: This could be due to a lack of sunlight, nutrients, or water. Make sure your kangkong is getting enough of all three.
* Pests: Water spinach is generally pest-resistant, but you might occasionally encounter aphids or other common garden pests. You can control these pests with insecticidal soap or neem oil.
* Algae Growth: This is more common in hydroponic setups. To prevent algae growth, change the water regularly and make sure your container is not in direct sunlight for too long. You can also add a small amount of hydrogen peroxide to the water to kill algae.
* Root Rot: This is more common in hydroponic setups if the water is not properly oxygenated. Make sure to change the water regularly and consider adding a pump or aerator.
Harvesting and Using Your Water Spinach
Harvesting your water spinach is the most rewarding part of the process! As I mentioned earlier, you can start harvesting about 4-6 weeks after planting (or 3-5 weeks for hydroponically grown kangkong).
To harvest, simply cut the stems a few inches above the soil or water line. The plant will regrow, giving you multiple harvests. I usually harvest about half of the plant at a time, leaving the rest to continue growing.
Water spinach is incredibly versatile in the kitchen. You can stir-fry it, steam it, add it to soups, or even eat it raw in salads. It has a mild, slightly sweet flavor that pairs well with garlic, ginger, chili peppers, and soy sauce.
Here are a few of my favorite ways to use homegrown kangkong:
* Garlic Stir-Fried Water Spinach: This is a classic dish that’s quick, easy, and delicious. Simply stir-fry the kangkong with garlic, oil, and a little bit of soy sauce.
* Water Spinach Soup: Add kangkong to your favorite soup recipe for a boost of nutrients and flavor.
* Water Spinach Salad: Use young, tender kangkong leaves in salads for a refreshing and healthy meal.
* Kangkong Adobo: A Filipino dish where water spinach is cooked in soy sauce, vinegar, garlic, and peppercorns.
Tips for Success
Here are a few extra tips to help you succeed in growing water spinach at home:
* Start with Good Quality Seeds or Cuttings: This will give you a head start and increase your chances of success.
* Provide Plenty of Sunlight: Water spinach needs at least 6 hours of sunlight per day.
* Keep the Soil Moist (But Not Waterlogged): Water your kangkong regularly, especially during hot weather.
* Fertilize Regularly: Feed your kangkong with compost tea or a diluted organic fertilizer every two weeks.
* Harvest Regularly: This will encourage the plant to produce more leaves.
* Don’t Be Afraid to Experiment: Try different growing methods and nutrient solutions to see what works best for you.
Growing water spinach at home is a fun and rewarding experience. With a little bit of effort, you can enjoy a constant supply of
Conclusion
So, there you have it! This simple yet incredibly effective DIY trick to improve cucumber harvest is a game-changer for any gardener, whether you’re a seasoned pro or just starting out. We’ve walked you through the process, highlighting the benefits of consistent watering, strategic pruning, and the importance of providing adequate support for your cucumber vines. But the real magic lies in the specific technique we’ve shared – the one that encourages more female flowers and, consequently, a significantly larger yield of those crisp, delicious cucumbers we all crave.
Why is this a must-try? Because it addresses the core issues that often limit cucumber production. Inconsistent watering leads to stressed plants and fewer fruits. Neglecting to prune results in overcrowded vines that compete for resources. And a lack of support can lead to disease and reduced airflow. This DIY method tackles all of these problems head-on, creating the optimal environment for your cucumber plants to thrive.
But don’t stop there! Feel free to experiment with variations to suit your specific needs and growing conditions. For example, if you live in a particularly hot climate, consider using shade cloth to protect your cucumber plants from the harsh afternoon sun. You could also try companion planting with basil or marigolds to deter pests naturally. And if you’re growing cucumbers in containers, be sure to use a high-quality potting mix and fertilize regularly.
Another variation to consider is the type of support you use. While we’ve suggested a trellis, you could also use stakes, cages, or even a fence. The key is to provide a sturdy structure that allows your cucumber vines to climb and receive ample sunlight. You can also experiment with different pruning techniques, such as removing suckers or pinching off the growing tips to encourage bushier growth.
The possibilities are endless, and the best way to discover what works best for you is to get your hands dirty and try it out! We are confident that this DIY trick will make a noticeable difference in your cucumber harvest. Imagine the satisfaction of picking basket after basket of fresh, homegrown cucumbers, knowing that you played a direct role in their abundance. Think of all the delicious salads, pickles, and refreshing snacks you can create with your bountiful harvest.
We wholeheartedly encourage you to give this DIY trick a try. It’s easy, affordable, and incredibly rewarding. And most importantly, we want to hear about your experience! Share your results, tips, and variations in the comments below. Let’s create a community of cucumber enthusiasts who are passionate about maximizing their harvests and enjoying the fruits (or vegetables!) of their labor. Your insights could help other gardeners achieve even greater success. So, go ahead, get planting, and let’s grow some amazing cucumbers together! Don’t forget to document your progress and share your photos – we can’t wait to see what you create! Happy gardening!
Frequently Asked Questions (FAQ)
Q: How often should I water my cucumber plants?
A: Consistent watering is crucial for a successful cucumber harvest. Aim to water deeply and regularly, providing about 1-2 inches of water per week, especially during hot and dry periods. The soil should be consistently moist but not waterlogged. Check the soil moisture by sticking your finger about an inch deep – if it feels dry, it’s time to water. Consider using a soaker hose or drip irrigation to deliver water directly to the roots, minimizing water loss through evaporation and reducing the risk of fungal diseases. Remember that container-grown cucumbers will likely need more frequent watering than those planted in the ground.
Q: What’s the best way to prune my cucumber plants?
A: Pruning cucumber plants can significantly improve airflow, reduce disease, and encourage fruit production. Start by removing any yellowing or dead leaves near the base of the plant. Then, focus on pruning the suckers, which are the small shoots that grow between the main stem and the side branches. Removing these suckers will direct the plant’s energy towards fruit production. You can also pinch off the growing tips of the vines once they reach the top of your trellis or support structure to encourage branching and more fruit. Be careful not to over-prune, as this can stress the plant.
Q: What kind of support should I use for my cucumber plants?
A: Cucumbers are vining plants and require support to grow properly. A trellis is a popular and effective option, providing a sturdy structure for the vines to climb. You can also use stakes, cages, or even a fence. The key is to choose a support that is tall enough and strong enough to support the weight of the mature vines and fruits. Make sure the support is securely anchored in the ground to prevent it from tipping over in strong winds. When training your cucumber vines to climb the support, gently guide them and tie them loosely with twine or plant ties.
Q: How can I encourage more female flowers on my cucumber plants?
A: Cucumber plants produce both male and female flowers, but only the female flowers produce fruit. To encourage more female flowers, ensure your plants receive adequate sunlight, water, and nutrients. Avoid stressing the plants, as stress can lead to a higher proportion of male flowers. Some cucumber varieties are gynoecious, meaning they produce primarily female flowers. Consider planting these varieties for a higher yield. You can also try foliar feeding with a seaweed extract, which is believed to promote female flower development.
Q: What are some common pests and diseases that affect cucumber plants, and how can I prevent them?
A: Cucumber plants are susceptible to several pests and diseases, including aphids, cucumber beetles, squash bugs, powdery mildew, and downy mildew. To prevent these problems, practice good garden hygiene by removing plant debris and weeds. Encourage beneficial insects, such as ladybugs and lacewings, which prey on aphids and other pests. Use row covers to protect young plants from pests. Water at the base of the plants to avoid wetting the foliage, which can promote fungal diseases. If you notice signs of pests or diseases, treat them promptly with organic insecticides or fungicides. Crop rotation can also help prevent soilborne diseases.
Q: What type of fertilizer is best for cucumber plants?
A: Cucumbers are heavy feeders and benefit from regular fertilization. Use a balanced fertilizer with a ratio of 10-10-10 or 14-14-14. You can also use a fertilizer specifically formulated for vegetables. Apply the fertilizer according to the package instructions, typically every 2-3 weeks. Side-dressing with compost or well-rotted manure can also provide essential nutrients. Avoid over-fertilizing, as this can lead to excessive foliage growth and reduced fruit production.
Q: How long does it take for cucumbers to mature after flowering?
A: The time it takes for cucumbers to mature after flowering depends on the variety and growing conditions. Generally, it takes about 50-70 days from planting to harvest. After flowering, cucumbers typically mature in about 1-2 weeks. Check the seed packet or plant tag for specific information on the maturity time for your chosen variety. Harvest cucumbers when they are the desired size and color, before they become overripe and bitter.
Q: Can I grow cucumbers in containers?
A: Yes, cucumbers can be successfully grown in containers, but it’s important to choose a large enough container, at least 5 gallons in size. Use a high-quality potting mix and provide adequate drainage. Container-grown cucumbers will need more frequent watering and fertilization than those planted in the ground. Choose bush or compact varieties that are well-suited for container gardening. Provide a trellis or other support for the vines to climb.
Q: What should I do if my cucumber fruits are bitter?
A: Bitter cucumbers are often caused by stress, such as inconsistent watering, high temperatures, or nutrient deficiencies. To prevent bitterness, ensure your plants receive adequate water, sunlight, and nutrients. Harvest cucumbers when they are the desired size and color, before they become overripe. Some cucumber varieties are less prone to bitterness than others. If your cucumbers are bitter, you can try peeling them and removing the seeds, as these parts tend to be the most bitter.

Leave a Comment