
Indoor Radish Growing: Forget the sprawling garden! I’m here to tell you that fresh, peppery radishes are totally achievable, even if your outdoor space is limited to a balcony or doesn’t exist at all. Have you ever craved that satisfying crunch of a homegrown radish in the dead of winter? Well, you’re in the right place!
Radishes, though humble, have a surprisingly rich history. They’ve been cultivated for thousands of years, with evidence suggesting they were enjoyed in ancient Egypt and Greece. Imagine, those civilizations were already enjoying the crisp bite of a radish! Now, we can bring that same ancient goodness right into our homes.
Why bother with indoor radish growing? Because let’s face it, store-bought radishes can sometimes be a bit… lackluster. They lack that vibrant flavor and satisfying texture that comes from a freshly harvested, homegrown radish. Plus, growing your own is incredibly rewarding! It’s a fantastic way to connect with nature, even indoors, and enjoy the freshest possible produce. This DIY guide will give you simple tricks and hacks to ensure a bountiful harvest of these peppery delights, no matter the season. Get ready to enjoy the freshest salads and snacks, all thanks to your own indoor radish patch!
Grow Your Own Radishes Indoors: A Beginner’s Guide
Hey there, fellow gardening enthusiasts! Ever craved the peppery crunch of a fresh radish in the dead of winter? Well, guess what? You don’t need a sprawling garden to enjoy these little root veggies. I’m going to walk you through the surprisingly simple process of growing radishes indoors. Get ready to have a vibrant, edible garden right on your windowsill!
What You’ll Need
Before we dive in, let’s gather our supplies. This is a pretty low-cost project, which is always a win in my book!
* Radish Seeds: Choose a variety that matures quickly. ‘Cherry Belle’ and ‘French Breakfast’ are excellent choices for indoor growing.
* Containers: You’ll need containers that are at least 6 inches deep. I prefer using plastic pots with drainage holes, but you can also repurpose yogurt containers or even old plastic tubs. Just make sure they have drainage!
* Potting Mix: Use a well-draining potting mix. Avoid using garden soil, as it can compact and hinder root growth. A mix specifically designed for vegetables is ideal.
* Grow Lights (Optional but Recommended): While radishes can grow indoors with natural light, they’ll thrive with supplemental grow lights, especially during the darker months.
* Watering Can or Spray Bottle: For gentle watering.
* Small Shovel or Trowel: For planting the seeds.
* Fertilizer (Optional): A balanced liquid fertilizer can give your radishes a boost.
Choosing the Right Radish Variety
Not all radishes are created equal, especially when it comes to indoor growing. You want varieties that mature quickly and don’t require a ton of space. Here are a few of my favorites:
* Cherry Belle: These are classic, round, bright red radishes that mature in about 22 days. They’re reliable and easy to grow.
* French Breakfast: These are elongated, red radishes with white tips. They have a milder flavor and mature in about 25 days.
* Easter Egg: This is a mix of different colored radishes (red, pink, purple, white) that mature in about 28 days. It’s a fun and colorful option!
* Sparkler: Similar to Cherry Belle, but with a slightly spicier flavor. They mature in about 24 days.
Planting Your Radish Seeds
This is where the magic happens! Let’s get those seeds in the soil.
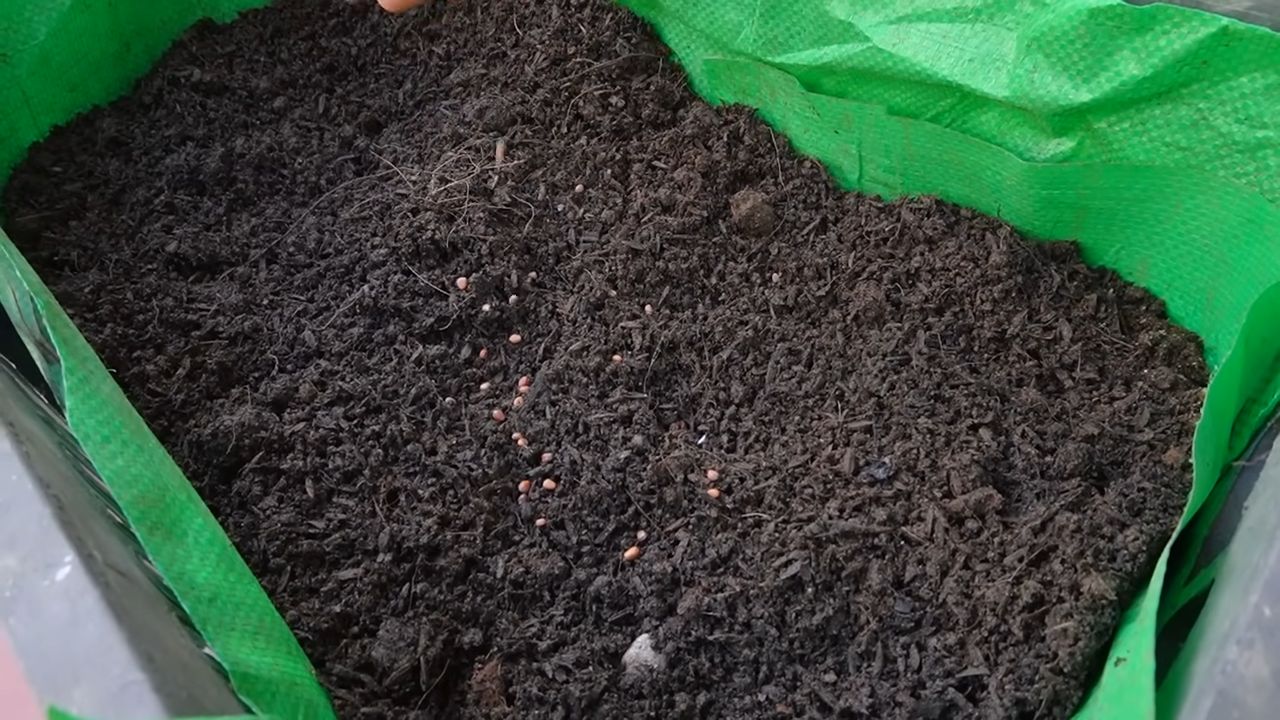
1. Prepare Your Containers: Fill your containers with potting mix, leaving about an inch of space at the top. Gently pat down the soil to remove any air pockets.
2. Sow the Seeds: Sow the radish seeds about ½ inch deep and 1 inch apart. I like to use my finger to make small indentations in the soil, drop in the seeds, and then cover them with soil.
3. Water Gently: Water the soil gently until it’s evenly moist. Avoid overwatering, as this can lead to rot. A spray bottle is great for this step.
4. Provide Light: Place your containers in a sunny location that receives at least 6 hours of direct sunlight per day. If you’re using grow lights, position them a few inches above the soil surface.
5. Maintain Moisture: Keep the soil consistently moist, but not soggy. Check the soil moisture daily and water when the top inch feels dry.
Caring for Your Indoor Radishes
Now that your seeds are planted, it’s time to nurture them and watch them grow!
1. Thinning Seedlings: Once your seedlings emerge (usually within 3-7 days), you’ll need to thin them out. This means removing some of the seedlings to give the remaining ones enough space to grow. Thin them so that they are about 1-2 inches apart. Use small scissors to snip off the unwanted seedlings at the soil line.
2. Watering: Radishes need consistent moisture to grow quickly and develop crisp roots. Water them regularly, especially during hot or dry weather. Avoid letting the soil dry out completely.
3. Fertilizing (Optional): If you want to give your radishes a boost, you can fertilize them with a balanced liquid fertilizer diluted to half strength. Apply the fertilizer every 2-3 weeks.
4. Light: Ensure your radishes are getting enough light. If you’re using natural light, rotate the containers regularly to ensure even growth. If you’re using grow lights, keep them on for about 12-14 hours per day.
5. Temperature: Radishes prefer cooler temperatures, ideally between 60-70°F (15-21°C). Avoid placing them near heat sources, such as radiators or vents.
Dealing with Common Problems
Even with the best care, you might encounter a few challenges along the way. Here’s how to troubleshoot some common problems:
* Leggy Seedlings: This means your seedlings are stretching towards the light and becoming weak and spindly. This is usually caused by insufficient light. Move your containers to a sunnier location or provide supplemental grow lights.
* Slow Growth: Slow growth can be caused by a variety of factors, including insufficient light, poor soil, or lack of nutrients. Make sure your radishes are getting enough light, water, and fertilizer.
* Cracked Radishes: This is usually caused by inconsistent watering. Make sure you’re watering your radishes regularly and avoiding letting the soil dry out completely.
* Pests: While indoor radishes are less susceptible to pests than outdoor radishes, you might still encounter aphids or other small insects. You can usually control these pests by spraying your plants with a solution of soapy water.
Harvesting Your Radishes
The best part! Radishes are quick growers, so you won’t have to wait long to enjoy your harvest.
1. Check for Maturity: Radishes are typically ready to harvest about 3-4 weeks after planting, depending on the variety. Check the seed packet for specific maturity dates.
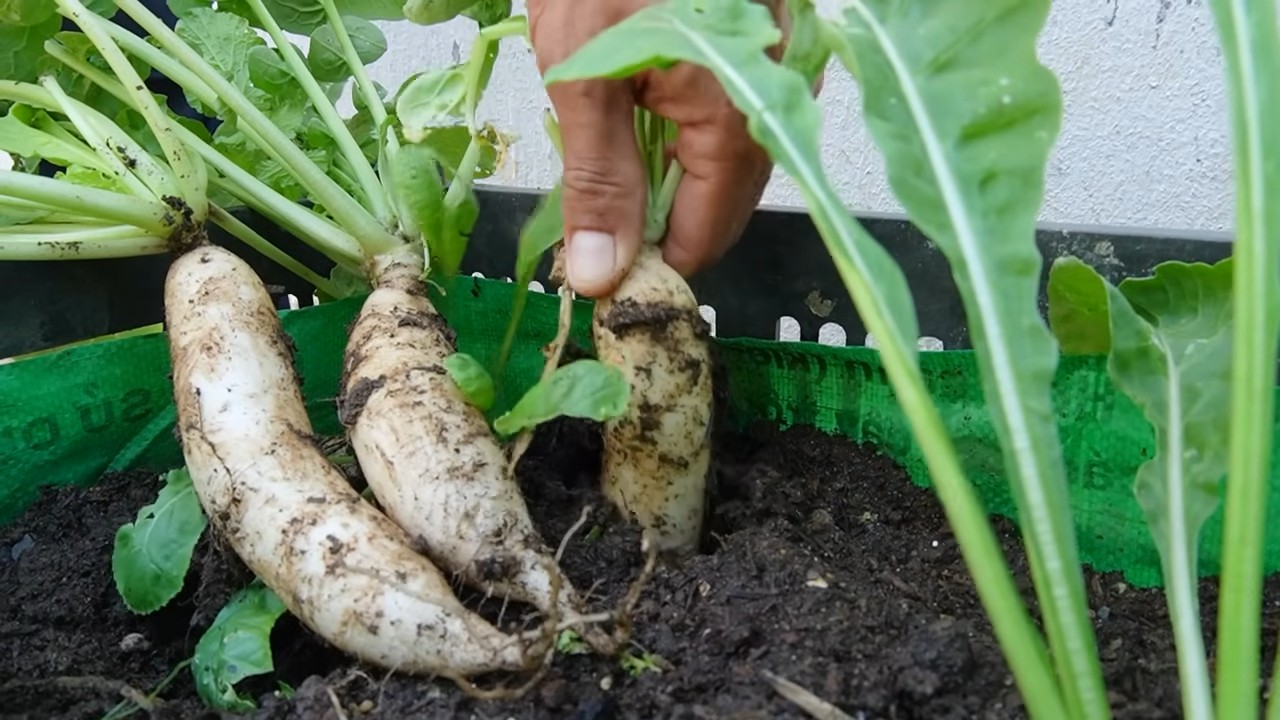
2. Harvesting: To harvest your radishes, gently pull them from the soil. If they’re difficult to pull, you can loosen the soil around them with a small trowel.
3. Enjoy: Wash your radishes thoroughly and enjoy them fresh in salads, sandwiches, or as a crunchy snack. You can also roast or sauté them for a more cooked flavor.
Tips for Success
Here are a few extra tips to help you grow the best indoor radishes:
* Succession Planting: To enjoy a continuous harvest of radishes, sow a new batch of seeds every 1-2 weeks.
* Choose the Right Container Size: Make sure your containers are deep enough to accommodate the radish roots. At least 6 inches deep is ideal.
* Don’t Overcrowd: Thin your seedlings properly to give them enough space to grow.
* Keep the Soil Moist: Radishes need consistent moisture to grow quickly and develop crisp roots.
* Provide Adequate Light: Radishes need at least 6 hours of direct sunlight per day, or 12-14 hours of grow light.
* Monitor for Pests: Check your plants regularly for pests and take action promptly if you find any.
* Experiment with Varieties: Try growing different varieties of radishes to find your favorites.
Troubleshooting Guide
Let’s dive a little deeper into some common issues and how to fix them.
Why are my radish leaves growing but no radish root?
This is a frustrating one! There are a few potential culprits:
* Too much nitrogen: Radishes are root vegetables, so they need a balance of nutrients. Too much nitrogen in the soil will encourage leafy growth at the expense of root development. Avoid using fertilizers that are high in nitrogen.
* Overcrowding: If your radishes are too close together, they’ll compete for resources and may not develop properly. Make sure you thin your seedlings to the recommended spacing.
* Too hot: Radishes prefer cooler temperatures. If it’s too hot, they may bolt (go to seed) and focus on producing leaves instead of roots. Try to keep them in a cool location.
* Not enough light: While radishes don’t need *intense* light, they still need a good amount. Insufficient light can hinder root development.
Why are my radishes small and spicy?
Small, spicy radishes are often a sign of stress:
* Lack of water: Radishes need consistent moisture to grow quickly and develop mild roots. If they’re stressed by drought, they’ll become small and spicy.
* Poor soil: Poor soil can also stress radishes and lead to small, spicy roots. Make sure you’re using a well-draining potting mix that’s rich in nutrients.
*
Conclusion
So, there you have it! Growing radishes indoors is not only possible, it’s surprisingly simple and incredibly rewarding. Forget those bland, store-bought radishes that lack the peppery punch you crave. With this DIY trick, you can cultivate a continuous supply of crisp, flavorful radishes right in your own home, regardless of the season or your outdoor space limitations.
This isn’t just about convenience; it’s about control. You dictate the growing conditions, ensuring your radishes are free from harmful pesticides and herbicides. You get to experience the satisfaction of nurturing something from seed to table, a connection to nature that’s often missing in our modern lives. And let’s be honest, there’s something undeniably cool about showing off your indoor radish garden to friends and family.
But the best part? The versatility! Once you’ve mastered the basics, the possibilities are endless. Experiment with different radish varieties – from the classic Cherry Belle to the spicy French Breakfast or the vibrant Easter Egg blend. Try adding companion plants like chives or lettuce to your container for a more diverse and productive mini-garden. Consider using different types of growing mediums, such as coco coir or a soilless mix, to see which yields the best results for you.
Don’t be afraid to tweak the lighting, watering schedule, or even the temperature to find the sweet spot for your indoor radish growing setup. Remember, gardening is a journey of learning and experimentation. Each batch of radishes you grow will teach you something new, helping you refine your technique and achieve even better results.
Ready to ditch the store-bought radishes and embrace the joy of homegrown flavor? We urge you to give this DIY trick a try. It’s a small investment of time and effort that yields a big return in terms of taste, satisfaction, and a connection to the natural world.
And most importantly, we want to hear about your experience! Share your photos, tips, and challenges in the comments below. Let’s build a community of indoor radish growers, sharing our knowledge and inspiring each other to cultivate the freshest, most flavorful radishes imaginable. What are you waiting for? Get planting!
Frequently Asked Questions (FAQ)
What are the best radish varieties to grow indoors?
While many radish varieties can be grown indoors, some tend to perform better than others. Shorter, round varieties like Cherry Belle, Champion, and French Breakfast are generally recommended due to their quick maturity and compact size. These varieties don’t require as much space or light as larger, longer varieties. However, don’t be afraid to experiment with other types! Just be mindful of their expected size and maturity time. Easter Egg radishes, a mix of colorful round varieties, are also a fun and visually appealing option for indoor growing. Ultimately, the best variety for you will depend on your personal preferences and growing conditions.
How much light do indoor radishes need?
Radishes need at least 6 hours of direct sunlight per day to thrive. If you don’t have a sunny windowsill, you’ll need to supplement with artificial light. LED grow lights are an excellent option, as they are energy-efficient and provide the full spectrum of light that plants need. Position the grow light a few inches above the radish seedlings and adjust as they grow. Insufficient light can lead to leggy, weak plants with small, underdeveloped radishes. Signs of insufficient light include pale leaves, stretched stems, and a lack of vibrant color.
How often should I water my indoor radishes?
Radishes need consistent moisture to grow quickly and develop crisp, flavorful roots. Water thoroughly when the top inch of soil feels dry to the touch. Avoid overwatering, as this can lead to root rot. Ensure your container has adequate drainage to prevent water from pooling at the bottom. A good rule of thumb is to water every 2-3 days, but this will vary depending on the temperature, humidity, and type of growing medium you’re using. Check the soil moisture regularly and adjust your watering schedule accordingly.
What kind of soil should I use for indoor radish growing?
Radishes prefer well-draining, loose soil that is rich in organic matter. A good potting mix specifically formulated for vegetables is ideal. You can also create your own mix by combining equal parts of potting soil, compost, and perlite or vermiculite. Avoid using garden soil, as it can be too heavy and compacted for container gardening. The loose texture of the soil allows the radish roots to develop easily and prevents them from becoming misshapen.
How long does it take for radishes to mature indoors?
One of the great things about radishes is their quick maturity. Most varieties will be ready to harvest in just 3-4 weeks from planting. Check the seed packet for the specific maturity time of your chosen variety. To harvest, gently pull the radishes from the soil when they reach the desired size. Don’t wait too long to harvest, as radishes can become woody and bitter if left in the ground for too long.
Can I grow radishes in a small container?
Yes, radishes are well-suited for growing in small containers. A container that is at least 6 inches deep and wide is sufficient for a small batch of radishes. Make sure the container has drainage holes to prevent waterlogging. You can even grow radishes in window boxes or hanging baskets. Just be sure to choose a container that is appropriate for the size of the radish variety you’re growing.
How do I prevent pests and diseases in my indoor radish garden?
Indoor radish gardens are generally less susceptible to pests and diseases than outdoor gardens. However, it’s still important to take precautions. Inspect your plants regularly for signs of pests, such as aphids or whiteflies. If you find any pests, you can try washing them off with a strong stream of water or using insecticidal soap. To prevent fungal diseases, ensure good air circulation around your plants and avoid overwatering.
Can I succession plant radishes indoors for a continuous harvest?
Absolutely! Succession planting is a great way to ensure a continuous supply of fresh radishes. Sow a new batch of seeds every 1-2 weeks to have a steady harvest throughout the growing season. This is especially beneficial for indoor radish growing, as you can control the growing conditions and maintain a consistent harvest schedule.
What are some common problems when growing radishes indoors and how can I fix them?
Some common problems include:
* **Leggy plants:** Insufficient light. Provide more light, either through a sunnier location or with grow lights.
* **Small radishes:** Overcrowding or poor soil. Thin out the seedlings to provide more space and ensure the soil is rich in nutrients.
* **Bitter radishes:** Overmaturity or stress. Harvest radishes promptly when they reach the desired size and ensure they are getting adequate water and nutrients.
* **Root rot:** Overwatering. Allow the soil to dry out slightly between waterings and ensure the container has good drainage.
How do I know when my radishes are ready to harvest?
The best way to determine if your radishes are ready to harvest is to check their size and shape. Most varieties are ready to harvest when they are about 1 inch in diameter. You can also gently brush away some of the soil around the base of the plant to get a better look at the radish. If they look plump and well-formed, they are likely ready to harvest. Don’t wait too long, as radishes can become woody and bitter if left in the ground for too long.

Leave a Comment