
Grow peanuts in a sack? Yes, you read that right! Forget sprawling fields and back-breaking labor. I’m about to let you in on a little secret that will revolutionize your peanut-growing game. Imagine harvesting a bounty of delicious, homegrown peanuts from the comfort of your balcony or patio. Sounds too good to be true? Trust me, it’s not!
For centuries, peanuts have been a staple crop, deeply intertwined with cultures around the globe. From ancient Incan civilizations to the American South, these legumes have nourished and sustained communities. But traditional peanut farming can be demanding, requiring ample space and specific soil conditions. That’s where this DIY trick comes in.
In today’s world, where space is a premium and time is precious, this method of growing peanuts in a sack offers a fantastic solution. Whether you’re a seasoned gardener or a complete beginner, this hack allows you to enjoy the satisfaction of growing your own food, regardless of your living situation. Plus, it’s a fun and educational project for the whole family! So, are you ready to learn how to grow peanuts in a sack and unlock a world of homegrown goodness? Let’s get started!
Growing Peanuts in a Sack: A Fun and Easy DIY Project!
Hey there, fellow gardening enthusiasts! Ever thought about growing your own peanuts? It’s surprisingly easy, and you don’t even need a huge garden! I’m going to walk you through how to grow peanuts in a sack – a perfect project for small spaces, balconies, or even just a fun experiment. Get ready for some homegrown goodness!
What You’ll Need
Before we dive in, let’s gather our supplies. This is a pretty low-cost project, which is always a win in my book!
* **A Large Sack:** Think burlap, heavy-duty plastic (like a feed sack), or even a strong grow bag. The bigger, the better – aim for at least 20 gallons. This gives the peanut plants plenty of room to spread their roots and develop those delicious nuts.
* **Peanut Seeds (Raw, Unshelled):** This is crucial! You need *raw*, *unshelled* peanuts. Roasted peanuts won’t sprout. You can usually find these at health food stores, garden centers, or online. Make sure they are specifically labeled for planting.
* **Potting Mix:** A good quality potting mix is essential. It should be well-draining and rich in nutrients. Avoid using garden soil directly, as it can compact and hinder peanut development.
* **Compost:** Compost is your plant’s best friend! It adds organic matter, improves drainage, and provides a slow-release source of nutrients.
* **Perlite or Vermiculite:** These help improve drainage and aeration in the soil. Peanuts don’t like soggy feet!
* **Watering Can or Hose:** For keeping your peanut plants hydrated.
* **Optional: Mycorrhizae:** This beneficial fungi helps plants absorb nutrients more efficiently. It’s not essential, but it can give your peanuts a boost.
* **Optional: Fertilizer:** A balanced fertilizer (like 10-10-10) can be used sparingly to supplement nutrients.
Preparing Your Sack
This step is all about creating the perfect home for your peanut plants.
1. **Choose Your Location:** Peanuts need at least 6-8 hours of direct sunlight per day. Pick a sunny spot for your sack.
2. **Prepare the Sack:** If you’re using a burlap sack, you might want to line it with a plastic bag (poke holes for drainage!) to prevent the soil from drying out too quickly. If you’re using a plastic sack, make sure it has plenty of drainage holes at the bottom.
3. **Create Drainage:** This is super important! Peanuts hate sitting in water. Make sure your sack has adequate drainage holes. If it doesn’t, add some! I usually poke several holes around the bottom edge.
4. **Mix Your Soil:** In a large container or wheelbarrow, combine your potting mix, compost, and perlite/vermiculite. A good ratio is roughly 2 parts potting mix, 1 part compost, and 1 part perlite/vermiculite. Mix it all together thoroughly. If you’re using mycorrhizae, mix it in at this stage according to the package instructions.
5. **Fill the Sack:** Fill your prepared sack with the soil mixture, leaving a few inches of space at the top.
Planting Your Peanuts
Now for the fun part – planting those peanuts!
1. **Soak the Peanuts (Optional):** Soaking the peanuts in water for a few hours before planting can help speed up germination. I usually soak mine overnight.
2. **Planting Depth:** Plant the peanuts about 1-2 inches deep.
3. **Spacing:** Space the peanuts about 4-6 inches apart. If you’re using a large sack, you can plant several peanuts. I usually plant 4-5 peanuts in a 20-gallon sack.
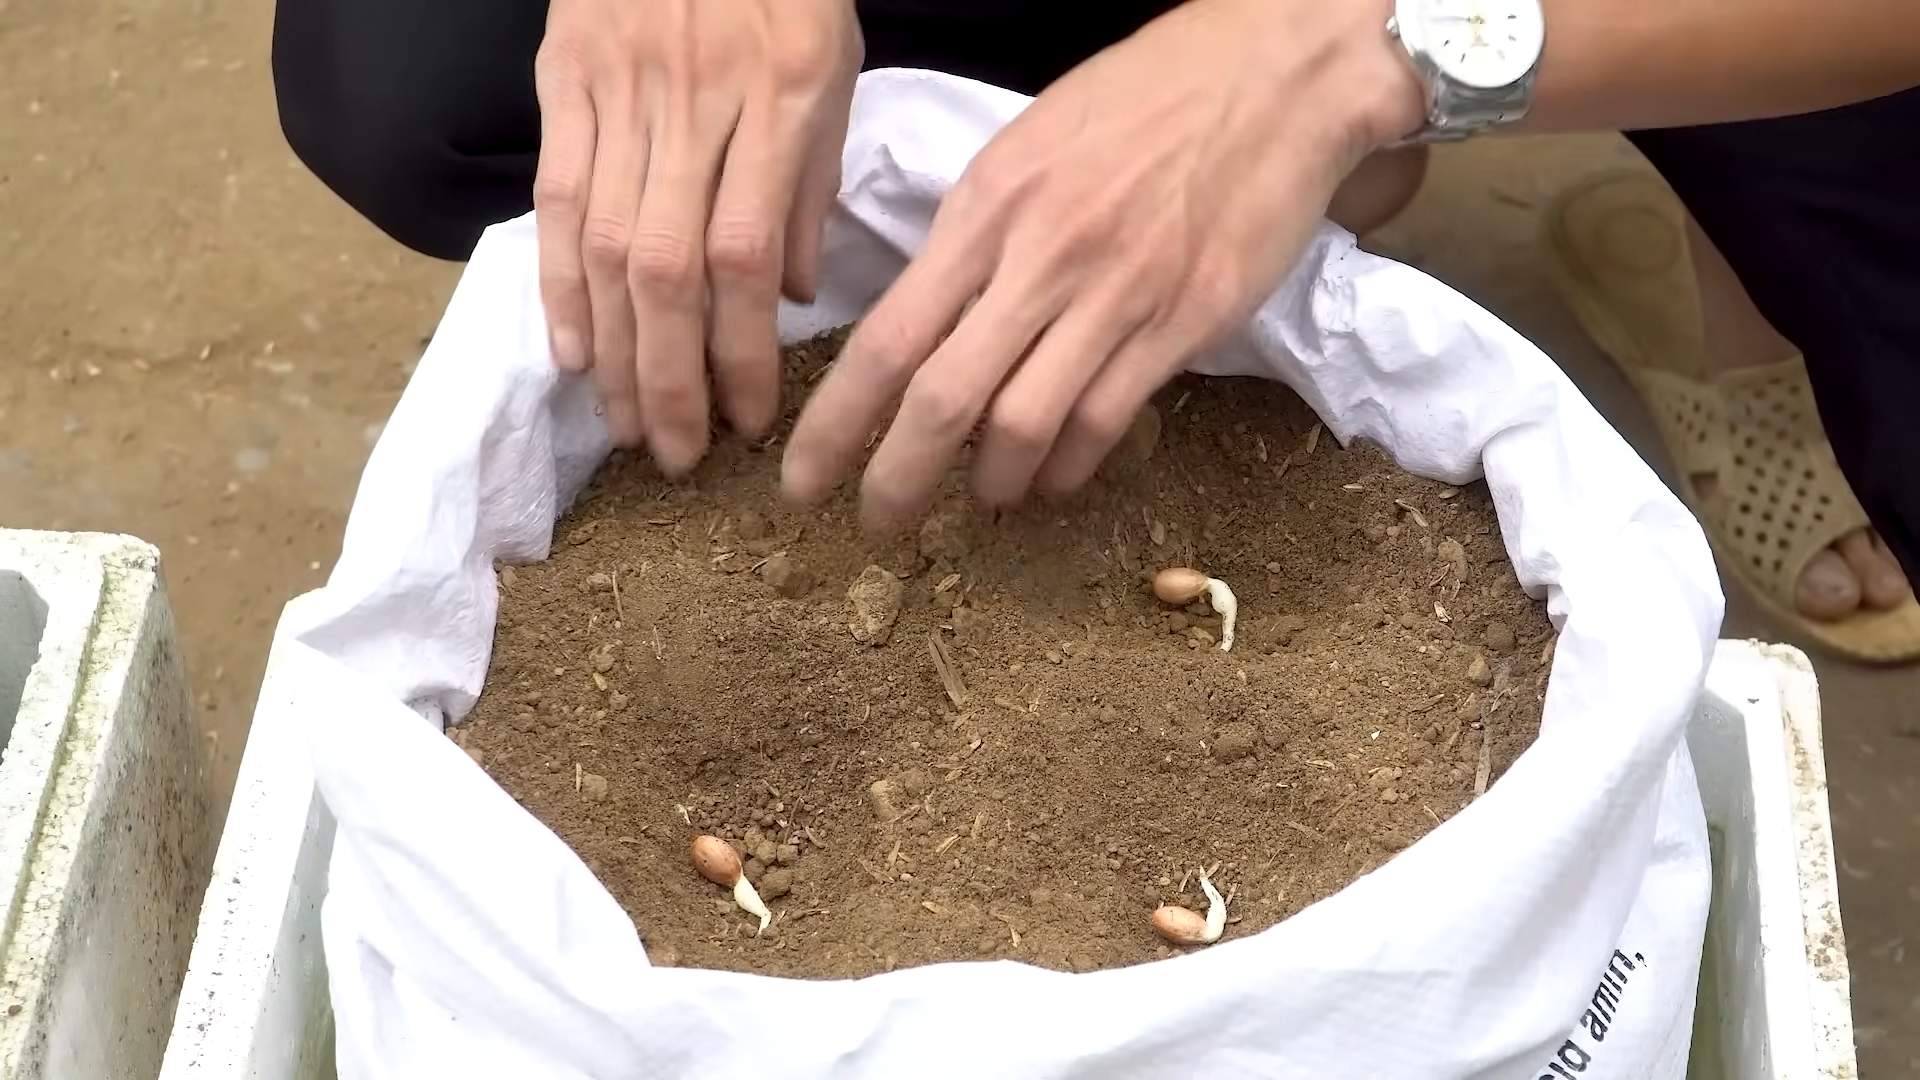
4. **Planting Technique:** Make a small hole in the soil, place the peanut in the hole, and cover it with soil. Gently pat the soil down.
5. **Water Thoroughly:** After planting, water the soil thoroughly until water drains out of the bottom of the sack.
Caring for Your Peanut Plants
This is where the patience comes in! But trust me, it’s worth it.
1. **Watering:** Keep the soil consistently moist, but not soggy. Water when the top inch of soil feels dry to the touch. During hot weather, you may need to water more frequently.
2. **Sunlight:** Remember, peanuts need plenty of sunlight! Make sure your sack is in a location that gets at least 6-8 hours of direct sunlight per day.
3. **Fertilizing (Optional):** If you notice your plants are looking a little pale or not growing as vigorously as you’d like, you can fertilize them with a balanced fertilizer. Follow the package instructions carefully. I usually fertilize mine every few weeks.
4. **Weeding:** Keep the area around your peanut plants free of weeds. Weeds can compete with your peanuts for nutrients and water.
5. **Hilling:** As your peanut plants grow, you’ll notice small yellow flowers appearing. After the flowers fade, a “peg” will emerge from the base of the flower and grow down into the soil. This peg is where the peanut will develop. To encourage peanut production, you can gently “hill” the soil around the base of the plants, covering the pegs with soil. This helps protect the developing peanuts and keeps them moist.
6. **Pest Control:** Peanuts are generally pretty pest-resistant, but keep an eye out for common garden pests like aphids or spider mites. If you spot any pests, you can treat them with an organic insecticide.
Harvesting Your Peanuts
This is the most exciting part! Get ready to reap the rewards of your hard work.
1. **Timing:** Peanuts typically take about 120-150 days to mature. You’ll know they’re ready to harvest when the leaves start to turn yellow and the plant begins to die back.
2. **Testing:** To be sure, you can dig up a few peanuts and check them. The shells should be hard and the kernels should be plump and well-formed.
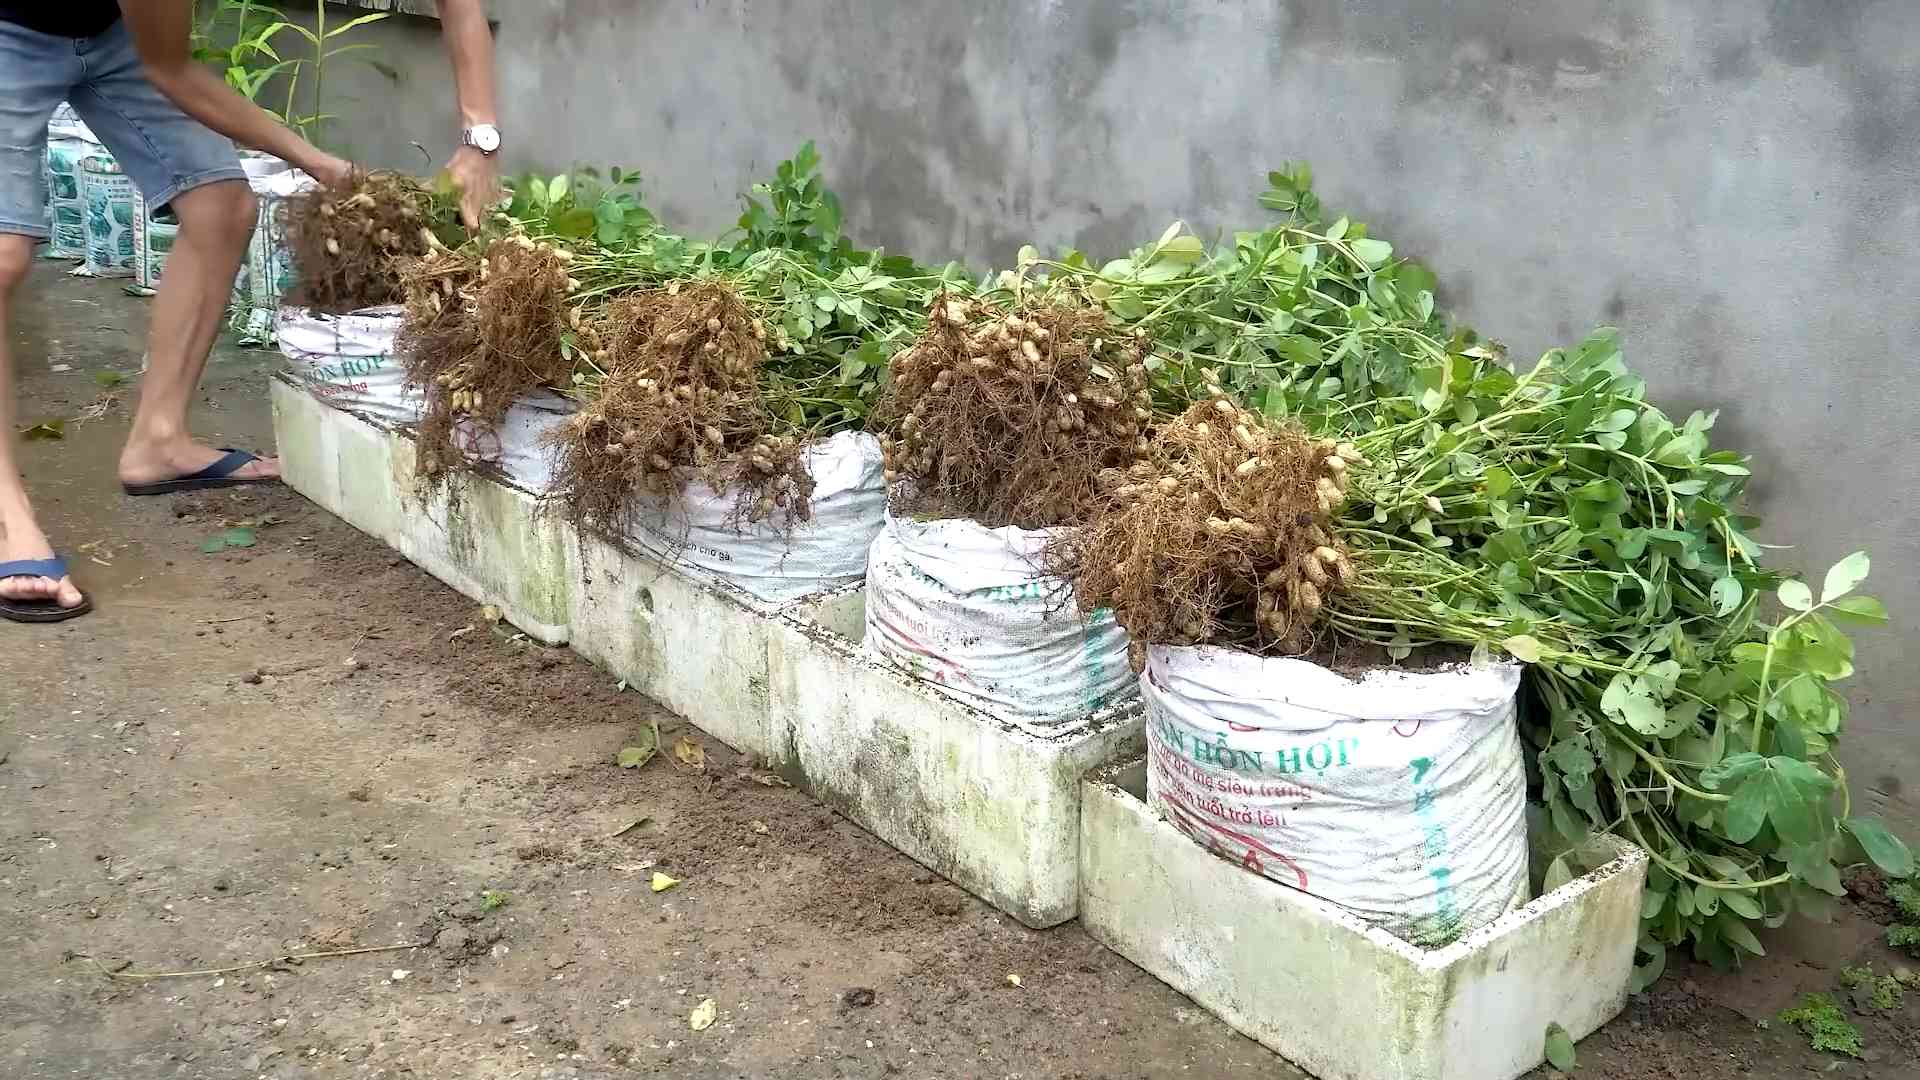
3. **Harvesting:** To harvest, gently pull the entire plant out of the sack. Shake off as much soil as possible.
4. **Curing:** This is an important step! Curing helps to dry the peanuts and improve their flavor. Hang the entire plant upside down in a warm, dry, well-ventilated place for about 2-4 weeks.
5. **Separating the Peanuts:** Once the plants are cured, you can separate the peanuts from the vines.
6. **Drying (Optional):** If you want to store your peanuts for a longer period, you can dry them further in a dehydrator or oven on low heat.
7. **Storing:** Store your dried peanuts in an airtight container in a cool, dry place.
Troubleshooting
Even with the best planning, sometimes things don’t go exactly as expected. Here are a few common problems you might encounter and how to fix them:
* **Poor Germination:** If your peanuts aren’t sprouting, make sure you’re using raw, unshelled peanuts. Also, check the soil temperature. Peanuts need warm soil to germinate.
* **Yellowing Leaves:** Yellowing leaves can be a sign of nutrient deficiency. Try fertilizing your plants with a balanced fertilizer.
* **Lack of Peanuts:** If your plants are growing well but not producing peanuts, make sure they’re getting enough sunlight and that you’re hilling the soil around the base of the plants.
* **Pests:** Keep an eye out for pests and treat them promptly with an organic insecticide.
Enjoying Your Homegrown Peanuts
Now that you’ve harvested and cured your peanuts, it’s time to enjoy them! You can roast them, boil them, or eat them raw. They’re also great in salads, stir-fries, and desserts. I love roasting mine with a little salt and pepper.
Growing peanuts in a sack is a fun and rewarding project that anyone can do. With a little patience and care, you can enjoy fresh, homegrown peanuts right from your own backyard (or balcony!). Happy gardening!
Conclusion
So, there you have it! Growing peanuts in a sack is not just a fun gardening experiment; it’s a surprisingly efficient and rewarding way to cultivate these delicious legumes, even if you’re short on space or dealing with less-than-ideal soil conditions. The beauty of this method lies in its simplicity and adaptability. You’re essentially creating a self-contained ecosystem perfectly tailored to peanut growth, minimizing weed competition, optimizing drainage, and making harvesting a breeze.
Think about it: no more back-breaking digging through compacted soil to unearth your precious peanuts. Instead, you simply upend the sack and gather your bounty! Plus, the controlled environment often leads to a higher yield compared to traditional in-ground planting.
But the benefits don’t stop there. This method is incredibly versatile. Want to experiment with different peanut varieties? Go for it! Try Virginia peanuts for their large size, Spanish peanuts for their sweet flavor, or Runner peanuts for their consistent yield. You can also tailor the soil mix to your specific needs. Adding extra compost will boost nutrient levels, while incorporating perlite will improve drainage even further.
Consider adding companion plants to your sack garden. Herbs like basil or thyme can help deter pests and attract beneficial insects, creating a healthier and more productive environment for your peanuts. Marigolds are another excellent choice, known for their nematode-repelling properties.
For those living in cooler climates, growing peanuts in a sack allows you to move your plants indoors during unexpected frosts, extending the growing season and ensuring a successful harvest. You can even use a dark-colored sack to absorb more sunlight and warm the soil, giving your peanuts an extra boost.
And if you’re feeling adventurous, why not try growing other legumes in a sack? Beans, peas, and even potatoes can thrive in this type of container garden. The possibilities are endless!
Ultimately, growing peanuts in a sack is a must-try for any gardener, regardless of experience level. It’s a sustainable, space-saving, and incredibly satisfying way to enjoy fresh, homegrown peanuts. It’s also a fantastic project to do with kids, teaching them about the wonders of nature and the importance of growing your own food.
We’re confident that once you experience the joy of harvesting your own sack-grown peanuts, you’ll be hooked! So, grab a sack, some soil, and a handful of peanut seeds, and get ready to embark on a rewarding gardening adventure.
Don’t forget to document your progress and share your experiences with us! We’d love to see your sack gardens and hear about your tips and tricks for growing the best peanuts possible. Share your photos and stories on our social media channels using #SackPeanuts and let’s inspire others to discover the joys of this simple yet effective gardening method. We are eager to see your success with this peanut growing method.
Frequently Asked Questions (FAQ)
What kind of sack should I use?
The ideal sack is made of burlap or a similar breathable material. This allows for proper drainage and aeration, preventing the soil from becoming waterlogged. Avoid using plastic sacks, as they can trap moisture and lead to root rot. A sack that holds approximately 10-20 gallons of soil is a good starting point. You can also repurpose old feed sacks or even sturdy shopping bags, as long as they have drainage holes. Remember to clean the sack thoroughly before using it to remove any potential contaminants.
What type of soil mix is best for growing peanuts in a sack?
Peanuts thrive in well-draining, sandy loam soil. A good mix would be equal parts garden soil, compost, and sand or perlite. The compost provides essential nutrients, while the sand or perlite improves drainage. Avoid using heavy clay soil, as it can become compacted and restrict root growth. You can also add a slow-release fertilizer to the soil mix to provide a steady supply of nutrients throughout the growing season. Consider testing your soil pH; peanuts prefer a slightly acidic to neutral pH (around 6.0-7.0).
How often should I water my peanut plants in a sack?
Water your peanut plants regularly, especially during hot and dry weather. The soil should be consistently moist but not waterlogged. Check the soil moisture by sticking your finger about an inch into the soil. If it feels dry, it’s time to water. Avoid overwatering, as this can lead to root rot. During periods of heavy rain, you may need to protect your sack from excessive moisture. A good rule of thumb is to water deeply and less frequently, rather than shallowly and more often.
How much sunlight do peanut plants need?
Peanut plants need at least 6-8 hours of direct sunlight per day to thrive. Choose a sunny location for your sack garden. If you live in a particularly hot climate, you may need to provide some afternoon shade to prevent the plants from scorching. If you’re growing your peanuts indoors, supplement with grow lights to ensure they receive adequate light. Rotate the sack periodically to ensure all sides of the plant receive equal sunlight.
When is the best time to plant peanuts in a sack?
The best time to plant peanuts is after the last frost, when the soil has warmed up to at least 65°F (18°C). Peanuts are warm-season crops and require a long growing season (around 120-150 days). You can start peanut seeds indoors 4-6 weeks before the last frost to get a head start. Transplant the seedlings into the sack once the weather has warmed up.
How do I know when my peanuts are ready to harvest?
Harvest time is crucial for optimal peanut flavor and texture. The best way to determine if your peanuts are ready is to dig up a sample plant and check the pods. The pods should be mature, with well-defined veins and a papery shell. The inside of the shell should be dark in color. The kernels should be plump and fill the shell completely. If the pods are still white or immature, wait a few more weeks before harvesting.
How do I harvest peanuts from a sack?
Harvesting peanuts from a sack is incredibly easy! Simply tip the sack over and gently pull the plants out. Shake off any excess soil and separate the peanuts from the roots. You can then cure the peanuts by drying them in a well-ventilated area for several weeks.
What are some common pests and diseases that affect peanut plants?
Common pests that affect peanut plants include aphids, spider mites, and nematodes. Diseases include leaf spot and root rot. You can prevent these problems by using healthy soil, providing adequate drainage, and practicing good sanitation. Companion planting with herbs like basil or thyme can also help deter pests. If you notice any signs of pests or diseases, treat them promptly with organic pesticides or fungicides.
Can I reuse the soil from my peanut sack for other plants?
Yes, you can reuse the soil from your peanut sack, but it’s important to amend it with fresh compost and fertilizer to replenish the nutrients. Peanuts are heavy feeders and can deplete the soil of essential nutrients. You can also sterilize the soil by baking it in the oven to kill any potential pests or diseases.
How do I store my harvested peanuts?
Store your harvested peanuts in a cool, dry place in an airtight container. Properly cured and stored peanuts can last for several months. You can also freeze peanuts for longer storage. Roasted peanuts will have a shorter shelf life than raw peanuts.

Leave a Comment