
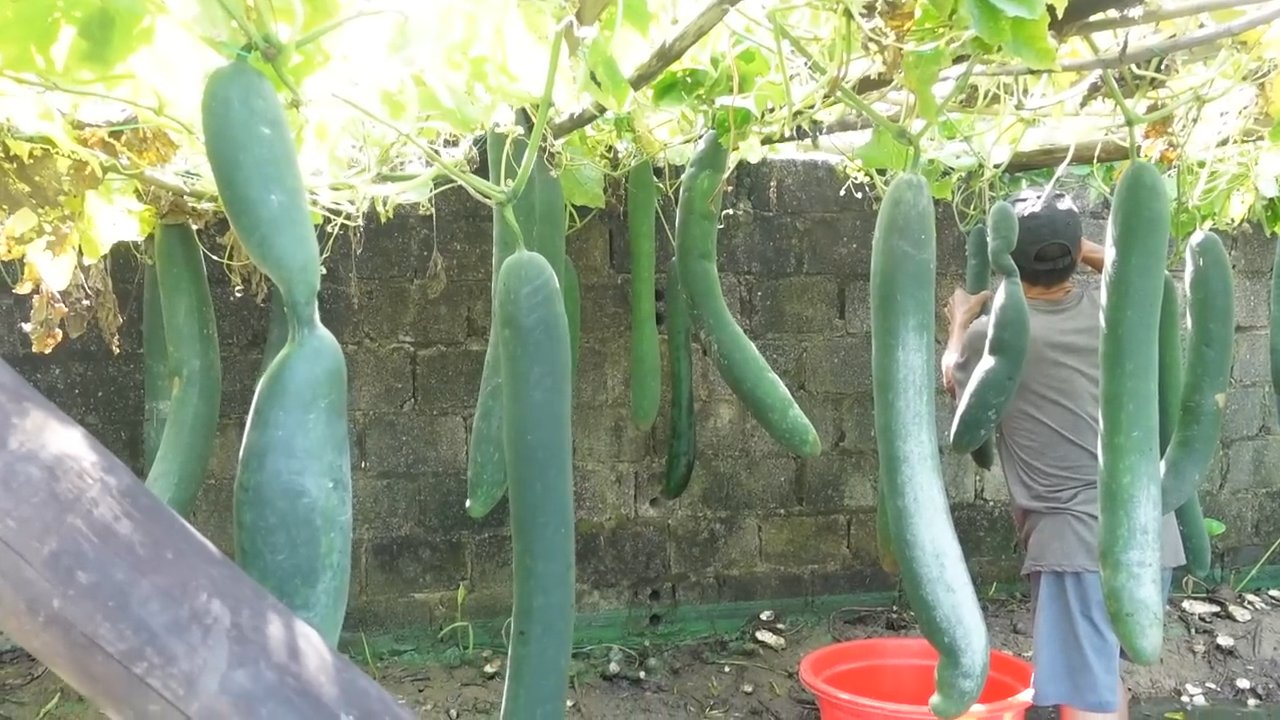
Long Squash Harvest season is upon us, and if you’re anything like me, you’re probably staring at a sprawling vine overflowing with these green beauties, wondering, “What am I going to do with all this squash?!” Don’t worry, you’re not alone! For centuries, squash has been a staple in gardens and kitchens around the world, from the indigenous peoples of the Americas who revered it as one of the “Three Sisters” (along with corn and beans) to modern-day gardeners who appreciate its versatility and abundance.
But let’s be honest, knowing how to maximize your long squash harvest and preserve it properly can be a bit daunting. That’s why I’ve put together this guide packed with DIY tricks and hacks to help you not only gather your bounty but also enjoy it throughout the year. Imagine delicious squash soups in the winter, flavorful roasted squash dishes in the fall, and even creative squash-based desserts! This article will equip you with the knowledge and skills to make the most of your harvest, reduce food waste, and impress your friends and family with your gardening prowess. So, grab your gardening gloves, and let’s dive in!
Harvesting and Storing Long Squashes: My DIY Guide for a Bountiful Harvest
Hello dear garden friends! Today, I’m excited to share my tried-and-true tips and tricks for harvesting and storing long squashes, such as butternut squash or muscat squash. It’s so satisfying to reap the fruits of your own labor, and with the right approach, you can enjoy your squashes for months. Let’s get started!
When is the right time to harvest?
That’s the million-dollar question, isn’t it? There are a few clear signs that will tell you when your long squashes are ready for harvest.
- The Color: The color of the squash should have intensified and match the variety. For example, a butternut squash will change from a light beige to a rich, darker beige.
- The Rind: The rind should be hard. Do the nail test! Try to press your fingernail into the rind. If you don’t leave an indentation, the squash is ripe.
- The Stem: The stem should be dry and woody. It should have turned slightly brown and started to dry out.
- The Tapping Sound: Tap lightly on the squash. If it sounds hollow, it’s ripe.
Attention: Harvest your squashes before the first frost! Frost can damage the squashes and affect their storage life.
Required Materials
Before we begin, here is a list of things you will need for harvesting and storage:
- A sharp knife or pruning shears
- Garden gloves (to protect your hands)
- A wheelbarrow or a sturdy basket (for transporting the squashes)
- Soft cloths or newspaper
- A dry, cool, and well-ventilated storage area (e.g., a basement or garage)
- Possibly disinfectant (optional)
The Harvest: Step by Step
- Preparation is everything: Put on your garden gloves and have your sharp knife or pruning shears ready.
- Cutting the squash: Carefully cut the squash from the vine. Be sure to leave a stem of about 5-10 cm (2-4 inches) on the squash. A long stem helps to prevent the entry of bacteria and fungi and extends the storage life.
- Better safe than sorry: Lift the squash carefully and place it in your wheelbarrow or basket. Avoid dropping or damaging the squash, as this can lead to rot.
- Cleaning (optional): If your squashes are very dirty, you can gently wipe them with a damp cloth. Avoid washing them, as moisture can impair their storage life. If you do wipe them, let them dry completely afterward.
- Disinfection (optional): Some gardeners recommend treating the stem ends with a disinfectant (e.g., diluted vinegar or alcohol) to prevent bacteria from entering. I don’t always do this, but it can’t hurt, especially if you notice scratches or damage on the squashes.
Storage: How to Keep Your Squashes Fresh for a Long Time
Proper storage is crucial for you to enjoy your squashes throughout the winter.
Preparing the Storage Area
- The right place: Find a dry, cool, and well-ventilated room. A basement, garage, or an unheated room is ideal. The temperature should ideally be between 10 and 15 degrees Celsius (50-59°F).
- Cleaning: Clean the storage area thoroughly to remove mold and bacteria.
- Base layer: Place soft cloths or newspaper on the floor or on shelves to protect the squashes from direct contact with the ground.
Storing the Squashes
- Store individually: Place the squashes individually on the prepared surface. Make sure they do not touch each other to ensure air circulation.
- Stem side up: Store the squashes with the stem facing up.
- Regular checks: Check the squashes regularly (about once a week) for signs of rot or damage. Remove damaged squashes immediately to prevent the spread of rot.
- Turning (optional): Some gardeners recommend turning the squashes regularly to avoid pressure spots. I don’t always do this, but it can’t hurt.
Avoiding Common Mistakes
Here are a few mistakes you should avoid when harvesting and storing squashes:
- Harvesting too early: Do not harvest the squashes too early, as they will not ripen properly and will not last long.
- Damage: Avoid damaging the squashes during harvest and storage. Damaged squashes rot more quickly.
- Moisture: Do not store the squashes in damp rooms, as this encourages the growth of mold.
- Direct sunlight: Do not store the squashes in direct sunlight, as this can lead to overheating and faster spoilage.
- Temperatures are too high: Do not store the squashes at temperatures that are too high, as this accelerates ripening and shortens their storage life.
Additional Tips for a Successful Harvest and Storage
- Variety selection: Choose squash varieties that are suitable for long-term storage. Butternut, muscat, and Hubbard squashes, for example, store well.
- Healthy plants: Pay attention to healthy plants during the growing season. Healthy plants produce healthy squashes that are better for storage.
- Good ventilation: Ensure good ventilation in the storage area to prevent the formation of mold.
- Pests: Check the squashes regularly for pests and treat them if necessary.
What to Do if a Squash is Damaged?
If you discover a squash that is damaged or shows signs of rot, you should remove it immediately to prevent it from spreading to other squashes. If the damage is only minor, you may still be able to use the squash by cutting out the damaged area generously. Be sure to process the squash quickly then.
Conclusion
With these tips and tricks, you can successfully harvest and store your long squashes and enjoy your harvest all winter long. It’s a rewarding feeling to know that you have grown and preserved your own food. Happy harvesting and storing! And don’t forget to share your experiences with me! I look forward to your comments and questions.

Conclusion
So, there you have it! Transforming your abundant long squash harvest into delicious and versatile noodles is not only incredibly easy, but it’s also a fantastic way to reduce food waste and enjoy the fruits (or rather, vegetables) of your labor in a whole new light. We’ve walked you through the simple steps, highlighting the ease and efficiency of using a spiralizer to create these healthy and flavorful noodles.
But why is this DIY trick a must-try? Beyond the sheer satisfaction of using your homegrown produce, long squash noodles offer a lighter, healthier alternative to traditional pasta. They’re naturally low in carbohydrates and calories, packed with vitamins and fiber, and boast a subtly sweet flavor that pairs beautifully with a wide range of sauces and seasonings. Think of it as a blank canvas for your culinary creativity!
Beyond the Basics: Unleashing Your Culinary Creativity
Don’t feel limited to just one way of enjoying your long squash noodles. The possibilities are truly endless! Here are a few suggestions to get your creative juices flowing:
* Asian-Inspired Stir-Fries: Toss your long squash noodles with soy sauce, ginger, garlic, and your favorite stir-fry vegetables for a quick and healthy weeknight meal. Add some protein like tofu, chicken, or shrimp for a complete dish.
* Creamy Pasta Alternatives: Replace traditional pasta in your favorite creamy pasta dishes with long squash noodles. A light Alfredo sauce or a pesto cream sauce works particularly well.
* Salad Sensations: Use raw long squash noodles as a base for refreshing summer salads. Combine them with cherry tomatoes, cucumbers, feta cheese, and a lemon vinaigrette for a light and flavorful lunch.
* Baked Noodle Casseroles: Incorporate cooked long squash noodles into baked casseroles for added texture and nutrients. They’re a great addition to lasagna, vegetable bakes, and even mac and cheese.
* Soup Star: Add long squash noodles to your favorite soups during the last few minutes of cooking. They’ll absorb the flavors of the broth and add a delightful texture.
* Spice it Up: Experiment with different seasonings and spices to customize the flavor of your long squash noodles. Try adding chili flakes for a spicy kick, or herbs like basil, oregano, or thyme for an Italian-inspired flavor.
* Roasting for Depth: Roasting the long squash before spiralizing can bring out a deeper, richer flavor. Toss the squash with olive oil, salt, and pepper, and roast at 400°F (200°C) until tender before spiralizing.
A Note on Squash Variety: While this guide focuses on long squash, feel free to experiment with other varieties like butternut squash or spaghetti squash. The spiralizing technique remains the same, but the flavor and texture of the noodles will vary slightly.
We are confident that once you try this simple yet rewarding DIY trick, you’ll be hooked! It’s a fantastic way to make the most of your long squash harvest and enjoy a healthy and delicious alternative to traditional pasta.
So, grab your spiralizer, gather your long squash, and get ready to create some culinary magic! We encourage you to try this method and share your experiences with us. What are your favorite ways to use long squash noodles? What sauces and seasonings do you find work best? Share your tips, tricks, and photos in the comments below – we can’t wait to hear from you! Let’s celebrate the versatility and deliciousness of the long squash harvest together!
Frequently Asked Questions (FAQ)
Q: What kind of spiralizer is best for making long squash noodles?
A: There are several types of spiralizers available, each with its own pros and cons. Handheld spiralizers are the most affordable and compact option, but they can be a bit tiring to use for large quantities of squash. Tabletop spiralizers are more stable and easier to use for larger amounts, but they take up more counter space. Electric spiralizers are the most convenient option, but they are also the most expensive. Ultimately, the best spiralizer for you will depend on your budget, the amount of squash you plan to spiralize, and your personal preferences. Look for a spiralizer with sturdy blades and a comfortable grip.
Q: Do I need to peel the long squash before spiralizing it?
A: It depends on the thickness of the squash’s skin. If the skin is thin and tender, you can leave it on for added nutrients and fiber. However, if the skin is thick and tough, it’s best to peel it before spiralizing. You can use a vegetable peeler to remove the skin easily.
Q: How do I prevent my long squash noodles from being watery?
A: Long squash, like many vegetables, contains a high amount of water. To prevent your noodles from being watery, you can salt them lightly after spiralizing and let them sit in a colander for about 30 minutes. The salt will draw out excess moisture. You can also pat them dry with paper towels before cooking. Another trick is to cook them quickly over high heat, which will help to evaporate the water.
Q: How long do long squash noodles last in the refrigerator?
A: Cooked long squash noodles will last for about 3-4 days in the refrigerator when stored in an airtight container. Raw spiralized squash is best used within 1-2 days.
Q: Can I freeze long squash noodles?
A: While you can freeze long squash noodles, the texture may change slightly after thawing. They may become a bit softer. To freeze them, blanch them briefly in boiling water for about 1-2 minutes, then transfer them to an ice bath to stop the cooking process. Drain them well and pat them dry before freezing them in a single layer on a baking sheet. Once frozen, transfer them to a freezer bag or container. They can be stored in the freezer for up to 2-3 months.
Q: What are some good sauces to pair with long squash noodles?
A: Long squash noodles are incredibly versatile and pair well with a wide variety of sauces. Some popular options include:
* Marinara sauce
* Pesto sauce
* Alfredo sauce
* Creamy mushroom sauce
* Soy sauce-based stir-fry sauces
* Peanut sauce
* Lemon-garlic sauce
Don’t be afraid to experiment and try different sauces to find your favorites!
Q: Can I use long squash noodles in place of pasta in any recipe?
A: In most cases, yes! Long squash noodles can be used as a healthy and delicious substitute for pasta in many recipes. However, keep in mind that they cook much faster than traditional pasta, so you’ll need to adjust the cooking time accordingly. Also, they have a slightly different texture than pasta, so the final dish may have a slightly different mouthfeel.
Q: Are long squash noodles suitable for people with dietary restrictions?
A: Yes! Long squash noodles are naturally gluten-free, low in carbohydrates, and low in calories, making them a great option for people with dietary restrictions such as gluten intolerance, diabetes, or those following a low-carb diet. They are also a good source of vitamins, minerals, and fiber.
Q: Can I bake long squash noodles?
A: Yes, you can bake long squash noodles. They are a great addition to casseroles and baked dishes. It’s best to cook them slightly before adding them to the casserole to prevent them from becoming too watery.
Q: What if I don’t have a spiralizer? Are there other ways to make long squash noodles?
A: While a spiralizer is the easiest and most efficient way to make long squash noodles, you can also use a vegetable peeler to create wide ribbons or a mandoline slicer to create thin strips. The texture won’t be exactly the same as spiralized noodles, but it’s a good alternative if you don’t have a spiralizer on hand. You can also use a julienne peeler.
Q: How do I know when the long squash noodles are cooked?
A: Long squash noodles cook very quickly. They are usually done in just a few minutes. You’ll know they’re cooked when they are tender-crisp. Avoid overcooking them, as they can become mushy.
Q: Can I eat long squash noodles raw?
A: Yes, you can eat long squash noodles raw. They have a mild, slightly sweet flavor and a crunchy texture. They are a great addition to salads and slaws.
Q: What are the nutritional benefits of long squash?
A: Long squash is a nutritious vegetable that is low in calories and high in vitamins, minerals, and fiber. It is a good source of vitamin A, vitamin C, potassium, and manganese. It also contains antioxidants that can help protect against cell damage.
Q: Where can I find long squash?
A: Long squash is typically available at farmers’ markets and grocery stores during the fall and winter months. You can also grow your own long squash in your garden.
We hope these FAQs have answered your questions about making and using long squash noodles. Enjoy your long squash harvest!

Leave a Comment