
Mushroom Buckets Indoor Gardening: Unlock the Secrets to a Thriving Indoor Harvest!
Have you ever dreamed of harvesting fresh, delicious mushrooms right from the comfort of your own home? Imagine skipping the grocery store and enjoying the earthy, savory flavor of homegrown mushrooms whenever you please. Well, dream no more! This DIY guide will show you how to create your very own mushroom buckets indoor gardening setup, transforming any small space into a fungal paradise.
Cultivating mushrooms has a rich history, dating back centuries. From ancient civilizations recognizing their medicinal properties to modern chefs celebrating their culinary versatility, mushrooms have always held a special place in our lives. But you don’t need to be an expert mycologist to enjoy the fruits (or rather, fungi!) of this ancient practice.
In today’s busy world, finding time to connect with nature can be a challenge. That’s where mushroom buckets indoor gardening comes in. It’s a fantastic way to bring a touch of the outdoors inside, providing a rewarding and sustainable hobby. Plus, it’s a great way to reduce your carbon footprint and enjoy fresh, organic food without ever leaving your home. I’m excited to share these simple, yet effective, techniques that will have you harvesting your own gourmet mushrooms in no time. Let’s get started!
DIY Mushroom Buckets: Your Guide to Indoor Gardening Fun!
Hey there, fellow gardening enthusiasts! Ever thought about growing your own mushrooms indoors? It’s easier than you might think, and incredibly rewarding. Forget those expensive grocery store prices – with a little effort, you can have a steady supply of delicious, homegrown mushrooms right in your home. This guide will walk you through creating your own mushroom buckets, a simple and effective method for cultivating these fascinating fungi. Let’s get started!
What You’ll Need: The Mushroom Gardener’s Toolkit
Before we dive in, let’s gather our supplies. This is crucial for a smooth and successful mushroom-growing experience.
* Buckets: 5-gallon buckets are ideal. Make sure they are clean and food-grade. You can often find these at hardware stores or even repurpose old ones (just ensure they were used for food-safe materials).
* Mushroom Spawn: This is the “seed” of your mushrooms. Oyster mushrooms are a great choice for beginners because they are relatively easy to grow and tolerate a wider range of conditions. You can purchase spawn online or from a local mushroom supplier. Choose a strain that suits your climate and preferences.
* Substrate: This is the food source for your mushrooms. Straw is a popular and readily available option. You can also use hardwood sawdust, coffee grounds (used, of course!), or a combination of these. For this guide, we’ll focus on straw.
* Lime: Hydrated lime (also known as builder’s lime) is used to pasteurize the straw. This helps kill off competing organisms and gives your mushroom spawn a head start.
* Large Container for Pasteurization: A large tub, barrel, or even a clean garbage can will work. It needs to be big enough to submerge your straw.
* Heat Source: A propane burner, large pot on a stove, or even a solar water heater can be used to heat the water for pasteurization.
* Drill with Drill Bits: You’ll need a drill to create holes in your buckets for the mushrooms to grow out of. A 1/4-inch to 1/2-inch drill bit is suitable.
* Gloves: Protect your hands from the lime and potential contaminants.
* Spray Bottle: For misting the mushrooms as they grow.
* Thermometer: To monitor the water temperature during pasteurization.
* Optional: Duct tape (for covering holes if needed), a scale (for measuring lime), and a respirator (for working with lime in enclosed spaces).
Phase 1: Preparing the Substrate (Straw Pasteurization)
This is arguably the most important step. Proper pasteurization eliminates competing molds and bacteria, giving your mushroom spawn the best chance to thrive.
1. Chop the Straw: Cut the straw into smaller pieces, about 2-4 inches long. This makes it easier to pack into the buckets and allows the mushroom mycelium to colonize it more effectively. I like to use garden shears or a weed whacker for this.
2. Prepare the Lime Water: In your large container, mix water and hydrated lime. The general rule of thumb is 1-2 tablespoons of lime per gallon of water. The goal is to raise the pH of the water to kill off unwanted organisms. Always add lime to water, never water to lime. Wear gloves and eye protection during this step, as lime can be irritating.
3. Heat the Water: Heat the lime water to a temperature of 160-180°F (71-82°C). Use your thermometer to monitor the temperature. Maintain this temperature for about 60-90 minutes. This is the pasteurization process.
4. Submerge the Straw: Carefully submerge the chopped straw into the hot lime water. Make sure all the straw is completely covered. You might need to weigh it down with a brick or a heavy object.
5. Maintain Temperature: Keep the water temperature within the 160-180°F range for the entire pasteurization period. Stir the straw occasionally to ensure even heating.
6. Cool and Drain: After 60-90 minutes, turn off the heat and let the straw cool down in the water. This can take several hours, or even overnight. Once the straw is cool enough to handle, drain off the excess water. You want the straw to be damp, but not soaking wet. A good test is to squeeze a handful of straw – you should only get a few drops of water.
Phase 2: Preparing the Buckets
Now that our straw is pasteurized, let’s get our buckets ready for planting!
1. Drill Holes: Drill holes around the sides of the bucket. These holes will be where the mushrooms eventually grow out of. Space the holes about 4-6 inches apart, and make them staggered around the bucket. I usually drill about 10-15 holes per bucket.
2. Clean the Buckets: Even if your buckets are new, give them a quick wash with soap and water to remove any potential contaminants. Rinse thoroughly.
3. Optional: If you want to control the humidity around the mushrooms, you can cover some of the holes with duct tape. This allows you to adjust the airflow and moisture levels.
Phase 3: Planting the Mushroom Spawn
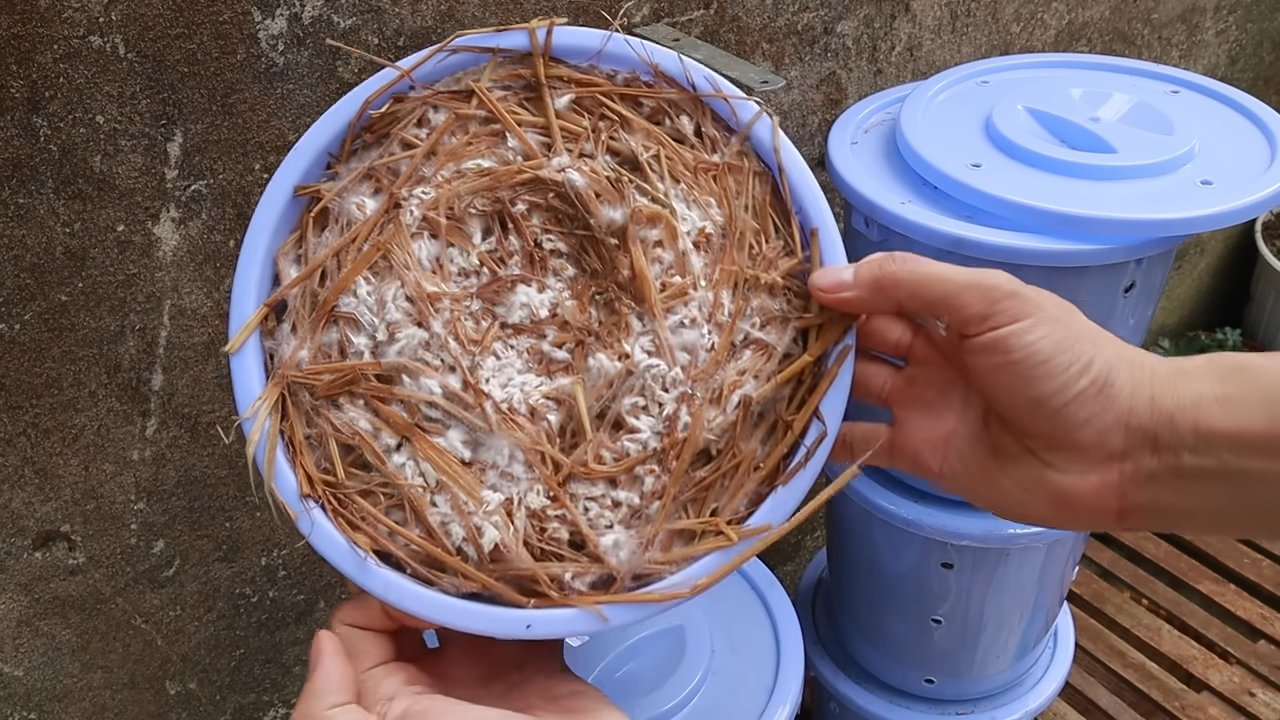
This is where the magic happens! We’ll be layering the pasteurized straw and mushroom spawn in the buckets to create the perfect environment for mushroom growth.
1. Layering: Start by placing a layer of pasteurized straw at the bottom of the bucket, about 4-6 inches thick.
2. Add Spawn: Sprinkle a generous layer of mushroom spawn over the straw. The amount of spawn you use will depend on the size of your bucket and the recommendations of the spawn supplier. A good rule of thumb is to use about 1 pound of spawn per 5-gallon bucket.
3. Repeat Layers: Continue layering straw and spawn, alternating between the two. Make sure to distribute the spawn evenly throughout the bucket.
4. Top Layer: Finish with a layer of straw on top.
5. Pack Lightly: Don’t pack the straw too tightly, as this can restrict airflow and hinder mushroom growth. A gentle packing is sufficient.
Phase 4: Incubation and Fruiting
Now comes the waiting game! This is where the mushroom mycelium colonizes the straw, preparing for fruiting.
1. Incubation Location: Place the filled buckets in a dark, humid location with a temperature between 65-75°F (18-24°C). A basement, closet, or garage often works well.
2. Humidity: Maintain high humidity around the buckets. You can achieve this by placing a tray of water near the buckets, misting them regularly with a spray bottle, or using a humidifier.
3. Monitor: Check the buckets regularly for signs of colonization. You should start to see white, fuzzy mycelium spreading throughout the straw within a week or two.
4. Fruiting Conditions: Once the straw is fully colonized (covered in white mycelium), it’s time to trigger fruiting. This involves exposing the buckets to more light and fresh air. Move the buckets to a location with indirect light and good ventilation.
5. Misting: Continue to mist the buckets regularly to maintain high humidity. The mushrooms need moisture to develop properly.
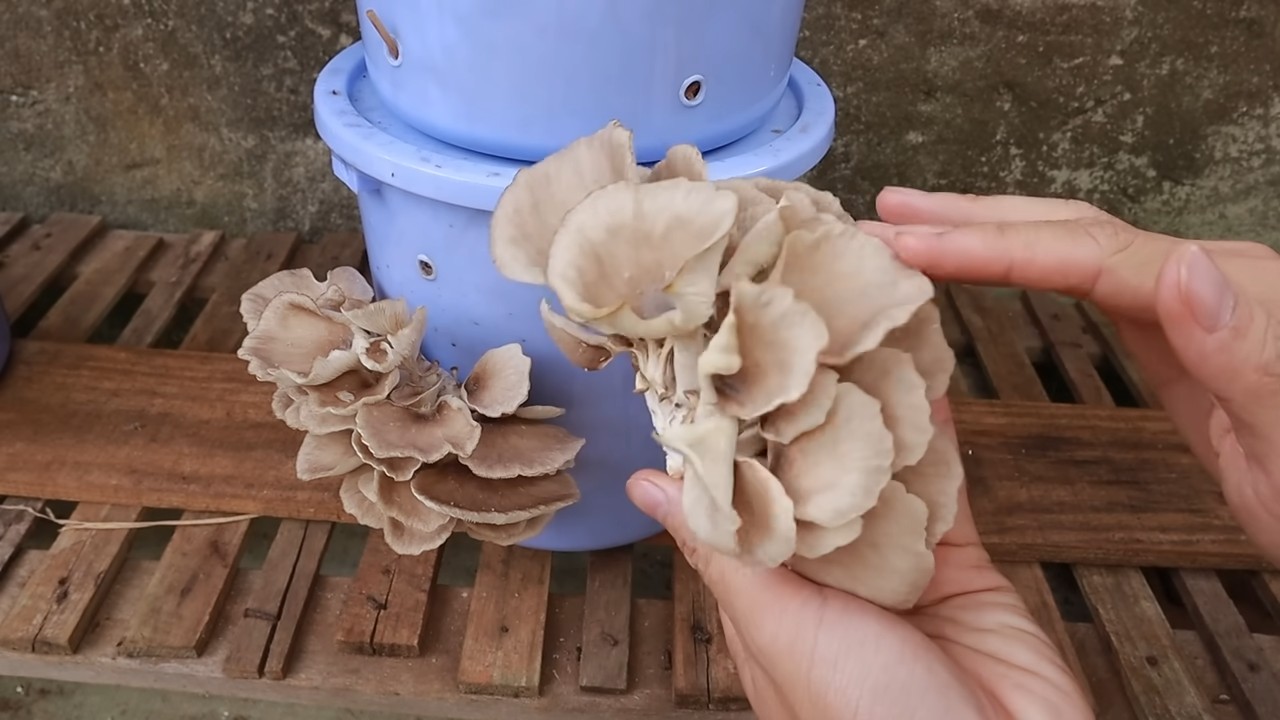
6. Harvesting: After a few days to a week, you should start to see small mushroom pins forming around the holes in the bucket. These pins will grow into mature mushrooms within a few days. Harvest the mushrooms when the caps are fully developed but before they start to drop spores. Simply twist or cut the mushrooms off the bucket.
Troubleshooting: Common Issues and Solutions
Even with the best preparation, you might encounter some challenges along the way. Here are some common issues and how to address them:
* Contamination: If you see green, black, or other colored molds growing in your bucket, it’s likely contaminated. Remove the contaminated areas immediately. If the contamination is widespread, you may need to discard the entire bucket. Proper pasteurization is key to preventing contamination.
* Slow Colonization: If the mycelium is slow to colonize the straw, it could be due to low temperatures, low humidity, or poor spawn quality. Ensure the temperature and humidity are within the optimal range, and consider using a different source of spawn.
* No Fruiting: If the straw is fully colonized but no mushrooms are forming, it could be due to lack of light, fresh air, or moisture. Move the buckets to a location with more light and ventilation, and increase the frequency of misting.
* Small Mushrooms: If the mushrooms are small and stunted, it could be due to lack of nutrients or insufficient humidity. Consider adding a small amount of nutrient supplement to the straw, such as coffee grounds or bran. Ensure the humidity is consistently high.
* Pests: Fungus gnats can sometimes
Conclusion
So, there you have it! Transforming humble buckets into thriving mushroom farms is not just a cost-effective way to enjoy fresh, delicious fungi; it’s a rewarding and sustainable project that connects you directly to the food you eat. We’ve walked you through the process, highlighting the simplicity and adaptability of this DIY approach. Forget expensive kits and complicated setups. With a few readily available materials and a little patience, you can cultivate a continuous supply of gourmet mushrooms right in your own home.
Why is this DIY mushroom bucket method a must-try? Because it empowers you to take control of your food source, reduces your reliance on store-bought produce, and minimizes your environmental footprint. Imagine the satisfaction of harvesting your own oyster mushrooms for a creamy pasta dish, or adding shiitakes to a hearty stir-fry, all grown with your own hands. The flavor and freshness are simply unmatched.
But the benefits extend beyond the culinary. Indoor mushroom gardening is a fascinating hobby that offers a unique learning experience. You’ll gain a deeper understanding of fungal biology, sustainable practices, and the interconnectedness of ecosystems. Plus, it’s a fantastic conversation starter!
Ready to take your mushroom cultivation to the next level? Consider these variations and suggestions:
* Experiment with different mushroom species: While oyster and shiitake mushrooms are excellent starting points, explore other varieties like lion’s mane, pioppino, or even wine cap mushrooms once you’ve gained some experience. Each species has its own unique flavor profile and growing requirements, offering endless possibilities for culinary exploration.
* Optimize your substrate: The substrate is the foundation of your mushroom farm. Experiment with different combinations of materials like straw, sawdust, coffee grounds, and cardboard to find what works best for your chosen mushroom species and local climate. Remember to always pasteurize or sterilize your substrate properly to prevent contamination.
* Control the environment: Mushrooms thrive in specific temperature and humidity ranges. Use a humidifier or mister to maintain optimal humidity levels, and consider using a small space heater or cooler to regulate temperature, especially during extreme weather conditions.
* Vertical Gardening: Stack your mushroom buckets vertically to maximize space, especially if you’re working with limited square footage. This creates a visually appealing and highly productive indoor garden.
* Composting: After you’ve harvested all the mushrooms you can from your buckets, don’t throw away the spent substrate! It’s a valuable source of nutrients for your garden. Add it to your compost pile or use it as a soil amendment to enrich your flower beds or vegetable garden.
The beauty of this DIY project lies in its adaptability. Don’t be afraid to experiment, adapt the techniques to your specific needs and resources, and learn from your experiences. Every batch of mushrooms is a learning opportunity.
We are confident that you’ll find this DIY mushroom bucket method to be a rewarding and enriching experience. So, gather your materials, follow the steps outlined in this article, and embark on your own mushroom growing adventure.
We encourage you to try this simple and effective method of mushroom buckets indoor gardening. Once you’ve harvested your first batch of homegrown mushrooms, we’d love to hear about your experience! Share your photos, tips, and challenges in the comments section below. Let’s build a community of mushroom enthusiasts and inspire others to embrace the joys of DIY food production. Happy growing!
Frequently Asked Questions (FAQ)
What type of mushrooms are easiest to grow in buckets?
Oyster mushrooms (Pleurotus spp.) are generally considered the easiest and most forgiving mushrooms for beginners to grow in buckets. They are fast-growing, relatively tolerant of environmental fluctuations, and produce abundant yields. Shiitake mushrooms (Lentinula edodes) are another popular choice, although they require a slightly more controlled environment and a longer incubation period. Other options include lion’s mane (Hericium erinaceus), pioppino (Agrocybe aegerita), and wine cap mushrooms (Stropharia rugosoannulata), but these may be more challenging for novice growers.
How long does it take to grow mushrooms in a bucket?
The time it takes to grow mushrooms in a bucket depends on the species, the environmental conditions, and the quality of the spawn. Oyster mushrooms typically begin to fruit within 2-4 weeks after inoculation, while shiitake mushrooms may take 2-3 months. Maintaining optimal temperature and humidity levels can significantly accelerate the growth process.
What is the best substrate for growing mushrooms in buckets?
The best substrate for growing mushrooms in buckets varies depending on the species. Oyster mushrooms thrive on a wide range of substrates, including straw, coffee grounds, cardboard, and sawdust. Shiitake mushrooms prefer hardwood sawdust or wood chips. It’s crucial to pasteurize or sterilize the substrate before inoculation to eliminate competing microorganisms.
How do I pasteurize or sterilize the substrate?
Pasteurization involves heating the substrate to a temperature of 140-160°F (60-71°C) for 1-2 hours to kill most harmful microorganisms. This can be done by soaking the substrate in hot water or steaming it in a large pot or container. Sterilization involves heating the substrate to a higher temperature (250°F or 121°C) for a longer period (1-2 hours) using a pressure cooker or autoclave. Sterilization is more effective at eliminating all microorganisms, but it’s also more energy-intensive and may not be necessary for all mushroom species.
How do I maintain the correct humidity levels in my mushroom bucket?
Mushrooms require high humidity levels (80-90%) to fruit properly. You can maintain humidity by misting the inside of the bucket with water several times a day, or by placing the bucket in a humid environment like a bathroom or greenhouse. You can also use a humidifier to increase the humidity in the surrounding air. Covering the bucket with a clear plastic bag or dome can also help to trap moisture, but be sure to provide adequate ventilation to prevent the buildup of carbon dioxide.
What if my mushroom bucket gets contaminated?
Contamination is a common problem in mushroom cultivation. Signs of contamination include mold growth, unusual odors, or discoloration of the substrate. If you notice contamination, it’s important to remove the affected area immediately to prevent it from spreading. In some cases, you may be able to salvage the bucket by removing the contaminated portion and spraying the remaining substrate with a diluted bleach solution. However, if the contamination is widespread, it’s best to discard the entire bucket to prevent the spread of contaminants to other areas.
How many times can I harvest mushrooms from a bucket?
You can typically harvest mushrooms from a bucket several times over a period of several weeks or months. Each flush of mushrooms will be smaller than the previous one. After the last flush, the substrate will be depleted of nutrients and will no longer produce mushrooms. At this point, you can compost the spent substrate and start a new batch.
Is indoor mushroom gardening safe?
Yes, indoor mushroom gardening is generally safe, but it’s important to take certain precautions. Always use clean materials and equipment to prevent contamination. Avoid breathing in mushroom spores, as they can cause allergic reactions in some people. Wear gloves when handling the substrate and mushrooms. And be sure to properly ventilate the growing area to prevent the buildup of carbon dioxide.
Can I use coffee grounds as a substrate for mushroom buckets indoor gardening?
Yes, coffee grounds can be an excellent addition to your substrate, especially for oyster mushrooms. They are rich in nutrients and provide a good source of nitrogen. However, coffee grounds should be used in moderation, as they can become compacted and inhibit air circulation. It’s best to mix coffee grounds with other materials like straw or sawdust to create a well-draining and aerated substrate. Also, ensure the coffee grounds are fresh and free from mold.
What do I do with the spent substrate after harvesting?
The spent substrate is a valuable resource that can be used in a variety of ways. It’s an excellent addition to your compost pile, providing a rich source of organic matter and nutrients. You can also use it as a soil amendment in your garden, improving soil structure and fertility. Additionally, the spent substrate can be used as a mulch around plants, helping to retain moisture and suppress weeds. Don’t throw it away; recycle it!

Leave a Comment