
Planting Cauliflower at Home might seem daunting, but trust me, with a few simple tricks and a little DIY spirit, you can harvest your own delicious, creamy cauliflower right in your backyard! Forget those bland, overpriced heads at the grocery store; imagine the satisfaction of serving up a dish featuring cauliflower you nurtured from seedling to table.
Cauliflower’s journey from its wild cabbage ancestor to the culinary star it is today is a fascinating one. Cultivated for centuries, it holds a special place in many cultures, often featuring in traditional dishes and representing abundance and good health. But let’s be honest, sometimes growing it feels more like a battle than a blessing!
That’s where these DIY hacks come in. I know, I know, you’re probably thinking, “I don’t have a green thumb!” But the truth is, you don’t need to be a master gardener to succeed. Planting Cauliflower at Home can be surprisingly easy when you know the secrets to avoiding common pitfalls like bolting, pest infestations, and poor head formation. This article is packed with practical tips and tricks to help you navigate the process, ensuring a bountiful harvest and a whole lot of bragging rights. So, grab your gardening gloves, and let’s get started!
Planting Cauliflower at Home: A Beginner’s Guide
Hey there, fellow gardening enthusiasts! I’m so excited to share my experience with growing cauliflower at home. It might seem intimidating at first, but trust me, with a little patience and these simple steps, you’ll be harvesting your own delicious cauliflower in no time!
Choosing Your Cauliflower Variety
Before we dive into the planting process, let’s talk about choosing the right cauliflower variety. This is crucial because different varieties have different maturity times and are better suited for specific climates.
* **Consider your climate:** If you live in a warmer climate, opt for early-maturing varieties like ‘Snowball’ or ‘Early White Hybrid’. For cooler climates, you can try ‘Amazing’ or ‘Graffiti’ (which produces beautiful purple heads!).
* **Think about maturity time:** Early varieties mature in about 50-60 days, while later varieties can take up to 80 days or more. Choose a variety that fits your growing season.
* **Check for disease resistance:** Some varieties are more resistant to common cauliflower diseases like black rot and clubroot. Look for these when selecting your seeds or seedlings.
* **Space considerations:** Some varieties grow larger than others. If you have limited space, opt for a compact variety.
I personally love growing ‘Snowball Y Improved’ because it’s reliable and produces beautiful, tightly packed white heads.
Starting Cauliflower Seeds Indoors (Optional but Recommended)
Starting your cauliflower seeds indoors gives them a head start, especially if you have a short growing season. I highly recommend this method!
* **When to start:** Start your seeds about 4-6 weeks before the last expected frost in your area.
* **What you’ll need:**
* Seed starting trays or small pots
* Seed starting mix (a light, well-draining mix is essential)
* Watering can or spray bottle
* Grow lights (optional, but they’ll help prevent leggy seedlings)
* Heat mat (optional, but it can speed up germination)
Step-by-step instructions:
1. **Prepare your seed starting trays:** Fill your trays or pots with seed starting mix, leaving about half an inch of space at the top.
2. **Sow the seeds:** Make a small indentation (about 录 inch deep) in the center of each cell or pot. Place 2-3 seeds in each indentation.
3. **Cover the seeds:** Gently cover the seeds with seed starting mix.
4. **Water thoroughly:** Water the trays or pots gently using a watering can or spray bottle. Make sure the soil is moist but not waterlogged.
5. **Provide warmth:** Place the trays or pots on a heat mat (if using) and cover them with a humidity dome or plastic wrap to create a humid environment.
6. **Provide light:** Place the trays or pots under grow lights or in a sunny window. If using grow lights, keep them about 2-3 inches above the seedlings.
7. **Monitor moisture:** Check the soil moisture daily and water as needed to keep it consistently moist.
8. **Thin the seedlings:** Once the seedlings have their first true leaves (the second set of leaves), thin them to one seedling per cell or pot. Choose the strongest seedling and snip off the others at the soil line.
9. **Harden off the seedlings:** About a week before you plan to transplant the seedlings outdoors, start hardening them off. This means gradually exposing them to outdoor conditions. Start by placing them in a sheltered spot outdoors for an hour or two each day, gradually increasing the amount of time they spend outside.
Preparing the Garden Bed
Cauliflower needs a sunny spot with well-drained soil. Proper soil preparation is key to a successful harvest!
* **Sunlight:** Choose a location that receives at least 6 hours of direct sunlight per day.
* **Soil:** Cauliflower prefers well-drained, fertile soil with a pH between 6.0 and 7.0.
* **Amendments:** Amend the soil with plenty of organic matter, such as compost or well-rotted manure. This will improve drainage, fertility, and water retention.
Step-by-step instructions:
1. **Clear the area:** Remove any weeds, rocks, or debris from the planting area.
2. **Till the soil:** Till the soil to a depth of at least 12 inches. This will loosen the soil and make it easier for the cauliflower roots to grow.
3. **Amend the soil:** Spread a 2-3 inch layer of compost or well-rotted manure over the soil.
4. **Incorporate the amendments:** Use a garden fork or tiller to incorporate the compost or manure into the soil.
5. **Test the soil pH:** Use a soil testing kit to check the soil pH. If the pH is too low (acidic), add lime to raise it. If the pH is too high (alkaline), add sulfur to lower it.
6. **Create planting rows:** Create planting rows that are spaced about 24-36 inches apart.
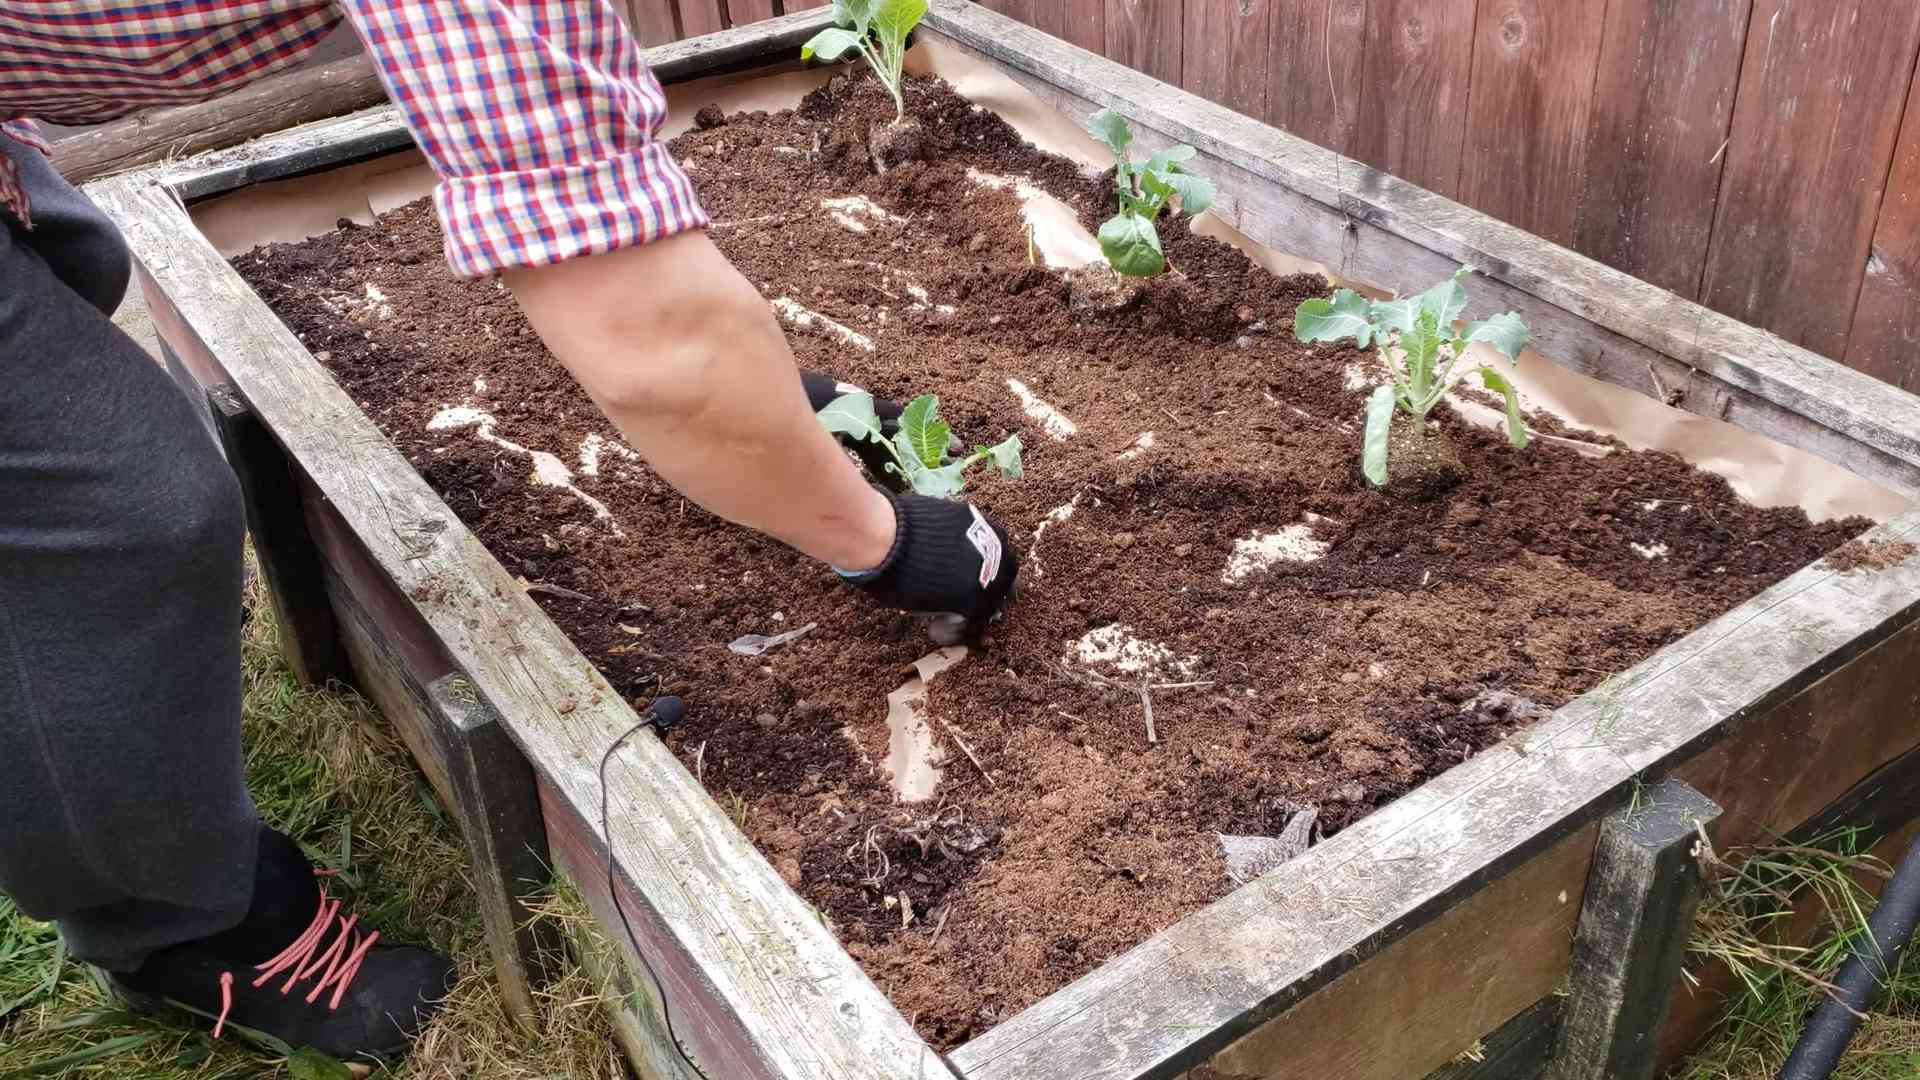
Transplanting Cauliflower Seedlings
Once your seedlings are hardened off and the danger of frost has passed, it’s time to transplant them into the garden.
* **Timing:** Transplant your seedlings in the late afternoon or on a cloudy day to minimize stress.
* **Spacing:** Space the seedlings about 18-24 inches apart within the rows.
Step-by-step instructions:
1. **Water the seedlings:** Water the seedlings thoroughly before transplanting them.
2. **Dig holes:** Dig holes that are slightly larger than the root balls of the seedlings.
3. **Remove the seedlings from their containers:** Gently remove the seedlings from their containers, being careful not to damage the roots.
4. **Place the seedlings in the holes:** Place the seedlings in the holes, making sure the top of the root ball is level with the soil surface.
5. **Fill the holes:** Fill the holes with soil and gently firm the soil around the seedlings.
6. **Water thoroughly:** Water the seedlings thoroughly after transplanting them.
7. **Mulch:** Apply a layer of mulch around the seedlings to help retain moisture, suppress weeds, and regulate soil temperature. I like to use straw or shredded leaves.
Caring for Your Cauliflower Plants
Proper care is essential for healthy cauliflower plants and a bountiful harvest.
* **Watering:** Water your cauliflower plants regularly, especially during dry periods. Aim for about 1-2 inches of water per week.
* **Fertilizing:** Fertilize your cauliflower plants every 2-3 weeks with a balanced fertilizer. I prefer using an organic fertilizer like fish emulsion or compost tea.
* **Weeding:** Keep the area around your cauliflower plants free of weeds. Weeds compete with the cauliflower plants for water and nutrients.
* **Pest control:** Monitor your cauliflower plants regularly for pests like cabbage worms, aphids, and flea beetles. Use organic pest control methods like handpicking, insecticidal soap, or neem oil to control these pests.
* **Blanching (for white varieties):** When the cauliflower head reaches about 2-3 inches in diameter, you’ll need to blanch it to keep it white. This involves covering the head with the surrounding leaves to protect it from the sun.
Step-by-step instructions for blanching:
1. **Choose a dry day:** Blanch your cauliflower on a dry day to prevent fungal diseases.
2. **Gather the leaves:** Gently gather the leaves around the cauliflower head.
3. **Secure the leaves:** Secure the leaves with twine, rubber bands, or clothespins. Make sure the head is completely covered.
4. **Check regularly:** Check the cauliflower head regularly to make sure it’s still covered.
5. **Harvest:** The cauliflower head should be ready to harvest in about 7-12 days after blanching.
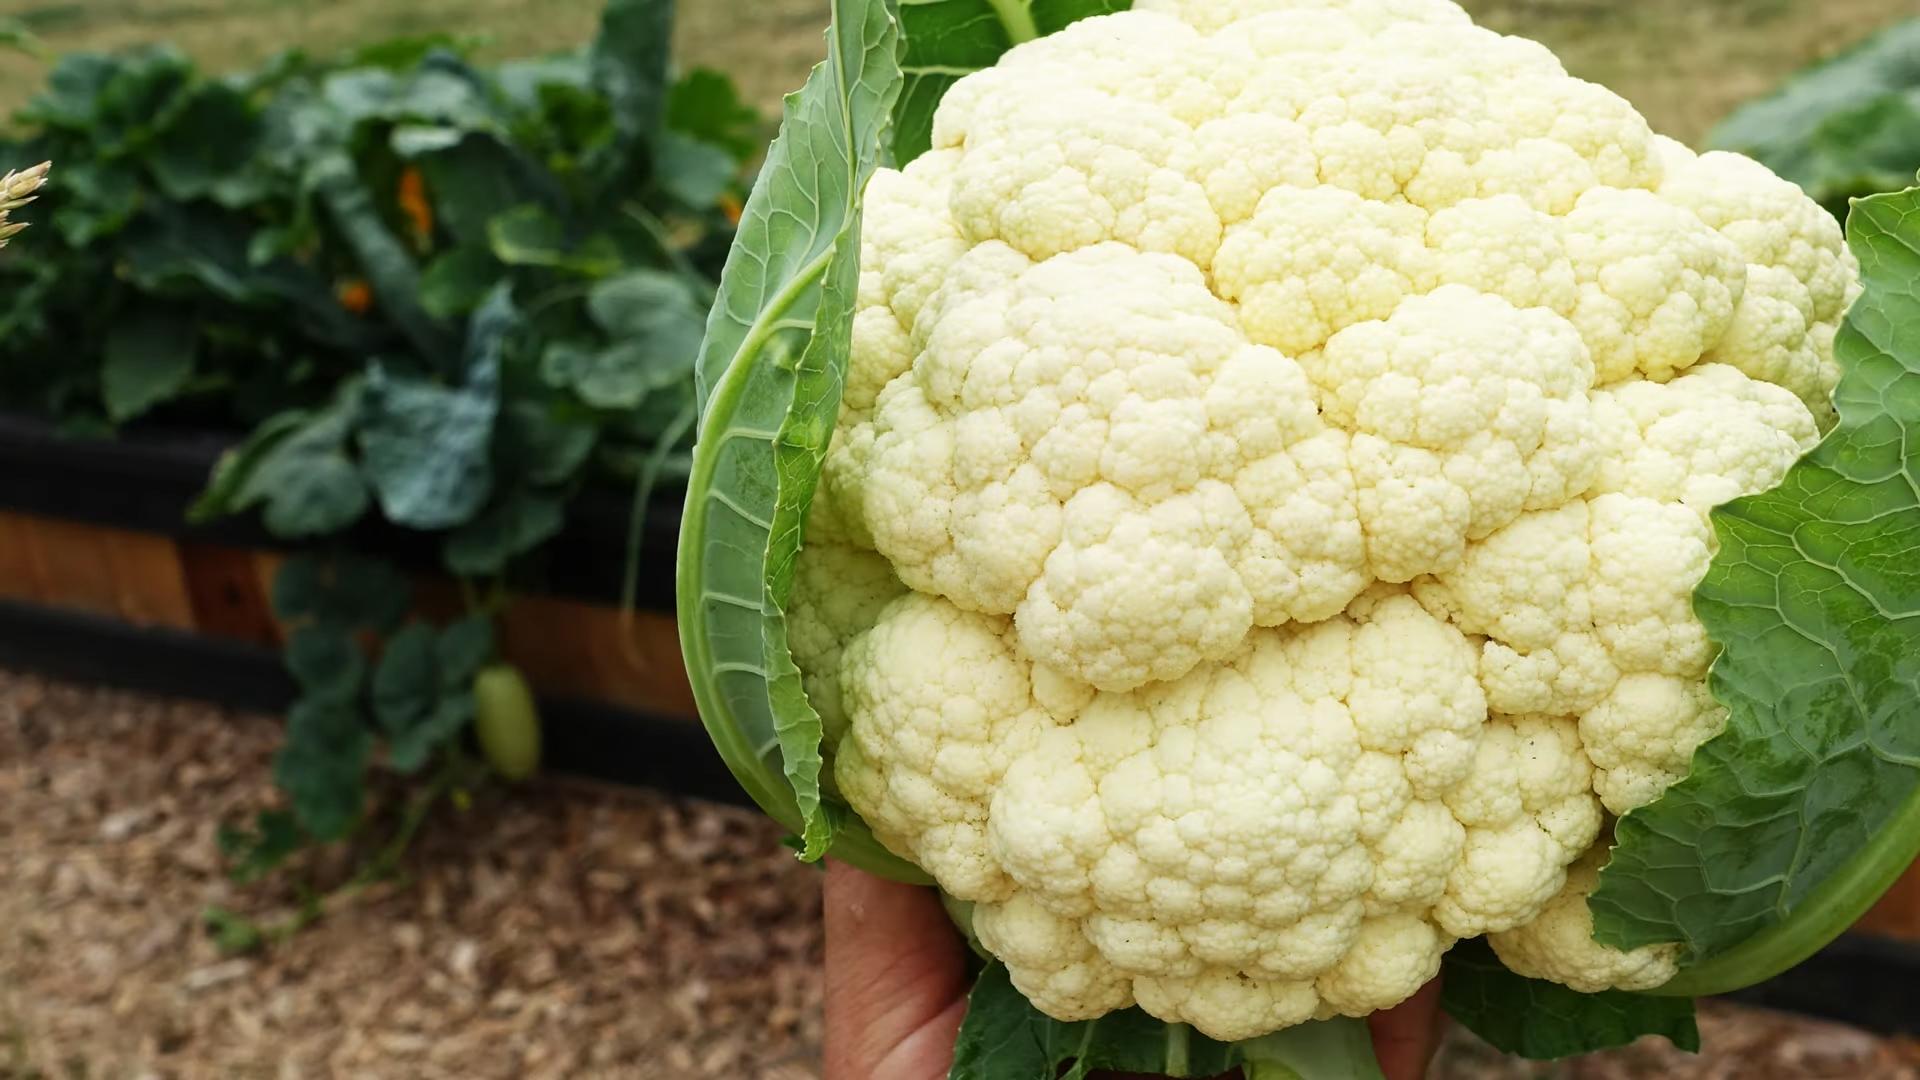
Harvesting Your Cauliflower
Harvesting your cauliflower at the right time is crucial for the best flavor and texture.
* **Timing:** Harvest your cauliflower when the head is firm, compact, and about 6-8 inches in diameter.
* **Method:** Cut the stem of the cauliflower head with a sharp knife, leaving a few leaves attached to protect the head.
Step-by-step instructions:
1. **Inspect the head:** Check the cauliflower head for firmness and size.
2. **Cut the stem:** Use a sharp knife to cut the stem of the cauliflower head, leaving a few leaves attached.
3. **Handle with care:** Handle the cauliflower head carefully to avoid bruising.
4. **Store properly:** Store the cauliflower head in the refrigerator for up to a week.
Troubleshooting Common Problems
Even with the best care, you might encounter some problems while growing cauliflower. Here are a few common issues and how to address them:
* **Buttoning:** This is when the cauliflower head forms prematurely and remains small. It’s often caused by stress, such as lack of water or nutrients. Make sure to water
Conclusion
So, there you have it! Planting cauliflower at home, while it might seem daunting at first, is an incredibly rewarding experience that brings fresh, flavorful produce right to your table. We’ve walked you through the essential steps, from selecting the right variety and preparing your soil to nurturing your plants and harvesting your beautiful heads of cauliflower.
But why should you bother with this DIY project when you can simply buy cauliflower at the grocery store? The answer lies in the unparalleled freshness and flavor you’ll achieve. Store-bought cauliflower often travels long distances and sits on shelves, losing its vibrancy and nutritional value. When you grow your own, you’re harvesting at peak ripeness, ensuring the most delicious and nutritious cauliflower possible. Plus, there’s an undeniable satisfaction in nurturing a plant from seed (or seedling) to harvest.
Beyond the superior taste and freshness, growing your own cauliflower allows you to control exactly what goes into your food. You can avoid harmful pesticides and herbicides, opting for organic and sustainable gardening practices. This is especially important for those concerned about their health and the environment.
This DIY cauliflower growing trick is a must-try because it empowers you to take control of your food source, enjoy unparalleled flavor, and embrace a more sustainable lifestyle.
Don’t be afraid to experiment with different varieties of cauliflower to find your favorites. Consider planting purple, orange, or Romanesco cauliflower for a visually stunning and equally delicious harvest. You can also try succession planting, staggering your planting dates to ensure a continuous supply of cauliflower throughout the growing season. If you’re short on space, explore container gardening options. Many dwarf varieties of cauliflower thrive in pots, making them perfect for balconies or small patios.
Remember to pay close attention to your plants’ needs, providing them with adequate sunlight, water, and nutrients. Regularly check for pests and diseases, and take prompt action to prevent them from spreading. With a little patience and care, you’ll be rewarded with a bountiful harvest of homegrown cauliflower.
We encourage you to embark on this gardening adventure and discover the joys of planting cauliflower at home. It’s a fantastic way to connect with nature, learn new skills, and enjoy the fruits (or rather, vegetables) of your labor.
Once you’ve harvested your first head of homegrown cauliflower, we’d love to hear about your experience! Share your tips, tricks, and photos with us in the comments below. Let’s build a community of cauliflower enthusiasts and inspire others to grow their own food. Happy gardening!
Frequently Asked Questions (FAQ)
What is the best time of year to plant cauliflower?
The best time to plant cauliflower depends on your climate. Cauliflower is a cool-season crop, meaning it thrives in temperatures between 60掳F and 70掳F (15掳C and 21掳C). In areas with mild winters, you can plant cauliflower in the fall for a winter or early spring harvest. In colder climates, start seeds indoors 6-8 weeks before the last expected frost and transplant them outdoors in the spring after the danger of frost has passed. You can also plant a second crop in late summer for a fall harvest. Pay attention to your local weather patterns and adjust your planting schedule accordingly.
How much sunlight does cauliflower need?
Cauliflower requires at least 6 hours of direct sunlight per day to thrive. Choose a planting location that receives ample sunlight throughout the day. If you’re growing cauliflower in containers, make sure to place them in a sunny spot. Insufficient sunlight can result in small, underdeveloped heads of cauliflower.
What type of soil is best for growing cauliflower?
Cauliflower prefers well-drained, fertile soil that is rich in organic matter. The ideal soil pH is between 6.0 and 7.0. Before planting, amend your soil with compost, aged manure, or other organic materials to improve its fertility and drainage. If your soil is heavy clay, consider adding sand or perlite to improve drainage. A soil test can help you determine the pH and nutrient levels of your soil, allowing you to make necessary adjustments.
How often should I water cauliflower plants?
Cauliflower plants need consistent moisture to thrive. Water deeply and regularly, especially during dry periods. Aim to keep the soil consistently moist but not waterlogged. Mulching around the plants can help retain moisture and suppress weeds. Check the soil moisture regularly by sticking your finger into the soil. If the top inch feels dry, it’s time to water.
What are some common pests and diseases that affect cauliflower?
Cauliflower is susceptible to several pests and diseases, including cabbage worms, aphids, flea beetles, clubroot, and black rot. Regularly inspect your plants for signs of pests or diseases. Use organic pest control methods, such as handpicking pests, using insecticidal soap, or applying Bacillus thuringiensis (Bt) for cabbage worms. To prevent diseases, practice crop rotation, ensure good air circulation, and avoid overhead watering. If you encounter a serious disease problem, consult with your local agricultural extension office for advice.
How do I prevent cauliflower from turning yellow?
Cauliflower heads can turn yellow if they are exposed to too much sunlight. To prevent this, blanch the heads by tying the outer leaves together over the developing head when it reaches about 2-3 inches in diameter. This will protect the head from the sun and keep it white. Use twine or rubber bands to secure the leaves. Check the heads regularly and adjust the leaves as needed.
When is cauliflower ready to harvest?
Cauliflower is typically ready to harvest when the head is firm, compact, and about 6-8 inches in diameter. The exact harvest time will depend on the variety and growing conditions. Check the seed packet or plant tag for specific maturity dates. To harvest, cut the stem below the head, leaving a few leaves attached.
Can I grow cauliflower in containers?
Yes, you can grow cauliflower in containers, especially dwarf varieties. Choose a large container that is at least 12 inches in diameter and depth. Use a well-draining potting mix and provide the plants with plenty of sunlight and water. Container-grown cauliflower may require more frequent fertilization than plants grown in the ground.
What are some good companion plants for cauliflower?
Good companion plants for cauliflower include herbs like rosemary, thyme, and sage, which can help repel pests. Other beneficial companion plants include marigolds, nasturtiums, and onions. Avoid planting cauliflower near other members of the brassica family, such as broccoli, cabbage, and kale, as they can attract the same pests and diseases.
How do I store harvested cauliflower?
Store harvested cauliflower in the refrigerator for up to a week. To keep it fresh, wrap the head in a damp paper towel and place it in a plastic bag. You can also freeze cauliflower for longer storage. To freeze, blanch the cauliflower florets in boiling water for 3 minutes, then transfer them to an ice bath to stop the cooking process. Drain the florets thoroughly and spread them out on a baking sheet to freeze. Once frozen, transfer the florets to a freezer bag or container.

Leave a Comment