
Plastic Bottle Mushroom Growing: Unlock the secrets to cultivating your own delicious mushrooms right at home, using something you probably already have lying around – plastic bottles! Ever dreamt of harvesting fresh, flavorful mushrooms without the hassle of traditional gardening? Well, get ready to turn that dream into reality with this incredibly simple and rewarding DIY project.
Mushroom cultivation has a rich history, dating back centuries. From ancient civilizations in Asia who revered mushrooms for their medicinal properties to modern-day gourmets who prize their unique flavors, mushrooms have always held a special place in our culinary and cultural landscape. Now, you can participate in this time-honored tradition, but with a sustainable twist!
Why should you try plastic bottle mushroom growing? Because it’s a game-changer! It’s budget-friendly, space-saving, and incredibly satisfying. Imagine the joy of watching tiny spores transform into a bountiful harvest, all within the confines of a recycled plastic bottle. Plus, it’s a fantastic way to reduce waste and contribute to a more sustainable lifestyle. I’m excited to show you how to transform those discarded bottles into thriving mushroom farms, bringing the magic of nature right to your kitchen counter. Let’s get started!
Pilzzucht im Eigenbau: Austernpilze in Plastikflaschen ziehen
Hallo liebe Pilzfreunde! Habt ihr euch jemals gefragt, wie man zu Hause seine eigenen Pilze züchten kann? Ich zeige euch heute, wie ihr mit einfachen Mitteln und recycelten Plastikflaschen leckere Austernpilze züchten könnt. Es ist einfacher als ihr denkt und macht richtig Spaß!
Was ihr braucht:
* Plastikflaschen: Am besten eignen sich 1,5- oder 2-Liter-Flaschen. Achtet darauf, dass sie sauber und unbeschädigt sind.
* Austernpilzbrut: Die bekommt ihr online oder im Fachhandel. Achtet auf eine gute Qualität.
* Substrat: Stroh, Kaffeesatz oder Sägespäne (Hartholz) sind ideal. Ich bevorzuge Stroh, da es leicht zu bekommen ist.
* Kalk: Gartenkalk oder Branntkalk, um das Substrat zu sterilisieren.
* Großer Topf oder Eimer: Zum Sterilisieren des Substrats.
* Bohrmaschine oder Messer: Um Löcher in die Flaschen zu machen.
* Sprühflasche: Zum Befeuchten der Pilze.
* Handschuhe: Zum Schutz eurer Hände.
* Desinfektionsmittel: Für die Arbeitsfläche und eure Hände.
* Geduld: Pilze wachsen nicht über Nacht!
Vorbereitung ist alles: Das Substrat sterilisieren
Das A und O für eine erfolgreiche Pilzzucht ist ein sauberes Substrat. Sonst haben Schimmelpilze und andere ungebetene Gäste leichtes Spiel. Keine Sorge, es ist nicht kompliziert!
1. Substrat vorbereiten: Wenn ihr Stroh verwendet, schneidet es in kurze Stücke (ca. 5-10 cm). Kaffeesatz könnt ihr direkt verwenden. Sägespäne sollten von unbehandeltem Hartholz sein.
2. Kalk hinzufügen: Gebt zum Stroh oder Sägespänen Kalk hinzu. Die Menge hängt vom Kalk ab, aber eine Faustregel ist: ca. 5-10% Kalk bezogen auf das Trockengewicht des Substrats. Kaffeesatz benötigt keinen Kalkzusatz.
3. Mischen: Vermischt das Substrat und den Kalk gründlich.
4. Sterilisieren: Füllt das Substrat in einen großen Topf oder Eimer und übergießt es mit kochendem Wasser. Achtet darauf, dass das Substrat komplett bedeckt ist.
5. Einweichen: Lasst das Substrat mindestens 1 Stunde, besser noch über Nacht, im heißen Wasser einweichen. Dadurch werden Schimmelpilze und andere Mikroorganismen abgetötet.
6. Abtropfen: Gießt das Wasser ab und lasst das Substrat gut abtropfen. Es sollte feucht, aber nicht nass sein. Drückt es am besten mit den Händen aus, bis kein Wasser mehr herausläuft.
Die Flaschen vorbereiten: Löcher bohren und desinfizieren
Jetzt kümmern wir uns um die Behausung unserer zukünftigen Pilze.
1. Flaschen reinigen: Wascht die Plastikflaschen gründlich mit heißem Wasser und Spülmittel aus. Spült sie danach gut mit klarem Wasser ab.
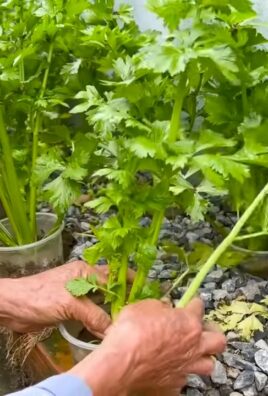
2. Löcher bohren: Bohrt oder schneidet mit einem Messer Löcher in die Flaschen. Die Löcher sollten ca. 1-2 cm groß sein und in einem Abstand von ca. 5-7 cm zueinander angeordnet sein. Ich mache meistens 6-8 Löcher pro Flasche. Diese Löcher dienen später der Belüftung und dem Austritt der Pilze.
3. Desinfizieren: Sprüht die Flaschen innen und außen mit Desinfektionsmittel ein. Lasst sie anschließend gut trocknen.
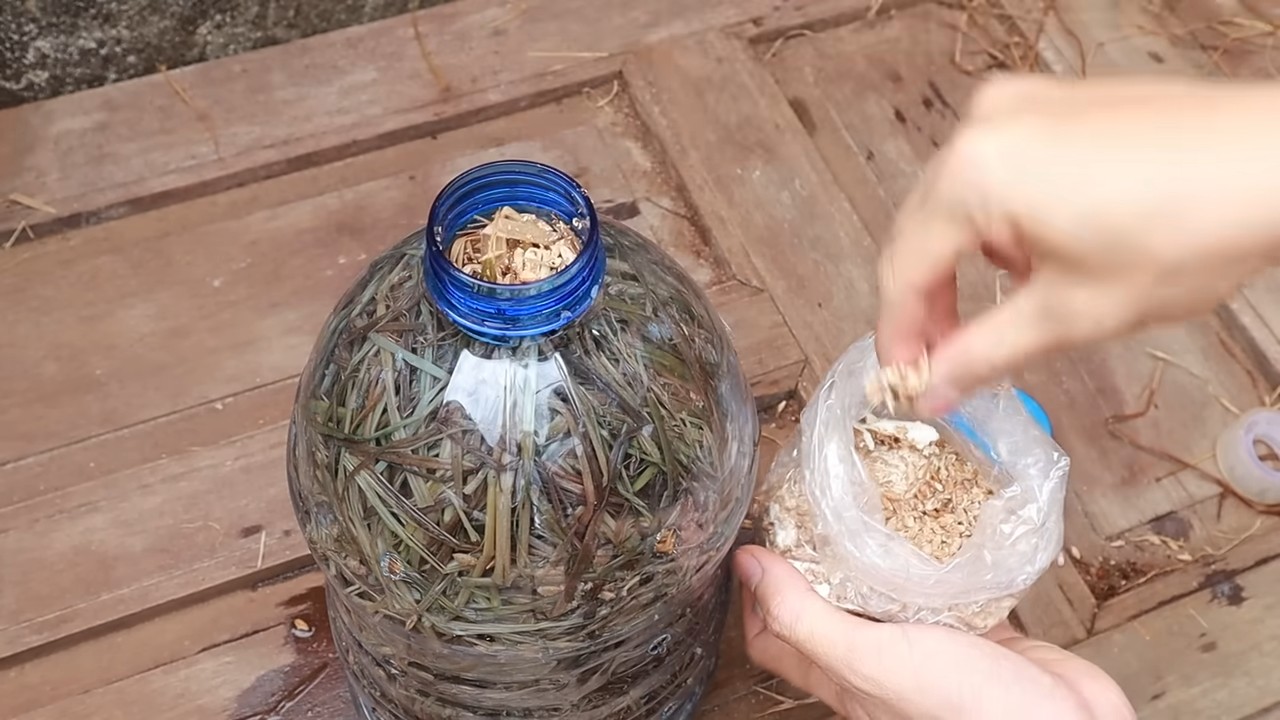
Das Substrat einfüllen und die Brut hinzufügen: Die Pilzkultur starten
Jetzt kommt der spannende Teil: Wir bringen das Substrat und die Pilzbrut zusammen!
1. Hände desinfizieren: Bevor ihr mit dem Befüllen beginnt, desinfiziert eure Hände gründlich.
2. Substrat einfüllen: Füllt die Flaschen mit dem vorbereiteten Substrat. Drückt es dabei leicht an, aber nicht zu fest.
3. Brut hinzufügen: Verteilt die Austernpilzbrut gleichmäßig im Substrat. Ich mache das meistens schichtweise: Eine Schicht Substrat, eine Schicht Brut, eine Schicht Substrat, usw. Die oberste Schicht sollte aus Substrat bestehen.
4. Flaschen verschließen: Verschließt die Flaschen mit dem Deckel. Wenn ihr keine Deckel habt, könnt ihr die Öffnung mit Frischhaltefolie abdecken und mit einem Gummiband fixieren.
5. Beschriften: Beschriftet die Flaschen mit dem Datum, damit ihr wisst, wann ihr angefangen habt.
Die Inkubationsphase: Warten und beobachten
Jetzt heißt es warten und den Pilzen Zeit geben, das Substrat zu besiedeln.
1. Standort wählen: Stellt die Flaschen an einen dunklen, kühlen (ca. 18-24°C) und gut belüfteten Ort. Ein Keller oder eine Garage sind ideal. Vermeidet direkte Sonneneinstrahlung.
2. Beobachten: Kontrolliert die Flaschen regelmäßig. Nach einigen Tagen sollte sich ein weißes Myzel (das Pilzgeflecht) im Substrat ausbreiten. Das ist ein gutes Zeichen!
3. Belüften: Öffnet die Flaschen ab und zu kurz, um frische Luft hineinzulassen.
4. Geduld haben: Die Inkubationsphase dauert in der Regel 2-3 Wochen.
Die Fruchtungsphase: Pilze ernten
Wenn das Substrat vollständig mit Myzel durchzogen ist, ist es Zeit für die Fruchtungsphase.
1. Standort wechseln: Stellt die Flaschen an einen helleren Ort, aber immer noch ohne direkte Sonneneinstrahlung. Eine höhere Luftfeuchtigkeit ist jetzt wichtig.
2. Befeuchten: Besprüht die Flaschen und die Umgebung regelmäßig mit Wasser, um die Luftfeuchtigkeit zu erhöhen. Ich sprühe meistens 2-3 Mal täglich.
3. Belüften: Sorgt für eine gute Belüftung, damit sich keine Schimmelpilze bilden.
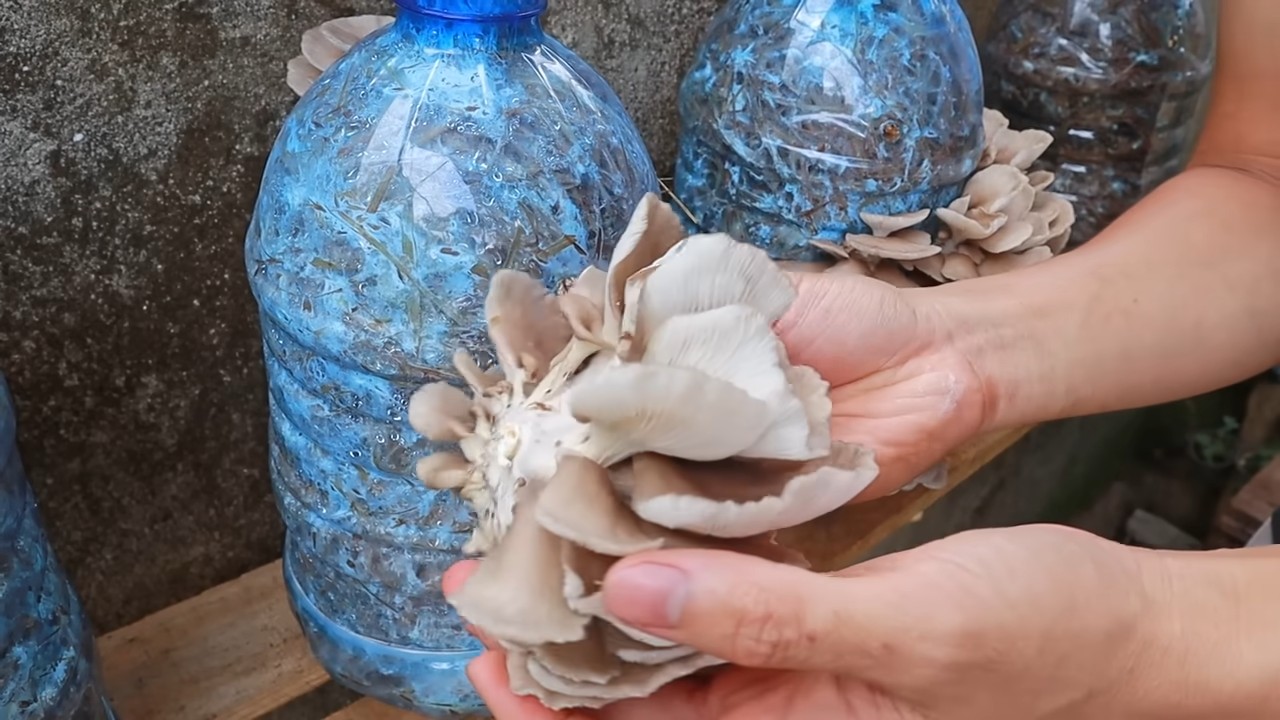
4. Pilze wachsen sehen: Nach einigen Tagen sollten sich kleine Pilzkörper an den Löchern bilden. Diese wachsen dann schnell zu stattlichen Austernpilzen heran.
5. Ernten: Erntet die Pilze, wenn sie ihre volle Größe erreicht haben, aber noch nicht ausgetrocknet sind. Dreht die Pilze vorsichtig ab oder schneidet sie mit einem Messer ab.
Nach der Ernte: Eine zweite Welle
Oft könnt ihr nach der ersten Ernte noch eine zweite oder sogar dritte Welle von Pilzen ernten.
1. Ruhephase: Lasst die Flaschen nach der Ernte einige Tage ruhen.
2. Befeuchten: Befeuchtet die Flaschen und die Umgebung weiterhin regelmäßig.
3. Wiederholung: Die Pilze sollten nach einiger Zeit wieder austreiben.
Tipps und Tricks für eine erfolgreiche Pilzzucht
* Sauberkeit ist wichtig: Achtet auf eine saubere Arbeitsumgebung und desinfiziert eure Hände und Werkzeuge regelmäßig.
* Die richtige Luftfeuchtigkeit: Austernpilze lieben eine hohe Luftfeuchtigkeit. Wenn die Luft zu trocken ist, könnt ihr die Flaschen in eine Plastiktüte stellen und diese leicht verschließen.
* Schimmel vermeiden: Wenn sich Schimmel bildet, entfernt die betroffenen Stellen sofort.
* Experimentieren: Probiert verschiedene Substrate aus, um herauszufinden, was am besten funktioniert.
* Nicht aufgeben: Manchmal klappt es nicht gleich beim ersten Mal. Lasst euch nicht entmutigen und probiert es einfach weiter!
Ich hoffe, diese Anleitung hilft euch dabei, eure eigenen Austernpilze zu züchten. Es ist ein tolles Hobby und ihr werdet mit leckeren, frischen Pilzen belohnt. Viel Spaß beim Ausprobieren!
Conclusion
So, there you have it! Transforming humble plastic bottles into thriving mushroom farms is not just a quirky DIY project; it’s a sustainable, cost-effective, and incredibly rewarding way to cultivate your own delicious fungi. We’ve walked you through the process, highlighting the simplicity and adaptability of this method. Why spend a fortune on store-bought mushrooms when you can harness the power of upcycling and grow your own fresh supply right at home?
This isn’t just about saving money; it’s about connecting with your food source, understanding the fascinating life cycle of mushrooms, and reducing your environmental footprint. By repurposing plastic bottles, you’re actively participating in waste reduction and contributing to a more sustainable lifestyle. Plus, the satisfaction of harvesting your own homegrown mushrooms is simply unparalleled.
The beauty of this DIY trick lies in its versatility. Feel free to experiment with different mushroom species. Oyster mushrooms are a fantastic starting point due to their resilience and rapid growth, but don’t be afraid to venture into the world of shiitake, lion’s mane, or even wine cap mushrooms as you gain experience. Each variety offers a unique flavor profile and nutritional benefit, allowing you to tailor your mushroom farm to your specific culinary preferences.
Consider experimenting with different substrates as well. While straw is a readily available and effective option, you can also explore using coffee grounds, cardboard, or even wood chips, depending on the type of mushroom you’re cultivating. Remember to research the specific substrate requirements of your chosen mushroom species for optimal results.
Don’t be afraid to get creative with your bottle design! You can paint the bottles to block out light (except for the fruiting holes), decorate them to add a touch of personality to your indoor garden, or even connect multiple bottles to create a larger, more elaborate mushroom farm. The possibilities are endless!
We understand that embarking on a new DIY project can sometimes feel daunting, but we assure you that this plastic bottle mushroom growing method is surprisingly straightforward. With a little patience and attention to detail, you’ll be harvesting your own bountiful crop of fresh, flavorful mushrooms in no time.
So, what are you waiting for? Gather your plastic bottles, source your mushroom spawn, and prepare to embark on a fascinating journey into the world of mycology. We’re confident that you’ll be amazed by the results.
We wholeheartedly encourage you to try this DIY trick and share your experiences with us! Post photos of your mushroom farms, share your tips and tricks, and let us know what challenges you encountered and how you overcame them. Your feedback will not only help us improve this guide but also inspire others to embrace the joy of homegrown mushrooms. Let’s build a community of mushroom enthusiasts and spread the word about this sustainable and rewarding practice! Happy growing!
Frequently Asked Questions (FAQ)
What type of plastic bottles are best for growing mushrooms?
Ideally, you should use PET (polyethylene terephthalate) plastic bottles, which are commonly used for water and soda. These bottles are durable, readily available, and relatively easy to work with. Avoid using bottles made from PVC (polyvinyl chloride) or other types of plastic, as they may leach harmful chemicals into the substrate and potentially contaminate your mushrooms. Make sure to thoroughly clean and sanitize the bottles before use to remove any residual contaminants.
Where can I get mushroom spawn?
Mushroom spawn can be purchased from a variety of sources, including online retailers specializing in mushroom cultivation supplies, local garden centers, and agricultural supply stores. When selecting spawn, ensure that it is a reputable source and that the spawn is fresh and healthy. Consider the type of mushroom you want to grow and choose spawn that is specifically suited for that species. Oyster mushroom spawn is a great option for beginners due to its ease of cultivation.
What is the best substrate to use for growing mushrooms in plastic bottles?
Straw is a popular and readily available substrate for growing mushrooms in plastic bottles, particularly for oyster mushrooms. However, other options include coffee grounds, cardboard, wood chips, and even paper waste. The best substrate will depend on the type of mushroom you are growing. Research the specific substrate requirements of your chosen mushroom species for optimal results. Remember to properly pasteurize or sterilize your substrate before inoculation to eliminate competing organisms.
How do I pasteurize or sterilize the substrate?
Pasteurization involves heating the substrate to a temperature that kills most harmful microorganisms without completely sterilizing it. This can be achieved by soaking the substrate in hot water (around 160-180°F) for 1-2 hours. Sterilization, on the other hand, involves completely eliminating all microorganisms, which can be done by pressure cooking the substrate for a specific duration. The choice between pasteurization and sterilization depends on the substrate and the mushroom species. For straw, pasteurization is usually sufficient, while for more nutrient-rich substrates like coffee grounds, sterilization may be necessary.
How long does it take for mushrooms to grow in plastic bottles?
The time it takes for mushrooms to grow in plastic bottles depends on several factors, including the mushroom species, the substrate, the environmental conditions (temperature, humidity, light), and the quality of the spawn. Generally, oyster mushrooms can start fruiting within 2-3 weeks after inoculation, while other species may take longer. Maintain optimal growing conditions to encourage rapid and healthy mushroom development.
What are the ideal environmental conditions for growing mushrooms in plastic bottles?
Mushrooms thrive in humid environments with temperatures ranging from 60-75°F (15-24°C). Maintain a humidity level of 80-90% by misting the bottles regularly or placing them in a humidity tent. Mushrooms also require indirect light for proper development. Avoid exposing them to direct sunlight, which can dry them out and damage them. Proper ventilation is also crucial to prevent the buildup of carbon dioxide and promote healthy air exchange.
How often should I water the mushrooms?
Water the mushrooms regularly to maintain a high humidity level. Mist the bottles with water 2-3 times a day, or more frequently if the environment is dry. Avoid overwatering, which can lead to fungal diseases. The substrate should be moist but not waterlogged.
How do I harvest the mushrooms?
Harvest the mushrooms when the caps are fully developed but before they start to release spores. Gently twist or cut the mushrooms off the substrate. Avoid pulling them out, as this can damage the mycelium and prevent future flushes.
Can I get multiple flushes of mushrooms from the same bottle?
Yes, you can typically get multiple flushes of mushrooms from the same bottle. After harvesting the first flush, allow the substrate to rest for a few days and then rehydrate it by misting it thoroughly. This will encourage the mycelium to produce another flush of mushrooms. You can usually get 2-3 flushes from each bottle before the substrate becomes depleted.
What if my mushrooms are not growing or are growing slowly?
If your mushrooms are not growing or are growing slowly, check the environmental conditions (temperature, humidity, light, ventilation) and make sure they are within the optimal range for your chosen mushroom species. Also, ensure that the substrate is properly hydrated and that there are no signs of contamination. If you suspect contamination, discard the affected bottle to prevent the spread of disease.
Is it safe to eat mushrooms grown in plastic bottles?
Yes, it is generally safe to eat mushrooms grown in plastic bottles, provided that you use food-grade plastic bottles, properly pasteurize or sterilize the substrate, and maintain clean growing conditions. Avoid using bottles made from PVC or other types of plastic that may leach harmful chemicals. If you are unsure about the safety of your mushrooms, it is always best to err on the side of caution and discard them.
Can I grow different types of mushrooms in the same bottle?
It is generally not recommended to grow different types of mushrooms in the same bottle, as they may compete for resources and inhibit each other’s growth. Each mushroom species has specific substrate and environmental requirements, and it is best to cultivate them separately for optimal results.
How do I dispose of the spent substrate after harvesting the mushrooms?
The spent substrate can be composted or used as a soil amendment in your garden. It is rich in nutrients and beneficial microorganisms that can improve soil health. Alternatively, you can dispose of it in your regular trash.
Leave a Comment