
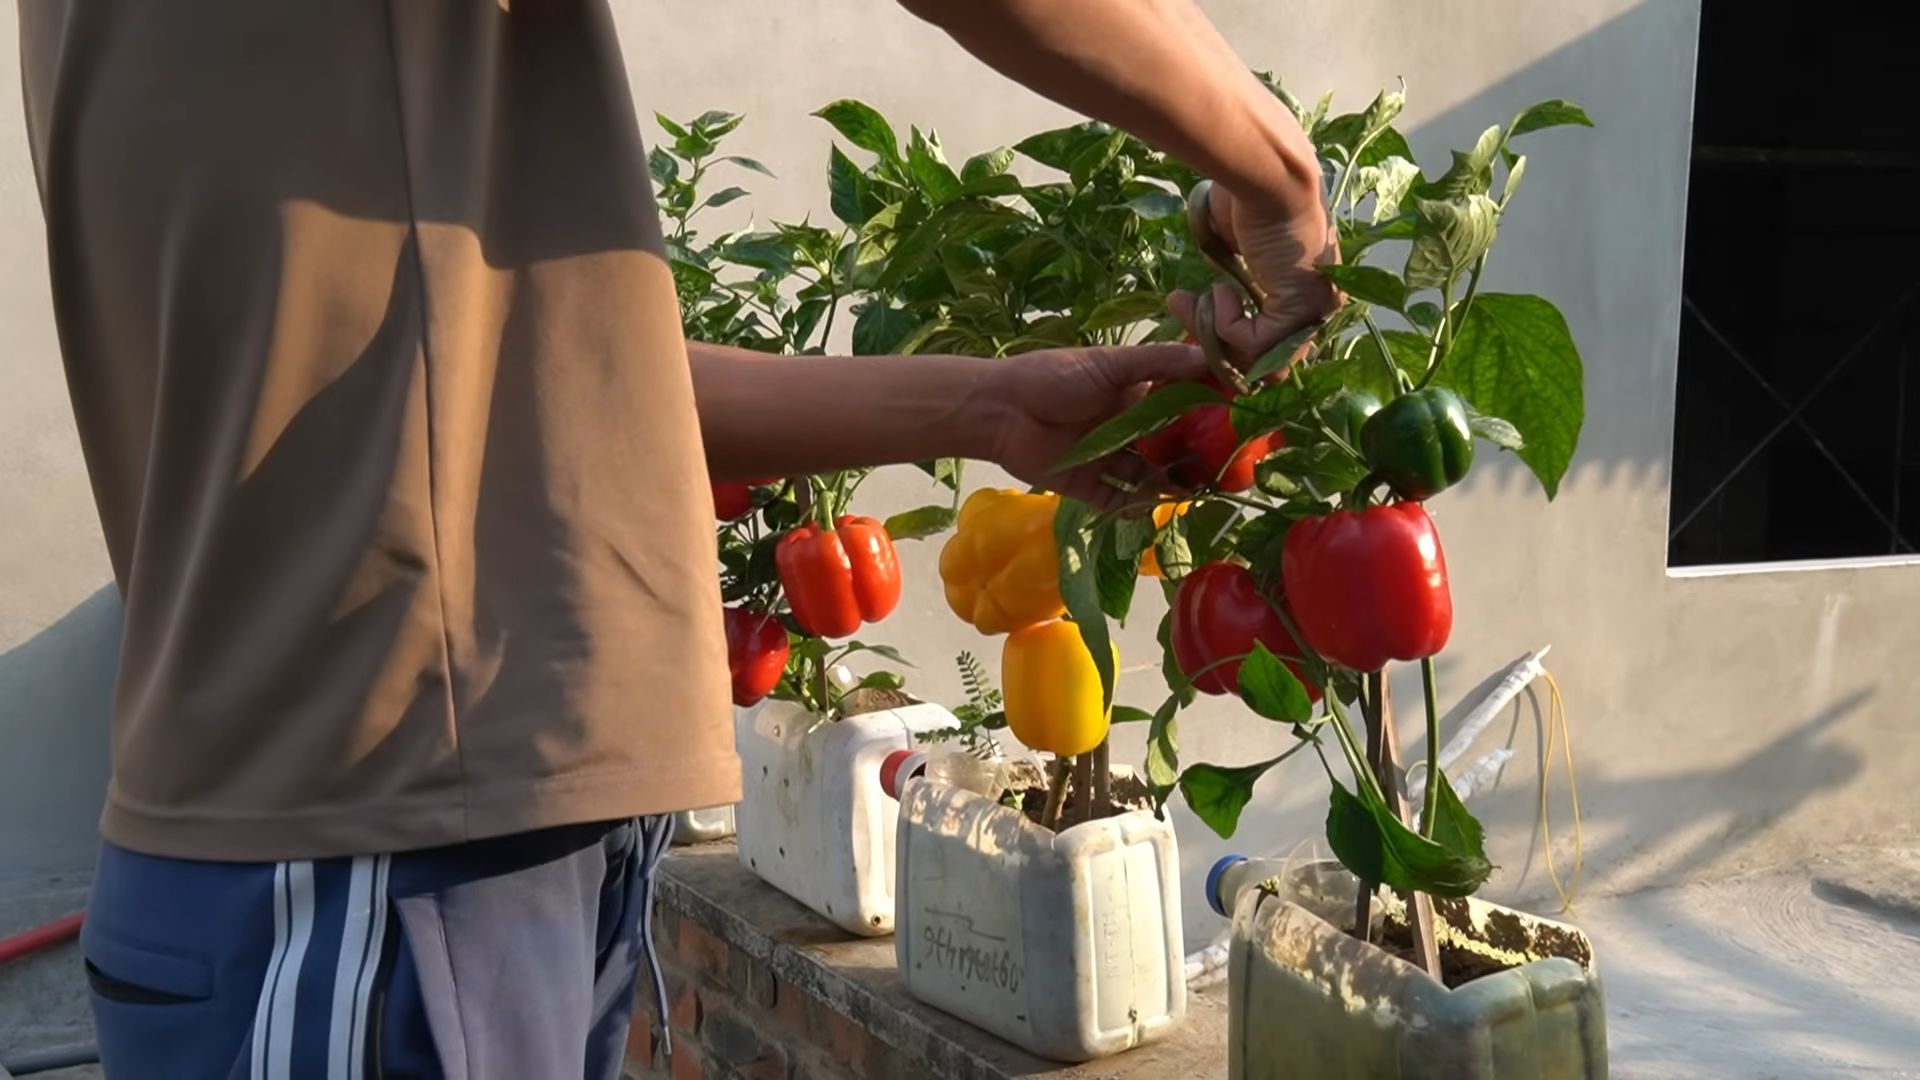
Recycled bottle bell peppers: Who knew turning trash into treasure could be so delicious? I’m always on the lookout for clever ways to reduce waste and boost my garden’s bounty, and this DIY trick ticks all the boxes! For generations, resourceful gardeners have sought innovative methods to extend growing seasons and protect their precious plants. Think of the ancient Romans using cloches to shield delicate seedlings from frost – we’re simply updating that tradition with a modern, eco-friendly twist.
Let’s face it, buying bell peppers at the grocery store can get expensive, and sometimes they just don’t have that vibrant, homegrown flavor. Plus, starting bell peppers from seed can be tricky, especially if you live in a region with a shorter growing season. That’s where this ingenious hack comes in. By using recycled plastic bottles, we can create mini-greenhouses that nurture our bell pepper plants, giving them a head start and shielding them from unpredictable weather. This method is not only cost-effective and environmentally conscious, but it also allows you to enjoy fresh, juicy recycled bottle bell peppers right from your own backyard, no matter the season!
DIY Recycled Bottle Bell Pepper Planters: A Sustainable Garden Hack
Hey there, fellow gardening enthusiasts! I’m so excited to share this super cool and eco-friendly DIY project with you: turning old plastic bottles into adorable bell pepper planters! Not only is this a fantastic way to recycle and reduce waste, but it’s also a budget-friendly way to grow your own delicious bell peppers. Let’s dive in!
Materials You’ll Need
Before we get started, let’s gather all the necessary materials. Trust me, having everything ready will make the process much smoother.
* Plastic Bottles: The star of the show! I recommend using 2-liter soda bottles or larger water bottles. The bigger the bottle, the more room your bell pepper plant will have to grow. Make sure they are clean and dry.
* Scissors or Utility Knife: For cutting the plastic bottles. Be careful and always cut away from yourself!
* Potting Soil: A good quality potting mix is essential for healthy bell pepper growth.
* Bell Pepper Seeds or Seedlings: You can start from seeds or buy small seedlings from your local garden center. I personally prefer seedlings for a quicker harvest.
* Drill or Nail and Hammer: To create drainage holes in the bottom of the bottles.
* Watering Can: For, well, watering!
* Optional: Spray Paint or Markers: To decorate your planters and make them look extra cute.
* Optional: Landscape Fabric or Coffee Filter: To prevent soil from washing out of the drainage holes.
Preparing the Plastic Bottles
This is where the transformation begins! We’re going to turn those discarded bottles into functional and stylish planters.
1. Clean the Bottles: Thoroughly wash the plastic bottles with soap and water to remove any residue. Rinse them well and let them dry completely. This is crucial to prevent any contamination that could harm your plants.
2. Cut the Bottles: Decide how tall you want your planters to be. I usually cut the bottles about halfway down, but you can adjust this depending on the size of your bottle and the size of your bell pepper plant. Use scissors or a utility knife to carefully cut the bottle. If you’re using a utility knife, be extra cautious!
3. Smooth the Edges: After cutting, the edges of the plastic bottle might be a bit sharp. To avoid any accidental cuts, use sandpaper or a lighter to smooth them out. If using a lighter, quickly run the flame along the edge to melt and smooth it. Be careful not to burn yourself or the plastic.
4. Create Drainage Holes: This is super important! Bell peppers need good drainage to prevent root rot. Use a drill or a nail and hammer to create several drainage holes in the bottom of the bottle. I usually make about 4-5 holes, evenly spaced.
5. Add Landscape Fabric (Optional): To prevent soil from washing out of the drainage holes, you can line the bottom of the bottle with a piece of landscape fabric or a coffee filter. This will help keep the soil in place while still allowing water to drain freely.
Planting Your Bell Peppers
Now for the fun part – planting your bell peppers!
1. Fill with Potting Soil: Fill the prepared plastic bottle with high-quality potting soil, leaving about an inch of space at the top. Don’t pack the soil too tightly, as this can restrict root growth.
2. Plant Your Seeds or Seedlings:
* From Seeds: If you’re starting from seeds, sow them according to the instructions on the seed packet. Usually, this involves making a small hole in the soil, dropping in a few seeds, and covering them lightly with soil. Water gently.
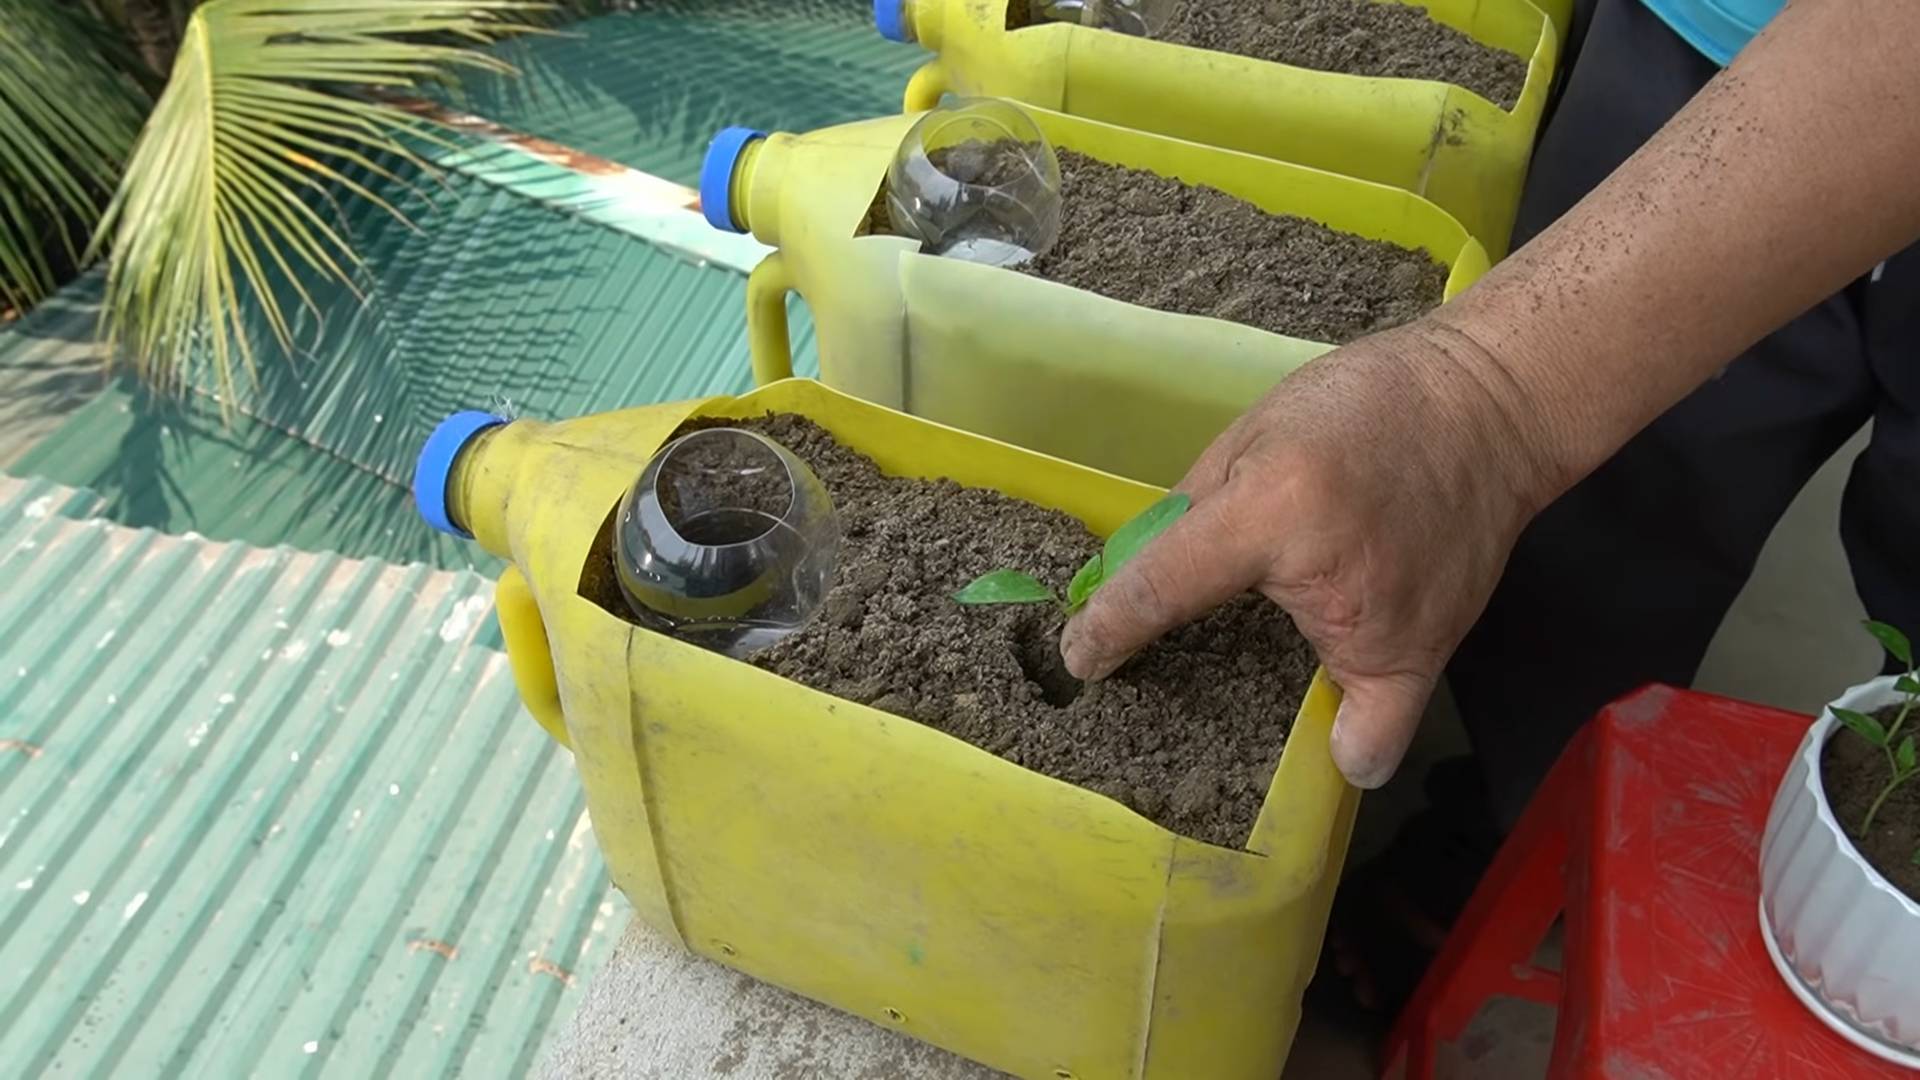
* From Seedlings: If you’re using seedlings, gently remove them from their containers. Loosen the roots a bit with your fingers. Dig a small hole in the soil large enough to accommodate the root ball. Place the seedling in the hole and cover the roots with soil. Gently pat the soil around the base of the plant.
3. Water Thoroughly: After planting, water your bell pepper plants thoroughly. Make sure the water drains out of the drainage holes. This will help settle the soil and get the roots off to a good start.
4. Add Support (Optional): As your bell pepper plant grows, it might need some support to prevent the branches from breaking under the weight of the peppers. You can use a small stake or a tomato cage to provide support. Insert the stake or cage into the soil near the plant, being careful not to damage the roots.
Decorating Your Planters (Optional)
This is where you can get creative and personalize your planters!
1. Spray Paint: If you want to give your planters a uniform look, you can spray paint them with your favorite color. Make sure to use paint that is safe for plastic and won’t leach harmful chemicals into the soil. Apply several thin coats of paint, allowing each coat to dry completely before applying the next.
2. Markers: You can also use permanent markers to draw designs on your planters. Get creative with patterns, flowers, or even write the name of the plant on the bottle.
3. Other Decorations: Feel free to add other decorations, such as ribbons, stickers, or even small stones. The possibilities are endless!
Caring for Your Bell Pepper Plants
Now that your bell pepper plants are planted and decorated, it’s time to learn how to care for them.
1. Sunlight: Bell peppers need at least 6-8 hours of sunlight per day. Place your planters in a sunny location, such as a patio, balcony, or windowsill.
2. Watering: Water your bell pepper plants regularly, especially during hot weather. Check the soil moisture by sticking your finger into the soil. If the top inch of soil feels dry, it’s time to water. Avoid overwatering, as this can lead to root rot.
3. Fertilizing: Bell peppers are heavy feeders, so they need regular fertilization. Use a balanced fertilizer, such as 10-10-10, every 2-3 weeks. Follow the instructions on the fertilizer package.
4. Pruning: Pruning can help improve air circulation and encourage fruit production. Remove any yellowing or dead leaves. You can also pinch off the suckers that grow between the main stem and the branches.
5. Pest Control: Keep an eye out for pests, such as aphids, spider mites, and whiteflies. If you notice any pests, treat them with an insecticidal soap or neem oil.
6. Harvesting: Bell peppers are ready to harvest when they are fully colored and firm to the touch. Use scissors or a knife to cut the peppers from the plant, leaving a small stem attached.
Troubleshooting
Even with the best care, you might encounter some problems with your bell pepper plants. Here are some common issues and how to fix them:
* Yellowing Leaves: This could be a sign of overwatering, underwatering, or nutrient deficiency. Adjust your watering schedule and fertilize your plants regularly.
* Blossom End Rot: This is a condition where the bottom of the pepper turns black and rotten. It’s usually caused by a calcium deficiency. Add calcium to the soil by using bone meal or eggshells.
* Lack of Fruit: This could be due to a lack of pollination. You can hand-pollinate your plants by using a small brush to transfer pollen from one flower to another.
* Pests: As mentioned earlier, keep an eye out for pests and treat them promptly.
Why This DIY Project Rocks!
I truly believe this DIY project is a winner for so many reasons:
* Eco-Friendly: You’re giving plastic bottles a new life instead of sending them to the landfill.
* Budget-Friendly: Growing your own bell peppers is much cheaper than buying them at the store.
* Space-Saving: These planters are perfect for small spaces, such as balconies and patios.
* Educational: It’s a great way to teach kids about gardening and sustainability.
* Rewarding: There’s nothing quite like the taste of homegrown bell peppers!
Final Thoughts
So there you have it – a complete guide to making your own recycled bottle bell pepper planters! I hope you found this tutorial helpful and inspiring. Get creative, have fun, and enjoy the fruits (or vegetables!) of your labor. Happy gardening!
Conclusion
So, there you have it! Transforming discarded plastic bottles into miniature greenhouses for your bell peppers is not just a clever upcycling project; it’s a game-changer for your gardening success. This simple DIY trick offers a multitude of benefits, from protecting delicate seedlings from harsh weather and pests to creating a warmer, more humid microclimate that encourages faster growth and earlier fruiting.
Why is this a must-try? Because it’s sustainable, cost-effective, and incredibly rewarding. You’re reducing plastic waste, saving money on expensive cloches or mini-greenhouses, and enjoying the satisfaction of nurturing your own bell peppers from seed to harvest. Imagine the pride you’ll feel when you bite into a juicy, homegrown bell pepper, knowing you played a direct role in its creation, all thanks to a repurposed plastic bottle!
But the beauty of this DIY trick lies in its adaptability. Feel free to experiment with different sizes of bottles to accommodate various stages of growth. For larger bell pepper plants, consider cutting the bottle in half and using the top portion as a temporary shield during unexpected frosts. You can also paint the bottles with a light-colored, non-toxic paint to reflect excess sunlight during the hottest parts of the day, preventing overheating. Another variation is to add small ventilation holes near the top of the bottle to improve airflow and reduce the risk of fungal diseases.
Don’t limit yourself to just bell peppers! This technique can also be used for other heat-loving vegetables like tomatoes, eggplants, and even certain herbs. The possibilities are endless!
We wholeheartedly encourage you to give this recycled bottle bell pepper trick a try. It’s a fun, easy, and environmentally friendly way to boost your gardening efforts. And most importantly, don’t forget to share your experiences with us! We’d love to see your creations, hear about your successes (and any challenges you encounter), and learn from your unique adaptations. Post pictures of your recycled bottle bell pepper protectors on social media using #RecycledBellPeppers or leave a comment below. Let’s build a community of resourceful gardeners who are passionate about sustainability and delicious, homegrown produce! Your insights could inspire others to embrace this simple yet powerful technique and contribute to a greener, more bountiful world. Happy gardening!
Frequently Asked Questions (FAQ)
What type of plastic bottles are best for this project?
Ideally, you should use clear plastic bottles, such as those from water, soda, or juice. Clear bottles allow maximum sunlight to reach the bell pepper seedlings. Avoid using dark-colored bottles, as they can absorb too much heat and potentially harm the plants. Also, ensure the bottles are clean and free of any residue before using them. Thoroughly wash them with soap and water and allow them to dry completely.
How do I prepare the plastic bottle for use?
First, remove the label from the bottle. Then, carefully cut off the bottom of the bottle using a sharp knife or scissors. Be cautious when cutting the plastic to avoid injury. The size of the opening you create will depend on the size of your bell pepper seedling. You want an opening large enough to easily place the bottle over the plant but small enough to provide adequate protection. Some gardeners prefer to leave a small lip at the bottom of the bottle to help anchor it in the soil.
When is the best time to use the recycled bottle bell pepper protectors?
The best time to use these protectors is immediately after transplanting your bell pepper seedlings into the garden. This is when the plants are most vulnerable to pests, harsh weather, and transplant shock. You can also use them to protect seedlings that you’ve started directly in the ground. Keep the bottles in place until the plants are established and the weather has warmed up consistently.
How do I prevent the plants from overheating inside the bottles?
Overheating can be a concern, especially during hot, sunny days. To prevent this, you can create small ventilation holes near the top of the bottle. This will allow for better airflow and help regulate the temperature inside. You can also paint the bottles with a light-colored, non-toxic paint to reflect sunlight. Monitor the plants regularly and remove the bottles temporarily during the hottest part of the day if necessary.
How long should I keep the bottles on the bell pepper plants?
The duration depends on the weather conditions and the growth rate of your plants. Generally, you can remove the bottles once the plants have grown significantly and the risk of frost has passed. This is usually around 4-6 weeks after transplanting. However, if you experience unexpected cold snaps or pest infestations, you can always put the bottles back on for temporary protection.
What if the bell pepper plant outgrows the bottle?
As your bell pepper plant grows, it will eventually outgrow the bottle. When this happens, you have a few options. You can remove the bottle completely and allow the plant to grow freely. Alternatively, you can cut the bottle in half and use the top portion as a temporary shield during cold nights or heavy rain. You can also transition to larger cloches or mini-greenhouses if you want to continue providing protection.
Can I reuse the bottles for multiple seasons?
Yes, you can definitely reuse the bottles for multiple seasons. However, it’s important to clean them thoroughly after each use to prevent the spread of diseases. Wash them with soap and water, and disinfect them with a diluted bleach solution. Allow them to dry completely before storing them for the next season. Inspect the bottles for any cracks or damage and replace them if necessary.
Will this DIY trick really make a difference in my bell pepper harvest?
Absolutely! By providing a warmer, more protected environment, these recycled bottle bell pepper protectors can significantly improve your bell pepper harvest. They help the plants establish themselves quickly, protect them from pests and diseases, and extend the growing season. You’ll likely see faster growth, earlier fruiting, and a higher yield of delicious, homegrown bell peppers.
What other plants can I use this trick for?
This technique is particularly effective for other heat-loving vegetables such as tomatoes, eggplants, cucumbers, and peppers of all kinds. It can also be used for certain herbs like basil and rosemary, especially in cooler climates. Experiment with different plants and see what works best in your garden.
How do I anchor the bottles in the ground to prevent them from blowing away?
There are several ways to anchor the bottles in the ground. You can leave a small lip at the bottom of the bottle when you cut it, which will help it grip the soil. You can also use small stakes or garden staples to secure the bottles in place. Another option is to mound soil around the base of the bottle to provide extra stability. Choose the method that works best for your soil type and weather conditions.

Leave a Comment