
Rooftop Corn Growing DIY: Imagine stepping onto your rooftop and harvesting fresh, juicy corn – a taste of summer grown right in your own urban oasis! It might sound like a far-fetched dream, but trust me, it’s totally achievable with a little know-how and some DIY spirit. Forget the sprawling fields of Iowa; we’re bringing the farm to the city, one rooftop at a time.
Corn, a staple crop for millennia, holds a special place in many cultures. From its origins in Mesoamerica, where it was revered as a sacred gift, to its widespread cultivation across the globe, corn has nourished civilizations and shaped culinary traditions. Now, you can participate in this rich history by cultivating your own corn, even without a traditional garden.
Why should you try rooftop corn growing? Well, for starters, it’s incredibly rewarding! There’s nothing quite like the satisfaction of nurturing a plant from seed to harvest. Plus, in a world where fresh, locally sourced food is increasingly valued, growing your own corn gives you control over its quality and origin. And let’s be honest, who wouldn’t want to impress their friends and family with homegrown corn on the cob? This rooftop corn growing DIY guide will provide you with all the tips and tricks you need to succeed, from choosing the right varieties to troubleshooting common problems. Let’s get growing!
Your Own Rooftop Garden: Corn Growing Made Easy!
Hey everyone! Have you ever wondered if you can grow your own vegetables right in the middle of the city? I’m telling you, yes, you can! And today I’m going to show you how you can create a small cornfield on your roof. Sound crazy? Maybe a little, but it’s a ton of fun and the result is simply unbeatable: fresh, homegrown corn straight from the roof!
Before we get started, here’s a little warning: Be absolutely sure that your roof can support the additional load. When in doubt, ask a structural engineer! And of course, you should find out if there are any building regulations that might prohibit it. Safety first!
What you need: The Material List
Before we start growing, we need to make sure we have everything necessary on hand. Here is a list of the materials and tools you will need for your rooftop garden corn project:
- Large pots or containers: Ones with good drainage are best. Remember, corn needs space!
- High-quality potting soil: A mixture of garden soil, compost, and coconut coir is ideal.
- Corn kernels: Choose a variety that is suitable for growing in containers. Dwarf corn varieties are a good choice.
- Fertilizer: An organic fertilizer rich in nitrogen, phosphorus, and potassium is perfect.
- Watering can or garden hose: For regular watering.
- Shovel or spade: For filling the containers.
- Gloves: To keep your hands clean.
- Stakes or a trellis: To support the corn plants if needed.
- Mulch: To retain moisture in the soil and suppress weeds.
- Bird netting (optional): To protect your harvest from hungry birds.
Step-by-Step Guide: Here’s How It’s Done!
Now let’s get down to it! Here is a detailed guide on how you can grow your own corn on the roof:
1. Preparing the containers:
- First, you need to make sure your containers are clean and ready.
- Fill the containers with the potting soil. Leave a few centimeters free at the top.
- Lightly press the soil down.
2. Sowing the corn kernels:
- Make small holes in the soil, about 2-3 cm (1 inch) deep.
- Place 2-3 corn kernels in each hole. This increases the chance that at least one will germinate.
- Cover the holes with soil and press down lightly.
- Gently water the soil so that it is well-moistened.
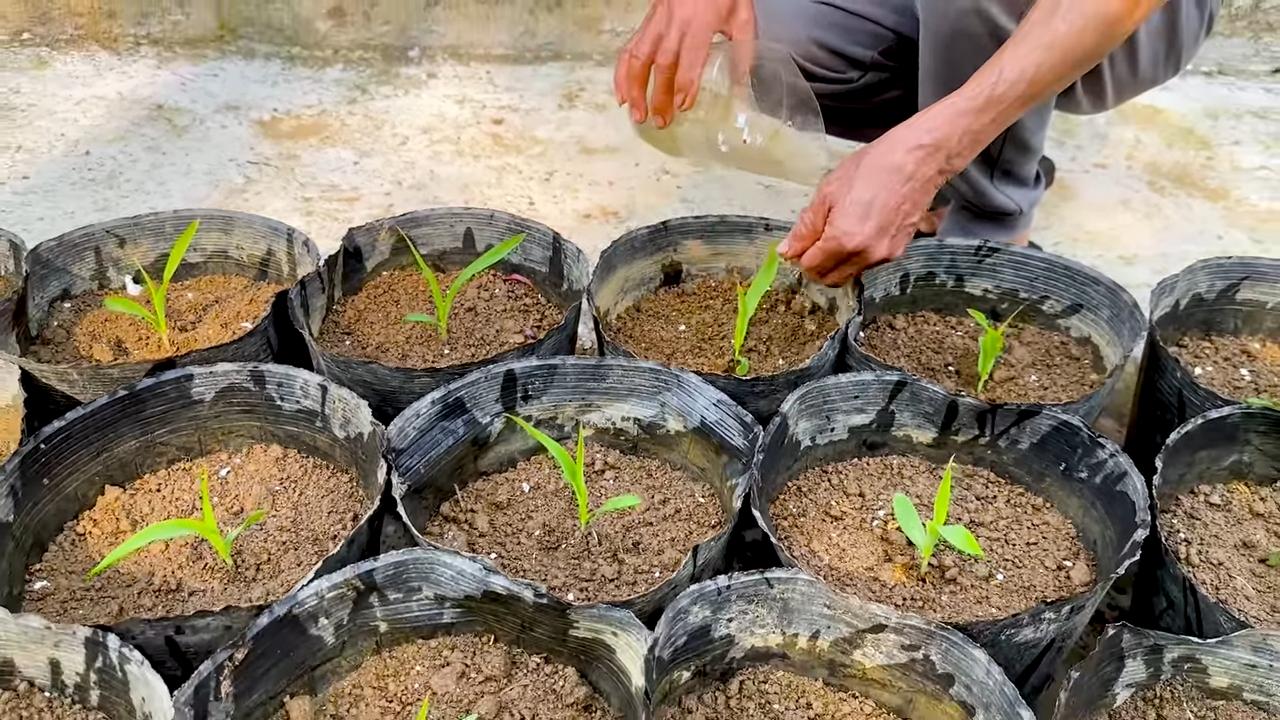
3. Germination:
- Place the containers in a sunny spot. Corn needs a lot of sun, at least 6-8 hours per day.
- Keep the soil moist, but not wet. Avoid waterlogging, as this can lead to root rot.
- After about 7-10 days, the first seedlings should appear.
4. Caring for the corn plants:
- Once the seedlings are about 5-10 cm (2-4 inches) tall, you can remove the weakest ones, leaving only the strongest plant per hole.
- Fertilize the plants regularly with an organic fertilizer. Follow the instructions on the packaging.
- Water the plants regularly, especially on hot days.
- As the plants get larger, it may be necessary to support them with stakes or a trellis to prevent them from tipping over.
- Mulch the soil around the plants to retain moisture and suppress weeds.
5. Pollination:
- Corn is wind-pollinated. If you only have a few plants, it can be helpful to assist with pollination manually.
- Gently shake the plants when the male flowers (the tassels at the top of the plant) release pollen.
- You can also collect the pollen with a brush and apply it to the female flowers (the silks on the ears of corn).
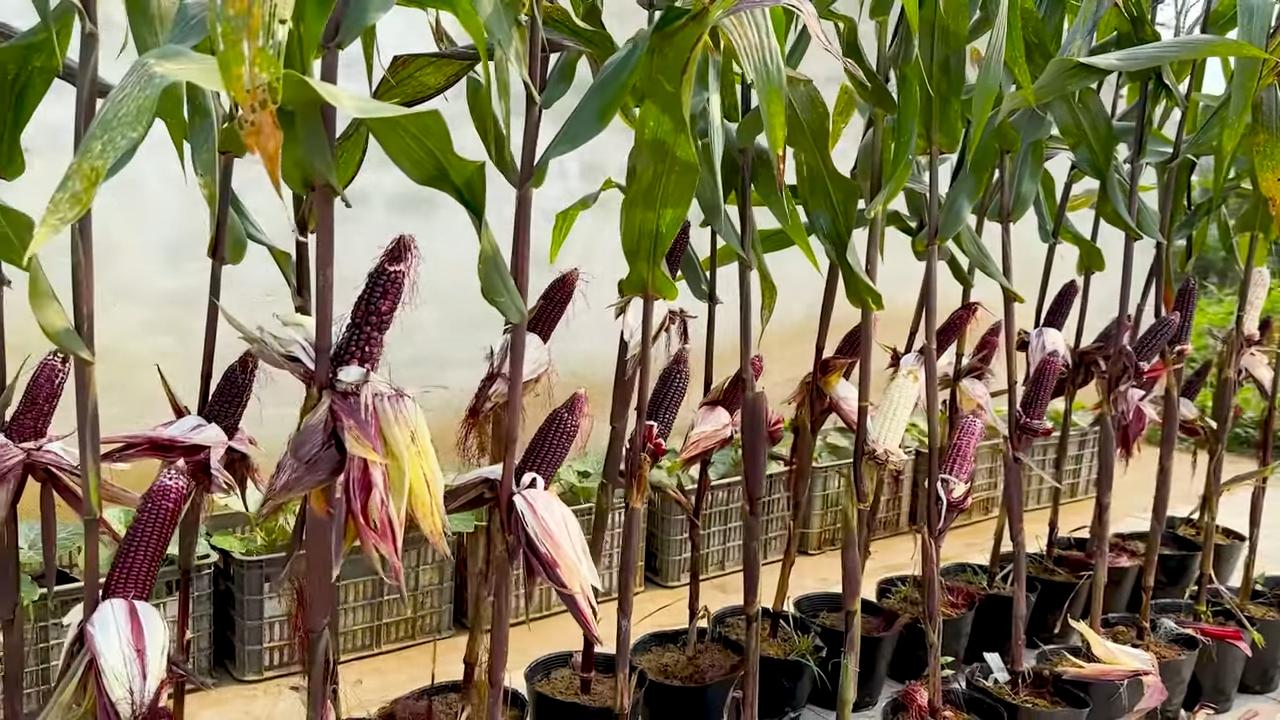
6. The Harvest:
- The ears of corn are ripe when the silks are brown and dry and the ears feel plump.
- Gently pull the ears from the plant.
- Remove the outer leaves and enjoy your homegrown corn!
Additional Tips and Tricks for Your Rooftop Corn
- Choose the right variety: Not every corn variety is suitable for growing in containers. Dwarf corn varieties or varieties specially bred for pot cultivation are a good choice. Find out which variety is best for your conditions before buying.
- Pay attention to drainage: Good drainage is crucial to avoid waterlogging. Make sure your containers have holes in the bottom and use a drainage layer of gravel or expanded clay.
- Protect your plants from wind: Rooftops are often windy. Place your containers in a sheltered spot or use windbreaks to protect the plants from damage.
- Observe your plants: Watch for signs of pests or diseases. The sooner you identify problems, the better you can treat them.
- Experiment: Try different varieties and growing methods to find out what works best for you. Growing corn on the roof is a learning process, so have fun with it!
- Integrate beneficial insects: Ladybugs are natural enemies of aphids, which can infest corn. You can buy ladybug larvae and release them in your rooftop garden to control aphids naturally.
- Compost your waste: Use your kitchen scraps and garden waste to make your own compost. Compost is an excellent fertilizer and helps keep the soil healthy.
- Use rainwater: Collect rainwater in rain barrels and use it to water your plants. This saves water and is good for the environment.
- Think about safety: Make sure your containers are placed securely and cannot fall. Use fastening materials to secure them if necessary.
- Document your progress: Take photos of your plants and write down what you’ve learned. This way, you can use your experiences for future growing projects.
Common Problems and Solutions
Problems can also arise when growing corn on the roof. Here are some of the most common problems and how you can solve them:
Poor pollination: If the ears are not fully developed, it may be due to poor pollination.
Poor germination: If the corn kernels don’t germinate, there could be several reasons. The soil might be too dry or too wet, the temperature could be too low, or the kernels might be too old. Make sure the soil is moist, the temperature is warm enough, and use fresh kernels.
Aphids: Aphids are small, sucking insects that can infest the leaves of corn plants. You can spray them off with a jet of water or treat them with a neem oil-based insecticide.
Corn smut: Corn smut is a fungal disease that causes large, unsightly galls on the ears. Remove infected ears immediately and dispose of them in the household trash. Avoid spreading the spores.
Conclusion
So, there you have it! Transforming your rooftop into a thriving cornfield might seem like a whimsical dream, but with a little planning and effort, it’s entirely achievable. This Rooftop Corn Growing DIY project isn’t just about producing fresh, delicious corn; it’s about embracing sustainable urban gardening, connecting with nature in unexpected ways, and experiencing the immense satisfaction of growing your own food from seed to table.
Why is this a must-try? Because it’s more than just a gardening project. It’s a statement. It’s a way to reclaim urban spaces, reduce your carbon footprint, and enjoy the unparalleled flavor of homegrown corn, picked at its peak ripeness. Imagine the envy of your neighbors as you harvest ears of sweet, juicy corn right from your rooftop oasis! Beyond the bragging rights, you’ll be contributing to a greener, more sustainable city.
But the benefits don’t stop there. This DIY project is incredibly adaptable. Feel like adding some companion plants? Consider planting beans or squash alongside your corn to create a mini-ecosystem that benefits all three. Want to experiment with different corn varieties? Try growing colorful Indian corn for decorative purposes or heirloom varieties for a unique flavor profile. The possibilities are endless! You could even explore vertical gardening techniques to maximize your space and create a stunning green wall of corn.
Don’t be intimidated by the prospect of growing corn on your rooftop. With the right preparation and a little bit of patience, you’ll be amazed at what you can achieve. Remember to choose a sunny location, provide adequate drainage, and water regularly. And don’t forget to protect your precious corn from pests and strong winds.
We encourage you to take the plunge and embark on this exciting Rooftop Corn Growing DIY adventure. It’s a rewarding experience that will connect you with nature, provide you with fresh, delicious food, and transform your rooftop into a vibrant green space.
Once you’ve harvested your first crop, we’d love to hear about your experience! Share your photos, tips, and challenges in the comments below. Let’s build a community of rooftop corn growers and inspire others to embrace sustainable urban gardening. What variety of corn did you choose? What challenges did you face, and how did you overcome them? Your insights could be invaluable to other aspiring rooftop farmers. So, get growing, get sharing, and let’s transform our cities, one rooftop cornfield at a time!
Frequently Asked Questions (FAQ)
1. Is it really possible to grow corn on a rooftop?
Absolutely! With proper planning and execution, growing corn on a rooftop is entirely feasible. The key is to provide the corn with the essential elements it needs to thrive: ample sunlight (at least 6-8 hours per day), well-draining soil, adequate water, and protection from strong winds. Choosing the right container size and corn variety is also crucial for success. Don’t let the unconventional location deter you; rooftop corn growing is a rewarding and surprisingly productive endeavor.
2. What kind of containers should I use for rooftop corn growing?
The size of the container is critical. Corn plants need room for their roots to develop. We recommend using large containers, at least 20 gallons in size, per plant. This will provide enough space for the roots to grow and support the tall stalks. Consider using durable, weather-resistant containers made from plastic, wood, or metal. Ensure the containers have drainage holes to prevent waterlogging, which can lead to root rot. You can also line the containers with landscape fabric to prevent soil from escaping through the drainage holes.
3. What type of soil is best for growing corn in containers?
Corn thrives in well-draining, nutrient-rich soil. A good potting mix specifically designed for vegetables is ideal. You can also create your own mix by combining equal parts of compost, peat moss (or coconut coir), and perlite or vermiculite. Compost provides essential nutrients, peat moss (or coconut coir) helps retain moisture, and perlite or vermiculite improves drainage. Avoid using garden soil, as it can be too heavy and compact for container gardening.
4. How often should I water my rooftop corn plants?
Corn plants require consistent watering, especially during hot weather. Water deeply whenever the top inch of soil feels dry to the touch. Avoid overwatering, as this can lead to root rot. A good rule of thumb is to water thoroughly until water drains out of the drainage holes. Consider using a soaker hose or drip irrigation system to provide a consistent and efficient water supply. Mulching around the base of the plants can also help retain moisture in the soil.
5. How do I protect my rooftop corn from pests and diseases?
Regularly inspect your corn plants for signs of pests or diseases. Common corn pests include corn earworms, aphids, and spider mites. You can control these pests by handpicking them off the plants, using insecticidal soap, or introducing beneficial insects like ladybugs. To prevent diseases, ensure good air circulation around the plants and avoid overwatering. If you notice any signs of disease, such as leaf spots or wilting, remove the affected leaves immediately.
6. How do I pollinate my corn plants on a rooftop?
Corn is wind-pollinated, so if you only have a few plants, you may need to hand-pollinate them to ensure good ear development. To hand-pollinate, gently shake the tassels (the male flowers at the top of the plant) to release pollen. Then, brush the pollen onto the silks (the female flowers that emerge from the developing ears). Repeat this process every day for several days to ensure that all the silks are pollinated.
7. When is the best time to harvest my rooftop corn?
Corn is typically ready to harvest about 60-90 days after planting, depending on the variety. The silks will turn brown and dry, and the ears will feel plump and full. To check for ripeness, peel back a portion of the husk and puncture a kernel with your fingernail. If the liquid that comes out is milky, the corn is ready to harvest. If the liquid is clear, it needs more time to ripen.
8. What are some variations I can try with this Rooftop Corn Growing DIY?
Beyond simply growing sweet corn, you can experiment with different varieties, such as ornamental corn for fall decorations or popcorn corn for a fun snack. Consider companion planting with beans or squash to create a more diverse and beneficial ecosystem. You can also explore vertical gardening techniques to maximize your space and create a stunning green wall of corn. Another variation is to try growing corn in different types of containers, such as self-watering planters or raised beds.
9. What if I live in an apartment building with rooftop access restrictions?
Before starting your rooftop corn growing project, it’s essential to check with your landlord or building management to ensure that rooftop gardening is permitted. Some buildings may have restrictions on the weight of containers or the types of plants that can be grown. If rooftop access is limited, consider exploring other urban gardening options, such as balcony gardening or community gardens.
10. How can I ensure my rooftop can handle the weight of the containers?
This is a crucial safety consideration. Before placing heavy containers on your rooftop, consult with a structural engineer or building professional to assess the load-bearing capacity of your roof. They can advise you on the maximum weight that your roof can safely support and recommend strategies for distributing the weight evenly. Avoid placing containers near the edges of the roof, where the load-bearing capacity may be lower.


Leave a Comment