
Rooftop Corn Planting Tips: Imagine stepping onto your rooftop and being greeted by a miniature cornfield swaying gently in the breeze! Sounds like something out of a whimsical dream, right? Well, it doesn’t have to be! This DIY guide is your passport to transforming your underutilized rooftop into a thriving urban farm, starting with the surprisingly simple act of growing your own corn.
For centuries, corn has been a staple crop, deeply woven into the fabric of countless cultures. From ancient civilizations in Mesoamerica, where corn held immense spiritual and nutritional significance, to its modern-day ubiquity, this grain has nourished and sustained communities across the globe. Now, you can tap into that rich history and bring a piece of it to your own home, no matter how limited your space may seem.
Why should you consider rooftop corn planting? Well, beyond the sheer novelty and bragging rights, growing your own corn offers a fantastic way to connect with nature, enjoy fresh, homegrown produce, and even contribute to a more sustainable lifestyle. Plus, let’s be honest, who wouldn’t love the satisfaction of harvesting their own sweet corn, knowing exactly where it came from and how it was grown? I know I would! So, let’s dive into these rooftop corn planting tips and turn your urban oasis into a bountiful harvest!
Rooftop Corn Planting: A DIY Guide to Urban Farming
Okay, so you’re thinking about growing corn on your roof? Awesome! It’s definitely a project that requires some planning and effort, but the reward of fresh, homegrown corn is totally worth it. I’ve done this myself, and I’m here to share everything I’ve learned to help you succeed. Let’s get started!
Planning Your Rooftop Corn Garden
Before you even think about seeds, you need to consider these crucial factors:
* Weight Capacity: This is the BIGGEST concern. Corn is heavy, especially when the soil is wet. You absolutely MUST consult with a structural engineer or qualified professional to determine the weight-bearing capacity of your roof. Don’t skip this step! Seriously. It’s not worth risking structural damage.
* Sunlight: Corn needs at least 6-8 hours of direct sunlight per day. Observe your rooftop throughout the day to see where the sun hits and for how long. If you don’t have enough sun, this project might not be feasible.
* Water Source: You’ll need a reliable water source nearby. Lugging buckets of water up to the roof is not sustainable. Consider a hose connection or a rainwater harvesting system.
* Wind: Rooftops can be windy. Strong winds can damage corn stalks, especially when they’re tall and laden with ears. You might need to provide windbreaks.
* Drainage: Proper drainage is essential to prevent root rot. Your containers or raised beds must have adequate drainage holes.
* Accessibility: How easy is it to get to your rooftop? You’ll need to carry soil, plants, and tools up there. Consider the logistics of moving heavy materials.
* Local Regulations: Check your local ordinances and HOA rules to see if there are any restrictions on rooftop gardening.
Choosing the Right Corn Variety
Not all corn varieties are suitable for rooftop gardening. You’ll want to choose shorter, more compact varieties that are less susceptible to wind damage. Here are a few suggestions:
* ‘Golden Bantam’: A classic sweet corn variety that’s relatively short and early-maturing.
* ‘Trinity’: A hybrid sweet corn known for its good flavor and disease resistance.
* ‘On Deck’: A very early maturing variety, great for shorter growing seasons.
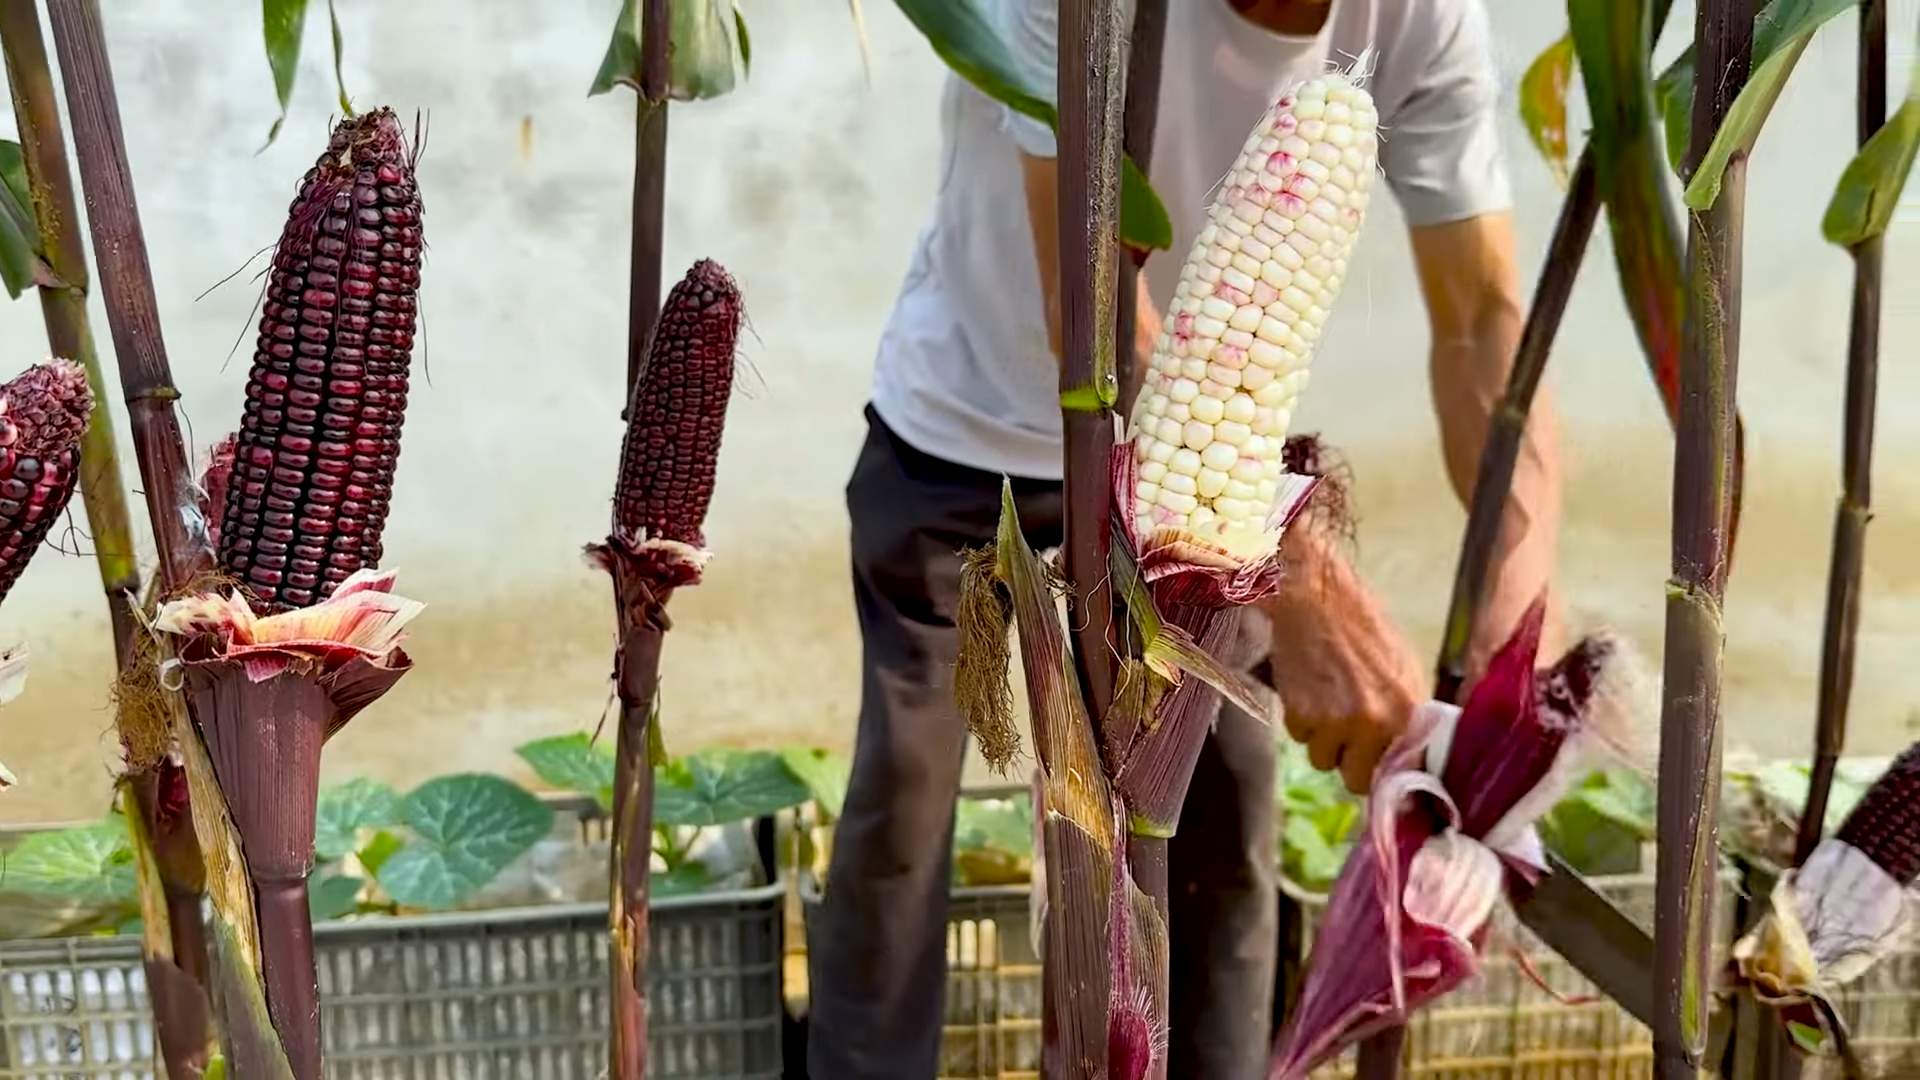
* ‘Blue Hopi’: A beautiful and drought-tolerant variety, but it’s not sweet corn. It’s used for cornmeal and flour.
Consider the length of your growing season when choosing a variety. You’ll need to select a variety that will mature before the first frost.
Building Your Rooftop Garden
Now for the fun part! You have a few options for containing your corn:
* Large Containers: Use large, sturdy containers with drainage holes. At least 20 gallons per plant is a good rule of thumb.
* Raised Beds: Building raised beds on your rooftop can provide more space for your corn. Make sure the beds are properly lined to protect your roof membrane.
* Grow Bags: Grow bags are a lightweight and affordable option. Choose large grow bags made from durable fabric.
Regardless of which option you choose, make sure your containers or beds are level and stable.
Step-by-Step Planting Guide
Alright, let’s get our hands dirty! Here’s how to plant your rooftop corn:
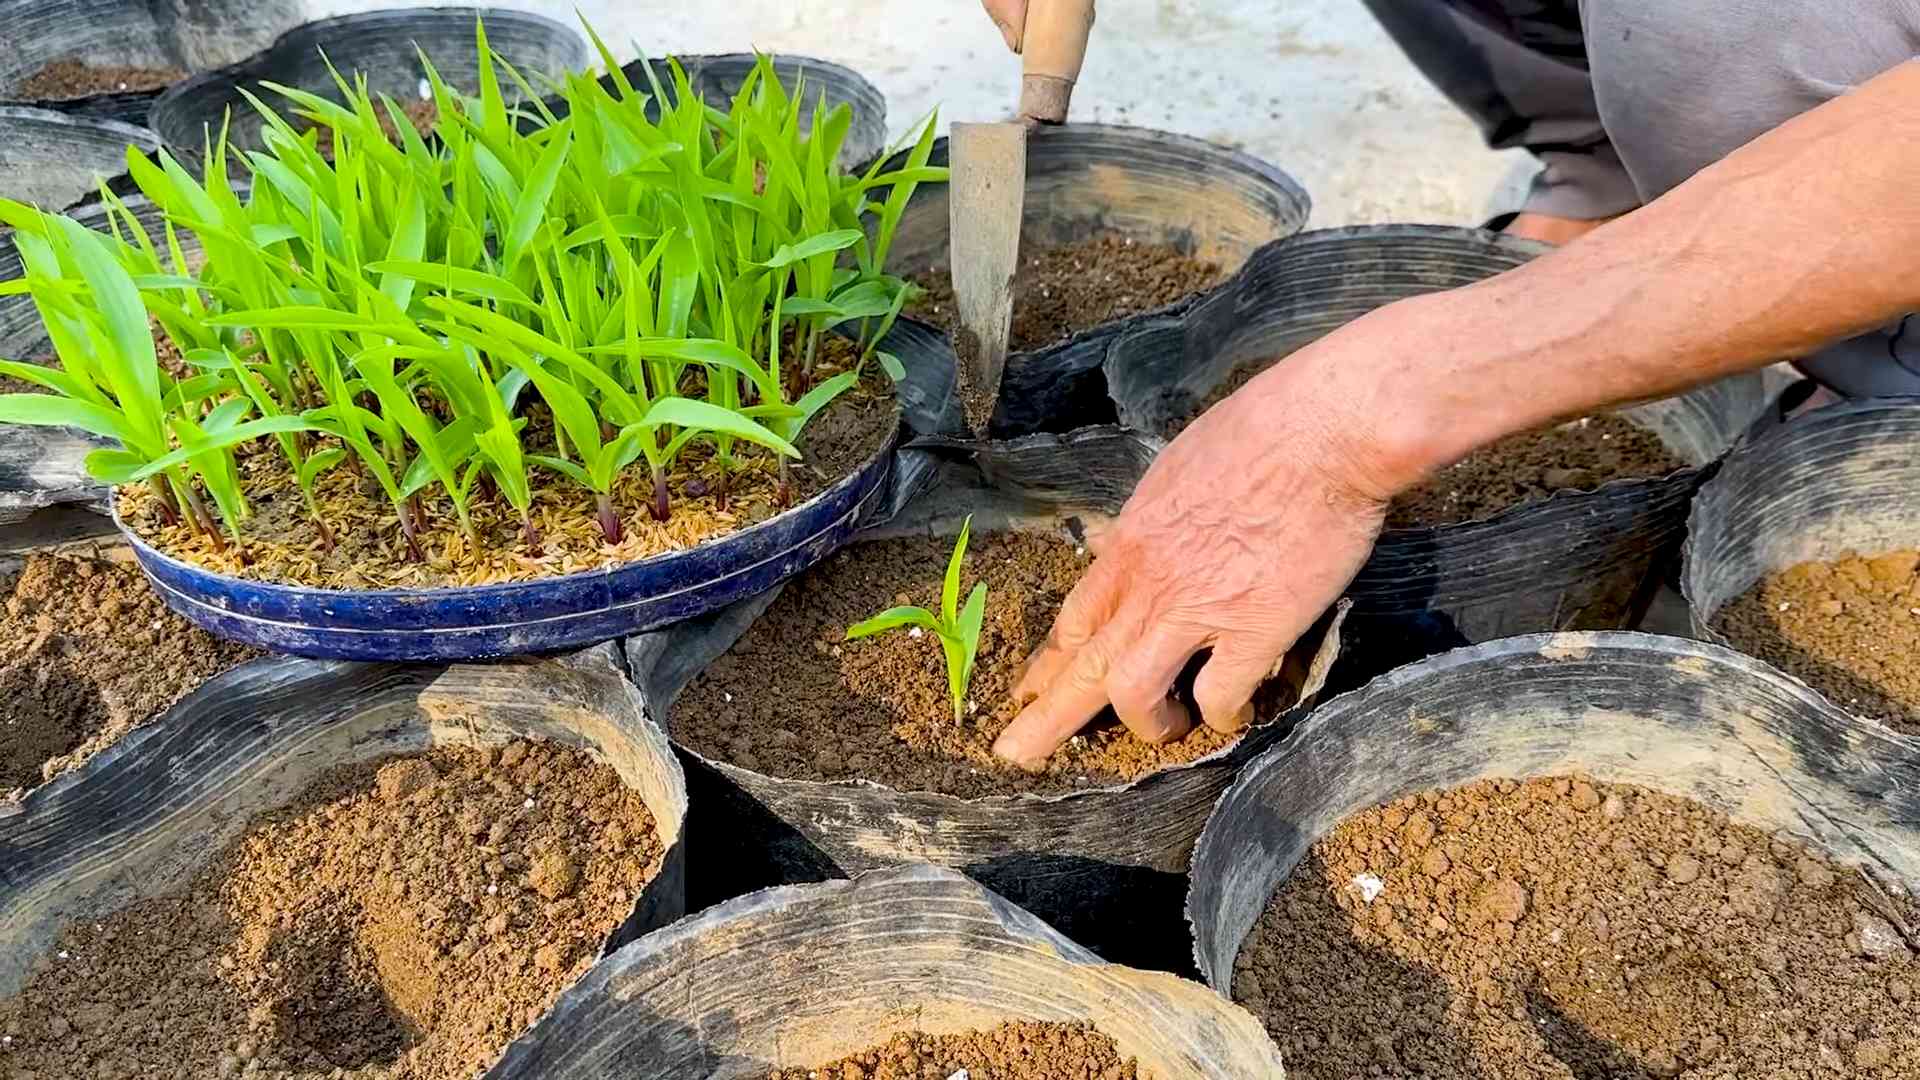
1. Prepare Your Soil: Corn needs rich, well-draining soil. I recommend a mix of equal parts compost, potting soil, and perlite or vermiculite. This will provide good drainage and plenty of nutrients. Avoid using garden soil, as it can be too heavy and compacted for containers.
2. Fill Your Containers or Beds: Fill your chosen containers or raised beds with the soil mixture, leaving a few inches of space at the top.
3. Plant Your Seeds: Plant corn seeds about 1-2 inches deep and 6-8 inches apart. Plant in blocks rather than rows to ensure good pollination. Corn is wind-pollinated, so planting in a block helps the pollen travel more effectively.
4. Water Thoroughly: Water the soil gently but thoroughly after planting. You want the soil to be moist but not waterlogged.
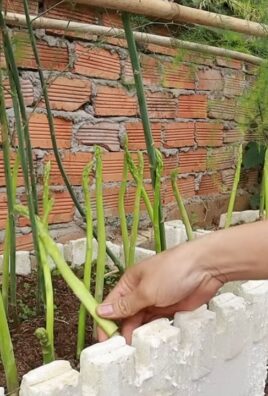
5. Provide Support (Optional): If you live in a windy area, consider providing support for your corn stalks. You can use bamboo stakes or tomato cages to help them stay upright.
6. Mulch: Add a layer of mulch around your corn plants to help retain moisture and suppress weeds. Straw, wood chips, or shredded leaves are all good options.
Caring for Your Rooftop Corn
Once your corn is planted, it’s important to provide proper care to ensure a successful harvest.
1. Watering: Corn needs consistent moisture, especially during hot weather. Water deeply whenever the top inch of soil feels dry. Avoid overwatering, as this can lead to root rot.
2. Fertilizing: Corn is a heavy feeder, so you’ll need to fertilize regularly. Use a balanced fertilizer (e.g., 10-10-10) every 2-3 weeks. You can also supplement with compost tea or fish emulsion.
3. Weeding: Keep your corn patch free of weeds. Weeds compete with corn for nutrients and water.
4. Pest Control: Keep an eye out for pests such as corn earworms, aphids, and Japanese beetles. Handpick pests whenever possible. You can also use organic insecticides if necessary.
5. Pollination: As I mentioned earlier, corn is wind-pollinated. If you’re growing corn in a confined space, you may need to hand-pollinate to ensure good kernel development. To hand-pollinate, gently shake the tassels (the male flowers at the top of the plant) over the silks (the female flowers that emerge from the ears). Do this in the morning when the pollen is fresh.
6. Wind Protection: If your rooftop is windy, consider building a windbreak. You can use shade cloth, trellises, or even strategically placed shrubs to protect your corn stalks.
Harvesting Your Rooftop Corn
The moment you’ve been waiting for! Here’s how to know when your corn is ready to harvest:
1. Check the Silks: The silks should be brown and dry.
2. Feel the Ears: The ears should feel plump and full.
3. Pierce a Kernel: Pierce a kernel with your fingernail. If the liquid that comes out is milky, the corn is ready to harvest. If the liquid is clear, it’s not quite ready. If the liquid is doughy, it’s overripe.
4. Harvest in the Morning: Harvest your corn in the morning when the sugars are at their peak.
5. Pull Down and Twist: To harvest, pull the ear down and twist it off the stalk.
Troubleshooting Common Problems
Even with the best planning, you might encounter some problems along the way. Here are a few common issues and how to address them:
* Poor Pollination: If your corn ears are missing kernels, it’s likely due to poor pollination. Try hand-pollinating or planting more corn plants closer together.
* Stunted Growth: Stunted growth can be caused by a variety of factors, including nutrient deficiencies, lack of water, or pest infestations. Make sure you’re providing adequate water and fertilizer, and check for pests regularly.
* Yellow Leaves: Yellow leaves can indicate a nitrogen deficiency. Apply a nitrogen-rich fertilizer to correct the problem.
* Root Rot: Root rot is caused by overwatering. Make sure your containers or beds have adequate drainage, and avoid watering too frequently.
* Wind Damage: If your corn stalks are damaged by wind, provide support with stakes or cages. You can also try planting shorter varieties that are less susceptible to wind damage.
Extra Tips for Rooftop Corn Success
* Succession Planting: Plant corn seeds every 2-3 weeks to extend your harvest season.
* Companion Planting: Plant corn with beans and squash. This is known as the “Three Sisters” planting method. The beans provide nitrogen to the soil, the squash shades the soil and suppresses weeds, and the corn provides support for the beans.
* Record Keeping: Keep a record of your planting dates, fertilizer applications, and pest control measures. This will help you learn from your mistakes and improve your results next year.
* Enjoy the Process: Rooftop gardening can be challenging, but it’s also incredibly rewarding. Enjoy the process of growing your own food, and don’t be afraid to experiment.
Growing corn on your rooftop is a unique and rewarding experience. With careful planning and attention to detail, you can enjoy a bountiful harvest of fresh, homegrown corn. Good luck, and happy gardening!
Conclusion
So, there you have it! Transforming your rooftop into a thriving cornfield might seem like a whimsical dream, but with these simple yet effective DIY rooftop corn planting tips, it’s absolutely achievable. We’ve walked you through everything from selecting the right containers and soil to ensuring proper drainage and providing the necessary support for your growing stalks.
Why is this a must-try? Beyond the sheer novelty of harvesting your own corn high above the ground, rooftop corn planting offers a unique blend of benefits. It’s a fantastic way to utilize otherwise unused space, turning a potentially barren area into a productive and beautiful garden. Imagine the satisfaction of serving freshly picked, homegrown corn at your next barbecue, knowing you nurtured it from seed to table right on your own roof. Plus, the dense foliage of corn plants can provide a natural cooling effect for your building, potentially reducing energy costs during the hot summer months. And let’s not forget the educational aspect – it’s a wonderful project for families, teaching children about the life cycle of plants and the importance of sustainable food practices.
But the beauty of DIY lies in its adaptability. Feel free to experiment with different corn varieties. While we’ve focused on standard sweet corn, you could try growing ornamental corn for its colorful kernels, or even popcorn varieties for a fun and delicious treat. Consider companion planting to enhance your rooftop corn garden. Beans, squash, and herbs like basil and oregano can all thrive alongside corn, providing mutual benefits and adding diversity to your rooftop ecosystem. You can also explore different container designs. While large pots are ideal, you could repurpose old barrels, troughs, or even build your own raised beds to suit your specific space and aesthetic preferences. Just remember to always prioritize proper drainage and structural integrity.
Don’t be afraid to get creative and personalize your rooftop corn planting experience!
We understand that venturing into rooftop gardening can seem daunting, especially with a crop like corn. But we’re confident that with a little planning, preparation, and a dash of enthusiasm, you can successfully cultivate a bountiful harvest. The key is to start small, observe your plants closely, and adapt your approach as needed. Remember to monitor the weather conditions and adjust your watering schedule accordingly. And don’t hesitate to seek advice from local gardening experts or online communities.
The rewards of rooftop corn planting are well worth the effort.
So, what are you waiting for? Gather your supplies, choose your corn variety, and get ready to transform your rooftop into a corn-filled paradise. We’re eager to hear about your experiences! Share your photos, tips, and challenges in the comments below. Let’s build a community of rooftop corn enthusiasts and inspire others to embrace the joys of urban gardening. We encourage you to share your DIY rooftop corn planting tips and tricks with us. Happy planting!
Frequently Asked Questions (FAQ)
What type of corn is best for rooftop planting?
The best type of corn for rooftop planting is typically a shorter, more compact variety. Sweet corn varieties like ‘Early Sunglow’ or ‘Golden Bantam’ are good choices because they mature relatively quickly and don’t grow as tall as some other types. Consider also ‘On Deck’ variety which is specifically bred for container growing. These shorter varieties are less susceptible to wind damage, which can be a significant concern on rooftops. Also, consider the size of your containers. If you have limited space, choose a variety that is known for its smaller stalk size. Remember to check the days to maturity for the variety you choose, especially if you live in an area with a shorter growing season.
How much sunlight does rooftop corn need?
Corn requires a significant amount of sunlight to thrive. Aim for at least 6-8 hours of direct sunlight per day. If your rooftop doesn’t receive this much sunlight, you may need to supplement with grow lights. Insufficient sunlight can lead to stunted growth, poor kernel development, and a reduced harvest. Observe your plants closely and adjust their position as needed to maximize sun exposure. If you’re using grow lights, position them appropriately and ensure they provide the correct spectrum of light for optimal growth.
What size containers are needed for rooftop corn planting?
Corn plants need ample space for their roots to develop. Use containers that are at least 12-18 inches in diameter and depth. Larger containers are generally better, as they provide more room for root growth and help retain moisture. Ensure the containers have adequate drainage holes to prevent waterlogging, which can lead to root rot. You can use plastic pots, terracotta pots, or even repurposed containers like barrels or troughs. Just make sure the containers are sturdy enough to support the weight of the mature corn plants and the soil.
How often should I water my rooftop corn plants?
Watering frequency depends on several factors, including the weather, the type of soil, and the size of the containers. Generally, you should water your corn plants deeply whenever the top inch of soil feels dry to the touch. During hot, dry weather, you may need to water daily. Avoid overwatering, as this can lead to root rot. Use a watering can or a hose with a gentle spray nozzle to avoid damaging the plants. Consider using a soaker hose or drip irrigation system to provide consistent moisture directly to the roots. Mulching around the base of the plants can also help retain moisture and reduce the need for frequent watering.
What type of soil is best for rooftop corn?
Corn plants thrive in well-draining, fertile soil. Use a high-quality potting mix that is specifically formulated for container gardening. Avoid using garden soil, as it can become compacted in containers and doesn’t provide adequate drainage. Amend the potting mix with compost or other organic matter to improve its fertility and water-holding capacity. A slightly acidic to neutral pH (around 6.0 to 7.0) is ideal for corn growth. You can test the pH of your soil using a soil testing kit and adjust it as needed with lime or sulfur.
How do I pollinate my rooftop corn?
Corn is wind-pollinated, so if you’re growing only a few plants on your rooftop, you may need to assist with pollination. When the tassels (the male flowers at the top of the plant) begin to shed pollen, gently shake the stalks to release the pollen. You can also collect the pollen in a container and then dust it onto the silks (the female flowers that emerge from the developing ears of corn). Repeat this process every day for several days to ensure adequate pollination. You can also plant in blocks rather than rows to increase the chances of pollination.
How do I protect my rooftop corn from pests and diseases?
Rooftop gardens are generally less susceptible to pests and diseases than ground-level gardens, but it’s still important to take precautions. Inspect your plants regularly for signs of pests or diseases. Common corn pests include corn earworms, aphids, and spider mites. You can control these pests with insecticidal soap, neem oil, or by handpicking them off the plants. Common corn diseases include rust and leaf blight. Prevent these diseases by providing good air circulation, avoiding overhead watering, and using disease-resistant corn varieties. If you notice any signs of disease, remove the affected leaves or plants immediately.
How do I know when my rooftop corn is ready to harvest?
Corn is typically ready to harvest about 20-25 days after the silks emerge. The silks will turn brown and dry, and the ears will feel plump and full. To check for ripeness, peel back a portion of the husk and puncture a kernel with your fingernail. If the liquid that comes out is milky, the corn is ready to harvest. If the liquid is clear, the corn is not yet ripe. If the liquid is doughy, the corn is overripe. Harvest the corn by twisting the ear downward and pulling it away from the stalk.
Can I grow other vegetables alongside my rooftop corn?
Yes, companion planting can be beneficial for rooftop corn. Good companion plants for corn include beans, squash, and herbs like basil and oregano. Beans fix nitrogen in the soil, which benefits the corn. Squash provides ground cover, which helps retain moisture and suppress weeds. Basil and oregano repel certain pests that can attack corn. Avoid planting corn near tomatoes, as they can compete for nutrients and water.
What are the safety considerations for rooftop gardening?
Before starting a rooftop garden, it’s essential to ensure that your roof can support the weight of the soil, containers, and plants. Consult with a structural engineer or building professional to assess the load-bearing capacity of your roof. Also, ensure that your rooftop has adequate drainage to prevent water from pooling and causing damage. Use lightweight containers and soil to minimize the weight load. Install a railing or other safety barrier around the perimeter of the rooftop to prevent falls. Be mindful of wind conditions and secure your plants and containers to prevent them from being blown over.


Leave a Comment