
Rooftop Guava Tree Growing Tips: Imagine stepping onto your rooftop and plucking a juicy, sun-ripened guava straight from your own tree! Sounds like a tropical dream, right? Well, it doesn’t have to be just a dream. This DIY guide is your passport to transforming your rooftop into a flourishing guava oasis, even if you’ve never grown anything beyond a windowsill herb garden.
Guava trees, with their sweet fragrance and delicious fruit, have been cherished for centuries. Originating in tropical America, they’ve spread across the globe, becoming a symbol of abundance and good health in many cultures. But you don’t need a sprawling orchard to enjoy the benefits of these amazing trees.
Why should you consider these rooftop guava tree growing tips? Because fresh, homegrown guavas are simply unbeatable! Store-bought varieties often lack the intense flavor and nutritional punch of a fruit ripened on the tree. Plus, growing your own food is incredibly rewarding, offering a connection to nature and a sense of accomplishment. In this article, I’ll share my tried-and-true methods for successfully cultivating a thriving guava tree on your rooftop, from choosing the right container to protecting it from the elements. Let’s get started and bring a taste of the tropics to your urban landscape!
Guavenbaum auf dem Dach: Dein DIY-Leitfaden für eine tropische Oase über den Wolken
Hallo Gartenfreunde! Habt ihr euch jemals vorgestellt, frische, saftige Guaven direkt von eurem eigenen Dach zu pflücken? Klingt verrückt, oder? Aber ich sage euch, es ist absolut machbar! Mit ein bisschen Planung, Geduld und diesem detaillierten DIY-Leitfaden könnt auch ihr eure eigene kleine tropische Oase über den Dächern der Stadt erschaffen. Lasst uns eintauchen!
Die Vorbereitung: Was du brauchst und wo du es findest
Bevor wir loslegen, müssen wir sicherstellen, dass wir alles Nötige zur Hand haben. Hier ist eine Liste der Dinge, die ihr für euer Guavenbaum-Dachgarten-Projekt benötigt:
* Ein robuster Pflanzkübel: Wählt einen großen Kübel mit einem Durchmesser von mindestens 60 cm und einer Tiefe von 50 cm. Guavenbäume brauchen Platz für ihre Wurzeln. Achtet darauf, dass der Kübel Drainagelöcher hat, um Staunässe zu vermeiden.
* Hochwertige Blumenerde: Verwendet eine gut durchlässige, nährstoffreiche Blumenerde. Eine Mischung aus Gartenerde, Kompost und Perlit ist ideal.
* Guavensetzling oder -baum: Ihr könnt entweder einen jungen Guavensetzling aus einer Baumschule kaufen oder einen kleinen Baum, der bereits Früchte trägt. Achtet darauf, dass der Baum gesund aussieht und keine Anzeichen von Krankheiten oder Schädlingen aufweist.
* Dünger: Ein Langzeitdünger für Obstbäume ist perfekt. Alternativ könnt ihr auch organischen Dünger wie Kompost oder Hornspäne verwenden.
* Gießkanne oder Schlauch: Zum regelmäßigen Gießen eures Guavenbaums.
* Gartenschere: Zum Beschneiden des Baums.
* Mulch: Zum Abdecken der Erde im Kübel, um die Feuchtigkeit zu halten und Unkraut zu unterdrücken.
* Optional: Rankhilfe: Je nach Guavensorte kann eine Rankhilfe sinnvoll sein, um den Baum zu stützen.
* Handschuhe: Zum Schutz eurer Hände.
* Schaufel oder Spaten: Zum Umtopfen des Baums.
Wo findet man das alles? Baumärkte und Gartencenter sind eure besten Freunde. Online-Shops sind auch eine gute Option, besonders wenn ihr nach speziellen Guavensorten sucht.
Die richtige Guavensorte wählen: Welche passt zu deinem Dach?
Nicht alle Guavensorten sind gleich! Einige sind besser für den Anbau in Kübeln geeignet als andere. Hier sind ein paar Sorten, die ich empfehlen kann:
* ‘Ruby Supreme’: Diese Sorte ist bekannt für ihre roten Früchte und ihren süßen Geschmack. Sie ist relativ kleinwüchsig und eignet sich gut für den Anbau in Kübeln.
* ‘Mexican Cream’: Diese Sorte hat gelbe Früchte mit einem cremigen, süßen Fruchtfleisch. Sie ist ebenfalls relativ kleinwüchsig und pflegeleicht.
* ‘Allahabad Safeda’: Eine indische Sorte mit weißen Früchten und einem süßen, aromatischen Geschmack. Sie ist etwas größer als die anderen Sorten, aber immer noch gut für den Anbau in Kübeln geeignet.
* ‘Thai Maroon’: Diese Sorte ist bekannt für ihre dunkelroten Früchte und ihr rotes Fruchtfleisch. Sie ist relativ robust und pflegeleicht.
Achtet bei der Auswahl der Sorte auf die Größe des Baums, die Fruchtgröße und den Geschmack. Informiert euch auch über die Winterhärte der Sorte, besonders wenn ihr in einer Region mit kalten Wintern lebt.
Der Standort: Sonne, Sonne, Sonne!
Guavenbäume lieben die Sonne! Sie brauchen mindestens 6-8 Stunden Sonnenlicht pro Tag, um optimal zu wachsen und Früchte zu tragen. Wählt also einen Standort auf eurem Dach, der den ganzen Tag über viel Sonne bekommt. Achtet auch darauf, dass der Standort vor starkem Wind geschützt ist, da dieser die Blätter und Früchte beschädigen kann.
Das Einpflanzen: Schritt für Schritt zum Guavenbaum-Glück
Jetzt kommt der spannende Teil: das Einpflanzen eures Guavenbaums! Hier ist eine detaillierte Anleitung:
1. Den Kübel vorbereiten: Stellt sicher, dass der Kübel Drainagelöcher hat. Wenn nicht, bohrt welche hinein. Legt eine Schicht Kies oder Tonscherben auf den Boden des Kübels, um die Drainage zu verbessern.
2. Die Blumenerde einfüllen: Füllt den Kübel mit Blumenerde, bis etwa 10 cm unter den Rand.
3. Den Baum vorbereiten: Nehmt den Guavenbaum vorsichtig aus seinem Topf. Lockert die Wurzeln etwas auf, indem ihr sie leicht auseinanderzieht.
4. Den Baum einsetzen: Setzt den Baum in die Mitte des Kübels. Die Oberseite des Wurzelballens sollte etwa 2-3 cm unter dem Rand des Kübels liegen.
5. Mit Erde auffüllen: Füllt den Kübel mit Blumenerde auf, bis der Wurzelballen vollständig bedeckt ist. Drückt die Erde leicht an.
6. Gießen: Gießt den Baum gründlich, bis das Wasser aus den Drainagelöchern läuft.
7. Mulchen: Verteilt eine Schicht Mulch um den Baum herum, um die Feuchtigkeit zu halten und Unkraut zu unterdrücken.
Die Pflege: Gießen, Düngen, Beschneiden
Ein Guavenbaum braucht regelmäßige Pflege, um gesund zu bleiben und Früchte zu tragen. Hier sind die wichtigsten Pflegemaßnahmen:
* Gießen: Gießt den Baum regelmäßig, besonders während der Wachstumsperiode. Die Erde sollte immer leicht feucht sein, aber nicht nass. Vermeidet Staunässe, da dies zu Wurzelfäule führen kann. Im Winter könnt ihr das Gießen reduzieren.
* Düngen: Düngt den Baum regelmäßig mit einem Langzeitdünger für Obstbäume. Alternativ könnt ihr auch organischen Dünger wie Kompost oder Hornspäne verwenden. Düngt den Baum während der Wachstumsperiode (Frühling und Sommer) alle 2-3 Monate.
* Beschneiden: Beschneidet den Baum regelmäßig, um seine Form zu erhalten und die Fruchtbildung zu fördern. Entfernt abgestorbene, kranke oder beschädigte Äste. Beschneidet den Baum am besten im Frühjahr, bevor er neu austreibt.
* Schutz vor Schädlingen und Krankheiten: Kontrolliert den Baum regelmäßig auf Schädlinge und Krankheiten. Bei Bedarf könnt ihr biologische Schädlingsbekämpfungsmittel oder Fungizide verwenden.
* Überwintern: Wenn ihr in einer Region mit kalten Wintern lebt, müsst ihr den Baum überwintern. Stellt den Kübel an einen hellen, kühlen Ort, z.B. in einen Wintergarten oder eine Garage. Gießt den Baum nur sparsam, um zu verhindern, dass die Erde austrocknet.
Die Ernte: Der Lohn deiner Mühe
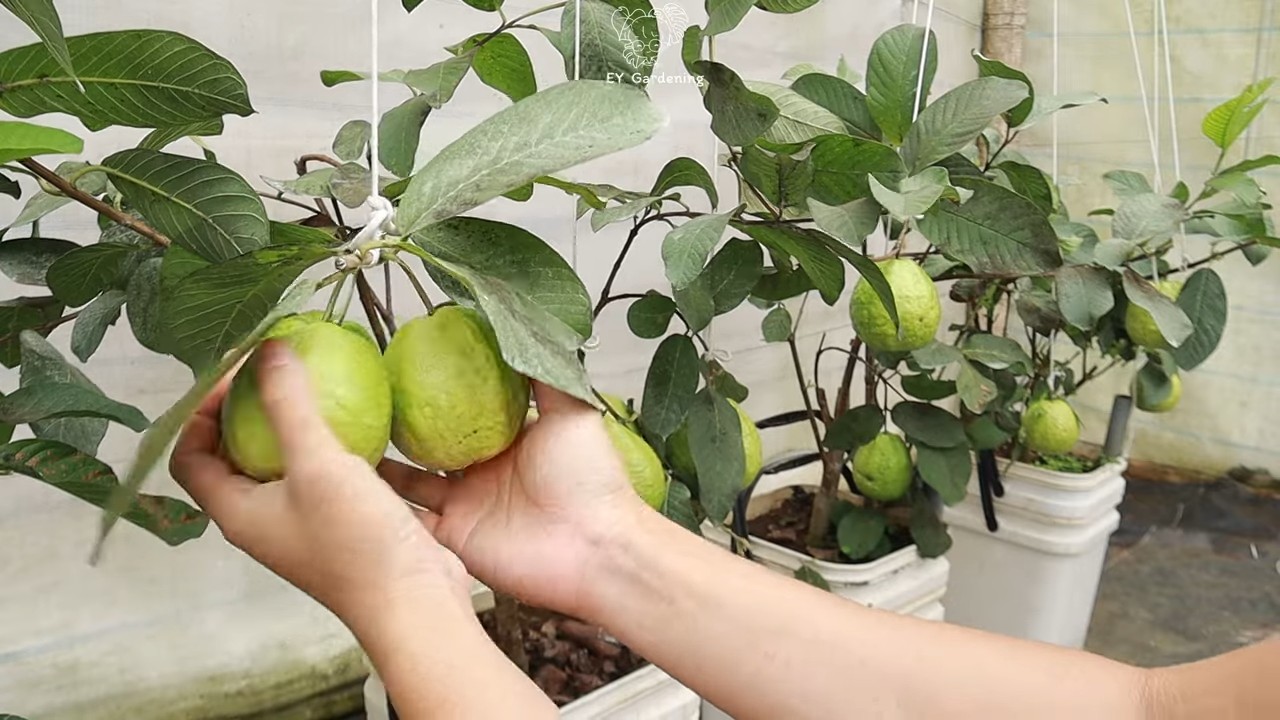
Nach ein paar Jahren (je nach Sorte und Pflege) wird euer Guavenbaum Früchte tragen. Die Früchte sind reif, wenn sie ihre Farbe ändern und leicht weich werden. Pflückt die Früchte vorsichtig vom Baum, um sie nicht zu beschädigen. Genießt eure selbstgezogenen Guaven frisch vom Baum oder verwendet sie für Marmelade, Saft oder andere Leckereien!
Häufige Probleme und Lösungen
Auch beim Guavenbaum-Anbau auf dem Dach können Probleme auftreten. Hier sind einige der häufigsten Probleme und wie ihr sie lösen könnt:
* Gelbe Blätter: Gelbe Blätter können ein Zeichen für Nährstoffmangel, Staunässe oder Schädlingsbefall sein. Überprüft die Erde auf Staunässe und düngt den Baum bei Bedarf. Kontrolliert den Baum auch auf Schädlinge.
* Keine Früchte: Wenn euer Guavenbaum keine Früchte trägt, kann dies an mangelnder Sonneneinstrahlung, falscher Düngung oder fehlendem Beschneiden liegen. Stellt sicher, dass der Baum genügend Sonne bekommt, düngt ihn regelmäßig und beschneidet ihn, um die Fruchtbildung zu fördern.
* Schädlinge: Guavenbäume können von verschiedenen Schädlingen befallen werden, z.B. Blattläusen, Schildläusen oder Spinnmilben. Bei Befall könnt ihr biologische Schädlingsbekämpfungsmittel oder Insektizide verwenden.
* Krankheiten: Guavenbäume können

Conclusion
So, there you have it! Transforming your rooftop into a guava paradise is not only achievable but also incredibly rewarding. We’ve explored the essential steps, from selecting the right variety and container to mastering the art of pruning and pest control. But why should you embark on this rooftop guava growing adventure?
Firstly, imagine stepping out onto your rooftop and plucking a sun-ripened, juicy guava, bursting with tropical flavor. Forget the bland, store-bought varieties; this is about experiencing the authentic taste of homegrown goodness. Secondly, growing your own guava tree is a sustainable and eco-friendly way to enjoy fresh produce. You’ll reduce your carbon footprint by eliminating transportation costs and minimizing the need for pesticides and herbicides. Plus, you’ll have the satisfaction of knowing exactly where your food comes from.
But perhaps the most compelling reason to try this DIY trick is the sheer joy of nurturing a living thing. Watching your guava tree flourish, bearing fruit year after year, is an incredibly fulfilling experience. It’s a connection to nature that can be particularly valuable in urban environments.
Ready to take your rooftop garden to the next level?
Don’t be afraid to experiment! Consider these variations to personalize your rooftop guava growing experience:
* Espalier Guava: Train your guava tree against a wall or fence for a unique and space-saving design. This also maximizes sunlight exposure.
* Grafted Varieties: Explore different grafted guava varieties for unique flavors and disease resistance. Look for dwarf varieties specifically suited for container growing.
* Companion Planting: Plant herbs like basil or marigolds around your guava tree to deter pests and attract beneficial insects.
* Guava Tea: Don’t discard the guava leaves! They can be dried and used to make a delicious and healthy tea.
Growing a guava tree on your rooftop is more than just a gardening project; it’s an investment in your health, your environment, and your overall well-being. It’s a chance to connect with nature, enjoy fresh, delicious fruit, and create a beautiful and productive space in the heart of the city.
We encourage you to embrace this DIY trick and transform your rooftop into a thriving guava oasis. And most importantly, we want to hear about your experiences! Share your photos, tips, and challenges in the comments below. Let’s build a community of rooftop guava growers and inspire others to discover the joys of homegrown fruit. Let us know what **rooftop guava tree growing tips** worked best for you!
Frequently Asked Questions (FAQ)
Q: What is the best variety of guava to grow on a rooftop?
A: The best guava variety for rooftop growing depends on your climate and personal preferences. However, dwarf varieties like ‘Ruby Supreme,’ ‘Mexican Cream,’ and ‘Thai White’ are generally recommended for container gardening. These varieties are smaller in size, making them easier to manage in pots, and they tend to fruit more readily. Research the specific characteristics of each variety to determine which one best suits your needs. Consider factors like fruit size, flavor, disease resistance, and cold hardiness. Local nurseries can also provide valuable insights into which varieties thrive in your region.
Q: What size container do I need for a rooftop guava tree?
A: A mature guava tree needs a substantial container to support its growth and fruit production. Start with a pot that is at least 24 inches in diameter and depth. As the tree grows, you may need to transplant it into a larger container, eventually reaching a size of 36 inches or more. Ensure the container has adequate drainage holes to prevent waterlogging, which can lead to root rot. The material of the container is also important. Terracotta pots are porous and allow for better aeration, but they can dry out quickly. Plastic pots retain moisture better but may not provide as much airflow. Choose a material that suits your climate and watering habits.
Q: How often should I water my rooftop guava tree?
A: Watering frequency depends on several factors, including the climate, the size of the container, and the age of the tree. Generally, water your guava tree deeply whenever the top inch of soil feels dry to the touch. During hot, dry weather, you may need to water daily. In cooler, wetter weather, you can reduce the frequency. Avoid overwatering, as this can lead to root rot. Use a moisture meter to accurately assess the soil moisture level. Also, consider using a self-watering container or drip irrigation system to ensure consistent watering, especially if you live in a hot climate or travel frequently.
Q: How do I fertilize my rooftop guava tree?
A: Guava trees are heavy feeders and require regular fertilization to thrive. Use a balanced fertilizer with a ratio of 10-10-10 or 14-14-14. Apply the fertilizer according to the manufacturer’s instructions, typically every 2-3 months during the growing season (spring and summer). You can also supplement with organic fertilizers like compost or aged manure. Avoid over-fertilizing, as this can burn the roots. Consider using a slow-release fertilizer to provide a steady supply of nutrients over time. Foliar feeding with a seaweed extract can also be beneficial, especially during periods of stress or rapid growth.
Q: How do I protect my rooftop guava tree from pests and diseases?
A: Regularly inspect your guava tree for signs of pests and diseases. Common pests include aphids, scale, and fruit flies. Control aphids and scale with insecticidal soap or neem oil. Use fruit fly traps to prevent fruit damage. Diseases like anthracnose and guava rust can be treated with copper-based fungicides. Prune your tree regularly to improve air circulation and reduce humidity, which can help prevent fungal diseases. Encourage beneficial insects like ladybugs and lacewings to control pests naturally. Consider using organic pest control methods whenever possible to minimize the impact on the environment and your health.
Q: How do I prune my rooftop guava tree?
A: Pruning is essential for maintaining the shape and size of your rooftop guava tree, as well as promoting fruit production. Prune in late winter or early spring, before new growth begins. Remove any dead, damaged, or crossing branches. Thin out the canopy to improve air circulation and sunlight penetration. Prune back long, leggy branches to encourage bushier growth. Guava trees fruit on new growth, so avoid pruning too heavily, as this can reduce fruit production. Consider shaping your tree into a desired form, such as a vase shape or a single trunk with multiple branches.
Q: How long does it take for a rooftop guava tree to bear fruit?
A: The time it takes for a guava tree to bear fruit depends on the variety, the age of the tree, and the growing conditions. Seedling trees can take 3-5 years to fruit, while grafted trees may fruit in as little as 1-2 years. Provide your tree with optimal growing conditions, including plenty of sunlight, well-drained soil, and regular fertilization, to encourage fruit production. Protect your tree from frost and extreme temperatures, as this can delay fruiting. Pollination is also important for fruit set. If you live in an area with limited pollinators, you may need to hand-pollinate the flowers.
Q: Can I grow a guava tree indoors?
A: While it’s possible to grow a guava tree indoors, it can be challenging. Guava trees need at least 6-8 hours of direct sunlight per day, which can be difficult to provide indoors. You’ll also need to ensure adequate humidity and air circulation. Choose a dwarf variety and use a large container with well-drained soil. Provide regular fertilization and water as needed. You may also need to hand-pollinate the flowers to ensure fruit set. If you live in a climate with cold winters, you can bring your rooftop guava tree indoors during the winter months to protect it from frost. However, be prepared to provide supplemental lighting and humidity to keep it healthy.

Leave a Comment