
Small space watermelon gardening might sound like an impossible dream, especially if you’re picturing sprawling vines taking over your entire backyard. But guess what? It’s totally achievable, even if you’re working with a tiny balcony, a patio, or a compact garden bed! I’m here to tell you that juicy, homegrown watermelon is within your reach, no matter how limited your space may be.
For centuries, watermelons have been a symbol of summer, abundance, and pure refreshment. Originating in Africa, these delightful fruits have traveled the globe, becoming a beloved treat in countless cultures. Think about it: family picnics, summer barbecues, and that satisfying “thwack” when you cut into a perfectly ripe watermelon – these are memories many of us cherish. But what if you could create those memories with a watermelon you grew yourself, even in a small space?
Let’s face it, not everyone has acres of land to dedicate to a sprawling watermelon patch. That’s where these DIY tricks and hacks come in! Small space watermelon gardening doesn’t have to be intimidating. I’m going to share some simple, effective techniques that will help you maximize your yield, choose the right varieties, and provide the support your watermelons need to thrive, all without sacrificing precious square footage. So, ditch the store-bought watermelon and get ready to enjoy the sweet taste of success with your very own homegrown harvest!
Growing Watermelons in Small Spaces: A DIY Guide
Hey there, fellow gardening enthusiasts! Dreaming of juicy, homegrown watermelons but think you don’t have the space? Think again! I’m here to tell you that even with a small balcony, patio, or tiny backyard, you can absolutely cultivate your own delicious watermelons. It’s all about choosing the right varieties, employing clever techniques, and giving your plants the TLC they deserve. Let’s dive in!
Choosing the Right Watermelon Variety
The key to small-space watermelon success lies in selecting compact or bush varieties. These types are bred to produce smaller vines, making them perfect for containers or limited garden beds. Here are a few of my favorites:
* Sugar Baby: A classic choice, Sugar Baby watermelons are small, round, and incredibly sweet. They typically weigh between 8-10 pounds, making them manageable for containers.
* Bush Sugar Baby: As the name suggests, this is a bush-type version of the Sugar Baby. It’s even more compact, making it ideal for very small spaces.
* Golden Midget: This variety produces small, yellow-skinned watermelons that are ready to harvest in just 70 days. They’re perfect for impatient gardeners like me!
* Tiger Baby: Similar to Sugar Baby in size and sweetness, but with a unique striped rind.
* Patio Baby: Specifically bred for container gardening, Patio Baby watermelons are super compact and produce small, personal-sized fruits.
Materials You’ll Need
Before we get started, let’s gather all the necessary supplies. Trust me, having everything on hand will make the process much smoother.
* Watermelon Seeds or Seedlings: Choose your preferred variety from the list above. I usually start with seeds, but seedlings can give you a head start.
* Large Container: A container at least 24 inches in diameter and 18 inches deep is essential. Watermelons have extensive root systems, so give them plenty of room to grow. Fabric pots are a great option as they allow for good drainage and air pruning of the roots.
* High-Quality Potting Mix: Avoid using garden soil in containers, as it can become compacted and doesn’t drain well. Opt for a well-draining potting mix specifically formulated for containers.
* Trellis or Support System: Even bush varieties can benefit from some support, especially as the fruits start to develop. A small trellis, tomato cage, or even sturdy stakes will do the trick.
* Water-Soluble Fertilizer: Watermelons are heavy feeders, so regular fertilization is crucial. Choose a balanced fertilizer with a slightly higher phosphorus content to promote fruit development.
* Watering Can or Hose: Consistent watering is key, especially during hot weather.
* Gardening Gloves: To protect your hands from dirt and potential irritants.
* Hand Trowel: For planting and transplanting.
* Pruning Shears: For trimming excess foliage.
* Mulch (Optional): To help retain moisture and suppress weeds. Straw or wood chips work well.
Step-by-Step Planting Guide
Alright, let’s get our hands dirty! Here’s a detailed guide to planting your watermelon seeds or seedlings:
1. Starting Seeds Indoors (Optional)
If you live in a cooler climate or want to get a head start on the growing season, you can start your watermelon seeds indoors about 4-6 weeks before the last expected frost.
1. Fill small pots or seed trays with seed-starting mix.
2. Sow 2-3 seeds per pot, about 1 inch deep.
3. Water gently and keep the soil consistently moist.
4. Place the pots in a warm location (around 75-85°F) or use a heat mat.
5. Once the seedlings emerge, thin them to one plant per pot.
6. Provide plenty of light, either from a sunny window or a grow light.
2. Preparing the Container
Whether you’re starting with seeds or seedlings, it’s important to prepare the container properly.
1. Choose a location that receives at least 6-8 hours of direct sunlight per day. Watermelons need plenty of sunshine to thrive.
2. Fill the container with high-quality potting mix, leaving a few inches of space at the top.
3. If you’re using a trellis or support system, install it now. This will prevent you from disturbing the roots later on.
3. Planting Seeds or Seedlings
Now comes the fun part – planting your watermelon!
For Seeds:
1. Sow 2-3 seeds directly into the container, about 1 inch deep.
2. Water gently and keep the soil consistently moist.
3. Once the seedlings emerge, thin them to one plant per container.
For Seedlings:
1. Gently remove the seedling from its pot, being careful not to damage the roots.
2. Dig a hole in the potting mix that’s large enough to accommodate the root ball.
3. Place the seedling in the hole and backfill with potting mix, gently firming the soil around the base of the plant.
4. Water thoroughly.
4. Mulching (Optional)
Adding a layer of mulch around the base of the plant can help retain moisture, suppress weeds, and regulate soil temperature.
1. Spread a 2-3 inch layer of straw or wood chips around the base of the plant, being careful not to touch the stem.
Caring for Your Watermelon Plants
Once your watermelon plants are established, it’s important to provide them with the care they need to thrive.
1. Watering
Watermelons need consistent watering, especially during hot weather.
1. Water deeply and regularly, keeping the soil consistently moist but not waterlogged.
2. Check the soil moisture regularly by sticking your finger into the soil. If the top inch feels dry, it’s time to water.
3. Avoid overhead watering, as this can promote fungal diseases. Water at the base of the plant instead.
4. During fruit development, increase watering slightly to ensure the fruits are juicy and sweet.
2. Fertilizing
Watermelons are heavy feeders and need regular fertilization to produce healthy vines and delicious fruits.
1. Start fertilizing about 2-3 weeks after planting, using a water-soluble fertilizer diluted to half strength.
2. Fertilize every 2-3 weeks throughout the growing season, following the instructions on the fertilizer package.
3. Choose a fertilizer with a slightly higher phosphorus content (the middle number) to promote fruit development.
4. Avoid over-fertilizing, as this can lead to excessive foliage growth and fewer fruits.
3. Pruning
While bush varieties don’t require extensive pruning, some trimming can help improve air circulation and promote fruit development.
1. Remove any dead or yellowing leaves.
2. Trim any excessive foliage that’s blocking sunlight from reaching the fruits.
3. If you’re growing a vining variety, you may need to prune the vines to keep them under control.
4. Pollination
Watermelons require pollination to produce fruits. If you’re growing your watermelons outdoors, bees and other pollinators will usually take care of this for you. However, if you’re growing them indoors or in a location with limited pollinators, you may need to hand-pollinate the flowers.
1. Identify the male and female flowers. Male flowers have a long, thin stem, while female flowers have a small, immature fruit at the base.
2. In the morning, use a small paintbrush or cotton swab to collect pollen from the male flower.
3. Gently transfer the pollen to the stigma of the female flower.
4. Repeat this process for several female flowers.
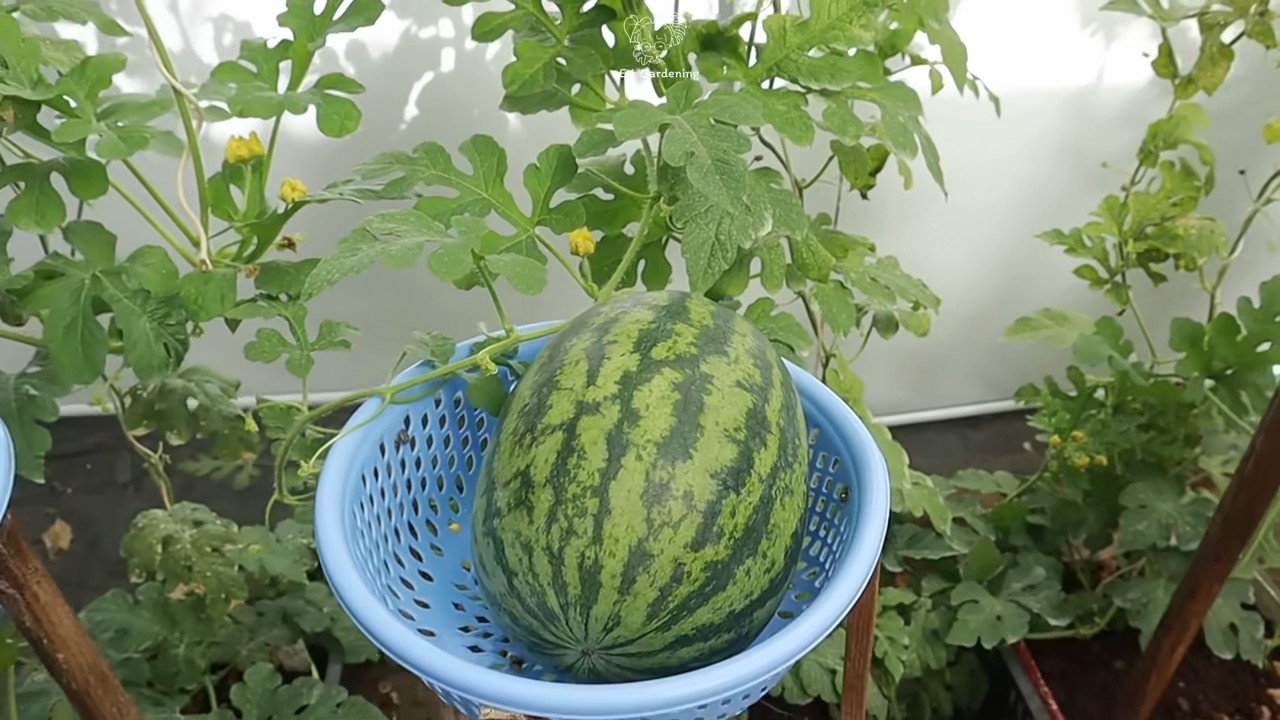
5. Supporting the Fruits
As the watermelons grow larger, they may need some extra support to prevent them from breaking off the vine.
1. Use slings made from pantyhose, netting, or fabric to support the fruits.
2. Tie the slings to the trellis or support system.
Harvesting Your Watermelons
The moment you’ve been waiting for – harvesting your homegrown watermelons!
1. Watermelons are typically ready to harvest about 70-90 days after planting, depending on the variety.
2. Look for these signs of ripeness:
* The tendril closest to the fruit turns brown and dry.
* The underside of the watermelon (where it rests on the ground) turns from white to yellow.
* The watermelon sounds hollow when you thump it.
3. Use a sharp knife or pruning shears to cut the watermelon from the vine, leaving a few inches of stem attached.
Troubleshooting Common Problems
Even with the best care, you may encounter some problems while growing watermelons. Here are a few common issues and how

Conclusion
So, there you have it! Transforming your limited outdoor area into a thriving watermelon patch is not just a dream; it’s an achievable reality with this simple, effective DIY trick. We’ve shown you how to maximize your yield, minimize your space requirements, and cultivate delicious, juicy watermelons even if you’re working with a balcony, patio, or small backyard. This isn’t just about growing fruit; it’s about embracing the joy of gardening, connecting with nature, and enjoying the unparalleled satisfaction of harvesting something you’ve nurtured from seed to table.
This method of small space watermelon gardening is a game-changer for urban gardeners and anyone facing spatial constraints. Forget the sprawling vines taking over your entire yard. With strategic trellising, careful pruning, and the right container size, you can create a vertical oasis of watermelon goodness. Think of the possibilities! Imagine the envy of your neighbors as they watch your watermelons flourish in a space they thought was too small.
But the beauty of this DIY approach lies not only in its practicality but also in its adaptability. Feel free to experiment with different watermelon varieties. Bush varieties are naturally more compact and well-suited for container gardening. Consider trying ‘Sugar Baby’ or ‘Bush Sugar Baby’ for a truly space-saving option. You can also explore different trellising methods. A sturdy tomato cage can work wonders for smaller varieties, while larger watermelons might require a more robust trellis system.
Don’t be afraid to get creative with your container choices, too. While a large pot is essential, you can repurpose old barrels, large buckets, or even build your own custom containers to fit your specific space and aesthetic. Just ensure proper drainage is in place to prevent waterlogging.
Remember, the key to success with small space watermelon gardening is consistent care and attention. Regular watering, fertilization, and pest control are crucial for healthy growth and abundant fruit production. Keep a close eye on your plants, and don’t hesitate to adjust your approach as needed.
We are confident that this DIY trick will revolutionize your gardening experience and allow you to enjoy the sweet taste of homegrown watermelons, no matter how limited your space may be. So, grab your seeds, prepare your containers, and get ready to embark on a rewarding gardening adventure.
We’re eager to hear about your experiences! Share your photos, tips, and challenges in the comments below. Let’s create a community of small-space watermelon growers and inspire others to embrace the joy of gardening, regardless of their spatial limitations. What watermelon variety did you choose? What trellising method worked best for you? What challenges did you face, and how did you overcome them? Your insights will be invaluable to other gardeners looking to try this DIY trick. Let’s grow together!
Frequently Asked Questions (FAQ)
What is the best watermelon variety to grow in a small space?
The best watermelon varieties for small spaces are bush or dwarf varieties. These are specifically bred to have shorter vines and a more compact growth habit, making them ideal for container gardening and trellising. Some popular choices include ‘Sugar Baby,’ ‘Bush Sugar Baby,’ ‘Golden Midget,’ and ‘Tiger Baby.’ These varieties typically produce smaller watermelons, but they are still incredibly delicious and perfect for individual servings. When selecting a variety, consider your local climate and growing conditions to ensure optimal success. Read seed descriptions carefully to understand the plant’s mature size and growth habits.
How large of a container do I need for growing watermelons in a small space?
Watermelons are heavy feeders and require ample space for their roots to develop. A minimum container size of 20 gallons is recommended for most watermelon varieties. However, larger containers (25-30 gallons or more) are even better, especially for larger varieties. The container should be sturdy and have adequate drainage holes to prevent waterlogging. Consider using a fabric pot, as these allow for better aeration and drainage, promoting healthier root growth. The size of the container directly impacts the size and yield of your watermelons, so don’t skimp on space!
How often should I water my watermelons grown in containers?
Watermelons are thirsty plants, especially when grown in containers. During hot weather, you may need to water your watermelons daily, or even twice a day, to keep the soil consistently moist. Check the soil moisture level regularly by sticking your finger about an inch into the soil. If it feels dry, it’s time to water. Avoid overwatering, as this can lead to root rot. Water deeply, allowing the water to drain out of the bottom of the container. Mulching around the base of the plant can help retain moisture and reduce the frequency of watering.
What type of fertilizer should I use for my container watermelons?
Watermelons are heavy feeders and require regular fertilization to thrive. Use a balanced fertilizer (e.g., 10-10-10) during the early stages of growth to promote healthy foliage development. Once the plant starts to flower, switch to a fertilizer with a higher phosphorus content (e.g., 5-10-5) to encourage fruit production. Apply fertilizer according to the package instructions, typically every 2-3 weeks. You can also supplement with organic fertilizers like compost tea or fish emulsion. Avoid over-fertilizing, as this can burn the roots and harm the plant.
How do I trellis watermelons in a small space?
Trellising is essential for small space watermelon gardening, as it allows you to grow watermelons vertically and maximize your space. Choose a sturdy trellis that can support the weight of the mature watermelons. Options include A-frame trellises, vertical trellises, or even sturdy tomato cages for smaller varieties. As the watermelon vines grow, gently train them to climb the trellis, using soft ties or twine to secure them. For larger watermelons, you may need to provide additional support by creating slings or hammocks out of netting or fabric to cradle the fruit and prevent it from breaking off the vine.
How do I know when my watermelons are ripe?
Determining when a watermelon is ripe can be tricky, but there are several indicators to look for. The tendril closest to the watermelon should be brown and dry. The underside of the watermelon, where it rests on the ground (or container), should be a creamy yellow color. When you thump the watermelon, it should sound hollow and deep. Avoid picking watermelons that are still green or have a bright white underside, as they are not yet ripe. With practice, you’ll develop a knack for knowing when your watermelons are perfectly ripe and ready to harvest.
What are some common pests and diseases that affect watermelons, and how can I prevent them?
Common pests that affect watermelons include aphids, squash bugs, and vine borers. Diseases include powdery mildew, fusarium wilt, and anthracnose. To prevent these problems, start with healthy seeds or seedlings. Ensure good air circulation around your plants by spacing them properly and pruning excess foliage. Regularly inspect your plants for signs of pests or diseases and take action promptly. Use organic pest control methods like insecticidal soap or neem oil to control pests. For diseases, use copper-based fungicides or other appropriate treatments. Crop rotation and soil solarization can also help prevent soilborne diseases.
Can I grow watermelons indoors in a small space?
While it’s possible to grow watermelons indoors, it’s more challenging than growing them outdoors. Watermelons require a lot of sunlight, so you’ll need to provide supplemental lighting with grow lights. You’ll also need to hand-pollinate the flowers, as there won’t be any bees or other pollinators indoors. Indoor growing can be a fun experiment, but it’s generally more successful to grow watermelons outdoors in a small space using the trellising and container gardening techniques described above.
How do I hand-pollinate my watermelon flowers?
Watermelons have separate male and female flowers. The female flowers have a small swelling at the base of the flower, which will eventually become the watermelon. To hand-pollinate, use a small paintbrush or cotton swab to collect pollen from the male flower and transfer it to the stigma of the female flower. Do this in the morning, when the flowers are open and the pollen is fresh. You may need to repeat this process for several days to ensure successful pollination.
What if my watermelon plant produces flowers but no fruit?
There are several reasons why your watermelon plant might produce flowers but no fruit. One common reason is inadequate pollination. Make sure you are hand-pollinating the flowers if you are growing them indoors, or ensure that there are plenty of bees and other pollinators in your garden. Another reason could be nutrient deficiencies. Make sure you are fertilizing your plants regularly with a balanced fertilizer. Stressful growing conditions, such as extreme heat or drought, can also prevent fruit set. Provide adequate water and shade during hot weather.
Leave a Comment