
Soil-Free Sprout Growing: Imagine harvesting fresh, crunchy sprouts right from your kitchen counter, without ever getting your hands dirty with soil! Sounds like something out of a futuristic garden, right? Well, it’s not only possible, but surprisingly easy. For centuries, cultures around the globe, particularly in Asia, have recognized the incredible nutritional power packed into tiny sprouts. From mung bean sprouts in stir-fries to alfalfa sprouts in salads, these little powerhouses have been a staple for their health benefits and ease of cultivation.
But let’s face it, dealing with soil can be messy, time-consuming, and sometimes attract unwanted pests. That’s where the magic of soil-free sprout growing comes in! I’m going to show you how to bypass the soil altogether and create your own mini-sprout farm using simple, readily available materials. This DIY trick is a game-changer for anyone who wants to enjoy fresh, organic sprouts year-round, regardless of space constraints or gardening experience. Plus, it’s a fantastic way to introduce kids to the wonders of growing their own food. So, ditch the dirt and let’s dive into the world of clean, convenient, and incredibly rewarding soil-free sprouting!
Growing Sprouts Without Soil: A Beginner’s Guide
Hey there, fellow sprout enthusiasts! Are you ready to ditch the dirt and dive into the wonderful world of soil-free sprouting? I’m going to walk you through a super easy and rewarding method for growing your own delicious and nutritious sprouts right in your kitchen, no soil required! This is perfect for anyone who wants fresh greens year-round, avoids the mess of soil, or is simply looking for a fun and healthy DIY project.
What You’ll Need
Before we get started, let’s gather our supplies. The beauty of this method is that it requires very few materials, most of which you probably already have at home.
* Sprouting Seeds: This is the most important ingredient! Choose seeds specifically labeled for sprouting. Some popular options include alfalfa, broccoli, radish, mung beans, lentils, and clover. Avoid using seeds meant for planting in the garden, as they may be treated with chemicals. I personally love a mix of alfalfa and radish for a peppery kick!
* Wide-Mouth Mason Jar: A quart-sized jar works perfectly, but you can use larger or smaller jars depending on how many sprouts you want to grow.
* Sprouting Lid or Cheesecloth and Rubber Band: You’ll need something to cover the jar that allows for drainage and airflow. Sprouting lids are specifically designed for this purpose and are super convenient. Alternatively, you can use a piece of cheesecloth secured with a rubber band.
* Water: Clean, filtered water is best.
* Bowl or Dish: To rest the jar in at an angle for drainage.
* Optional: A dark place or a towel to cover the jar during the initial sprouting phase. This can help some sprouts germinate faster.
Choosing Your Seeds
Not all seeds are created equal when it comes to sprouting. It’s crucial to use seeds specifically intended for sprouting. These seeds have been tested for safety and are free from harmful chemicals. Garden seeds, on the other hand, may be treated with fungicides or other chemicals that you definitely don’t want to consume.
Here’s a quick rundown of some popular sprouting seeds:
* Alfalfa: Mild, slightly sweet flavor. A classic sprouting choice.
* Broccoli: Slightly spicy and packed with nutrients.
* Radish: Peppery and adds a zesty flavor to salads and sandwiches.
* Mung Beans: The sprouts you often see in Asian cuisine. They have a mild, slightly nutty flavor.
* Lentils: Hearty and filling, with a slightly earthy flavor.
* Clover: Mild and slightly sweet, similar to alfalfa.
Experiment with different seeds to find your favorites! I encourage you to try different combinations too.
Step-by-Step Sprouting Guide
Okay, let’s get sprouting! This process is incredibly simple, but consistency is key. You’ll need to rinse and drain your sprouts regularly to prevent mold and ensure they grow properly.
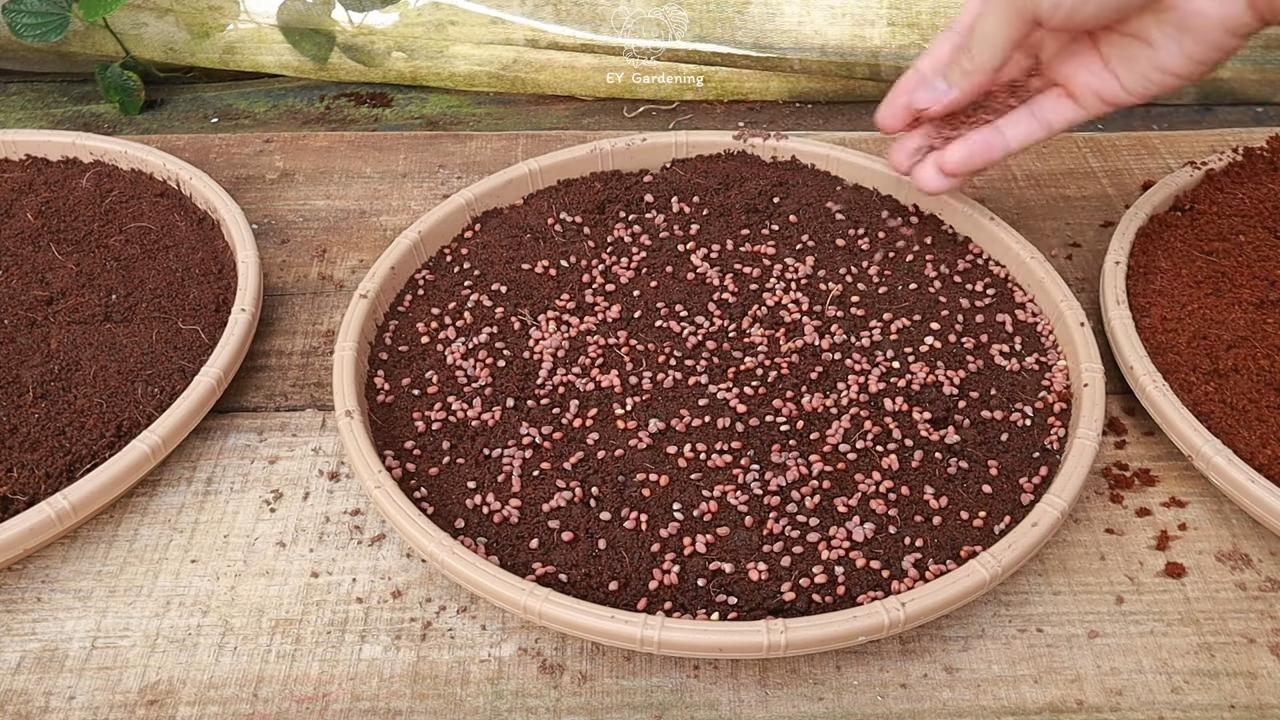
1. Soaking the Seeds:
* Place 1-3 tablespoons of sprouting seeds into your mason jar. The amount of seeds you use will depend on the type of seed and the size of your jar. Start with less rather than more, as the seeds will expand significantly as they sprout. I usually start with 2 tablespoons for a quart jar.
* Add plenty of cool, filtered water to the jar – about three times the volume of the seeds. This allows the seeds to fully hydrate.
* Cover the jar with your sprouting lid or cheesecloth and rubber band.
* Let the seeds soak for 8-12 hours, or overnight. This is a crucial step as it awakens the seeds and starts the germination process. I usually soak mine before I go to bed and then drain them in the morning.
2. Draining and Rinsing:
* After the soaking period, drain the water from the jar thoroughly. Make sure to invert the jar completely to remove all excess water. This is important to prevent the sprouts from becoming waterlogged and developing mold.
* Rinse the seeds with fresh, cool water. Gently swirl the seeds around in the jar to ensure they are all rinsed.
* Drain the water again, making sure to remove all excess water.
3. Sprouting:
* Place the jar upside down in a bowl or dish at an angle. This allows for proper drainage and airflow. I usually use a small mixing bowl.
* Place the jar in a location with indirect sunlight. Direct sunlight can overheat the sprouts. Some people prefer to keep the jar in a dark place during the initial sprouting phase, as this can encourage longer, whiter sprouts. You can achieve this by covering the jar with a towel. I’ve tried both methods and haven’t noticed a huge difference, but it’s worth experimenting with to see what works best for you.
* Rinse and drain the sprouts 2-3 times per day. This is the most important part of the process! Consistent rinsing keeps the sprouts hydrated and prevents mold growth. I usually rinse them in the morning, afternoon, and before bed.
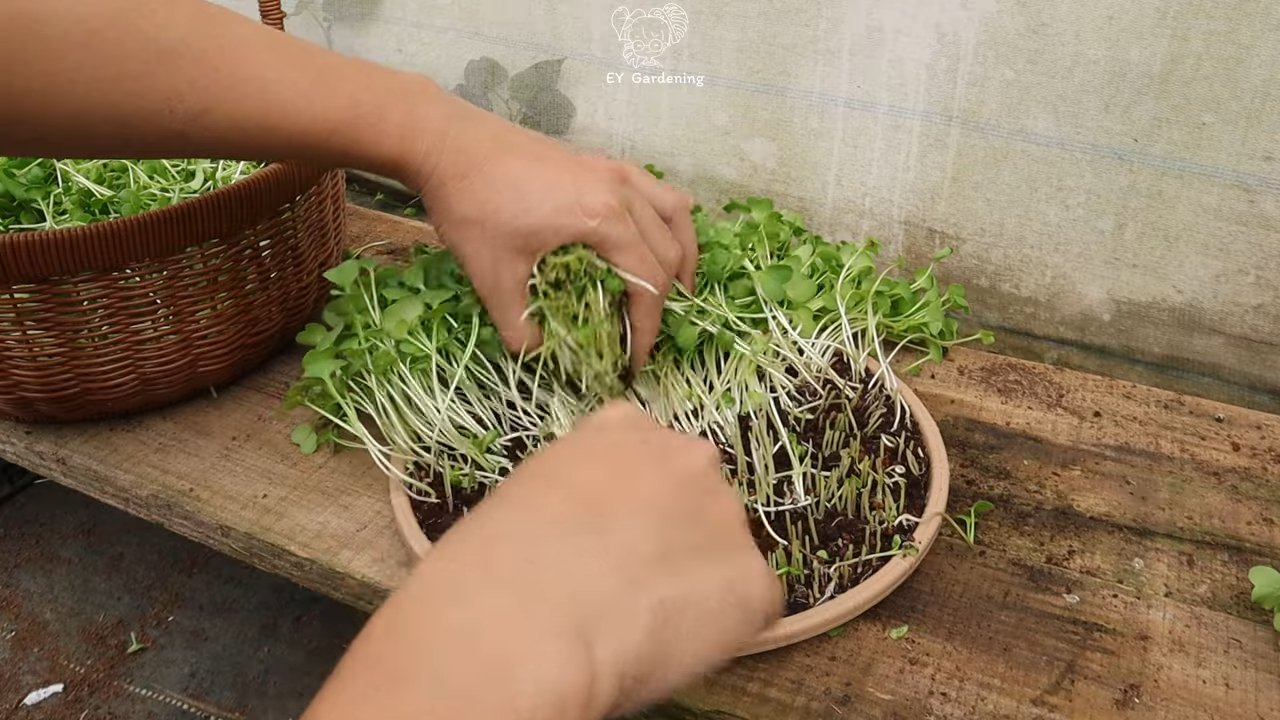
4. Harvesting:
* Your sprouts will be ready to harvest in 3-7 days, depending on the type of seed and your personal preference. They are ready when they have small leaves and a good amount of sprout growth.
* Give the sprouts a final rinse and drain.
* Remove any unsprouted seeds or hulls. This is optional, but it can improve the texture and appearance of your sprouts. I usually just pick out the larger hulls.
* Allow the sprouts to dry thoroughly before storing them. You can spread them out on a clean towel or use a salad spinner to remove excess moisture.
5. Storing:
* Store your sprouts in an airtight container in the refrigerator. They will typically last for up to a week. I usually line the container with a paper towel to absorb any excess moisture.
* Rinse the sprouts again before using them.
Troubleshooting
Sometimes, things don’t go exactly as planned. Here are a few common issues you might encounter and how to address them:
* Mold: Mold is the biggest enemy of sprouting. It usually appears as fuzzy white or gray patches. If you see mold, discard the entire batch of sprouts immediately. To prevent mold, make sure you are rinsing and draining the sprouts thoroughly 2-3 times per day. Good airflow is also essential.
* Unpleasant Odor: A foul smell is another sign that something is wrong. It could indicate bacterial growth or spoilage. Discard the sprouts immediately.
* Slow Growth: If your sprouts are growing slowly, it could be due to several factors. Make sure they are getting enough water and airflow. The temperature could also be a factor. Sprouts generally prefer a temperature between 65-75°F (18-24°C).
* Seed Quality: Using old or low-quality seeds can also affect germination. Always use fresh, high-quality sprouting seeds.
Tips and Tricks for Sprouting Success
Here are a few extra tips to help you become a sprouting pro:
* Use filtered water: Tap water can contain chlorine and other chemicals that can inhibit sprouting.
* Ensure good airflow: Proper airflow is essential for preventing mold. Make sure your sprouting lid or cheesecloth allows for adequate ventilation.
* Experiment with different seeds: Try different types of seeds to find your favorites.
* Keep it clean: Wash your jar and sprouting lid thoroughly between batches to prevent contamination.
* Don’t overcrowd the jar: Use the right amount of seeds for the size of your jar. Overcrowding can lead to poor airflow and increased risk of mold.
* Taste test: Taste your sprouts regularly to monitor their flavor and texture.
* Enjoy your harvest! Add your sprouts to salads, sandwiches, soups, smoothies, or enjoy them as a snack.
Adding a Chlorophyll Boost
Want to give your sprouts an extra boost of nutrients and a vibrant green color? Try exposing them to sunlight for a few hours before harvesting. This will increase their chlorophyll content, making them even healthier and more visually appealing. Just be careful not to expose them to direct sunlight for too long, as this can overheat them.
Sprouting Mung Beans: A Special Note
Mung beans are a popular choice for sprouting, but they require a slightly different approach. To get those long, white sprouts you often see in Asian cuisine, you’ll need to keep them in a dark, humid environment.
Here’s how to sprout mung beans:
1. Follow the same soaking and rinsing instructions as above.
2. After rinsing, place the jar in a dark place, such as a cupboard or a covered container.
3. Keep the sprouts moist by rinsing them 3-4 times per day.
4. The sprouts will be ready to harvest in 3-5 days, when they are about 2-3 inches long.
Beyond the Basics:
Conclusion
So, there you have it! Soil-free sprout growing is not just a trendy kitchen experiment; it’s a game-changer for anyone seeking fresh, nutrient-packed greens without the mess and hassle of traditional gardening. We’ve explored how incredibly simple it is to cultivate your own mini-garden right on your countertop, bypassing the need for soil altogether. This method opens up a world of possibilities, allowing you to enjoy the vibrant flavors and health benefits of sprouts year-round, regardless of your living space or gardening experience.
The beauty of soil-free sprouting lies in its adaptability. Feel free to experiment with different types of seeds – from the classic alfalfa and radish to the more adventurous broccoli and sunflower. Each variety offers a unique flavor profile and nutritional punch, allowing you to tailor your sprout harvest to your specific tastes and dietary needs. Consider creating your own sprout mixes for a symphony of flavors and textures in your salads, sandwiches, and smoothies.
Beyond the basic jar method, explore other innovative approaches. Stackable sprouting trays offer increased capacity and improved air circulation, while automatic sprouters take the guesswork out of watering and rinsing. You can even repurpose everyday items like plastic containers or colanders to create your own DIY sprouting system. The possibilities are truly endless!
But the real magic happens when you take the leap and try it yourself. Don’t be intimidated by the simplicity – that’s precisely what makes soil-free sprout growing so appealing. It’s a low-risk, high-reward endeavor that can transform your kitchen into a source of fresh, healthy food. Imagine the satisfaction of harvesting your own sprouts, knowing exactly where they came from and how they were grown.
We wholeheartedly encourage you to embark on your own soil-free sprouting adventure. Start small, experiment with different seeds, and don’t be afraid to make mistakes. The learning process is part of the fun! And most importantly, share your experiences with us. We’d love to hear about your successes, your challenges, and your creative variations. Let’s build a community of soil-free sprouting enthusiasts, sharing tips and inspiration to help each other grow.
Ready to ditch the soil and embrace the freshness? Give soil-free sprout growing a try today! You’ll be amazed at how easy and rewarding it is to cultivate your own delicious and nutritious sprouts.
Frequently Asked Questions (FAQ)
What types of seeds are best for soil-free sprouting?
The best seeds for soil-free sprouting are those specifically labeled for sprouting or microgreens. These seeds have been tested for germination rates and are less likely to carry harmful bacteria. Popular choices include alfalfa, broccoli, radish, clover, mung beans, lentils, and sunflower seeds. Avoid using seeds intended for planting in the garden, as they may be treated with chemicals that are not safe for consumption. Always purchase your seeds from a reputable source to ensure quality and safety. Experiment with different varieties to discover your favorite flavors and textures.
How often should I rinse my sprouts?
Rinsing your sprouts is crucial for preventing mold and bacterial growth. Aim to rinse them at least twice a day, preferably in the morning and evening. In warmer climates or during humid weather, you may need to rinse them more frequently, up to three or four times a day. Ensure that you drain the sprouts thoroughly after each rinse to prevent them from sitting in stagnant water. Proper rinsing and drainage are key to successful soil-free sprout growing.
How long does it take for sprouts to be ready to eat?
The sprouting time varies depending on the type of seed and the environmental conditions. Generally, most sprouts are ready to eat within 3 to 7 days. Alfalfa and radish sprouts typically take 5 to 7 days, while broccoli sprouts may be ready in as little as 3 days. Keep an eye on your sprouts and harvest them when they have reached your desired length and flavor. Remember that sprouts continue to grow after harvesting, so it’s best to consume them within a few days for optimal freshness and flavor.
How do I prevent mold growth on my sprouts?
Mold growth is a common concern when sprouting, but it can be easily prevented with proper hygiene and care. The most important factor is adequate rinsing and drainage. Ensure that you rinse your sprouts thoroughly at least twice a day and that you drain them completely after each rinse. Good air circulation is also essential. Avoid overcrowding the sprouts in your sprouting container and ensure that there is adequate ventilation. If you notice any signs of mold, discard the affected sprouts immediately and thoroughly clean your sprouting container before starting a new batch. Using clean water and sanitized equipment will also help to minimize the risk of mold growth.
How should I store my harvested sprouts?
Once your sprouts are ready to eat, rinse them thoroughly and drain them well. Store them in a clean, airtight container lined with a paper towel to absorb excess moisture. Keep the container in the refrigerator. Sprouts are best consumed within a few days of harvesting for optimal freshness and flavor. Avoid storing them for extended periods, as they may lose their nutritional value and become susceptible to spoilage.
Can I sprout any type of seed?
While many seeds can be sprouted, it’s important to choose seeds specifically intended for sprouting. Seeds intended for planting in the garden may be treated with chemicals that are not safe for consumption. Additionally, some seeds, such as kidney beans, contain toxins that are only deactivated through cooking. Always research the specific seed you intend to sprout to ensure that it is safe for raw consumption. When in doubt, choose seeds labeled for sprouting or microgreens from a reputable source.
What are the nutritional benefits of sprouts?
Sprouts are nutritional powerhouses, packed with vitamins, minerals, enzymes, and antioxidants. They are a rich source of vitamins A, C, and K, as well as folate, iron, and potassium. Sprouts are also a good source of fiber and protein. The sprouting process increases the bioavailability of nutrients, making them easier for the body to absorb. Adding sprouts to your diet can boost your immune system, improve digestion, and provide a wide range of health benefits.
Is soil-free sprout growing safe?
Yes, soil-free sprout growing is generally safe as long as you follow proper hygiene and care practices. The key to preventing bacterial contamination is frequent rinsing and drainage. Ensure that you use clean water and sanitized equipment. Avoid overcrowding the sprouts in your sprouting container and provide adequate air circulation. If you notice any signs of mold or spoilage, discard the affected sprouts immediately. By following these simple guidelines, you can enjoy the benefits of fresh, healthy sprouts without any safety concerns.
Can I use tap water for sprouting?
While tap water is generally safe for sprouting, it’s best to use filtered water if possible. Tap water may contain chlorine or other chemicals that can inhibit germination or affect the flavor of your sprouts. Filtered water will provide a cleaner and more consistent environment for your sprouts to thrive. If you choose to use tap water, let it sit for a few hours to allow the chlorine to dissipate before using it for rinsing and soaking.
What if my sprouts don’t germinate?
If your sprouts are not germinating, there could be several reasons. First, ensure that you are using fresh, high-quality seeds specifically intended for sprouting. Old or damaged seeds may have a low germination rate. Second, check the temperature of your sprouting environment. Sprouts typically germinate best in a warm, but not hot, environment. Third, make sure that you are providing adequate moisture. The seeds should be kept moist but not waterlogged. Finally, check the lighting conditions. While sprouts don’t need direct sunlight, they do need some light to germinate. If you have addressed all of these factors and your sprouts still aren’t germinating, try a different batch of seeds or a different sprouting method.
Leave a Comment