
Starting Strawberries from Seed might sound intimidating, but trust me, it’s a rewarding journey that unlocks a world of delicious possibilities right in your own backyard! For centuries, strawberries have been cherished, not just for their sweet, juicy flavor, but also for their vibrant color and versatility. From ancient Roman gardens to medieval monastery plots, these little red gems have graced tables and delighted palates across cultures.
But why bother with the seemingly complex task of starting strawberries from seed when you can just buy seedlings? Well, for starters, it opens up a whole universe of unique and heirloom varieties that you simply won’t find at your local garden center. Imagine growing alpine strawberries, bursting with intense flavor, or enjoying the novelty of white strawberries! Plus, there’s an undeniable satisfaction in nurturing a plant from its very first sprout to its first ripe berry.
This DIY guide is your key to unlocking that satisfaction. I’ll walk you through every step, from selecting the right seeds to providing the perfect growing conditions. Starting Strawberries from Seed doesn’t have to be a daunting task. With a little patience and these simple tricks, you’ll be harvesting your own homegrown strawberries in no time. Get ready to embark on a fruitful adventure!
Starting Strawberries from Seed: A Comprehensive Guide
Hey there, fellow gardening enthusiasts! Ever dreamt of having a strawberry patch bursting with delicious, homegrown berries? While most people opt for buying strawberry plants, starting them from seed is a surprisingly rewarding (and budget-friendly!) adventure. It takes patience, but trust me, the satisfaction of nurturing those tiny seeds into thriving plants is unmatched. So, grab your gardening gloves, and let’s dive into the wonderful world of starting strawberries from seed!
Why Start Strawberries from Seed?
Before we get our hands dirty, let’s quickly touch on why you might choose to start strawberries from seed instead of buying established plants.
* Cost-Effective: Seeds are significantly cheaper than buying established strawberry plants, especially if you’re planning a large patch.
* Variety: You’ll have access to a wider range of strawberry varieties, including some unique and heirloom types that might not be available as plants.
* Control: You have complete control over the growing process from the very beginning, ensuring your plants are healthy and strong.
* Satisfaction: There’s just something incredibly satisfying about watching a tiny seed sprout and grow into a plant that produces delicious fruit.
Understanding Strawberry Seed Germination
Strawberries can be a bit finicky when it comes to germination. They require a period of cold stratification to break their dormancy. This essentially mimics the winter conditions they would naturally experience, signaling to the seed that it’s time to sprout. Don’t worry, it’s not complicated! We’ll cover it in detail below.
Materials You’ll Need
Okay, let’s gather our supplies. Here’s what you’ll need to get started:
* Strawberry Seeds: Choose a variety that suits your climate and taste preferences. Reputable seed companies are your best bet for quality seeds.
* Seed Starting Trays or Small Pots: These will provide a controlled environment for your seedlings.
* Seed Starting Mix: This is a light, sterile mix that’s perfect for delicate seedlings. Avoid using garden soil, as it can be too heavy and may contain pathogens.
* Spray Bottle: For gently watering your seeds and seedlings.
* Plastic Wrap or a Humidity Dome: To maintain moisture levels during germination.
* Refrigerator: For cold stratification.
* Grow Lights (Optional but Recommended): To provide consistent light for your seedlings, especially if you don’t have a sunny windowsill.
* Small Labels and a Marker: To keep track of your varieties.
* Tweezers (Optional): For handling tiny seeds.
Step-by-Step Guide to Starting Strawberry Seeds
Alright, let’s get down to the nitty-gritty! Here’s a detailed guide to starting your strawberry seeds:
Phase 1: Cold Stratification
This is the crucial step that tricks the seeds into thinking they’ve gone through winter.
1. Prepare Your Seed Starting Mix: Moisten your seed starting mix with water until it’s damp but not soggy. You want it to hold together when you squeeze it, but not drip water.
2. Fill Your Seed Starting Trays or Pots: Fill your trays or pots with the moistened seed starting mix, leaving about half an inch of space at the top.
3. Sow the Seeds: Strawberry seeds are tiny, so be careful! You can use tweezers to gently place 2-3 seeds per cell or pot. Don’t bury the seeds too deep; they need light to germinate. Just gently press them into the surface of the soil.
4. Water Gently: Use your spray bottle to lightly mist the surface of the soil. Avoid overwatering, as this can cause the seeds to rot.
5. Cover with Plastic Wrap or a Humidity Dome: This will help maintain moisture levels.
6. Refrigerate: Place your trays or pots in the refrigerator for 4-6 weeks. The ideal temperature is around 35-40°F (2-4°C). Make sure the refrigerator is not frost-free, as the seeds need the cold temperature to break dormancy.
7. Monitor Moisture: Check the moisture level of the soil every week or so. If it seems dry, lightly mist it with water.
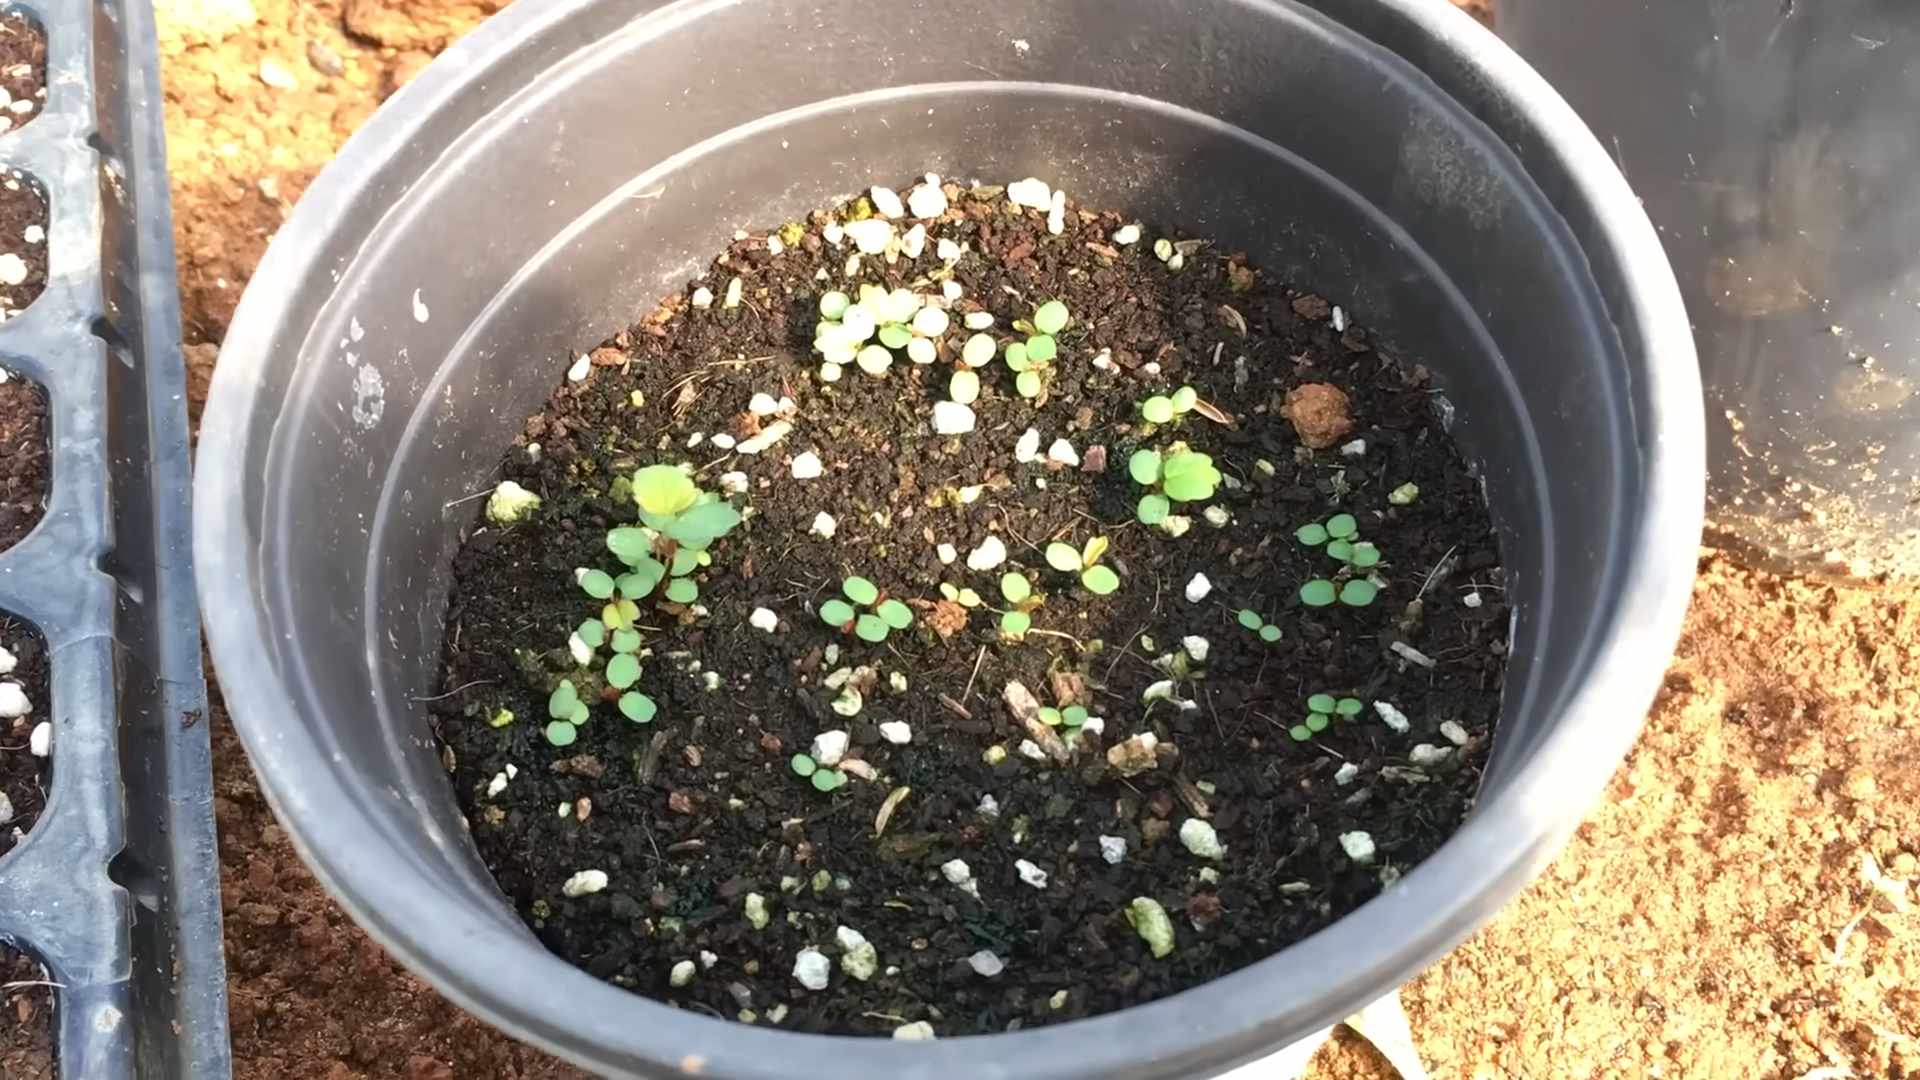
Phase 2: Germination
After the cold stratification period, it’s time to bring your seeds into a warmer environment to germinate.
1. Remove from Refrigerator: Take your trays or pots out of the refrigerator.
2. Place Under Grow Lights or in a Sunny Window: Place them under grow lights or in a sunny window that receives at least 6-8 hours of sunlight per day. If using a windowsill, rotate the trays or pots regularly to ensure even light exposure.
3. Maintain Moisture: Continue to keep the soil consistently moist, but not soggy. Mist the surface of the soil regularly with your spray bottle.
4. Remove Plastic Wrap or Humidity Dome Gradually: Once you see signs of germination (usually within 1-3 weeks), gradually remove the plastic wrap or humidity dome to allow for better air circulation. Start by lifting one corner for a few hours each day, then gradually increase the amount of time until it’s completely removed.
5. Monitor for Mold: Keep an eye out for any signs of mold or fungus. If you see any, remove the affected seedlings and improve air circulation.
Phase 3: Seedling Care
Once your seedlings have emerged, it’s important to provide them with the right care to help them grow strong and healthy.
1. Thin Seedlings: Once your seedlings have developed a few true leaves (the second set of leaves that appear after the initial seed leaves), thin them out so that only one strong seedling remains in each cell or pot. Use small scissors to snip off the weaker seedlings at the soil line.
2. Watering: Water your seedlings regularly, allowing the soil to dry out slightly between waterings. Avoid overwatering, as this can lead to root rot.
3. Fertilizing: Once your seedlings have developed several true leaves, you can start feeding them with a diluted liquid fertilizer specifically formulated for seedlings. Follow the instructions on the fertilizer label.
4. Light: Continue to provide your seedlings with plenty of light, either from grow lights or a sunny window.
5. Air Circulation: Ensure good air circulation around your seedlings to prevent fungal diseases. You can use a small fan to gently circulate the air.
6. Hardening Off: Before transplanting your seedlings outdoors, you’ll need to harden them off. This process gradually acclimates them to outdoor conditions. Start by placing them outdoors in a sheltered location for a few hours each day, gradually increasing the amount of time they spend outdoors over a period of 1-2 weeks. Protect them from direct sunlight and strong winds during this process.
Phase 4: Transplanting
Once your seedlings are strong and healthy and the weather is warm enough, it’s time to transplant them into your garden or containers.
1. Choose a Location: Strawberries need at least 6-8 hours of sunlight per day. Choose a location with well-drained soil.
2. Prepare the Soil: Amend the soil with compost or other organic matter to improve drainage and fertility.
3. Dig Holes: Dig holes that are slightly larger than the root balls of your seedlings.
4. Gently Remove Seedlings: Carefully remove the seedlings from their trays or pots, being careful not to damage the roots.
5. Plant Seedlings: Place the seedlings in the holes and gently backfill with soil. Make sure the crown of the plant (the point where the roots meet the stem) is at soil level.
6. Water Thoroughly: Water the newly transplanted seedlings thoroughly.
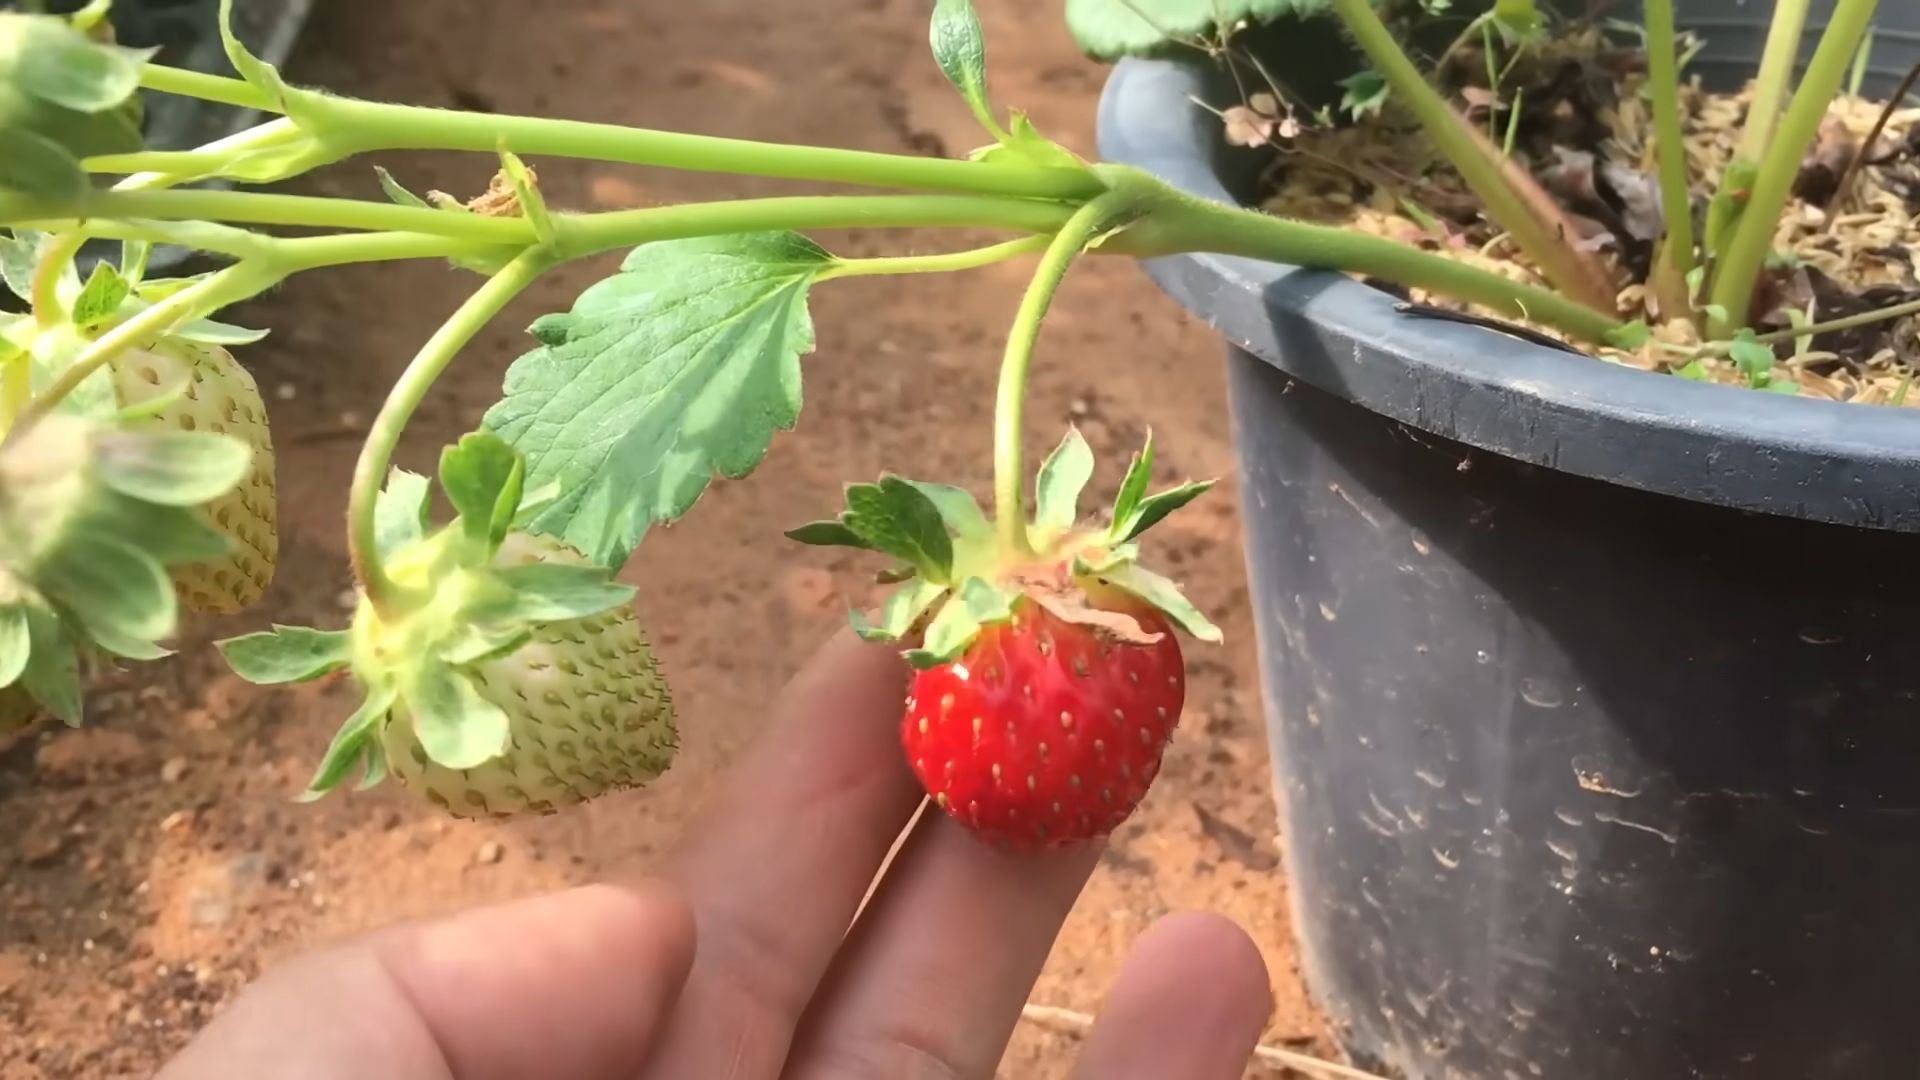
7. Mulch: Apply a layer of mulch around the plants to help retain moisture, suppress weeds, and keep the berries clean. Straw is a traditional mulch for strawberries, hence the name!
Tips for Success
Here are a few extra tips to help you succeed in starting strawberries from seed:
* Be Patient: Strawberry seeds can be slow to germinate, so don’t get discouraged if you don’t see results right away.
* Use Fresh Seeds: Strawberry seeds have a relatively short shelf life, so use fresh seeds for the best results.
* Maintain Consistent Moisture: Consistent moisture is crucial for germination and seedling growth.
* Provide Adequate Light: Strawberries need plenty of light to thrive.
* Protect from Pests and Diseases: Keep an eye out for pests and diseases and take action promptly if you see any problems.
* Choose the Right Variety: Some strawberry varieties are better suited for starting from seed than others. Day-neutral varieties are often a good choice.
* Don’t Give Up! Starting strawberries from seed can be challenging, but it’s also incredibly rewarding. Don’t be afraid to experiment and learn from your mistakes.
Troubleshooting
*
Conclusion
So, there you have it! Starting strawberries from seed might seem a little daunting at first, but the rewards are well worth the effort. Imagine plucking plump, juicy strawberries from your own garden, knowing you nurtured them from the tiniest of seeds. This DIY trick isn’t just about saving money; it’s about connecting with nature, understanding the growing process, and enjoying a truly unique and satisfying gardening experience.
Why is this a must-try? Because it unlocks access to strawberry varieties you simply won’t find as starter plants in your local nurseries. Think alpine strawberries with their intense flavor, or heirloom varieties passed down through generations. You gain complete control over the process, ensuring your plants are grown organically and free from harmful chemicals from the very beginning. Plus, the sheer joy of watching those tiny seeds sprout and transform into thriving strawberry plants is an unparalleled feeling for any gardener.
But the adventure doesn’t stop there! Feel free to experiment with different strawberry varieties. Try a mix of everbearing and June-bearing types for a continuous harvest throughout the season. Consider growing your strawberries in hanging baskets or vertical planters to save space and add a touch of visual appeal to your garden. You can even try starting your seeds indoors during the winter months to get a head start on the growing season.
Don’t be afraid to tweak the process to suit your specific climate and growing conditions. If you live in a particularly hot or dry area, provide extra shade and water to your seedlings. If you’re dealing with poor soil, amend it with plenty of compost and organic matter. The key is to observe your plants closely and adjust your approach as needed.
We wholeheartedly encourage you to give this DIY trick a try. Starting strawberries from seed is a rewarding and enriching experience that will transform your garden and your appreciation for these delicious fruits. And most importantly, don’t forget to share your experience with us! We’d love to hear about your successes, your challenges, and any tips or tricks you discover along the way. Post pictures of your seedlings, share your favorite strawberry recipes, and let’s create a community of passionate strawberry growers! Let us know which **starting strawberries from seed** method worked best for you!
Now, let’s address some frequently asked questions to help you get started on your strawberry-growing journey.
Frequently Asked Questions (FAQ)
Q: What are the best strawberry varieties to start from seed?
A: While many strawberry varieties can be grown from seed, some are more readily available and tend to be more successful for beginners. Alpine strawberries (like ‘Mignonette’ or ‘Yellow Wonder’) are a great choice because they are relatively easy to germinate and produce delicious, small berries. Day-neutral varieties, which produce fruit throughout the growing season, are also a good option. Look for varieties specifically labeled as suitable for seed starting. Avoid F1 hybrid varieties, as their offspring may not be true to type. Researching the specific characteristics of each variety, such as disease resistance and flavor profile, will help you choose the best option for your garden and preferences.
Q: How long does it take for strawberry seeds to germinate?
A: Strawberry seeds can be notoriously slow to germinate. It typically takes anywhere from 2 to 6 weeks for seedlings to emerge, and sometimes even longer. Patience is key! Factors that influence germination time include seed quality, temperature, moisture levels, and light exposure. Maintaining consistent moisture and a temperature between 70-75°F (21-24°C) will help speed up the process. Some gardeners also recommend a period of cold stratification (placing the seeds in the refrigerator for a few weeks) to improve germination rates.
Q: What is cold stratification and why is it important?
A: Cold stratification is a process that mimics the natural winter conditions that strawberry seeds would experience in the wild. It involves exposing the seeds to a period of cold, moist conditions to break their dormancy and promote germination. To cold stratify strawberry seeds, place them in a damp paper towel or coffee filter, seal them in a plastic bag, and refrigerate them for 2-4 weeks. Make sure the paper towel remains moist but not soaking wet. After the cold stratification period, you can sow the seeds as usual. While not always essential, cold stratification can significantly improve germination rates, especially for certain strawberry varieties.
Q: What type of soil should I use for starting strawberry seeds?
A: Use a fine-textured, well-draining seed starting mix. Avoid using garden soil, as it can be too heavy and may contain pathogens that can harm your seedlings. A good seed starting mix will provide the necessary nutrients and drainage for healthy root development. You can also make your own seed starting mix by combining equal parts peat moss (or coconut coir), perlite, and vermiculite.
Q: How much light do strawberry seedlings need?
A: Strawberry seedlings need plenty of light to thrive. Once they emerge, provide them with at least 6-8 hours of direct sunlight per day, or supplement with grow lights. If using grow lights, position them a few inches above the seedlings and keep them on for 14-16 hours per day. Insufficient light can lead to leggy, weak seedlings.
Q: How often should I water strawberry seedlings?
A: Keep the soil consistently moist but not waterlogged. Water gently from below to avoid damping off, a fungal disease that can kill young seedlings. You can water from below by placing the seed starting tray in a shallow dish of water and allowing the soil to absorb the moisture. Avoid overwatering, as this can create a breeding ground for fungal diseases.
Q: When can I transplant my strawberry seedlings outdoors?
A: Transplant your strawberry seedlings outdoors after the last frost, when the soil has warmed up and the plants have developed several sets of true leaves. Harden off the seedlings gradually by exposing them to outdoor conditions for a few hours each day over the course of a week. Choose a sunny location with well-drained soil.
Q: What are some common problems when starting strawberries from seed?
A: Some common problems include poor germination rates, damping off, and leggy seedlings. Poor germination can be caused by old or low-quality seeds, improper temperature or moisture levels, or lack of cold stratification. Damping off is a fungal disease that can kill young seedlings. Prevent damping off by using a sterile seed starting mix, providing good air circulation, and avoiding overwatering. Leggy seedlings are caused by insufficient light. Provide your seedlings with plenty of light to prevent them from becoming leggy.
Q: Can I grow strawberries from seed in containers?
A: Yes, strawberries grow very well in containers. Choose a container that is at least 6 inches deep and has good drainage. Use a high-quality potting mix and provide the plants with plenty of sunlight and water. Container-grown strawberries may need to be fertilized more frequently than those grown in the ground.
Q: How do I fertilize strawberry seedlings?
A: Once your strawberry seedlings have developed a few sets of true leaves, you can start fertilizing them with a diluted liquid fertilizer. Use a balanced fertilizer with an NPK ratio of 10-10-10 or 20-20-20. Follow the instructions on the fertilizer label and avoid over-fertilizing, as this can burn the roots.
We hope these FAQs have answered your questions and given you the confidence to embark on your strawberry-growing adventure! Happy gardening!
Leave a Comment