
Sweet Potato Bag Gardening: Ever dreamt of harvesting a bounty of sweet potatoes right from your own backyard, even if you’re short on space? I know I have! Forget sprawling gardens and back-breaking digging; I’m here to let you in on a little secret that’s revolutionizing the way we grow these delicious tubers: sweet potato bag gardening!
For centuries, sweet potatoes have been a staple crop, nourishing communities across the globe. From their origins in Central and South America, they’ve journeyed to become a beloved ingredient in cuisines worldwide. But did you know that you don’t need acres of land to enjoy the fruits (or rather, roots!) of your labor?
In today’s fast-paced world, many of us are craving a connection to nature, a way to grow our own food, and a sustainable lifestyle. But limited space and busy schedules often get in the way. That’s where this DIY trick comes in! Sweet potato bag gardening offers a simple, affordable, and incredibly rewarding solution. Imagine the satisfaction of harvesting your own sweet potatoes, knowing exactly where they came from and how they were grown. Plus, it’s a fantastic way to reduce your carbon footprint and enjoy fresh, healthy produce. So, let’s dive in and discover how you can transform a simple bag into a thriving sweet potato patch!
Sweet Potato Bag Gardening: A Bountiful Harvest in a Small Space!
Hey there, fellow gardening enthusiasts! Ever dreamed of harvesting a mountain of sweet potatoes but thought you didn’t have the space? Well, I’m here to tell you that dream can become a reality, even if you only have a balcony or a small patio! I’m going to walk you through the wonderful world of sweet potato bag gardening. It’s a fun, easy, and incredibly rewarding way to grow these delicious tubers. Get ready to be amazed by the yield you can get from just a few bags!
What You’ll Need
Before we dive in, let’s gather our supplies. This is a pretty low-cost project, which is always a win in my book!
* Burlap Bags or Heavy-Duty Grow Bags: I recommend using burlap bags (the kind coffee beans come in are perfect!) or heavy-duty grow bags that are at least 20 gallons in size. The bigger, the better, as sweet potatoes need room to spread out.
* Sweet Potato Slips: These are sprouted sweet potatoes, and they’re what you’ll plant. You can buy them online, at your local garden center, or even grow your own (more on that later!).
* Potting Mix: A good quality potting mix is crucial. Avoid using garden soil, as it can compact and hinder root growth. I like to use a mix that’s light and airy, with good drainage.
* Compost: Compost is your sweet potato’s best friend! It provides essential nutrients and helps retain moisture.
* Watering Can or Hose: You’ll need a way to water your sweet potatoes regularly.
* Scissors or a Knife: For cutting drainage holes in the bags.
* Optional: A small amount of slow-release fertilizer. This can give your sweet potatoes an extra boost, but it’s not essential if you’re using good quality compost.
Preparing Your Bags
Okay, let’s get our hands dirty! The first step is preparing our bags for planting.
1. Drainage is Key: Sweet potatoes don’t like soggy feet, so drainage is crucial. If you’re using burlap bags, they’ll naturally drain well. But if you’re using plastic grow bags, you’ll need to cut some drainage holes in the bottom. I usually make about 4-5 holes, each about half an inch in diameter.
2. Layering the Soil: Now, let’s start filling the bags. We’re going to layer the soil to provide the best possible growing environment for our sweet potatoes.
* Bottom Layer: Start with a layer of potting mix, about 6-8 inches deep. This will provide a good base for the roots to grow into.
* Compost Layer: Next, add a layer of compost, about 2-3 inches deep. This will provide essential nutrients and help retain moisture.
* Potting Mix Layer: Top with another layer of potting mix, about 4-6 inches deep. This will be where we plant our sweet potato slips.
3. Watering the Soil: Before planting, give the soil a good watering. This will help settle the soil and ensure that the roots have access to moisture right away.
Planting Your Sweet Potato Slips
Now for the fun part – planting! This is where we bring our sweet potato slips into the equation.
1. Spacing: How many slips you plant per bag depends on the size of your bag. For a 20-gallon bag, I recommend planting 2-3 slips. This will give them enough room to grow without overcrowding.
2. Planting Depth: Dig a small hole in the potting mix, about 2-3 inches deep. Gently place the sweet potato slip into the hole, making sure the roots are pointing downwards. Cover the roots with soil and gently pat it down.
3. Watering After Planting: After planting, give the slips another good watering. This will help them settle in and encourage root growth.
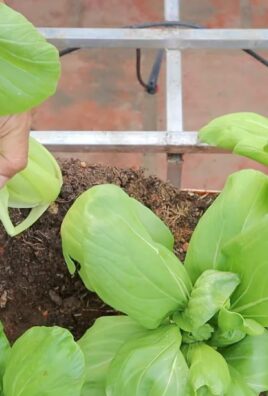
Caring for Your Sweet Potato Plants
Now that our sweet potatoes are planted, it’s time to take care of them! Here’s what you need to do to ensure a bountiful harvest.
1. Sunlight: Sweet potatoes need plenty of sunlight – at least 6-8 hours per day. Place your bags in a sunny spot where they’ll get plenty of direct sunlight.
2. Watering: Water your sweet potatoes regularly, especially during hot, dry weather. The soil should be consistently moist, but not soggy. Check the soil moisture by sticking your finger into the soil – if it feels dry, it’s time to water.
3. Fertilizing: If you’re using good quality compost, you may not need to fertilize your sweet potatoes. However, if you notice that the leaves are turning yellow or the plants aren’t growing vigorously, you can give them a boost with a small amount of slow-release fertilizer. Follow the instructions on the fertilizer package.
4. Hilling: As your sweet potato plants grow, you may notice that the tubers start to push up through the soil. This is normal, but it’s important to cover them with more soil to protect them from sunlight. This process is called hilling. Simply add more potting mix and compost to the top of the bag, covering any exposed tubers.
5. Pest Control: Sweet potatoes are generally pretty pest-resistant, but they can sometimes be bothered by aphids or other common garden pests. If you notice any pests, you can try spraying them with insecticidal soap or neem oil.
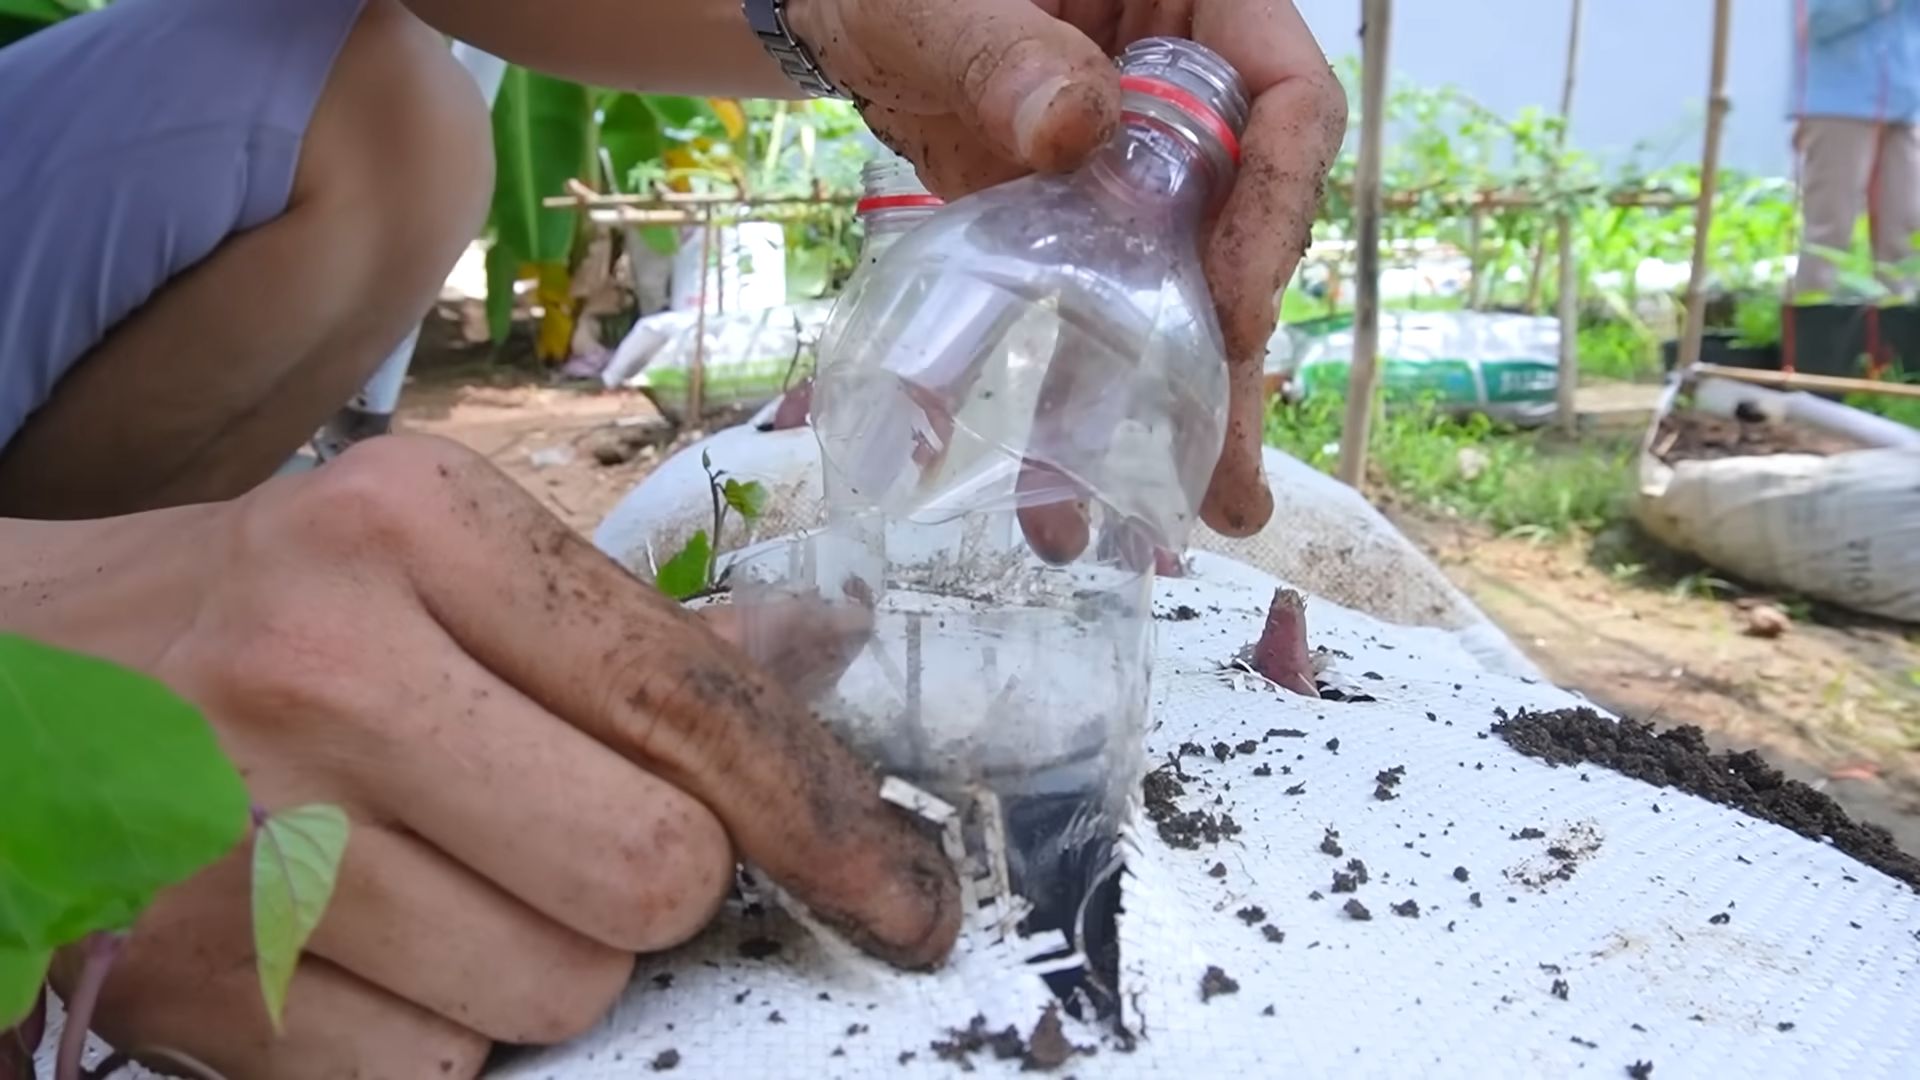
Growing Your Own Sweet Potato Slips (Optional)
Want to save some money and grow your own sweet potato slips? It’s easier than you might think!
1. Choosing a Sweet Potato: Select a healthy, organic sweet potato. Avoid using sweet potatoes that have been treated with chemicals, as these may not sprout.
2. Sprouting in Water: There are two main methods for sprouting sweet potatoes in water:
* Toothpick Method: Insert toothpicks around the middle of the sweet potato, and suspend it in a jar of water, with the bottom half submerged.
* Direct Immersion Method: Simply place the sweet potato in a shallow dish of water, with about an inch of water covering the bottom.
3. Location: Place the jar or dish in a warm, sunny location.
4. Water Changes: Change the water every few days to prevent it from becoming stagnant.
5. Waiting for Sprouts: After a few weeks, you should start to see sprouts emerging from the sweet potato.
6. Separating the Slips: Once the sprouts are about 6-8 inches long, you can gently twist them off the sweet potato.
7. Rooting the Slips: Place the slips in a jar of water, with the bottom inch or two submerged. After a few days, they should start to develop roots.
8. Planting the Slips: Once the roots are about an inch long, you can plant the slips in your prepared bags, following the instructions above.
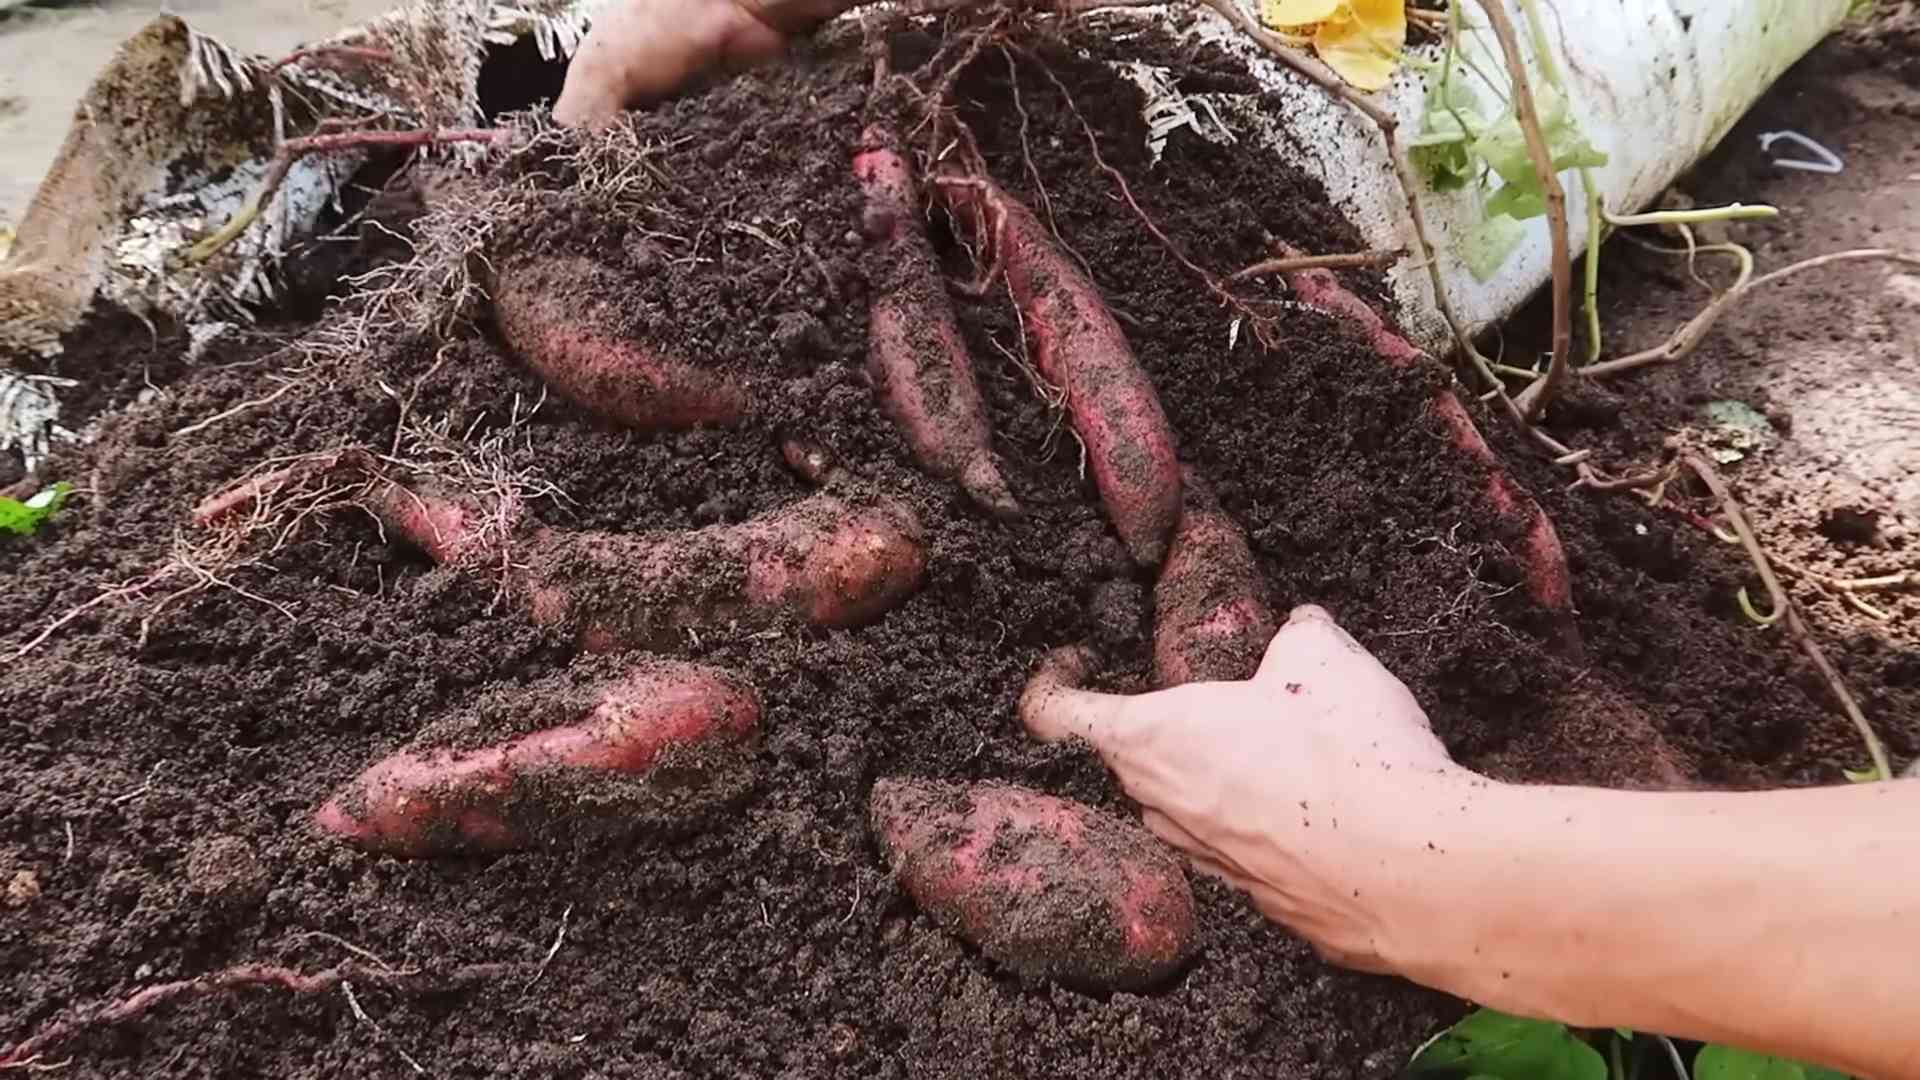
Harvesting Your Sweet Potatoes
The moment we’ve all been waiting for – harvest time! Here’s how to know when your sweet potatoes are ready to be dug up.
1. Timing: Sweet potatoes typically take about 90-120 days to mature. The best time to harvest is usually in the fall, before the first frost.
2. Signs of Maturity: The leaves of the sweet potato plants will start to turn yellow and die back. This is a sign that the tubers are mature and ready to be harvested.
3. Gentle Digging: Carefully tip the bag over and gently dig through the soil to unearth your sweet potatoes. Be careful not to damage the tubers.
4. Curing: After harvesting, it’s important to cure your sweet potatoes. This will help them develop their sweetness and improve their storage life. To cure sweet potatoes, place them in a warm, humid location (around 80-85 degrees Fahrenheit) for about a week.
5. Storage: After curing, store your sweet potatoes in a cool, dry place. They should last for several months.
Troubleshooting
Even with the best planning, sometimes things don’t go exactly as expected. Here are a few common problems you might encounter and how to deal with them.
* Yellowing Leaves: This could be a sign of nutrient deficiency. Try adding some compost or slow-release fertilizer.
* Slow Growth: Make sure your sweet potatoes are getting enough sunlight and water. If they’re still growing slowly, try adding some compost or slow-release fertilizer.
* Pests: If you notice any pests, try spraying them with insecticidal soap or neem oil.
* Rotting Tubers: This could be a sign of overwatering. Make sure your bags have
Conclusion
So, there you have it! Sweet potato bag gardening is not just a gardening trend; it’s a revolutionary way to cultivate delicious, nutritious sweet potatoes, even if you’re short on space or gardening experience. We’ve explored the simple steps, from choosing the right bag and soil to nurturing your plants and harvesting your bounty. But why is this DIY trick a must-try?
Firstly, the sheer convenience is undeniable. Forget tilling vast plots of land or battling stubborn weeds in a traditional garden. Sweet potato bag gardening allows you to grow these vibrant tubers on a balcony, patio, or even a sunny corner of your driveway. It’s accessibility at its finest, opening up the world of homegrown produce to apartment dwellers and urban gardeners alike.
Secondly, the yield is surprisingly impressive. A single bag can produce a substantial harvest of sweet potatoes, often exceeding what you might expect from a similar space in the ground. This makes it an incredibly efficient way to maximize your gardening efforts and enjoy a plentiful supply of these versatile vegetables.
Thirdly, it’s a fantastic learning experience. Sweet potato bag gardening provides a hands-on opportunity to connect with nature, understand the life cycle of plants, and develop your gardening skills. It’s a rewarding and educational activity for individuals and families alike.
But the beauty of this method lies in its adaptability. Feel free to experiment with different varieties of sweet potatoes to discover your favorites. Consider adding companion plants like marigolds or nasturtiums to deter pests and attract beneficial insects. You can even try using different types of containers, such as repurposed burlap sacks or large plastic tubs, as long as they provide adequate drainage.
For a spicier twist, try adding a few jalapeño plants to the same bag. The peppers won’t affect the sweet potatoes’ flavor, but you’ll have a bonus crop of spicy peppers to enjoy alongside your sweet potato harvest. If you’re looking for a more ornamental approach, consider planting sweet potato vines in hanging baskets or containers. Their cascading foliage adds a touch of beauty to any space, and you can still harvest the tubers at the end of the season.
Don’t be afraid to get creative and personalize your sweet potato bag gardening experience. The possibilities are endless!
We wholeheartedly encourage you to give this DIY trick a try. It’s a fun, rewarding, and sustainable way to grow your own food, regardless of your gardening experience or available space. Once you’ve harvested your first batch of homegrown sweet potatoes, you’ll be hooked!
And most importantly, we want to hear about your experiences! Share your photos, tips, and stories with us in the comments below. Let’s build a community of sweet potato bag gardening enthusiasts and inspire others to embrace this innovative and accessible gardening method. Happy gardening!
Frequently Asked Questions (FAQ)
What kind of bag should I use for sweet potato bag gardening?
The ideal bag should be large, sturdy, and provide good drainage. A grow bag specifically designed for gardening is an excellent choice, as it’s made from breathable fabric that promotes healthy root growth. However, you can also use a large plastic container, a burlap sack, or even a repurposed laundry basket, as long as you drill drainage holes in the bottom. Aim for a bag that is at least 24 inches in diameter and 24 inches deep to provide ample space for the sweet potatoes to develop. The larger the bag, the more sweet potatoes you’re likely to harvest.
What type of soil is best for sweet potato bag gardening?
Sweet potatoes thrive in well-draining, loose soil that is rich in organic matter. A good potting mix is a great starting point. You can amend it with compost, aged manure, or other organic materials to improve its fertility and drainage. Avoid using heavy clay soil, as it can become waterlogged and hinder root development. A slightly acidic to neutral soil pH (around 6.0 to 7.0) is ideal. You can test your soil pH with a simple soil testing kit available at most garden centers.
How often should I water my sweet potato plants in a bag?
Watering frequency depends on the weather, the type of bag you’re using, and the stage of growth. Generally, you should water your sweet potato plants whenever the top inch of soil feels dry to the touch. During hot, dry weather, you may need to water them daily. Be careful not to overwater, as this can lead to root rot. Ensure that the bag has adequate drainage to prevent water from pooling at the bottom. A good rule of thumb is to water deeply and less frequently, rather than shallowly and more often.
How much sunlight do sweet potato plants need?
Sweet potatoes are sun-loving plants and require at least 6-8 hours of direct sunlight per day to thrive. Choose a location for your bag that receives plenty of sunshine throughout the day. If you live in a particularly hot climate, you may need to provide some afternoon shade to prevent the plants from scorching. If you don’t have a sunny spot, you can supplement with grow lights, but natural sunlight is always preferable.
When is the best time to harvest sweet potatoes from a bag?
Sweet potatoes are typically ready to harvest about 90-120 days after planting slips. The leaves will start to turn yellow and the vines may begin to die back, indicating that the tubers are mature. You can also gently dig around the edges of the bag to check the size of the sweet potatoes. Harvest before the first frost, as frost can damage the tubers. To harvest, carefully tip the bag over and gently remove the sweet potatoes from the soil.
Can I grow sweet potatoes from store-bought sweet potatoes?
Yes, you can sprout sweet potatoes from store-bought sweet potatoes to create slips. Choose organic sweet potatoes, as non-organic ones may be treated with chemicals that inhibit sprouting. Suspend the sweet potato in a jar of water, with the bottom half submerged. Place the jar in a warm, sunny location. Within a few weeks, sprouts (slips) will emerge from the sweet potato. Once the slips are about 6-8 inches long, gently twist them off and root them in water before planting them in your bag.
Are there any common pests or diseases that affect sweet potato plants in bags?
Sweet potato plants are relatively pest-resistant, but they can be susceptible to certain pests and diseases, such as sweet potato weevils, flea beetles, and fungal diseases. Regularly inspect your plants for signs of infestation or disease. If you notice any problems, take action promptly. Organic pest control methods, such as neem oil or insecticidal soap, can be effective for controlling pests. Ensure good air circulation and avoid overwatering to prevent fungal diseases.
Can I reuse the soil from my sweet potato bag for other plants?
Yes, you can reuse the soil from your sweet potato bag, but it’s important to amend it with fresh compost or other organic matter to replenish nutrients. Sweet potatoes are heavy feeders, so they can deplete the soil of essential nutrients. You may also want to test the soil pH to ensure that it’s suitable for the plants you plan to grow next. Avoid using the soil if your sweet potato plants were affected by any diseases, as the pathogens may still be present in the soil.
How do I cure sweet potatoes after harvesting them?
Curing sweet potatoes is essential for improving their flavor and storage life. After harvesting, gently brush off any excess soil and allow the sweet potatoes to dry in a warm, humid place (around 80-85°F and 85-90% humidity) for about 7-10 days. This process allows the skins to harden and any minor cuts or bruises to heal. After curing, store the sweet potatoes in a cool, dry, and well-ventilated place (around 55-60°F) for several months.
Leave a Comment